When you click on links to various merchants on this site and make a purchase, this can result in this site earning a commission. Affiliate programs and affiliations include, but are not limited to, the eBay Partner Network.
Don't forget to buy a new set of connecting-rod nuts. These are, technically, use-once pieces. Not sure why, as I would expect the bolts to do all the stretching. But that's the recommendation.
As interesting as it seems to just toss in a set of standard bearing shells, I'd invest the time in measuring the journals and each bearing shell thickness as they come out. It's virtually impossible to accurately measure the big end of the rod with the piston still in the block, so the fallback is measuring old and new shells. Use Plastigage to verify clearances too. It's cheap old-school stuff but it works.
The silicone OPG: The 25 lbs/in "torque spec" is measurable for about 60% of the bolts using the click-style wrench suggested. For the rest, you get to guesstimate. There are some specialty torque wrenches that have a crowfoot-style wrench end that lets you get a good measurement from the side where there is no end-on access.
The stud kit with lock-nuts makes things more fun if you try to measure torque, as you get to include the break-away torque for the nylon friction cap. Better IMO is a contact-plus-N-turns method that might give you the most even pressure on the gasket.
I've only installed two silicone OPG's on 928's, both with the stud kit. The holes get cleaned with the gun brushes and brake-clean. Then Loctite primer. Then Loctite on the studs. The studs go in a predetermined number of turns so that there will be the same projection beyond the pan and the lock nuts. Remember that there are shorter and longer studs at various places around the pan mounting face. Very Important: --Let the Loctite cure overnight.-- The pan is then installed with paper strips between the block and the gasket at several locations. The nuts are carefully and evenly turned to draw the pan up to the block. The goal is to bring it to the point where the paper strips are just barely movable all the way around. Pull the strips and bring the nuts up evenly another third to one-half of a turn (depending on what paper you used...) to establish the correct "squish" on the gasket. There will be no noticeable squeeze-out or bulges in the gasket when the pressure is even and correct. In my limited experience with other engines and silicone gaskets, the majority of leaks are the result of too much bolt pressure; When one sees a little seepage, the first instinct is to snug the bolts. The gasket distorts even more, leak gets worse, ad mausoleum. ('til it's really and permanently dead...)
Stan (Mrmerlin) long ago recommended that you use very thin copper wire strands to help hold the gasket in place on the sump as you place it to the block. It works. I do the same trick with very thin plastic cable ties. There just needs to be room to get the studs through the holes with the wire or ties in the same holes.
I'm curious as I am in no way and expert on 928s but thought I'd ask- In the third picture from the top, it looks like there is some bright maybe rub marks on the block between the crankshaft and the inside of the main bearing saddle? I'm sure that is normal from the manufacturing process, right? Just wanted to know as at some point I'm going to do the MM/OPG in one of my cars, probably the '89 S4 this Summer.
Thanks and good job on your efforts so far.
Joe
I'm no expert either, but I believe they are from manufacturing. I noted some oil varnish on that area, so I'm sure the marks haven't happened recently, at least.
Don't forget to buy a new set of connecting-rod nuts. These are, technically, use-once pieces. Not sure why, as I would expect the bolts to do all the stretching. But that's the recommendation.
I have read this is because the nuts have a grippy texture on the underside that rubs off when you remove them. So they would be prone to backing out if re-used.
I have read this is because the nuts have a grippy texture on the underside that rubs off when you remove them. So they would be prone to backing out if re-used.
1. The front cross member (steering rack support) is a major structural piece....which is why it has those "little volcanos" to locate it. You can't saw that thing in 3 pieces and ever make it as strong as it was originally....regardless of how much you re-enforce it. Terrible idea.
2. The "blue" markings on the crankshaft are from induction hardening the journals. Completely normal. You can look up induction hardening on the Internet and see the process.
3. The rod nuts are a one use part....because the ribbed surface digs in and wears down. If you re-use them, you will over torque the rod bolts (if you use the torque method.) If you use the angle method, they will be under torqued. If you make a mistake and need to remove a nut, 10 seconds after you have tightened it.....you need a new nut. If a set of rod nuts is out of your budget, leave everything alone.
4. Silicone pan gaskets virtually require studs and lock nuts. Bolts tightened to 25 in lbs are not tight enough to stay in place....they will vibrate loose and fall out. The original pan gaskets were perhaps the weakest design of the entire engine. Silicone gaskets are very marginally better, if you do everything absolutely perfect and install a stud/lock nut kit. Hopefully, Roger has "straightened out" the people that supply him with the studs/nuts.....we've talked about it. I was getting stud kits with 30 "long studs" one time and 30 "short studs" the next time. When I got 30 "long studs", I could cut down 5 of the studs and make them work. When I got the 30 "short stud" versions....I found that stretching 25 of those short studs into long studs was too time consuming.....
Semi-retired, as of Feb 1, 2023.
The days of free technical advice are over.
Free consultations will no longer be available.
Will still be in the shop, isolated and exclusively working on project cars, developmental work and products, engines and transmissions.
Have fun with your 928's people!
4. Silicone pan gaskets virtually require studs and lock nuts. Bolts tightened to 25 in lbs are not tight enough to stay in place....they will vibrate loose and fall out. The original pan gaskets were perhaps the weakest design of the entire engine. Silicone gaskets are very marginally better, if you do everything absolutely perfect and install a stud/lock nut kit. Hopefully, Roger has "straightened out" the people that supply him with the studs/nuts.....we've talked about it. I was getting stud kits with 30 "long studs" one time and 30 "short studs" the next time. When I got 30 "long studs", I could cut down 5 of the studs and make them work. When I got the 30 "short stud" versions....I found that stretching 25 of those short studs into long studs was too time consuming.....
More great advice, thanks. What's so bad about the original cork gaskets though? When mine leaked I just snugged up the bolts that were easy to reach, and it was fine. Cleanup was effortless. It left nothing stuck to the sealing surface. Although now that I see some internal tears I'm glad I'm replacing it.
What's so bad about the original cork gaskets though? When mine leaked I just snugged up the bolts that were easy to reach, and it was fine. Cleanup was effortless. It left nothing stuck to the sealing surface. Although now that I see some internal tears I'm glad I'm replacing it.
Ditto here, for mine's first almost 30 years anyway. With the amount of extra care and effort needed to correctly install the silicone gasket, I decided to go back with the cork composite gasket. If it seeps again in another 30 years, I'll likely do it again if I'm still around the car.
Mine started with a tiny drip on the belly pan that I noticed after winter 2015/16 storage. I snugged the bolts a tad and it seemed to stop. But that triggered a pan gasket purchase, and it was replaced last fall (2016) prior to winter lay-up. Now moving into its second sixtieth life fraction, it's sealing nicely. Fifty eight to go.
More great advice, thanks. What's so bad about the original cork gaskets though? When mine leaked I just snugged up the bolts that were easy to reach, and it was fine. Cleanup was effortless. It left nothing stuck to the sealing surface. Although now that I see some internal tears I'm glad I'm replacing it.
I use the cork gasket almost exclusively. There's just something wrong with that red silicone gasket hanging out between the pan and the cradle. A cork gasket will last 80,000 miles without any issue, if done correctly.
There's actually a better way to do this, rather than cork....or silicone.
I use the cork gasket almost exclusively. There's just something wrong with that red silicone gasket hanging out between the pan and the cradle. A cork gasket will last 80,000 miles without any issue, if done correctly.
There's actually a better way to do this, rather than cork....or silicone.
I'm guessing Reinzosil. If it's rated for 300C it will be fine at ~100C.
You will need to use a mallet to remove the pan after it cures though. It essentially makes the bolts or studs redundant.
What do you want in a gasket material? 1) Stability against relaxation. You'll be putting it in compression, you want it to stay in compression. 2) Physical and chemical stability against changes from contact with hot oil, and maybe stuff on the outside, too.
Those are the big ones. Nice is low stiffness (equivalently, high compliance); a gasket is, after all, just a bit of purposely compliant material between two hard surfaces. This means the sealing effectiveness will be less sensitive to variations in displacement – the all-important squeeze – produced by deviations from perfect flatness and bolting procedure.
Ease of installation and removal is important, of course, along with other cost issues. Originality is a factor difficult to evaluate against technical factors, but obviously important in the larger pursuit of vintage car satisfaction.
For a component we'd like to be semi-permanent, perhaps the jury is still out, or it simply doesn't matter to those who are vintage themselves. My own decision may reflect a bias in favor of an engineered material over something you scrape off a tree. But I'd prefer a cork-colored silicone gasket - Greg is on the money on that score.
But I'd prefer a cork-colored silicone gasket - Greg is on the money on that score.
Different folks, different strokes !
In spite of Herr Braun's disgust over the RED silicone gasket, I get considerable pleasure from seeing it on my OB. Had no particular difficulty installing it, (without studs), and after 9 years, there is not a drip of oil anywhere. I am beginning to worry things will start to rust down there without some oil ;-)
Alrighty, I'm digging into the fun, interesting technical part now. Broke the torque on all the connecting rod nuts, and now I plan on removing each set of bearings, taking photos and reinstalling them with the old nuts before moving on to the next rod.
A few questions...
Is there a danger of pushing the pistons too far up into the bores as I make some wiggle room? Watched a few vids of people doing this, and nobody seems concerned about it.
Is measuring bearing clearance for the new bearings recommended on a high mileage engine like this, or would I just be wasting my time?
Is spinning the bearings into position on the rods with the caps off a good practice, or is pressing them in a must?
This weekend's project: Motor Mount and possibly oil pan gasket
I'm in the middle of tackling replacement of the 140K mileage motor mounts in my 88 S4 5spd this holiday weekend. I am using the Volvo mount like from 928srus.
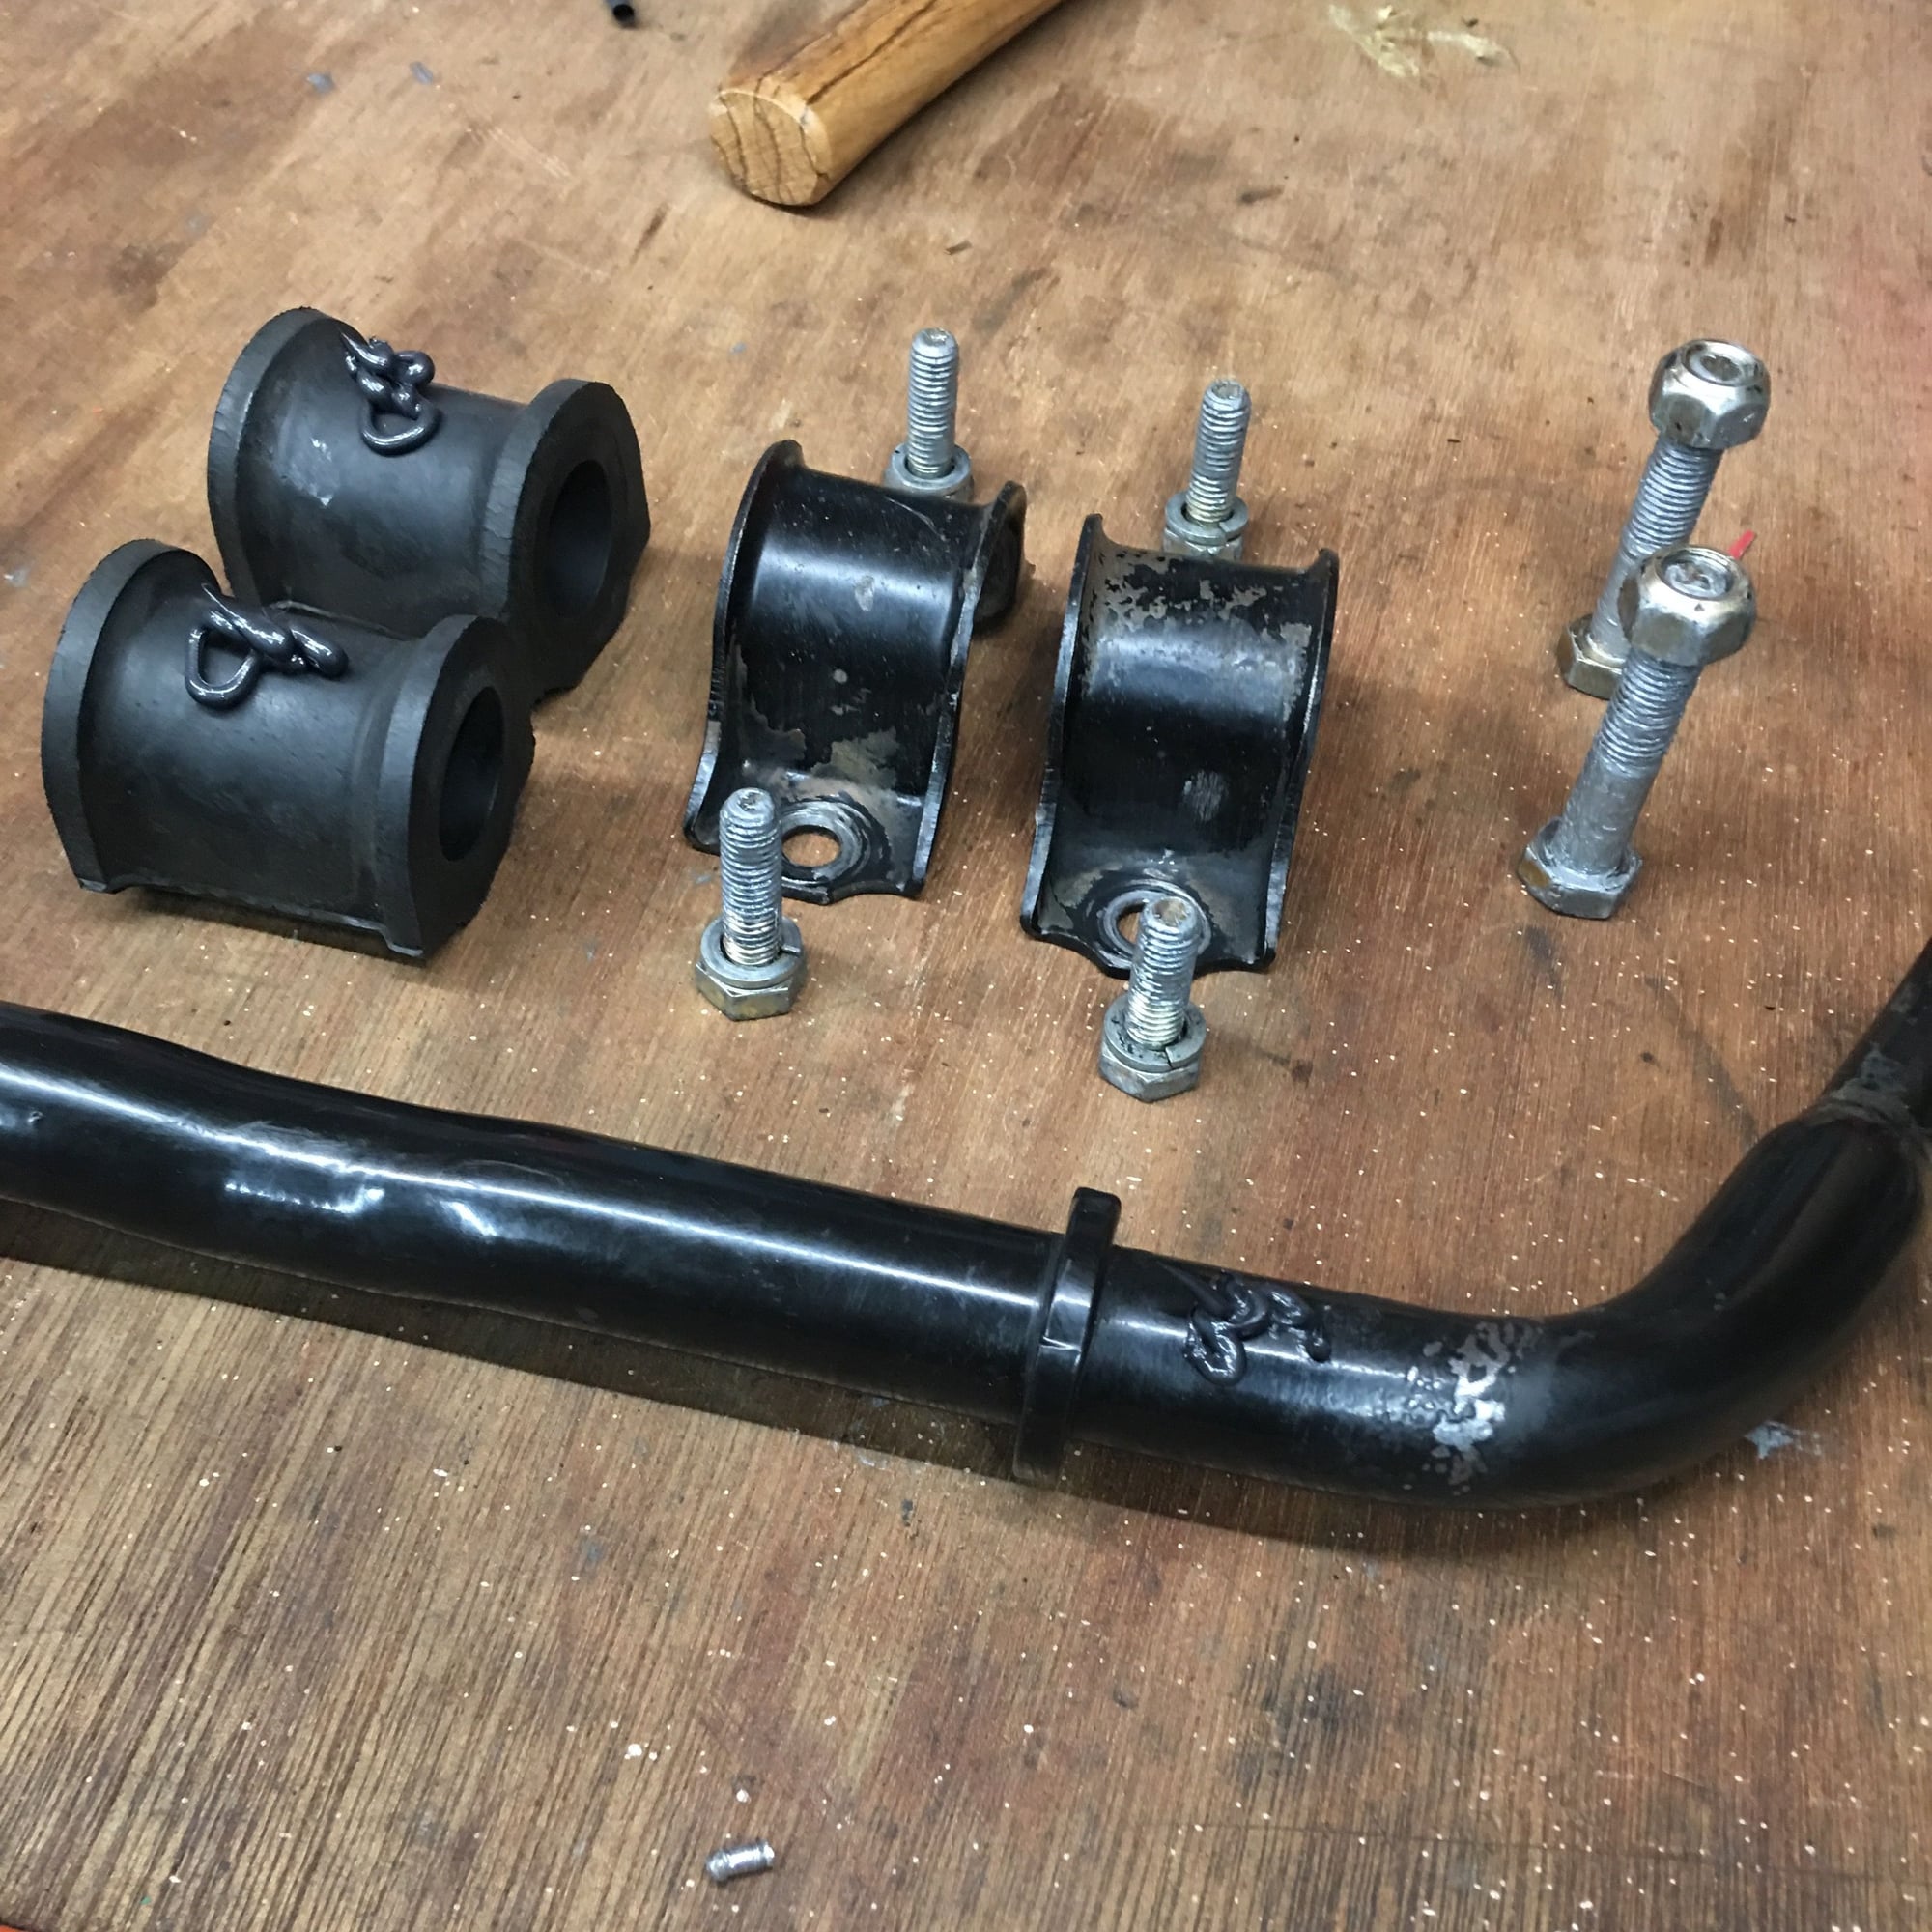
Things are going smoothly so far. I have the engine hoisted now and have the sway bar and PS steering bracket off.
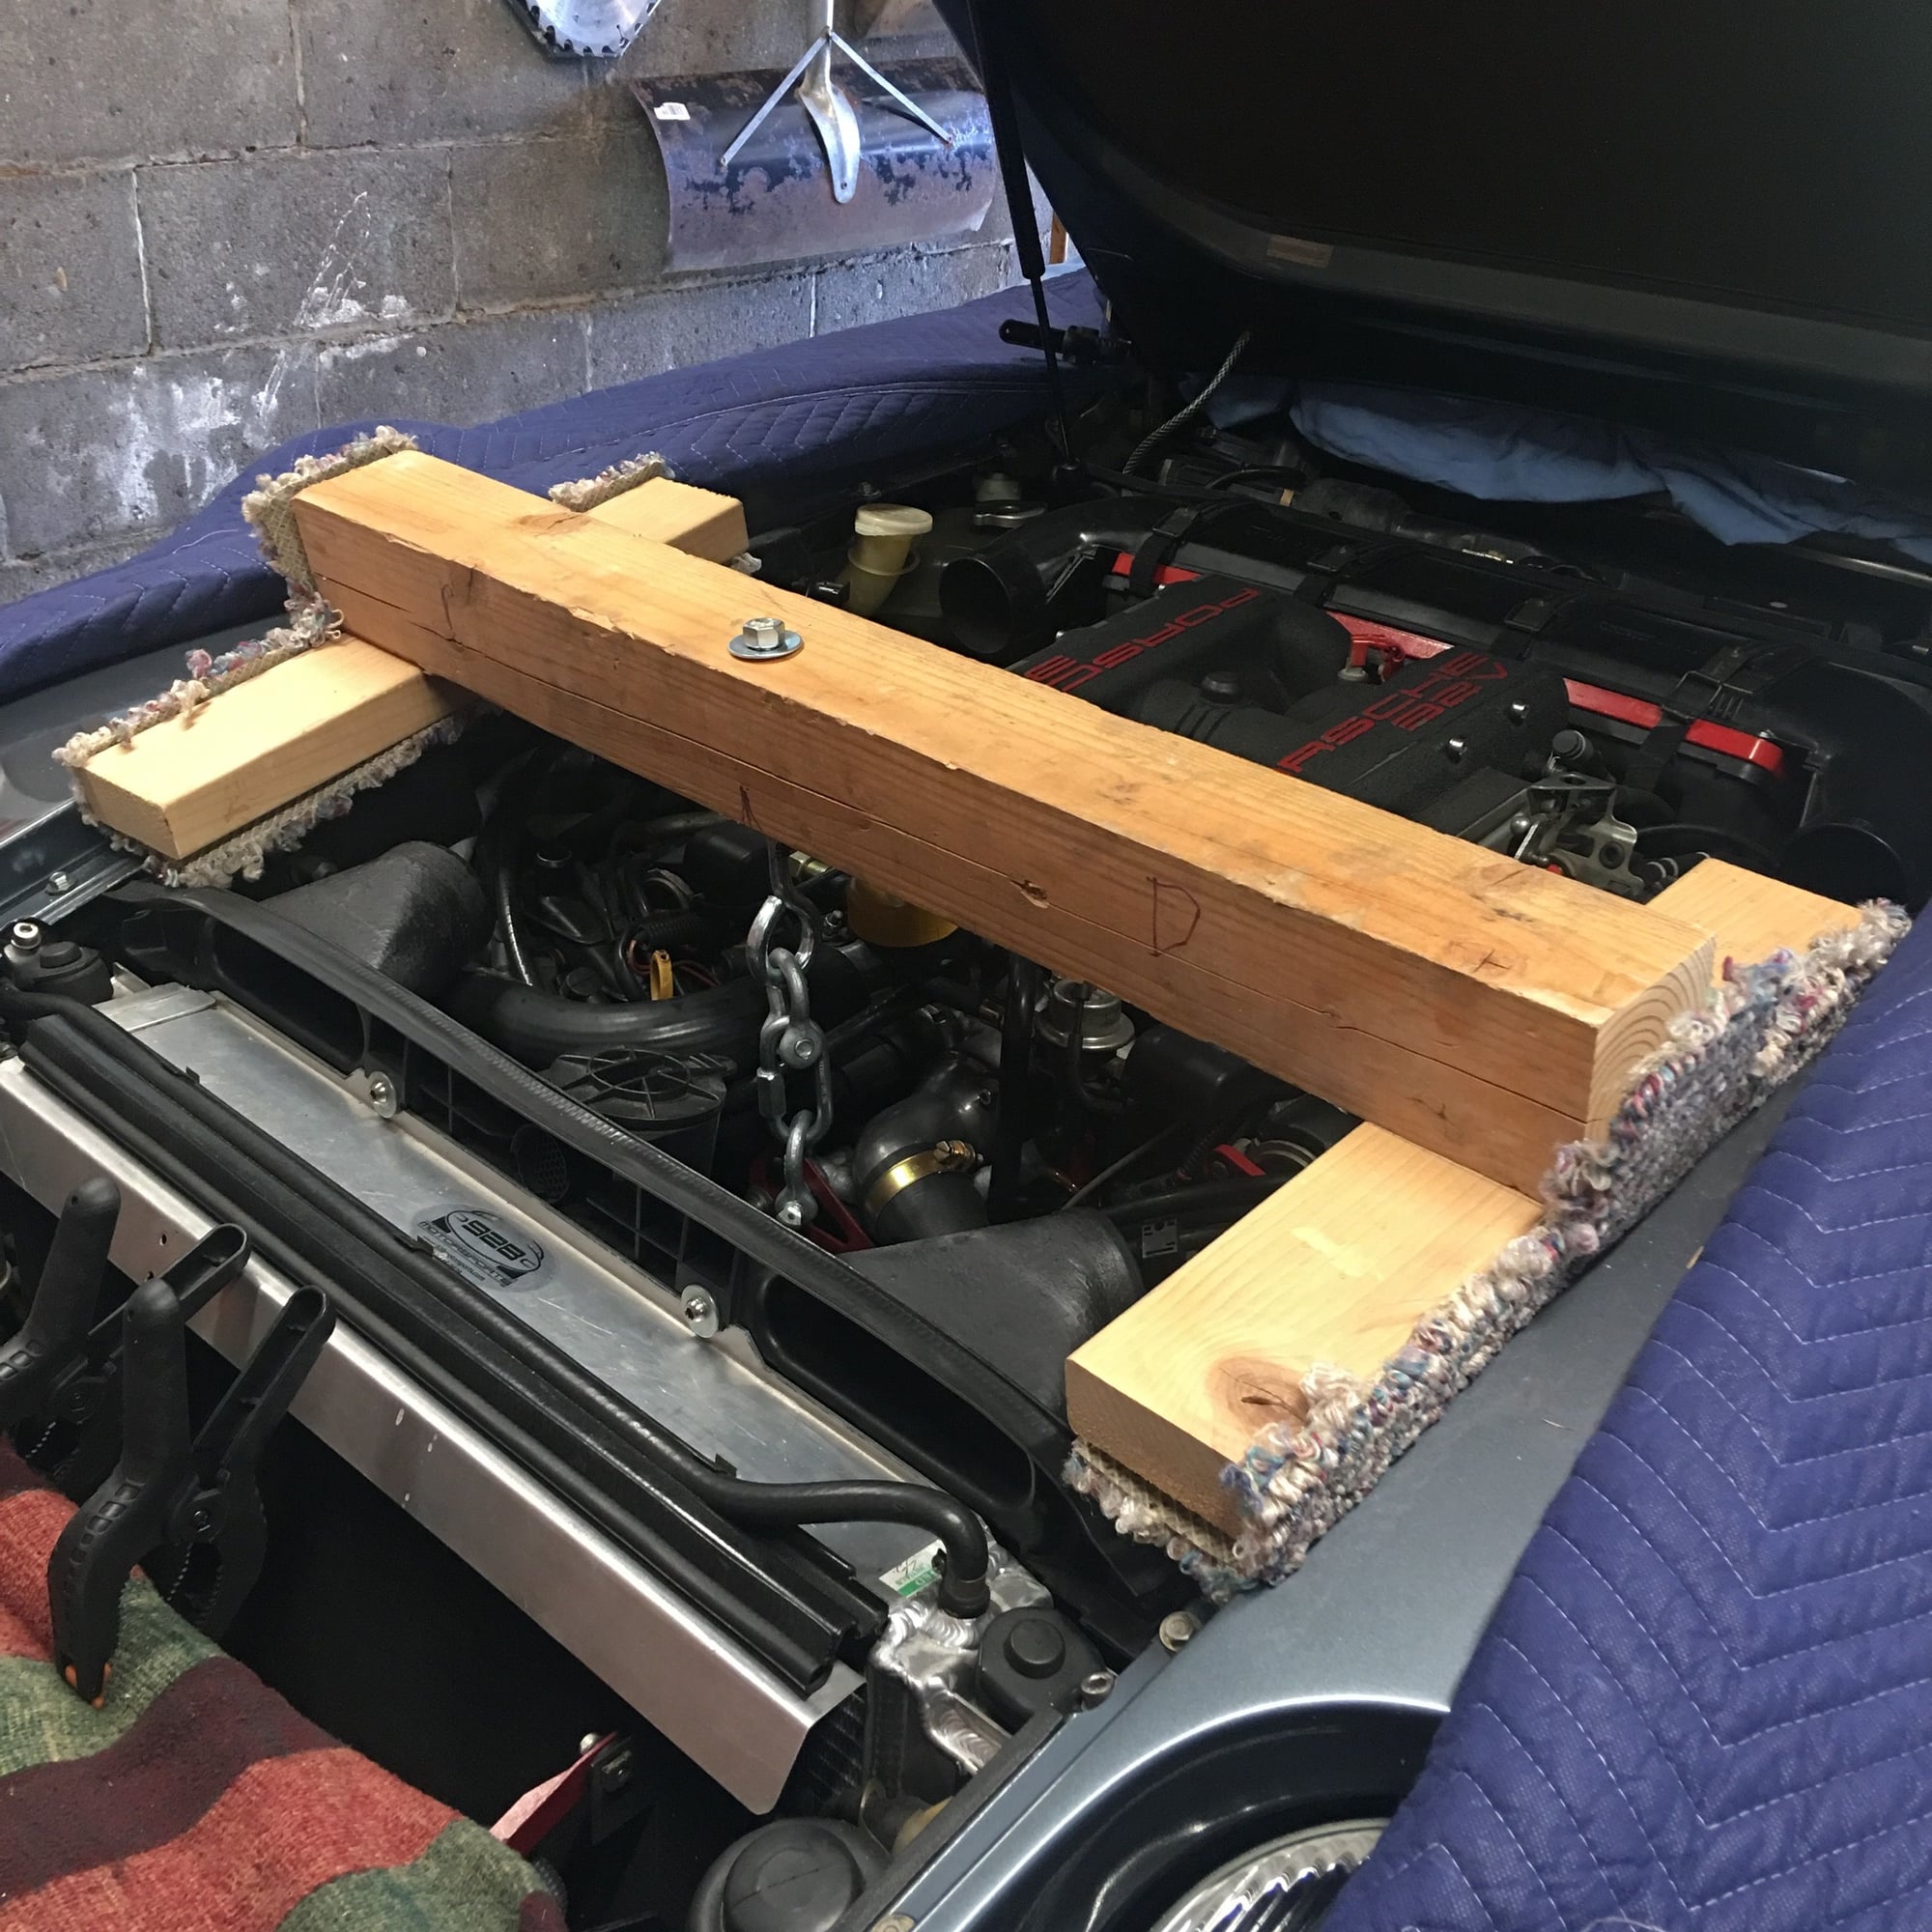
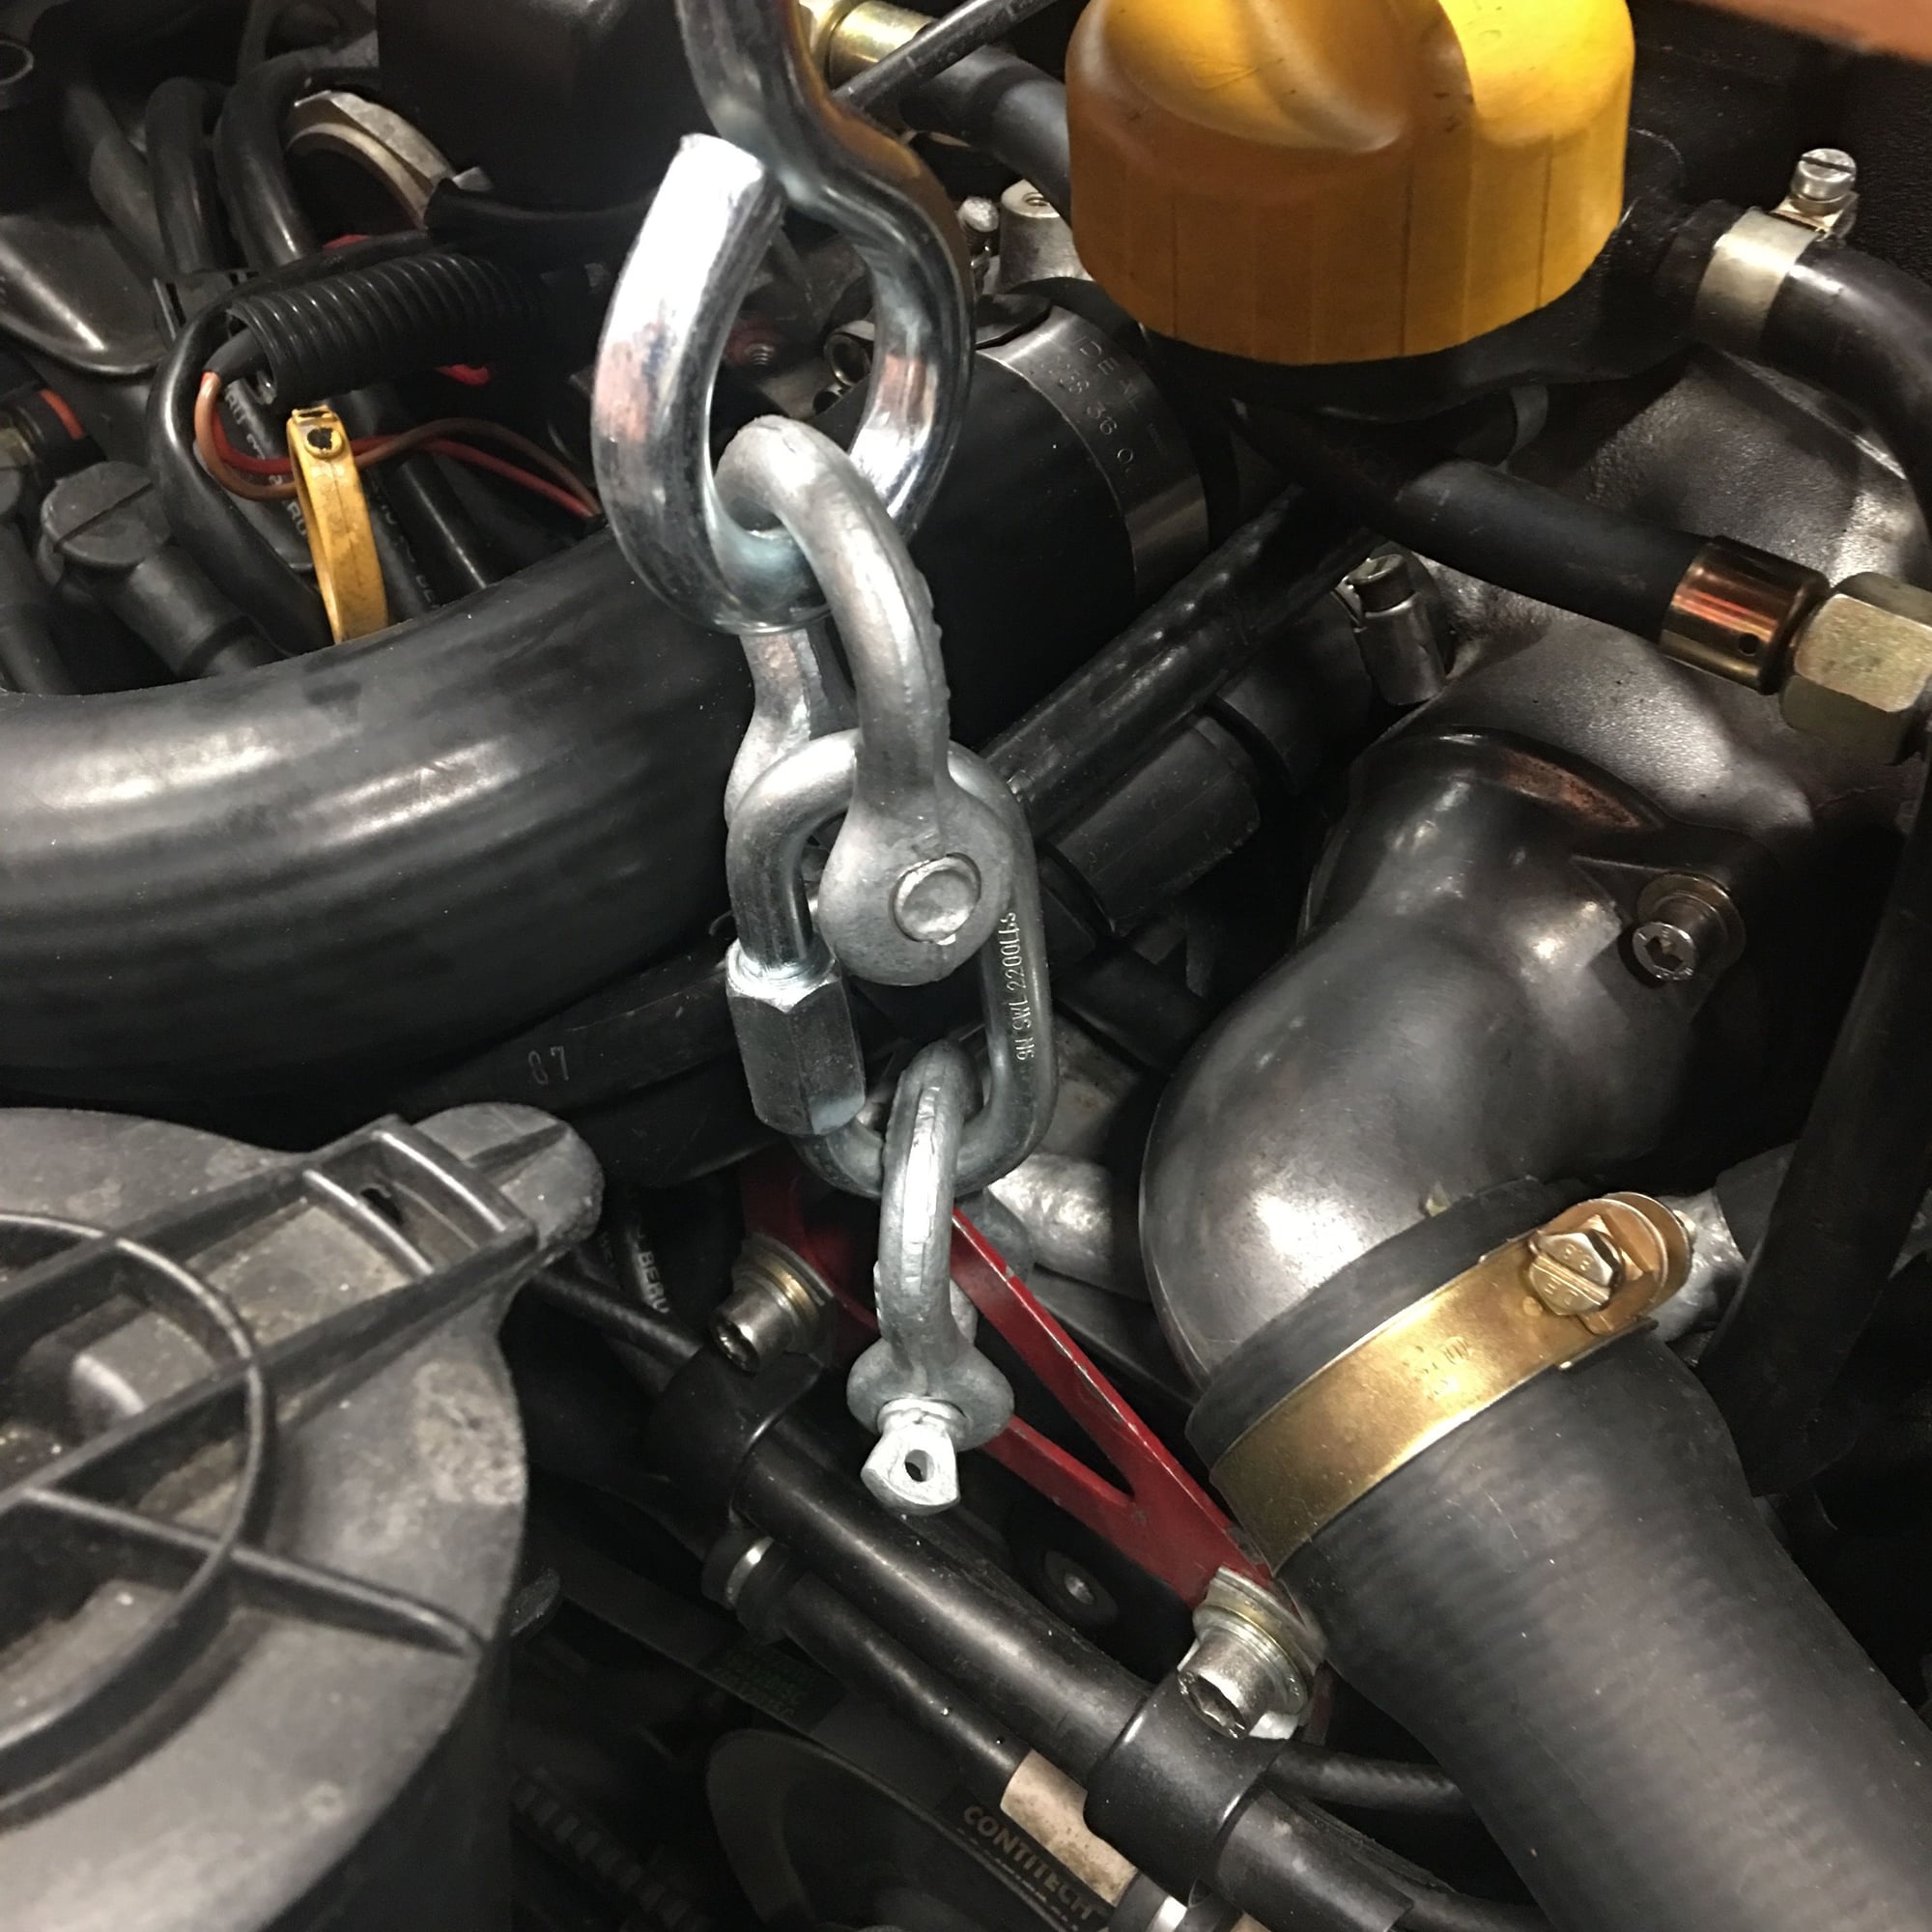
Thanks to fellow list member Thomas Dingwall for lending me this simple but effective hoist.
The hoist is holding the front anchor point.
Sway bar bushings were in excellent condition so I cleaned and re-greased them before reuse. Also all bolts are getting cleaned and anti-seized.
I'm about ready to jump back out there for some more disassembly but I thought I would get some advice on whether, or not, to replace the original oil pain gasket. The existing gasket is not leaking and looks to be in good condition.
On the recommendation from Roger at 928srus, I purchased the silicone gasket and reusing the standard bolts with 242 Locktight (Blue). Roger specifically recommended silicone over cork and specifically recommended stock bolts over longer bolts with nuts.
However, after reading the recent thread Finally got my oil pan off there seems to be some differing opinions on which is seal is better and whether to use the bolt/nut method.
My first question for you is, should I even bother removing the oil pan if it isnt leaking? Or should I just clean and locktight and torque any loose bolts? What is the toque spec for these bolts?
Second question, if I do move forward with replacing the seal, any evidence that the method Roger recommended is not effective as compared to bolt/nut options? Is there a specific torque to ensure the seal is not overly compressed?
Thanks in advance, I'll update this thread as I dig in deeper.
Mike Benno
Last edited by Michael Benno; 07-03-2017 at 01:29 AM.

 06-29-2017, 01:49 PM