When you click on links to various merchants on this site and make a purchase, this can result in this site earning a commission. Affiliate programs and affiliations include, but are not limited to, the eBay Partner Network.
This write up documents some of the important procedures and surprises when replacing the flexible brake lines. I opted to upgrade to the stainless steel lines from one of our suppliers. The fitment of the new lines was perfect but several surprises were encountered along the way. I don't think the issues could have been avoided and are probably typical of a car of 89 vintage. Also, I had help from a fellow 928er which made the job and surprises more enjoyable. Space is really tight and rusty connections require leverage so having an extra set of hands coming in from a different angle really helps out.
Firstly, make sure you hit all fittings of the flexible lines and bleeder nipples with PB Blaster or your favorite "lossening" solvent. The fittings and nipples are ferrous based and rust.
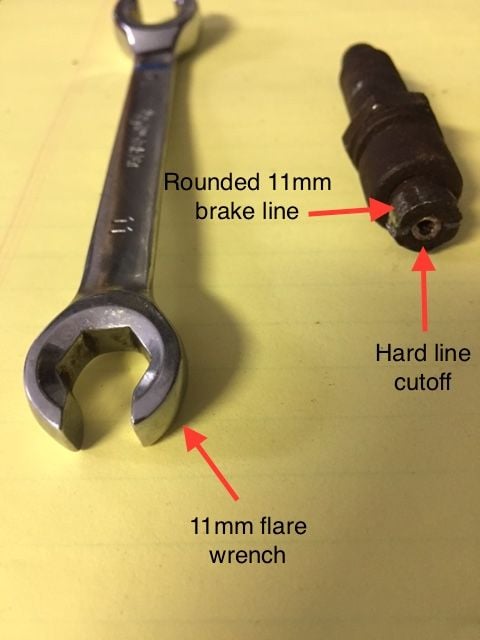
A flare wrench is a necessity as far as we can tell. You want as much wrench area on the fitting and nipples as possible to avoid rounding. You need an 11mm flare wrench. Buy this in advance(unlike me) because your typical auto parts stores don't have one. We ended up going to 4 different stores before we located one and they only had one.
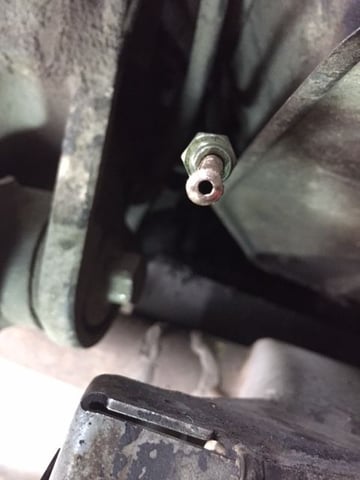
If you are lucky the old flexible lines will come out without issue. My luck was 3 out of 4. The right rear flexible line did not release from the male fitting on the hard line. The fitting wasn't in virgin condition when we started but the flare wrench was on it solid and it still rounded(see pic). The only option was to cut it off with the hope of replacing the male fitting and then re-flaring the line.
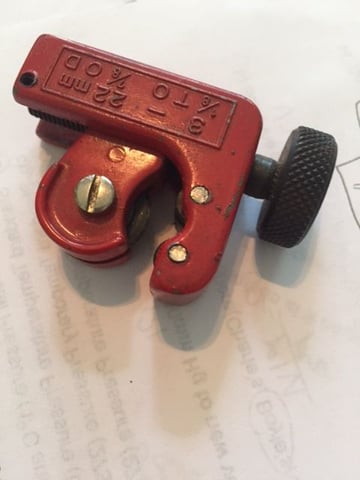
The fitting was hack sawed off and then a small pipe cutter was used to square up the line. A gentle champfer was then filed to smooth out the cut and the opening was reamed to clean up the inner surface.
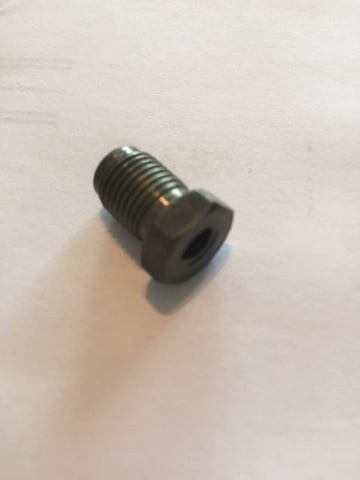
A new fitting was slid onto the hard line and a flaring tool was used to create the new flare. This procedure was surprisingly easy(only 2 tries) to do but you do want to lock down the clamp on the hardline as tight as possible. I borrowed a flaring tool from Advance Auto and it had 13mm hold down screws. They were not tight enough on the first flare try. On the second try I tightened them as much as I could with my 13mm ratcheting wrench(not a big lever arm). I mention this because other kits have large wing nuts to tighten the tool and I wouldn't trust the effective tightening on the hardline. It gets a lot of pressure when you are screwing the press into the flare die.
The flare kit instructions show how much of a protusion the hard line should have to get the proper flare. I went a little bit extra thinking more material is better to make a seal than less.
Based on internet research I learned there are at least 3 types of flare styles. I never figured out which one Porsche uses so I rolled the dice and used the flare that the loaner flaring kit provided. The kit didn't reference what tooling style it used. Maybe Stan or one of our other gurus can make a recommendation on this.
The flare worked and held pressure when tightened into the new SS lines. Yay. My fear was that if the flare did not work I would need to replace the hardline back to a T-Connector on the other side of the car just forward of the battery box. I thought this would require exhaust system drop, heat shield drop and transmission drop. Dr. Bob has since posted that the line can be replaced without dropping anything because a hardline connector above the transmission is accessible. Fortunately, we didn't have to go there.
The next step after all new SS lines were installed was to bleed the system. Each caliper has two bleeder nipples. Each of these nipples were hit multiple times with PB Blaster and 7 of 8 opened up without issue. The eighth nipple just sheared off.
We tried multiple size extrators (#3-#5)and had no luck. Eventually the extractor fractured inside the nipple. Attempts to remove the extractor failed so I ended up ordering a used caliper from one of our suppliers.
This job was much more than I expected to encounter especially since my existing brake lines were working fine. I should have her back on the road next week once the replacement caliper arrives.
My luck with extractors has shown that if a bolt breaks from corrosion, you'll probably break off the extractor. Better to get a set of left handed drill bits and just suck it up.
Better metro-area machine shops can use an EDM machine to remove the steel from the aluminum. A good used caliper is fine, but if that's not an option then EDM is pretty slick in talented hands.
I had the same 3/4 score on flexible hoses, but the 3 that yielded took a lot of careful loosening to and from with flare wrench before they loosened up nicely (corrosion crud gets trapped between the union nut and hard line).
Was lucky that the one that rounded was the rear left - short and relatively easy to change, though a friend who recently changed the right rear line also confirmed that he could thread it over the transmission through to distributor by battery box.
The steel line has a nut that screws into the fitting on the end of the hose. You are replacing the hose. Be Not Afraid to apply a bunch of heat to the barrel end of the hose to try and get it to un-bond itself from the nut. Propane or MAPP gas is fine. A few heat cycles will do it.
Reassemble with anti-seize on the tube where the nut sits, and on the threads of the nut. Keeps the water out and hopefully keeps those corrosion devils at bay.
This write up documents some of the important procedures and surprises when replacing the flexible brake lines. I opted to upgrade to the stainless steel lines from one of our suppliers. The fitment of the new lines was perfect but several surprises were encountered along the way. I don't think the issues could have been avoided and are probably typical of a car of 89 vintage. Also, I had help from a fellow 928er which made the job and surprises more enjoyable. Space is really tight and rusty connections require leverage so having an extra set of hands coming in from a different angle really helps out.
Firstly, make sure you hit all fittings of the flexible lines and bleeder nipples with PB Blaster or your favorite "lossening" solvent. The fittings and nipples are ferrous based and rust.
A flare wrench is a necessity as far as we can tell. You want as much wrench area on the fitting and nipples as possible to avoid rounding. You need an 11mm flare wrench. Buy this in advance(unlike me) because your typical auto parts stores don't have one. We ended up going to 4 different stores before we located one and they only had one.
If you are lucky the old flexible lines will come out without issue. My luck was 3 out of 4. The right rear flexible line did not release from the male fitting on the hard line. The fitting wasn't in virgin condition when we started but the flare wrench was on it solid and it still rounded(see pic). The only option was to cut it off with the hope of replacing the male fitting and then re-flaring the line.
The fitting was hack sawed off and then a small pipe cutter was used to square up the line. A gentle champfer was then filed to smooth out the cut and the opening was reamed to clean up the inner surface.
A new fitting was slid onto the hard line and a flaring tool was used to create the new flare. This procedure was surprisingly easy(only 2 tries) to do but you do want to lock down the clamp on the hardline as tight as possible. I borrowed a flaring tool from Advance Auto and it had 13mm hold down screws. They were not tight enough on the first flare try. On the second try I tightened them as much as I could with my 13mm ratcheting wrench(not a big lever arm). I mention this because other kits have large wing nuts to tighten the tool and I wouldn't trust the effective tightening on the hardline. It gets a lot of pressure when you are screwing the press into the flare die.
The flare kit instructions show how much of a protusion the hard line should have to get the proper flare. I went a little bit extra thinking more material is better to make a seal than less.
Based on internet research I learned there are at least 3 types of flare styles. I never figured out which one Porsche uses so I rolled the dice and used the flare that the loaner flaring kit provided. The kit didn't reference what tooling style it used. Maybe Stan or one of our other gurus can make a recommendation on this.
The flare worked and held pressure when tightened into the new SS lines. Yay. My fear was that if the flare did not work I would need to replace the hardline back to a T-Connector on the other side of the car just forward of the battery box. I thought this would require exhaust system drop, heat shield drop and transmission drop. Dr. Bob has since posted that the line can be replaced without dropping anything because a hardline connector above the transmission is accessible. Fortunately, we didn't have to go there.
The next step after all new SS lines were installed was to bleed the system. Each caliper has two bleeder nipples. Each of these nipples were hit multiple times with PB Blaster and 7 of 8 opened up without issue. The eighth nipple just sheared off.
We tried multiple size extrators (#3-#5)and had no luck. Eventually the extractor fractured inside the nipple. Attempts to remove the extractor failed so I ended up ordering a used caliper from one of our suppliers.
This job was much more than I expected to encounter especially since my existing brake lines were working fine. I should have her back on the road next week once the replacement caliper arrives.
Excellent write up - if you have any more that you've documented, take a look at the link below. If you publish your article on our site, we'll give you credit and 10% off your next order.

 04-23-2017, 12:27 PM