When you click on links to various merchants on this site and make a purchase, this can result in this site earning a commission. Affiliate programs and affiliations include, but are not limited to, the eBay Partner Network.
Building a replacement cap for sealing headlamps after converting to HID or LED
I know I'm not the only one who has thought about this... for example, Jim Corenman raised the issue in post #12 in the thread Cree LED H4 Headlamps.
Over the last few days, I uninstalled the HID kit I installed on my car a little more than 10 years ago (see H4 HID Conversion Kit Installed; Writeup Now Available). It gave me 10+ years of good service, but the high beams using a "reflector shift" mechanism never really worked very well, and I figured it was time to experiment with LED headlamps and see how they'd fare.
Of note, those HID bulbs had very bulky and irregularly-shaped protrusions out the back, precluding the use of the sealing cap on the back of the H4 headlamp assembly. Over the years, I've been watching my headlamp glass (and reflector, probably) get cloudier and cloudier; the interior surfaces were getting that same kind of cloudy film that we're also cleaning off glass surfaces (light fixtures, glass cabinet doors, etc., etc.) in our house.
Yesterday, I figured that since I was changing my headlamps around quite a bit anyway (removal of the old HID kit is non-trivial, as the H4 connector was no longer close to the headlamp, but buried in the wheel well along with the bulkiest part of the HID driver), I'd take the time to clean the interior surfaces of the headlamp.
I used some (didn't measure, a cup or so) windshield washing fluid and swished it around all the interior surfaces — especially the glass — for a few minutes.
Same headlamp before cleaning:
and after cleaning:
And, as another point of reference, my two headlamps, one of them after cleaning, and the other one before cleaning. Same age, of course, and they were similarly clouded as of the start of the day yesterday.
This has convinced me that it really would be worthwhile to take a little time to see if a seal could be developed that would work with LED bulbs; they tend to be fairly simple shapes compared to the HID bulbs I had used previously. The photo below shows a standard halogen H4 bulb, a typical LED bulb, and my previous HID bulb. You can see that the barrel on the LED bulb where it would need to be wrapped by the seal is a simple cylinder (⌀ 24 mm).
Here's the original sealing cap, front and back:
This is a good photo to get a sense of the sealing challenge we're facing:
IMHO, the cap should:
not require disassembly of the LED bulb;
include some kind of passageway with a filter to allow pressure equalization across the cap (might not be necessary if just a tiny little bit of air can flow through the LED bulb assembly; I haven't tested this);
be held to the H4 headlamp assembly via the original hold-down clip;
have some screw holes and/or slots to allow for securing the LED driver that accompanies the LED bulb; and
be easy to install and remove.
I've already got a some ideas in mind (two mostly or entirely symmetrical parts made from a relatively thin, e.g., 5 to 10 mm plastic sheet) with seals (gaskets, O rings, etc. as appropriate) between the two pieces, around the LED bulb barrel, and between the pieces and the H4 assembly's metal flange.
I'm hoping that somebody will tell me, "It's already been done!" and provide a link. If not, and if there's interest, maybe it's time to work up a complete design, fire up the ShopBot (I don't have a 3D printer in my arsenal, unfortunately) and make something.
I'd also be interested to hear how many people might be interested in such a cap (i.e., enough to actually purchase one). I might need some more motivation.
I guess the other possibility is to just remove the headlamp assemblies every few years and clean them, but it's a nuisance, and it really does look crummy when they start getting cloudy.
Last edited by Ed Scherer; 05-21-2016 at 05:23 PM.
include some kind of passageway with a filter to allow pressure equalization across the cap (might not be necessary if just a tiny little bit of air can flow through the LED bulb assembly; I haven't tested this);
be held to the H4 headlamp assembly via the original hold-down clip;
have some screw holes and/or slots to allow for securing the LED driver that accompanies the LED bulb; and
be easy to install and remove.
I'm with you here, this is the right set of requirements.
Obviously the cap needs to seal around the "neck" of the LED assembly, which seems to imply two halves that fit around the neck. Or is the fan easily removed?
There was a question about the light pattern raised there, and the jury is still out pending testing.
Imagine a machined aluminum cap, same approximate shape except with a 1" (or whatever) hole in the middle, with an o-ring groove-- basically a "flattened donut". Mount the LED assembly (sans heatsink) to the reflector with its small clip, then slide the cap over the "neck" and secure with its big clip, then re-attach heatsink. Mounting points, filtered vent etc could all be incorporated pretty easily.
It will also take some effort to locate the luminous element in the proper place in the reflector housing. Improper front-to-back location will destroy the projected light pattern.
I'm with you here, this is the right set of requirements.
Thanks for responding, Jim.
Originally Posted by jcorenman
Obviously the cap needs to seal around the "neck" of the LED assembly, which seems to imply two halves that fit around the neck. Or is the fan easily removed?
I'd rather not assume that the fan part is easily removed.
There was a question about the light pattern raised there, and the jury is still out pending testing.
Thanks for the link to that thread. I'll review it later (I'm on a tight schedule for this afternoon). I've also got some photos of light patterns of my old H4 HID vs. stock halogen H4 and also the H4 LED vs. stock halogy H4. I can share those later.
Originally Posted by jcorenman
Imagine a machined aluminum cap, same approximate shape except with a 1" (or whatever) hole in the middle, with an o-ring groove-- basically a "flattened donut". Mount the LED assembly (sans heatsink) to the reflector with its small clip, then slide the cap over the "neck" and secure with its big clip, then re-attach heatsink. Mounting points, filtered vent etc could all be incorporated pretty easily.
That's pretty much what I've been considering, but I'd break it in half, with a seal between the halves.
I'd probably go with (at least for prototyping) high-temp plastic, as it's easier to machine with my ShopBot.
It will also take some effort to locate the luminous element in the proper place in the reflector housing. Improper front-to-back location will destroy the projected light pattern.
The H4 LED bulbs (at least the ones I have and similar ones I've seen) actually have their LED elements positioned very closely to where the filaments are in halogen H4 bulbs, and they're seated/positioned the same way relative to their bases.
These photos aren't quite aligned the same, but demonstrate the relative positioning of the low beam elements (top) and high beam elements (bottom).
There still is enough difference in geometry, though, that it does lead to a different projected light pattern. Within the next few days and in a separate thread, I'll share what I found.
This is fantastic timing for this thread. I have the Philips Gen 8 bulbs with a heat sink that is completely removable. The thread diameter is the same as the bulb itself. I just ordered the components for direct-power to the headlights, and was planning on modifying the stock cover or 3D printing something to use in it's place. I'd really rather not modify the stock part, as it would probably be very difficult to replace.
I have the Philips Gen 8 bulbs with a heat sink that is completely removable. The thread diameter is the same as the bulb itself. I just ordered the components for direct-power to the headlights, and was planning on modifying the stock cover or 3D printing something to use in it's place. I'd really rather not modify the stock part, as it would probably be very difficult to replace.
Can you give me an exact diameter of the barrel part around which the cap would need to seal? The LED bulbs I've got measure exactly 24 mm. It would also be useful to know the distance from the top (or bottom; I could assume a reasonable thickness) of the flange containing the three tabs to the part of the barrel of the LED bulb where the heat sink begins when it's fully threaded onto the barrel.
Perhaps I need to see if I can unscrew the fan/heat sink part of my bulbs, too; I wasn't sure if it was worth the risk of breaking something. It seems likely that unscrewing the heat sink / fan runs the risk of twisting some of the wiring into oblivion, but I really don't know. Anyway, a one-piece cap would be way easier to design and build than a two-piece cap.
I've actually been using my ShopBot today; trying to get my backlog of two other jobs (each of which uses its own work-holding fixture that need to be carefully aligned every time I put it back on the 'Bot) completed so I can free it up for this headlamp cap prototyping work.
I'll mic it up today and post photo of the readout. The nice thing about these 'Gen 8' bulbs is the power wire passes through the heat sink, so you can totally eliminate it (for better/alternate design), or thread it on after the dust cap is installed. A rubber grommet could seal the whole thing, and Arctic Silver paste on the threads would ensure proper heat transfer. You can see what it looks like unthreaded in this video:
After thinking about this some more, I don't think I want to waste time on a two-piece cap, given that the H4 LED bulbs with removable heat sinks are readily available (see the already-referenced thread Phillips LED H4 Headlamps) and relatively inexpensive.
I'm going to go ahead and make myself a couple of one-piece caps and I'll share the results. Hope to have something within the next week (might start prototyping today, but I don't have exactly the seals and base material that I'd like to go with).
I'll probably try to take apart my current H4 LED units; they're now expendable since I think I'll be getting those other removable-passsive-heatsink bulbs anyway.
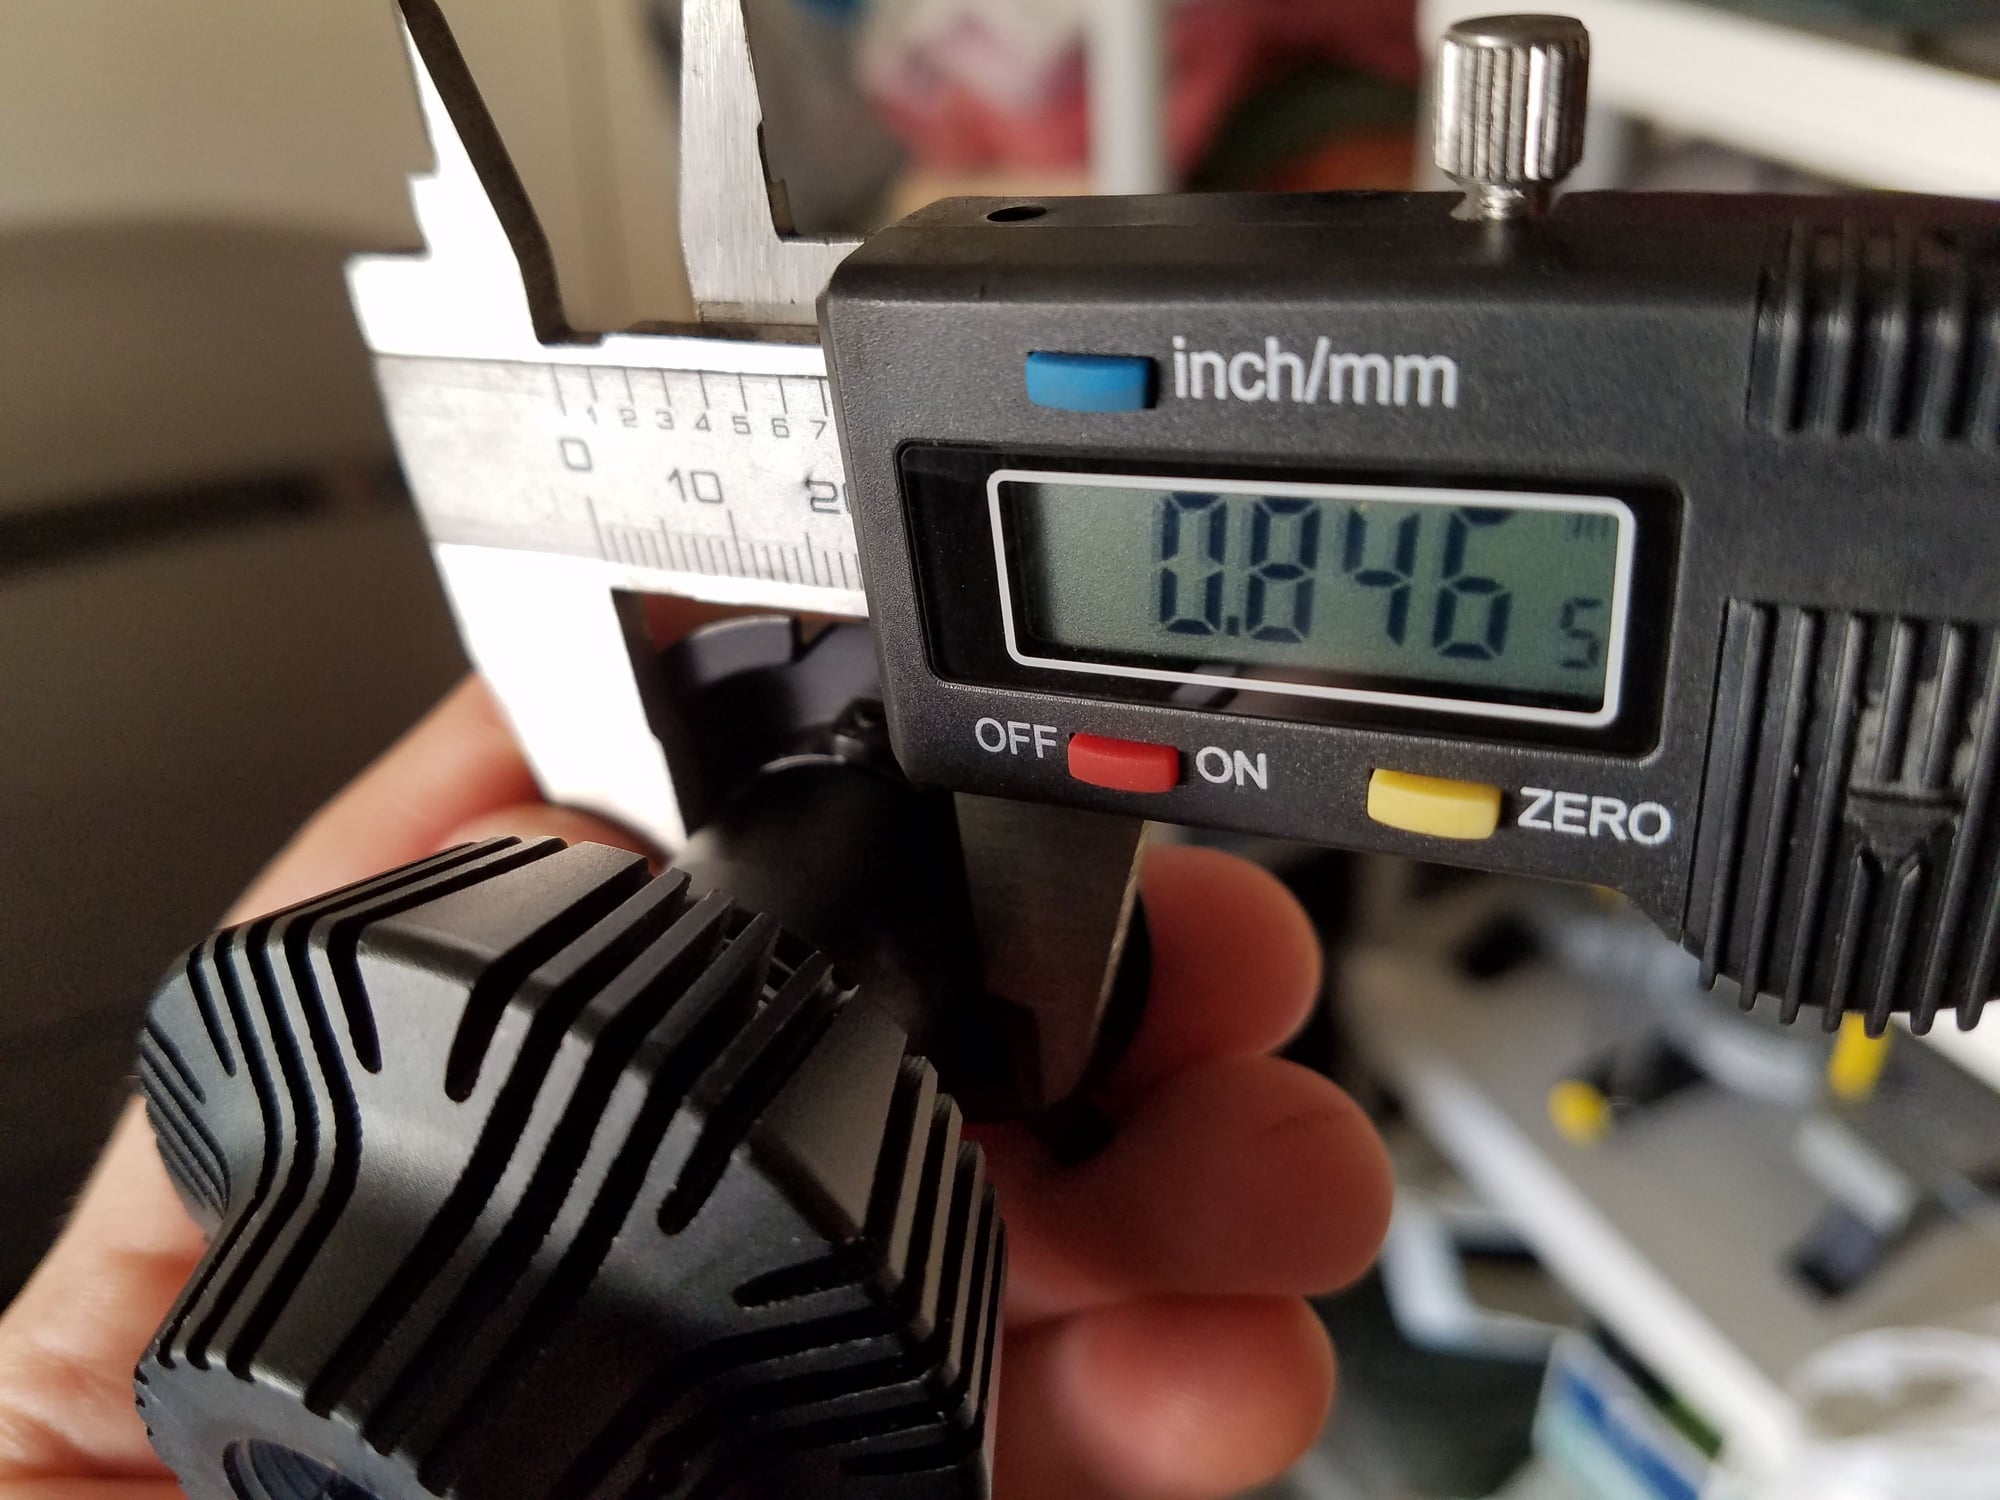
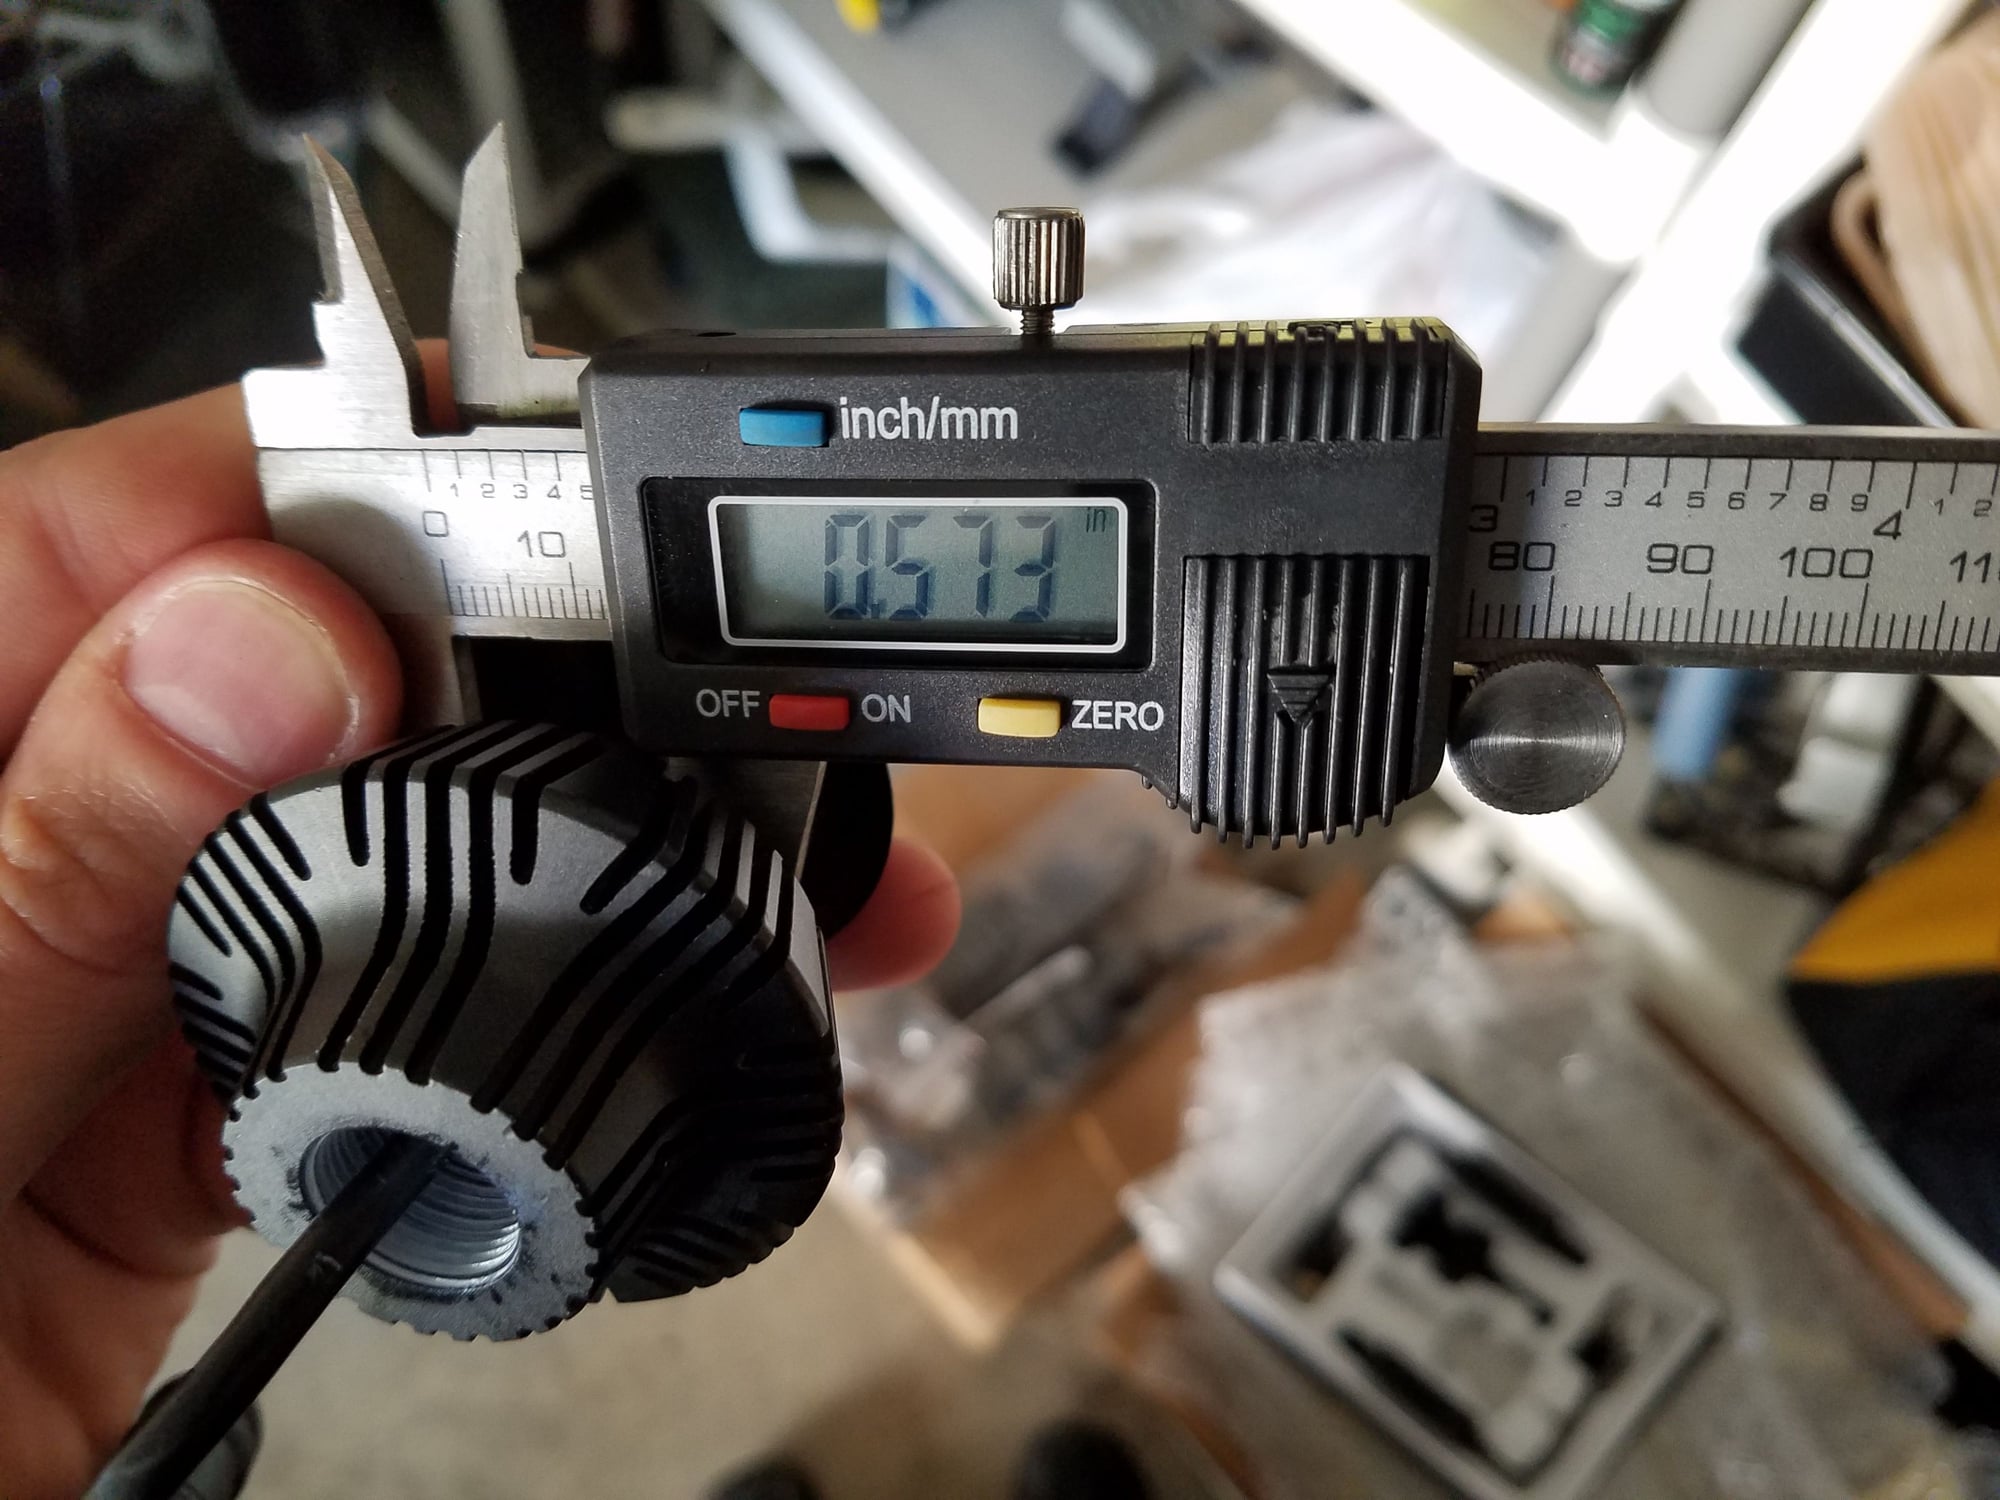
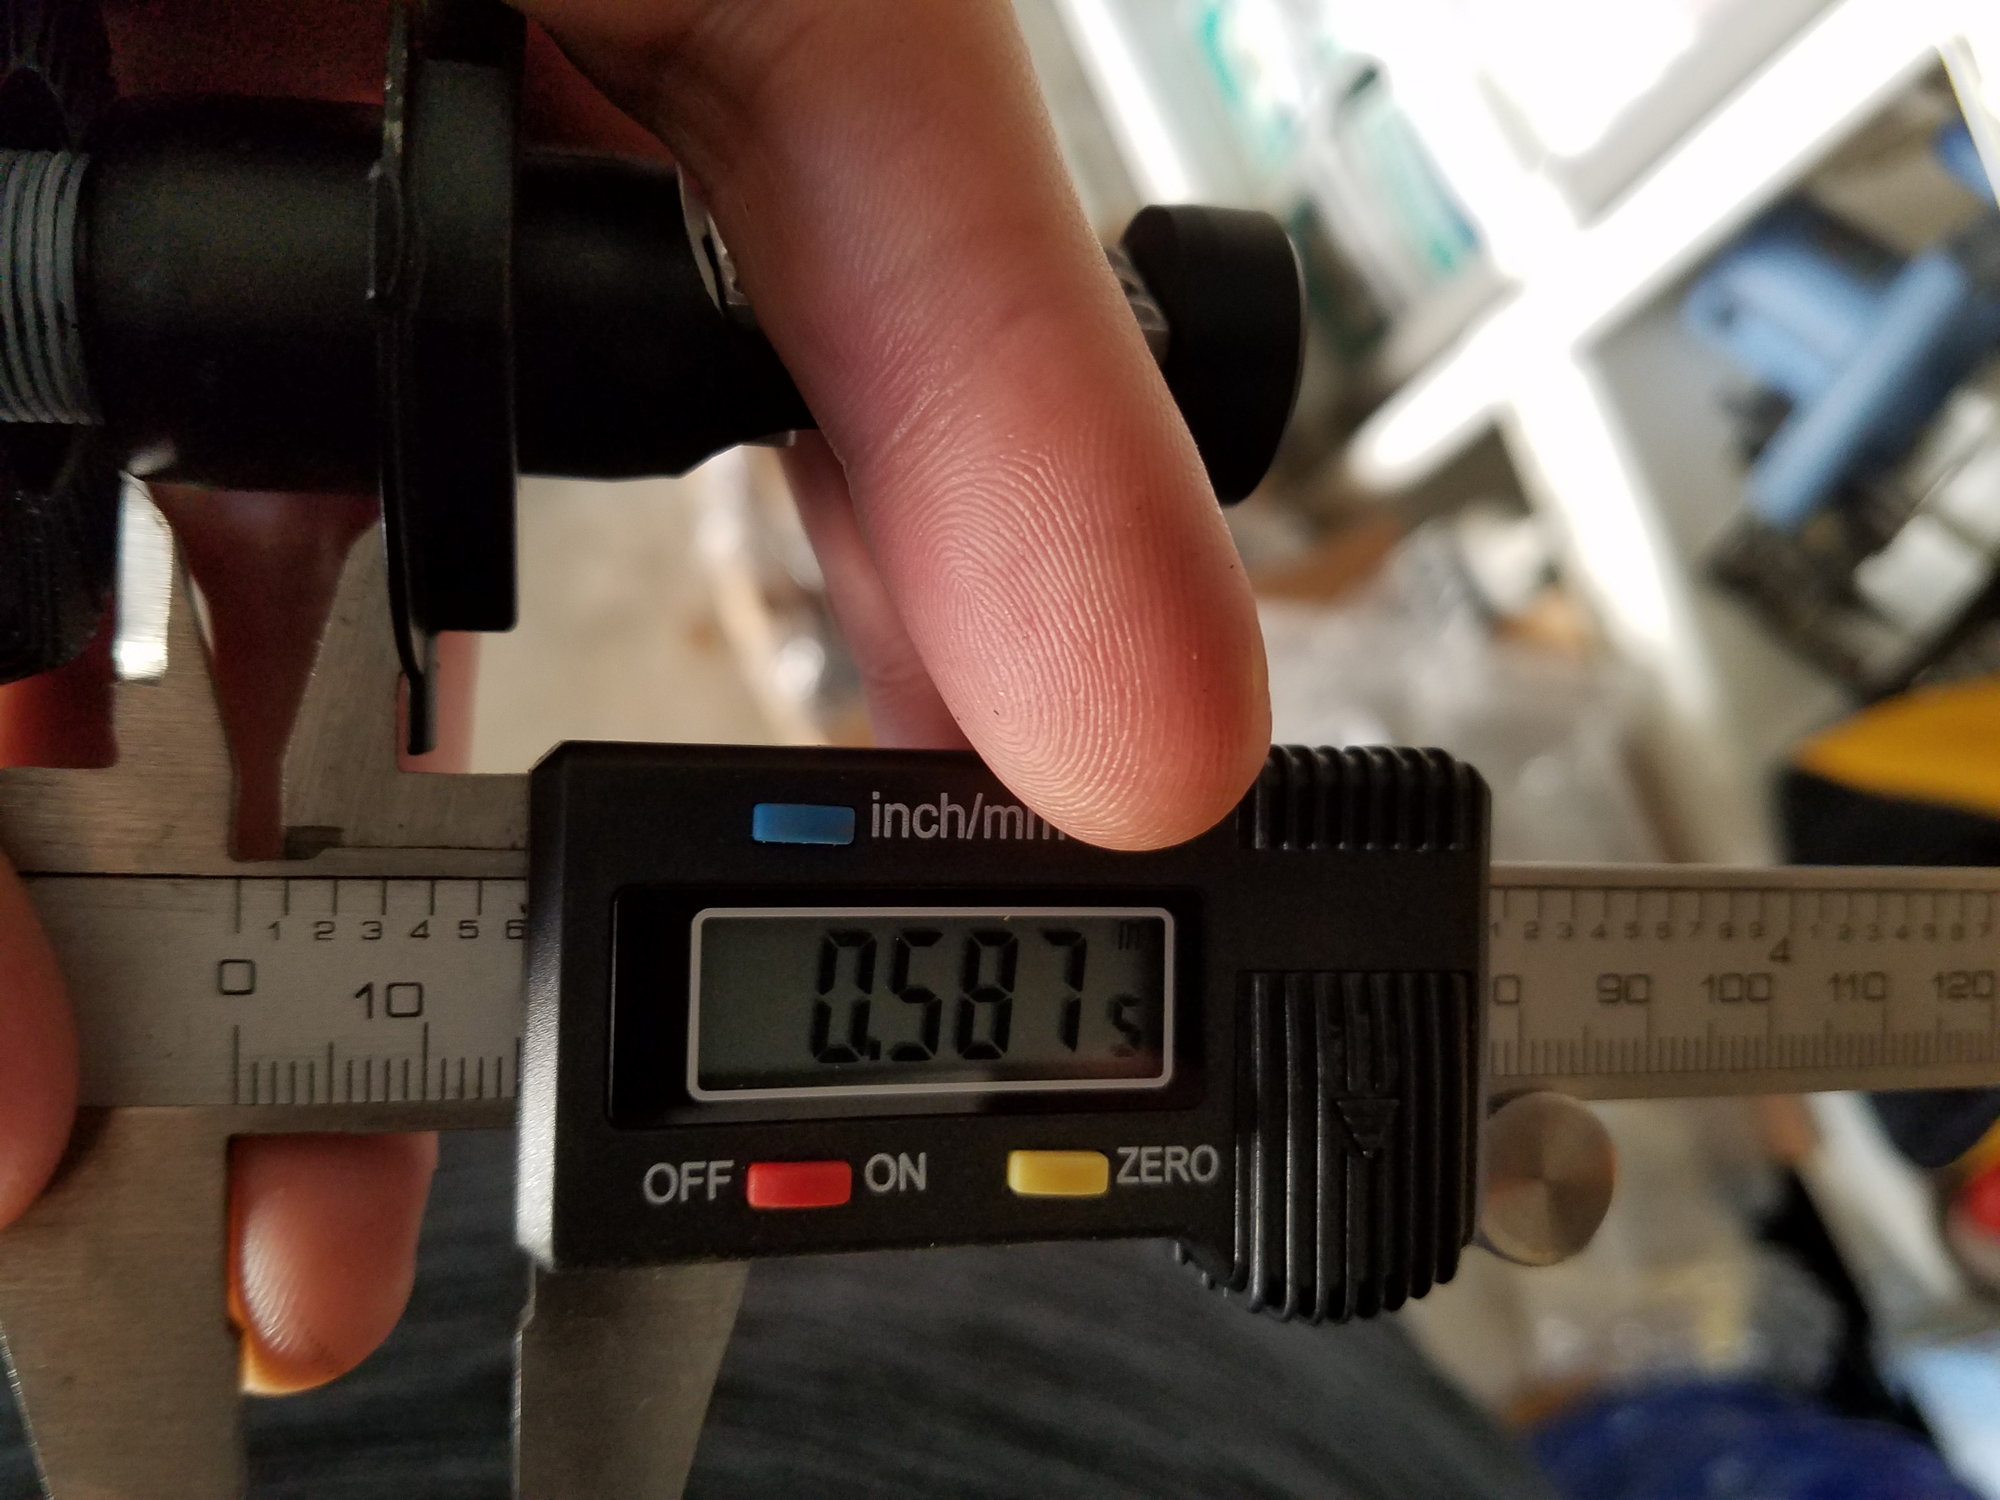
Here are my measurements on the back of the Philips LED. Can I request a set of caps once you print them? Otherwise I'll just make some myself... but no sense having us both do the work. Let me know how I can assist.
Diameter of the light just behind the alignment disc.
Thread Diameter
Depth of the shoulder behind the alignment disc. Threads extend another ~1" (forgot to measure this)
If/when I make some caps, I'll try to make enough to sell a few to others, too. Of course, if you (or anybody else) wants to tackle this and gets there first, I'll be happy to be a customer instead.
I've been a little delayed on this, as on Saturday when I was just getting started tackling projects that I expected to do over the 3-day weekend, I found out that my parents' basement (built-out) flooded, so I've been spending most of my free time dealing with that since then.
The 3D printer I have access to doesn't produce a quality finish that I'd want to use for a long-term solution. I can take one of the plates and start creating something in CAD though... free time just isn't on my side.
I received shipment of almost identical bulbs as shown above a couple of days ago. Silver bulb body rather than black, and different labeling, but those are the only differences I noted.
I really like these and will replace my existing ones with these.
I've ordered the supplies I need to make the rear caps and should have everything I need tomorrow. Machinable, high-temperature ABS, high temperature silicone ultra-compressible O-rings, and the tooling for what I have in mind.
The little slots in the drivers (one of the two is visible at the very bottom/center of the photo below) are perfect for nylon ties, so I'll make sure to have slots in the right places on the backs of the caps for a nice, clean, secure mount.

 05-21-2016, 03:27 PM