When you click on links to various merchants on this site and make a purchase, this can result in this site earning a commission. Affiliate programs and affiliations include, but are not limited to, the eBay Partner Network.
OK, I know the jokes are going to pour in here, but need some advice on how to move forward.
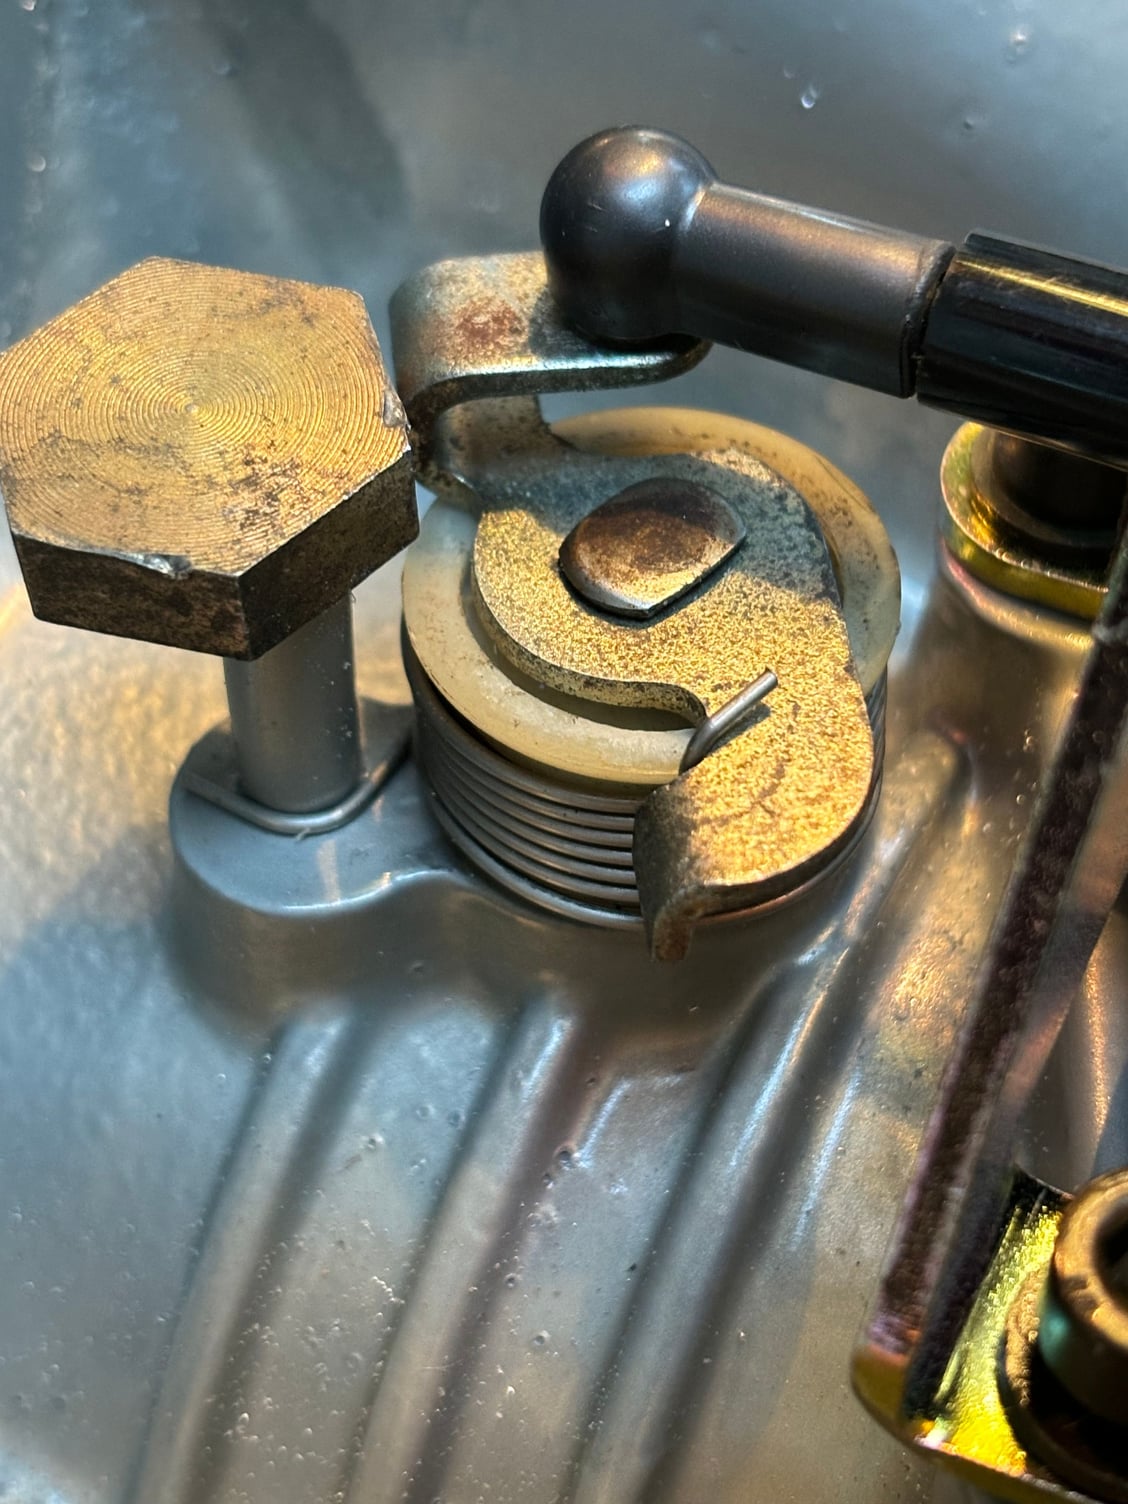
I’m reinstalling the flappy valve. The shaft will go through the bottom bearing easily but won’t go through the top bearing. I recall the bottom bearing was easier to install than the top. (Used Dwayne’s threaded rod method.). Perhaps there is powder coating build up in the opening that is pressing on the bearing and “squeezing” it? Nothing looks wrong with the bearing and it spins.
Any options other than cutting out the bearing and starting over?
Yes, it was lubed. And went through the first bearing easily. The second one is much tighter. I got frustrated and tried tapping it in with a brass punch which was pushing it in but the shaft wouldn’t turn at all, so I backed it out.
What is the ID of the bearing vs the OD of the shaft? Are both bearings ID the same? Is the OD of the shaft the same from top to bottom? Something is definitely amiss.
Could it be that one of the bearings is not pressed in all the way and is crooked, and miss aligning the shaft. also, can you install the shaft backwards from the top down that will let you know what the shaft will actually fit into the bearing or if it's an alignment issue
Last edited by Michael Benno; 12-22-2023 at 06:23 PM.
Check the part numbers and brands and see if they are identical. Are they quality bearings? I think I used ING bearings but left the old in until after powder coat.
I had two other bearings in the set I bought. They will both slide on without much effort at all, but one is clearly easier than another showing some variation between them. May have just got unlucky with the one I put in. I’m trying Stan’s advice to see if I can make it work and if the shaft will rotate easily when temps are normal. Will report back.
Years ago I used Dwyanes method but the bearing was unusually tough to get in, so I kept tightening the nut on the threaded rod. I had no idea how soft the metal was and actually slightly deformed it to the point that the flappy wouldn't fit anymore. Expensive lesson as I had to replace the whole thing with a used one.
update, I cut the offending bearing out and put in another that I had tested on the shaft before installing in the intake. It went in much easier except for the last 1/4 inch. However, The flappy still doesn’t turn as easily as I imagine it should. Takes more hand torque than I would expect.
went ahead and installed the diaphragm. I put vacuum to the diaphragm and it rotates the shaft (opens the flappy disc). Starts moving around 4 hg and fully open around 7hg. The gauge on the minivan isn’t the most precise. All good right? But …..
Newbie Question: should releasing the vacuum cause the shaft to rotate closed? It doesn’t budge when I release the vacuum. It will close if I apply pressure to the diaphragm. I assumed it would close when vacuum was released. Did I not wind the spring tightly enough?
its possible the plate may be off and its getting caught I would suggest to put the flappy wherever its stuck then give the shaft a tap up and then down from the opposite side .
NOTE if your testing the flappy with the unit facing top down the rubber cap will stop the shaft from turning, as it will be pressed into the shaft
This little saga of mine continues. I tried Stan's suggestion (Thanks Stan) of tapping on the shaft and actually got it to the point where it spun much easier / smoother. Yet it would still not close the flap (disc) when removing the vacuum.
I played with tightening the spring and at 180 tighter it would close the disc! Halleluiah I thought, the spring is just too loose. So I take it all apart and wind the spring around an extra turn (360 degrees). Tested at every step and the disc would snap close each time.
But once everything was tightened down down including the diaphragm value and tested, it now takes 9psi before the disc starts to open and doesn't fully open until closer to 15psi. Only reference I can find in the WSM literature (actually a service training bulletin) is that it should take 0.4 bar (5.8 psi) to open the disc. It still snaps closed once vacuum is removed thanks to the tighter (overtight?) spring. Have I screwed myself the other way now and the vacuum system isn't going to create enough vacuum to open the valve?

 12-22-2023, 04:33 PM