
928 Garage Porn
 08-23-2015, 03:20 PM
#61
Chronic Tool Dropper
Lifetime Rennlist
Member
Lifetime Rennlist
Member

Best price on the Mac 2400 was from Home Depot, better than the normal online suspects for sure. Drop-shipped it to the local store, to avoid UPS shipping damage that is frequently mentioned in online reviews. I relocated the inlet air filter, added a primary discharge filter for moisture removal inside the 'cage', and good to go.
 08-23-2015, 03:28 PM
#62
The Makita sounds like it might just cover most of my "home" garage needs...
We've got a larger one at the shop that will do everything else that I don't want to do at home....
thanks again for the great tips
We've got a larger one at the shop that will do everything else that I don't want to do at home....
thanks again for the great tips
I very recently added a small Makita 2hp 2400 compressor to the compressor cabinet, mounted on wheels so I can pull it out for portable use too. It's very quiet, in fact quiet enough to have a conversation while standing over it. Inside the sound-insulated cabinet, it's more than acceptable. For most projects, the quiet small-tank small-displacement compressor is plenty. For painting and other high-CFM user, the bigger 5HP 50-gal compressor can be easily valved into the air system and flipped on. "Most Projects" for me include blow-drying the car details after washing, inflating tires, using a pneumatic nailer/stapler for woodshop duties, etc. It runs the 1/2" impact gun for casual suspension work too, since that's intermittent duty for the most part.
Best price on the Mac 2400 was from Home Depot, better than the normal online suspects for sure. Drop-shipped it to the local store, to avoid UPS shipping damage that is frequently mentioned in online reviews. I relocated the inlet air filter, added a primary discharge filter for moisture removal inside the 'cage', and good to go.
Best price on the Mac 2400 was from Home Depot, better than the normal online suspects for sure. Drop-shipped it to the local store, to avoid UPS shipping damage that is frequently mentioned in online reviews. I relocated the inlet air filter, added a primary discharge filter for moisture removal inside the 'cage', and good to go.
08-23-2015, 03:59 PM
#63
Archive Gatekeeper
Rennlist Member
Rennlist Member
Pre-remodel:

My current space stopped being worthy of pictures about 2 days after I moved back in, but it is still a useful space. (Plenty of room for improvement, though- when is a hobby ever 'done'? The race wheels on the wall need to go away to storage, and I need to make better use of the space for additional tools..)
Followed a bunch of Dr. Bob's suggestions:
Lots of 2- and 4-gang outlets at 48" height:

Ceiling is only 9'3", so I had the door on 'my' side work with a sidewinder GDO and extended to be within 4" of the ceiling:

Add a crossover conduit (2" ABS) for the hydraulic hose for the MaxJax, and a bunch of in-wall 1/2" Rapidair tubing for compressed air:

Ceiling-mount reel for compressed air, right between the bays to reach everywhere in the garage:

Twist-lock outlets above the MaxJax columns, and Epoxy floor:

Saber cabinets (and La-Z-Boy- rescued from the curb just down the street):

Clear Akrobins on the back wall for 928 parts storage, 2 years ago:

And filled to the brim, now:

T5 HO light fixtures with 3000K F54T lamps:

30 gallon aqueous parts washer, and a 240V outlet for proper compressed air, at some point...

Tunes and PC- Acurus 5-channel AV amp rescued from the curb, $99 Ebay find for the matching preamp, leftover PSB speakers when the wife decreed no speakers would be visible in the house....

My current space stopped being worthy of pictures about 2 days after I moved back in, but it is still a useful space. (Plenty of room for improvement, though- when is a hobby ever 'done'? The race wheels on the wall need to go away to storage, and I need to make better use of the space for additional tools..)
Followed a bunch of Dr. Bob's suggestions:
Lots of 2- and 4-gang outlets at 48" height:
Ceiling is only 9'3", so I had the door on 'my' side work with a sidewinder GDO and extended to be within 4" of the ceiling:
Add a crossover conduit (2" ABS) for the hydraulic hose for the MaxJax, and a bunch of in-wall 1/2" Rapidair tubing for compressed air:
Ceiling-mount reel for compressed air, right between the bays to reach everywhere in the garage:
Twist-lock outlets above the MaxJax columns, and Epoxy floor:
Saber cabinets (and La-Z-Boy- rescued from the curb just down the street):
Clear Akrobins on the back wall for 928 parts storage, 2 years ago:
And filled to the brim, now:
T5 HO light fixtures with 3000K F54T lamps:
30 gallon aqueous parts washer, and a 240V outlet for proper compressed air, at some point...
Tunes and PC- Acurus 5-channel AV amp rescued from the curb, $99 Ebay find for the matching preamp, leftover PSB speakers when the wife decreed no speakers would be visible in the house....
08-23-2015, 06:49 PM
#64
Chronic Tool Dropper
Lifetime Rennlist
Member
Lifetime Rennlist
Member
This week I added a crossover pipe to carry the off-side hydraulic line for the Max-Jax lift. No way to hide it in the ceiling due to cathedral-sloped front section. so I used 1 1/4" PVC conduit to frame the garage door opening. Hydraulic unit is mounted next to the garage door at chest height (so compressor cabinet doors under the bench can open fully...), with the off-side plumbing now looping into a vertical section of PVC conduit to a formed bend and the horizontal section about 18" above the door frame. With the ceiling-huggng door arrangement, the door is still close to the wall all the way to the angled ceiling. On the other side of the garage door, the conduit extends down to within a foot of the floor, leaving a short bit of hose and a quick-connect fitting hanging there. The Maj-Jax-supplied hoses run to the lift columns, but tuck back under tool cabs until they get to the columns.
It's important to bleed any extension hoses added to the jack while they are still on the floor. Otherwise you'll end up with air bubbles in the high spots, pretty much impossible to get out once the hose is looped overhead. Post-project touch-up painting will cause the gray conduit to disappear... almost anyway.
I put in seven (7!) 4-tube HO surface-mount flourescent fixtures in the workbay, with LED 'cans' supplying walkaround light when the stadium lighting isn't needed. Walls are all painted light so there's adequate light for most projects. Surface mounted fixtures maintain the firecode rating in the ceiling, by the way, vs. flushmounts that would otherwise be cleaner looking.
There's a proliferation of LED panel-type lights available these days for video production, and some will likely be added for underhood worklighting. If there were a way to safely put some on lift arms for undercar work, I'd probably do that too. Maybe something with diffusers to eliminate the glare.
08-24-2015, 03:26 AM
#66
Cottage Industry Sponsor
Lifetime Rennlist
Member
Lifetime Rennlist
Member


But it would make sense to contact rennlist member and 928 owner "Andy E." directly to find out how big the damage would be...

Either way, great to see you have so much space for your hobby. I can fit two cars and a few shelves and cabinets, but that's it.
08-24-2015, 08:02 AM
#67
Burning Brakes

I haven't seen a dedicated garage thread for awhile.
I'm sure you guys have some awesome set ups, I'd love to see more of them.
I'll go first, to set the stage: Three beers to complete putting my tools away late last night and the 17 minute version of Cortez the Killer plays in the background.
Attachment 964321
I'm sure you guys have some awesome set ups, I'd love to see more of them.
I'll go first, to set the stage: Three beers to complete putting my tools away late last night and the 17 minute version of Cortez the Killer plays in the background.
Attachment 964321
 08-27-2015, 06:48 PM
#71
Instructor
Thursday night garage club
09-13-2015, 09:59 PM
#73
Chronic Tool Dropper
Lifetime Rennlist
Member
Lifetime Rennlist
Member
Spent some hours this week opening moving boxes that hold the plastic bins that will go in the new cabinets when they arrive in a few weeks. Looks like installation will be in the first week of October. In the meanwhile I found an airhose reel that I bought for my previous garage but never installed. The new garage has all the plastic airlines run in the walls and ceiling, so this 25' hose reel went up forward of the steel crossbeam above the front of the car-space. A 50' is on its way, should be here mid-week. That one goes on the front wall next to the garage door and above the wall-mounted pump for the Max-Jax. Mounting for it is painted and ready, but won't be drilled until the new reel is actually here. For those considering mounting a hose reel like these, take a minute to pull the hose off the reel before you try to lift the reel up to it's ceiling mounting position. Darn thing weights almost 50 lbs with all that hose on it, too much to juggle with one hahd while you try to find the nuts and washers in your pocket with your spare hand. Still need local coalescing filters & dessicant driers by each hose mounting before final connections are made.
Pictures when it's all together. Right now there's a big wall of plastic bins sitting over the air compressor/ shop-vac sound-deadened cabinet I built, waiting for new homes. Still a few heavier bins under a couple folding banquet tables that have done the support duties for the past year or so, while I hoarded my lunch and beer money for the cabinets.
Oh.... Charcoal frames with gun-metal grey doors, silver full pulls and shelves/interiors. Should go nicely with the two-tone porcelain tile floor. Two walls initially, -maybe- more later but I doubt it. There's a practical threshold somewhere near the point where the cost of the cabinets is more than some mysterious N times the replacement cost of all the junk (I meant things...) they are there to store and hide.
09-20-2015, 08:28 PM
#74
Rennlist Member
Join Date: Sep 2007
Location: Ridgecrest, California
Posts: 1,363
Likes: 0
Received 143 Likes
on
28 Posts
Hello All,
Thanks 77tony for pointing me to this thread for 928 Garage pictures. WOW! Really impressive garages shown here. I only hope someday my 928 garage will look half as nice as the ones shown here. Thanks all for sharing the inspirational pictures, tips, and really cool ideas - they are inspirational to me!
Since I've been off the forum for a while, I didn't realize this thread existed for posting 928 Garage pics and stories. As mentioned in the "Dwaynesgarage.com is down?" thread, I've been busy with a couple of construction jobs - one of which is the new Dwayne's Garage (actually, I just call it a shop but it's the future location where I'll be doing all my 928 work).
I was invited to post some pics of the progress so here goes...
This is a 3 year project and I just completed year 2. My goal was to build as much as possible by myself and see if I could do it and finish in 3 years. So far, so good. I have had to hire some help for a few jobs there were just too darned big for one person - I'll note those below.
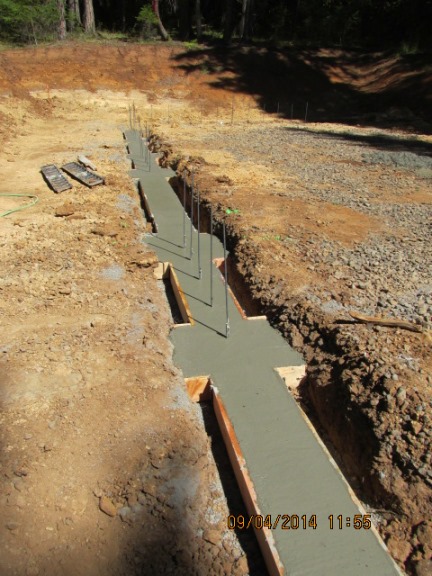
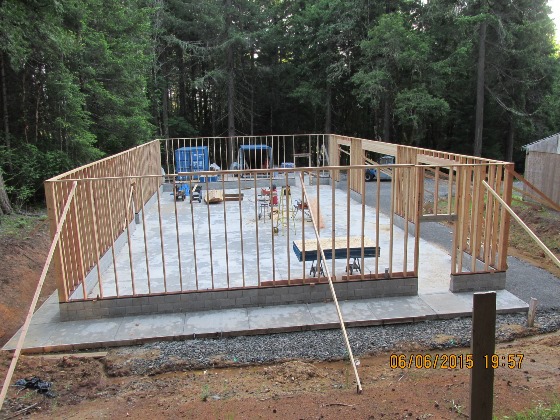
First, was excavation of the site. Building size is 40 x 70 feet so I hired a local heavy equipment operator to excavate part of the hillside for the site. I then did the excavation for the building footings, gravel and compaction, forms, rebar reinforcement, and concrete pour for the building footings. This was done last September.
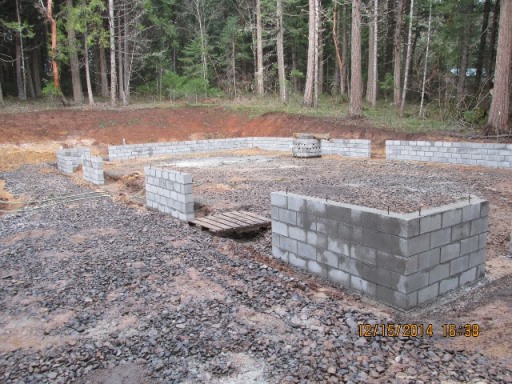
Next, came the foundation wall. I decided to build it out of concrete filled concrete blocks - 5 courses. About 640 blocks altogether. I did this work over a 2 week period of time in December 2014. I have to say after the 2nd day of laying blocks, my back was complaining big time. However, I discovered Bayer extra strength back and body aspirin and was able to complete the job with no pain. Could not have done it without the Bayer!
Next, I worked on the concrete slab and walkways in February this year. Placed the vapor barrier, gravel, compaction, rebar reinforcement, expansion joints, walkway forms, grading for runoff, etc. However, when it came to the actual pour and finish work on the concrete, had to hire a contractor - just too much for one person to handle. The slab and walk ways are 6" thick with #3 rebar reinforcement on 2' centers.
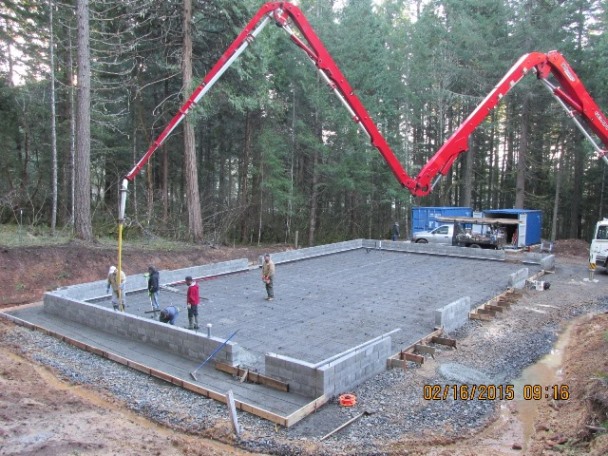
Here's pic when they were finished with the pour. I've been very happy with the quality of work.

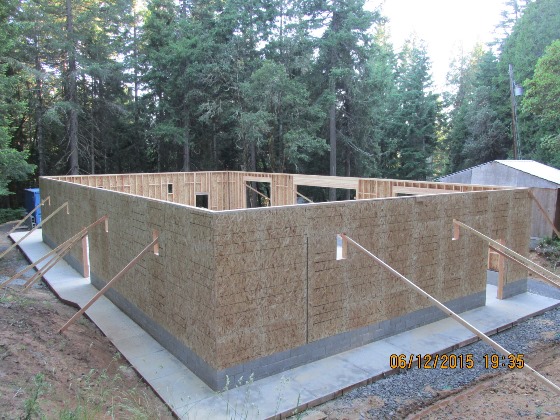
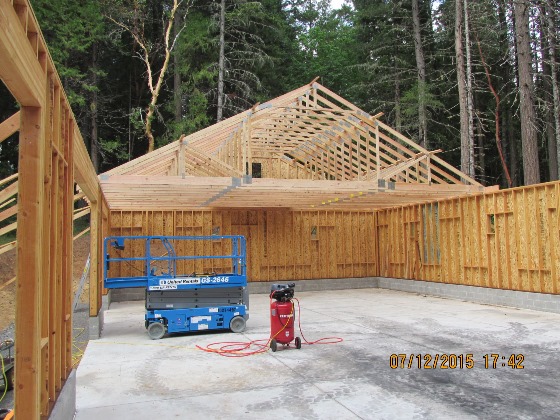
Next was framing in June. I did the framing myself with the help of this 5K 19-foot reach lift which came in real handy for installing the glulam beams over the 3 garage doors. Otherwise, the framing was done one stud at a time. Framing is 2x6 framing using 10-foot studs. Including the foundation wall, bottom and top plates and studs, floor to ceiling is 12 feet.
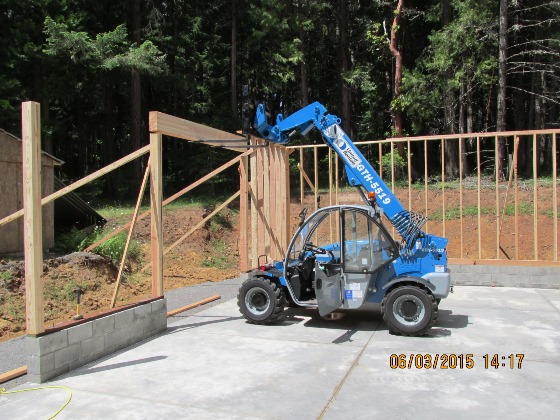
Three garage doors and three personnel doors. The 2 outer garage doors are 10 feet wide, 10 feet tall. The center garage door is 16 feet wide, 10 feet tall.
After framing was done, I installed the wall sheathing with rough openings for windows and wall bracing in preparation for truss installation.
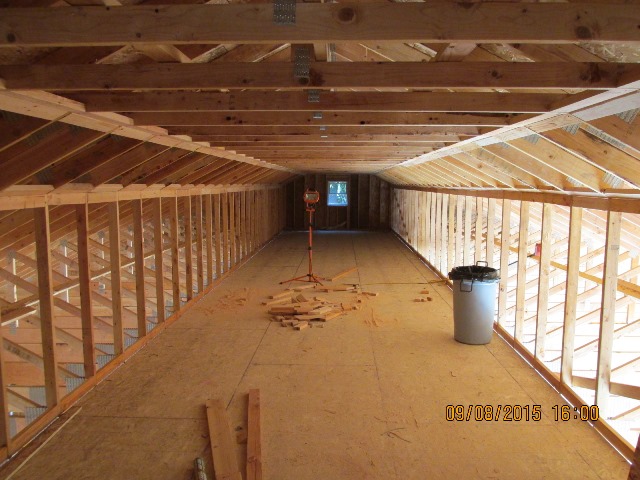
Next came truss installation. I had open span trusses with attic storage engineered, built and delivered to the site. I rented a 6K 42-foot reach lift with lift jib to lift the trusses in place.
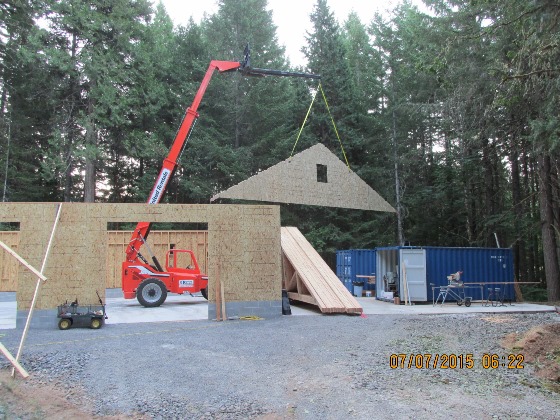
This was time consuming for one person because I had to get out of the reach lift frequently to steady the truss as I was putting it in place. The scissor lift was the other valuable piece of equipment that was essential to truss installation for one person.
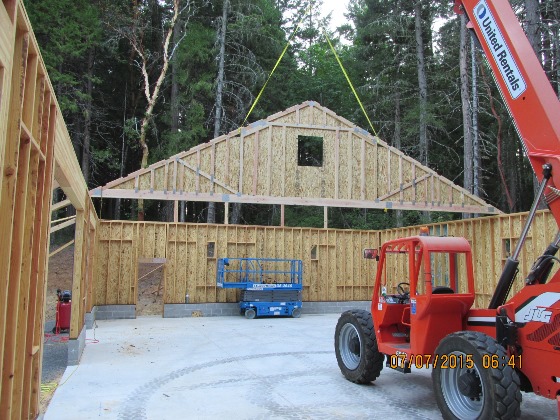
After several trusses were placed, I could see the roof line and attic space starting to take shape.
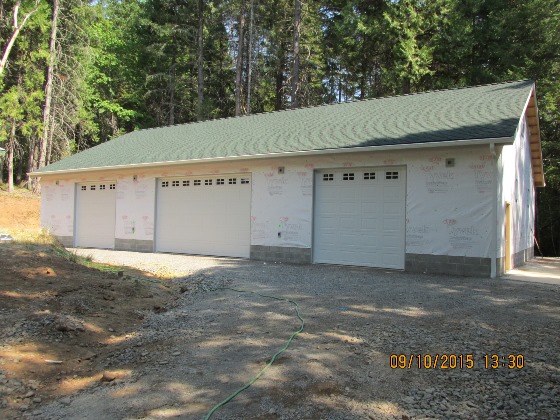
After the trusses were in place it was time to install the roof sheathing, fascia, and roofing. At this point, a local contractor freed up some time and I hired them to install the sheathing, fascia, and roofing. Trusses were time consuming and I was spending more time than expected so the contractor's availability to finish off the roofing tasks was welcomed and they did a great job - and fast too (about 5 times faster than I could have done it). Trusses and roofing was completed in July.

Quite a few things needed to be done this month so it was a busy visit in September. The company I purchased the garage doors from came out to install the garage doors and I hired a gutter contractor to install 74-foot seamless gutters along both eaves. In preparation and during this work, I set about renting a small excavator to dig two 60-foot trenches for the gutter runoff to go underground (2-feet) and down the hillside.
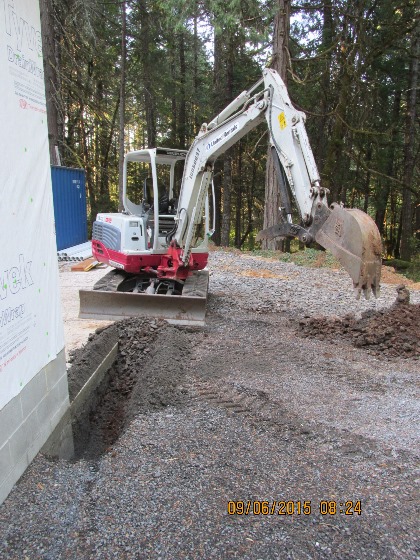
I installed the drain pipe and covered everything back up. My wife and I have been thinking about a water reclamation project with the runoff from the shop and house later.
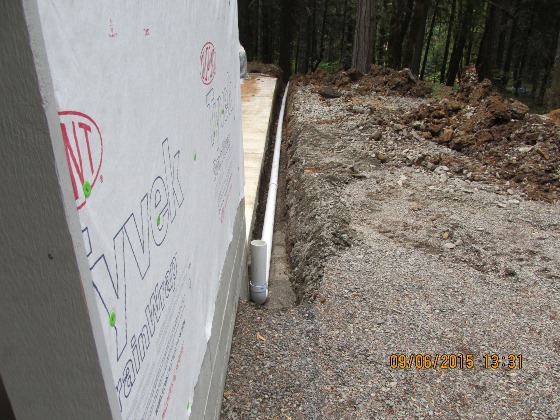
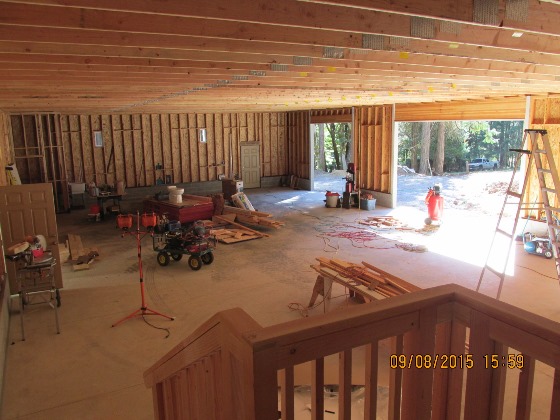
Next I excavated the waste drainage line from the new shop and the existing sewer line and connected both and covered everything back up. Additionally, I trenched the stubbed out water supply line to the new shop and connected it to the existing water supply. Now I have running water for the sink and toilet in the new shop. While I was working on these things, my local contractor completed the stairs to the upstairs storage/work area. Again, they did a great job on the stairs.
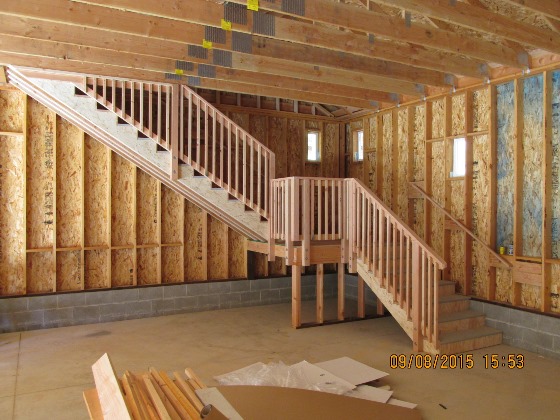
View of the shop floor from the stairs.
Continued.....
Thanks 77tony for pointing me to this thread for 928 Garage pictures. WOW! Really impressive garages shown here. I only hope someday my 928 garage will look half as nice as the ones shown here. Thanks all for sharing the inspirational pictures, tips, and really cool ideas - they are inspirational to me!
Since I've been off the forum for a while, I didn't realize this thread existed for posting 928 Garage pics and stories. As mentioned in the "Dwaynesgarage.com is down?" thread, I've been busy with a couple of construction jobs - one of which is the new Dwayne's Garage (actually, I just call it a shop but it's the future location where I'll be doing all my 928 work).
I was invited to post some pics of the progress so here goes...
This is a 3 year project and I just completed year 2. My goal was to build as much as possible by myself and see if I could do it and finish in 3 years. So far, so good. I have had to hire some help for a few jobs there were just too darned big for one person - I'll note those below.
First, was excavation of the site. Building size is 40 x 70 feet so I hired a local heavy equipment operator to excavate part of the hillside for the site. I then did the excavation for the building footings, gravel and compaction, forms, rebar reinforcement, and concrete pour for the building footings. This was done last September.
Next, came the foundation wall. I decided to build it out of concrete filled concrete blocks - 5 courses. About 640 blocks altogether. I did this work over a 2 week period of time in December 2014. I have to say after the 2nd day of laying blocks, my back was complaining big time. However, I discovered Bayer extra strength back and body aspirin and was able to complete the job with no pain. Could not have done it without the Bayer!
Next, I worked on the concrete slab and walkways in February this year. Placed the vapor barrier, gravel, compaction, rebar reinforcement, expansion joints, walkway forms, grading for runoff, etc. However, when it came to the actual pour and finish work on the concrete, had to hire a contractor - just too much for one person to handle. The slab and walk ways are 6" thick with #3 rebar reinforcement on 2' centers.
Here's pic when they were finished with the pour. I've been very happy with the quality of work.
Next was framing in June. I did the framing myself with the help of this 5K 19-foot reach lift which came in real handy for installing the glulam beams over the 3 garage doors. Otherwise, the framing was done one stud at a time. Framing is 2x6 framing using 10-foot studs. Including the foundation wall, bottom and top plates and studs, floor to ceiling is 12 feet.
Three garage doors and three personnel doors. The 2 outer garage doors are 10 feet wide, 10 feet tall. The center garage door is 16 feet wide, 10 feet tall.
After framing was done, I installed the wall sheathing with rough openings for windows and wall bracing in preparation for truss installation.
Next came truss installation. I had open span trusses with attic storage engineered, built and delivered to the site. I rented a 6K 42-foot reach lift with lift jib to lift the trusses in place.
This was time consuming for one person because I had to get out of the reach lift frequently to steady the truss as I was putting it in place. The scissor lift was the other valuable piece of equipment that was essential to truss installation for one person.
After several trusses were placed, I could see the roof line and attic space starting to take shape.
After the trusses were in place it was time to install the roof sheathing, fascia, and roofing. At this point, a local contractor freed up some time and I hired them to install the sheathing, fascia, and roofing. Trusses were time consuming and I was spending more time than expected so the contractor's availability to finish off the roofing tasks was welcomed and they did a great job - and fast too (about 5 times faster than I could have done it). Trusses and roofing was completed in July.
Quite a few things needed to be done this month so it was a busy visit in September. The company I purchased the garage doors from came out to install the garage doors and I hired a gutter contractor to install 74-foot seamless gutters along both eaves. In preparation and during this work, I set about renting a small excavator to dig two 60-foot trenches for the gutter runoff to go underground (2-feet) and down the hillside.
I installed the drain pipe and covered everything back up. My wife and I have been thinking about a water reclamation project with the runoff from the shop and house later.
Next I excavated the waste drainage line from the new shop and the existing sewer line and connected both and covered everything back up. Additionally, I trenched the stubbed out water supply line to the new shop and connected it to the existing water supply. Now I have running water for the sink and toilet in the new shop. While I was working on these things, my local contractor completed the stairs to the upstairs storage/work area. Again, they did a great job on the stairs.
View of the shop floor from the stairs.
Continued.....
Last edited by Dwayne; 09-20-2015 at 08:52 PM.
09-20-2015, 09:08 PM
#75
Rennlist Member
Join Date: Sep 2007
Location: Ridgecrest, California
Posts: 1,363
Likes: 0
Received 143 Likes
on
28 Posts
Upstairs, I planned to use the space for storage and clean workspace (e.g., 928 electronics, soldering, 928 interior work, etc.) and install a couple of benches. The space is 6'10" tall, 13 feet wide and 70 feet long.
The garage door folks finished their work and I was very happy with their work.
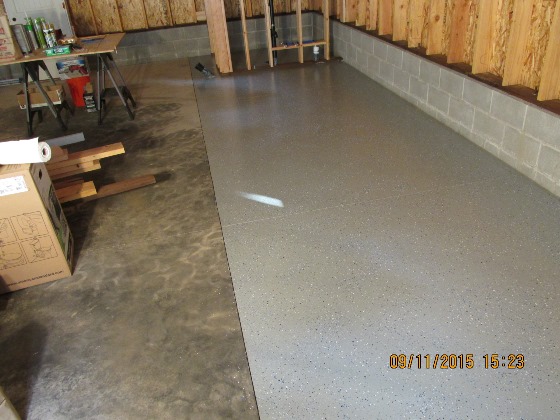
After the garage door folks and gutter folks left, I started applying the floor finish/treatment. I thought I'd go with the epoxy coat with paint chips for traction. Seemed like a good solution for when I spill 928 fluids on the floor for ease of clean up. The top of the picture is where the toilet room is and tub sink location.
Well, that's the progress so far. Still much to do in the next year. Siding will get installed next month and this winter I'll be working on installing the electrical. Next spring and summer will be insulation and drywall and hopefully finish everything up by next fall.
Still some things I need to work out are type and size of lighting fixtures, location of the 240V circuits and which bay to locate the car lift. I'm leaning toward the 4 post type of lift. I've got a lot of research to do on mapping out the electrical circuits before applying for the permit.
I'd also like to thank Wayne Strutt on this forum for his many help tips and suggestions when I started this construction project. He had some really good advice and nice written notes/instructions that were very helpful. Reading Dr. Bob's and Rob Edwards posts with tips recently has also been great. THANK YOU BOTH!
The garage door folks finished their work and I was very happy with their work.
After the garage door folks and gutter folks left, I started applying the floor finish/treatment. I thought I'd go with the epoxy coat with paint chips for traction. Seemed like a good solution for when I spill 928 fluids on the floor for ease of clean up. The top of the picture is where the toilet room is and tub sink location.
Well, that's the progress so far. Still much to do in the next year. Siding will get installed next month and this winter I'll be working on installing the electrical. Next spring and summer will be insulation and drywall and hopefully finish everything up by next fall.
Still some things I need to work out are type and size of lighting fixtures, location of the 240V circuits and which bay to locate the car lift. I'm leaning toward the 4 post type of lift. I've got a lot of research to do on mapping out the electrical circuits before applying for the permit.
I'd also like to thank Wayne Strutt on this forum for his many help tips and suggestions when I started this construction project. He had some really good advice and nice written notes/instructions that were very helpful. Reading Dr. Bob's and Rob Edwards posts with tips recently has also been great. THANK YOU BOTH!