When you click on links to various merchants on this site and make a purchase, this can result in this site earning a commission. Affiliate programs and affiliations include, but are not limited to, the eBay Partner Network.
Questions for the air conditioning experts (1983 car)
I've had my 1983 car since November and the air conditioning has never worked. As it's getting pretty darned hot, my focus is on getting it working.
Inside the car, it would appear that the ventilation controls work as they should (which is good news) apart from getting cold air. I checked the compressor and it doesn't engage.
I took the car to a local shop that will attempt to diagnose any a/c faults for free. After about a minute, the guy told me it's the old r12 set up and I needed to replace the fittings, change the dryer and clear the system so as to convert it to R134a. They couldn't do jack until then.
Searching for answers on this topic returns an overwhelming yield of results pointing in all different directions so I'm not sure how to proceed.
A very knowledgeable 928 guy has recommended 'Johnsen's Freeze 12 Quick Charge Kit' as it has done the trick for him.
You can R&R the whole system yourself for a reasonable amount, assuming your hoses and compressor are ok. Replace all the o-rings, replace the expansion valve, replace the receiver/dryer, get a set of gauges and vacuum pump and pull vacuum on it. If it holds, recharge with R-12.
That's the simple version. Devil is in the details of course, but all in all, not a hard job to do yourself.
And yes, R-12 is available, so why convert to R-134a?
I don't claim to be an expert but,
Your system most likely has a leak somewhere.
The first thing to do is pull a vacuum, if it holds vacuum, then you may get lucky with just a recharge for a short while, also you can do a leak test with a sniffer or dye to find the leak and go from there.
A 134 refit will cost as much as a r12 fix.
And yes, R-12 is available, so why convert to R-134a?
Originally Posted by OTR18WHEELER
A 134 refit will cost as much as a r12 fix.
I would prefer to remain in the r12 camp as from what I understand, it'll be colder on our cars as that's what they were made for. I haven't been able to find a shop that supports the r12 platform. Perhaps I'm looking wrong. Any recommendations?
Originally Posted by OTR18WHEELER
Your system most likely has a leak somewhere.
Do you think that's the case because my compressor doesn't engage?
It sounds like what the local shop was saying was you could save some bucks if you did an initial R134a conversion yourself, or they would have to do that for you; all of this to track down the source of the leaks.
The common leak points as pointed out are compressor seals, 2 hoses at compressor; this does not mean something else is not leaking.
If you purchased a retail can of anything to put in the car to test for leaks, you would still have to pull a vacuum and get a descent charge in the system to raise the pressures high enough. Once that is done the best leak test is an electronic leak detector; here again more equipment.
I understand your concern regarding the performance of R12 vs. R134a, however I've owned 3 sharks in my life (78,84s,89s4) and all blew ice cubes with R134a well up to 98F ambient. And, we have helped convert of 100's of clients cars as well. Note: Rear air models have issues.
Once you get the leaks fixed there are the common bugs and fixes for blend doors, fresh air actuator flaps, heater valves, control head relays, etc.
A very valuable source of info besides here and Pelican is Greg Nichols 928 Tips Site
and posts here by Doc Bob.
There are plenty of sources for parts as well, 928 Specialists, 928 Intl, and so on.
It sounds like what the local shop was saying was you could save some bucks if you did an initial R134a conversion yourself...
Yes, I thought I'd do some of the grunt work to save some cash. I've removed the compressor to change the o-rings and oil, I've also ordered a new receiver drier. I just a have a few questions; apologies for showing such a shameful lack of knowledge but it would be great to cut out sending the car to the shop.
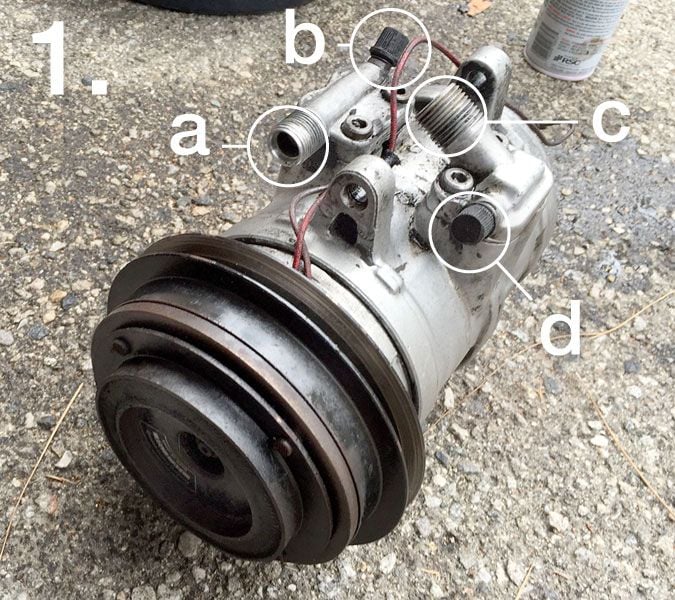
What are the points that I've highlighted here in these photographs? Which one (if any) is the low side service port? I've bought the necessary adapters and I'm trying to figure out where they go.
On the compressor, look at the manifold plates that bolt to the compressor body with those Allen-head bolts (techniclly, they are "socket-head capscrews") Replace the orings under those plates, plus the ones you highlighted.
The expansion valve is connected with four thread-on collars on your early car IIRC. Each has an o-ring seal.
At the other ends of those lines there are hose sections. There are o-rings at the ends of those hoses. The suction line, bigger of the two, goes to the compressor. The high-pressure line connects to the receiver-drier, sits in front of the radiator and condenser on the passenger side of US cars. The high-pressure line from the compressor connects to the condenser. Each of those connections, plus the drier connection to the compressor all have o-rings that need to be replaced.
The Schraeder valves and their caps need to be replaced. The seals in the Schreader valves get hard and don't seal well. The o-rings in the caps offer a secondary seal, and the old crispy ones won't do the job. My car has 5 or 6 Schreader valves, including the two basic charge ports, the two charge ports on the manifold plates at the compressor, and the safety switch and pressure transducer on the drier plumbing. Yours may be different. There are 4 port covers needed.
Rear air adds another bunch of things to reseal and inspect, including the lines to the rear evaporator and the rear expansion valve, the bulkhead fitting that pass through the floor under the passenger seat, a solenoid valve there with o-rings, plus o-rings where the rear air connects to the main lines at the firewall forward of the passenger's footwell.
Hi Dr Bob. Thanks for taking the time to reply. I appreciate it. Okay, let's unpack this ...
Originally Posted by dr bob
On the compressor, look at the manifold plates that bolt to the compressor body with those Allen-head bolts ... Replace the orings under those plates, plus the ones you highlighted.
Okay, got it.
Originally Posted by dr bob
The expansion valve is connected with four thread-on collars on your early car IIRC. Each has an o-ring seal.
okay, so this is what's under the plastic cover, attached to the bulkhead (not pictured).
Originally Posted by dr bob
At the other ends of those lines there are hose sections. There are o-rings at the ends of those hoses. The suction line, bigger of the two, goes to the compressor. The high-pressure line connects to the receiver-drier, sits in front of the radiator and condenser on the passenger side of US cars. The high-pressure line from the compressor connects to the condenser. Each of those connections, plus the drier connection to the compressor all have o-rings that need to be replaced.
Okay, got it. More o-rings.
Originally Posted by dr bob
The Schraeder valves and their caps need to be replaced. The seals in the Schreader valves get hard and don't seal well. The o-rings in the caps offer a secondary seal, and the old crispy ones won't do the job. My car has 5 or 6 Schreader valves, including the two basic charge ports, the two charge ports on the manifold plates at the compressor, and the safety switch and pressure transducer on the drier plumbing. Yours may be different. There are 4 port covers needed.
Right, this is where I'm confused; there are definitely two Schrader valves on the compressor. The kit I have only has two adapters. Apart from changing the o-rings, do I really need to change the schrader valves for the other (possibly) three or four? What are they for? and where are they? Have I highlighted them in my photographs?
Originally Posted by dr bob
Rear air adds another bunch of things to reseal and inspect, including the lines to the rear evaporator and the rear expansion valve, the bulkhead fitting that pass through the floor under the passenger seat, a solenoid valve there with o-rings, plus o-rings where the rear air connects to the main lines at the firewall forward of the passenger's footwell.
Thankfully, I don't have rear air so it sounds like I can avoid this headache.
Originally Posted by dr bob
... the two basic charge ports, the two charge ports on the manifold plates at the compressor
Is one of these the low side service port? Apologies again for the 'noob' nature of these questions.
Hi Dr Bob. Thanks for taking the time to reply. I appreciate it. Okay, let's unpack this ...
Originally Posted by dr bob
The Schraeder valves and their caps need to be replaced. The seals in the Schreader valves get hard and don't seal well. The o-rings in the caps offer a secondary seal, and the old crispy ones won't do the job. My car has 5 or 6 Schreader valves, including the two basic charge ports, the two charge ports on the manifold plates at the compressor, and the safety switch and pressure transducer on the drier plumbing. Yours may be different. There are 4 port covers needed.
Right, this is where I'm confused; there are definitely two Schrader valves on the compressor. The kit I have only has two adapters. Apart from changing the o-rings, do I really need to change the schrader valves for the other (possibly) three or four? What are they for? and where are they? Have I highlighted them in my photographs?
If you are using R-134a adapters for a conversion, the adapters install on the high- and low-side charge ports in the engine bay. The adapters have new Schraeder valves in them. Remove and discard the Schraeder valves from the existing ports where these adapters will be installed.
The charge ports on the compressor also have Schraeder valves in them. Believe it or not, Porsche did not manufacture a compressor for the car, but instead depends on other compressor manufacturers for the parts. Since most of the cars that use these compressors have them mounted somewhere higher on the engine, Denso thoughtfully included charge ports intergrated into the manifold plates. There are Schraeder valves in those two ports, sealed with black nitrile o-rings. Thanks to all the heat under the exhaust where the compressor is mounted, compounded by the effects of age, those little internal seals are crispy and often broken. The caps over them have o-rings, but they are similar in age and heat exposure to the ones in the ports, so they should be replaced too. It's important to note that while the Schrader valves are the same configuration as a common tire valve, the o-ring material for the AC parts is specific to AC service. A good local auto parts store will have the AC versions of these valves, and a tool to change them if you don't have one.
On my S4, there's a pressure safety switch, and a pressure transducer for fan speed control. Both are mounted on what look and feel like charge ports as part of the connecting tubing where the drier fits in front of the condenser. The ports include Schraeder valves to make it possible to service or replace the switch or transducer without losing the refrigerant charge. The Schraeder valves in those ports must be replaced as part of the resealing project. While it's likely that those parts won't be serviced regularly, it's better to just do it now. The valves are cheap, your system will be open anyway, and it takes just a few seconds to spin replacement valves into those ports. I used the safety-switch port to connect my vacuum pump during the R-134a conversion almost 20 years ago when I bought the car, so I could evacuate the whole charging manifold and the hose to the refrigerant tank, and also to let me draw oil into the high-side port using vacuum.
Originally Posted by decampos
Is one of these the low side service port? Apologies again for the 'noob' nature of these questions.
The low-side service port is on the larger suction line to the compressor, at the connection on the right side fender wall below and to the rear of the 14-pin connector and the jump post. If you are adding R-134a conversion adapters to these ports, look carefully at the accessibility challenge that this port presents. I did, and decided that a right-angle adapter here would make life easier in the future. The R-134a hose connections are mini cam-lock type connectors that require the hose to be lined up perfectly with the port adapter. Look at the end of the blue suction-side hose on your charging manifold and gauge set, and select the right adapter that will let you access the port with the hoses you have.
For completeness, the high-side port is part of the plumbing at the drier where it connects to the condenser. This port is used for monitoring pressures during service, and is also a safe place to charge the system using liquid while the engine is cold and stopped. If you aren't thoroughly familiar with the system dynamics, don't consider charging through this port at all. The red valve on your manifold should be open while evacuating through the service valve manifold but otherwise stays closed.
I can't overstress the need for complete white-glove surgical cleanliness when working on the AC system. Any tiny bit of debris that makes it into the system will damage the compressor, can interfere with expansion valve operation, etc. If there's --anything-- on a seal face where an o-ring sits, it will interfere with the sealing and you'll have a leak. Don't skimp or try to shortcut when it comes to the tools. Remember to lubricate every o-ring with refrigerant oil as you install them, and use care to tighten the fittings correctly. There should not be excessive loading on the hose connections as you assemble them, so they can stay square as you snug them up. The o-rings are slighly compressed in service but aren't squished. Avoid twisting an already-tightened connection, as this will tear the sealing surface of the o-ring inside and cause leaks. Over-tightening will often distort an o-ring to the point where it no longer seals completely, so observe the WSM torque requirements on all connections.
There are more than a few books and online tutorials on AC service. Regardless, I still recommend a good old-school guide like the Chiltons AC service manual. It's not 928-specific, but gives a tremendous amount of basic guidance on how the system works, service techniques, user safety, tools and equipment needed, and troubleshooting guidance. The only thing that's exotic about the 928 AC system is the car it's mounted in. Otherwise, the parts and pieces perform the same functions as they do in other cars. So gaining that basic book knowledge will help you with virtually any car AC system.
Photo 2 is low side service port for adding R-12. Don't forget to add any needed oil to compressor directly before putting on new O rings and sealing it up.
Photo 2 is low side service port for adding R-12. Don't forget to add any needed oil to compressor directly before putting on new O rings and sealing it up.
^^^ +++
Drain the old oil out of the compressor, then fill/drain a few times with the new oil before adding the compressor's part of the oil charge back in prior to installation. Once installed and hoses attached, turn the compressor through a dozen revolutions by hand before putting the belt back on. This will clear any filled cylinders in the compressor and avoid the infant mortality issues associated with trying to compress the oil in the cylinders.
The rest of the oil is easily drawn in when you have some vacuum in the system. I put the new oil in a measuring cup, then just dip the charge/suction/center hose into the oil and crack the high-side valve on the gauge manifold. That slurps the oil in just ahead of the drier, rather than dumping it right into the compressor suction via the low-side charge port. After the oil is in, you can resume vacuuming the system down and continue with the restoration process.
If you are converting to R-134a, be sure to use POE (PolyOlEster) refrigerant oil, and get as much of the old oil out as possible first. POE is much better at coexisting with mineral oil (R-12 oil) in a converted system; PAG oil makes a jelly instead in converted systems unless they are thoroughly flushed, not good for anything.
----
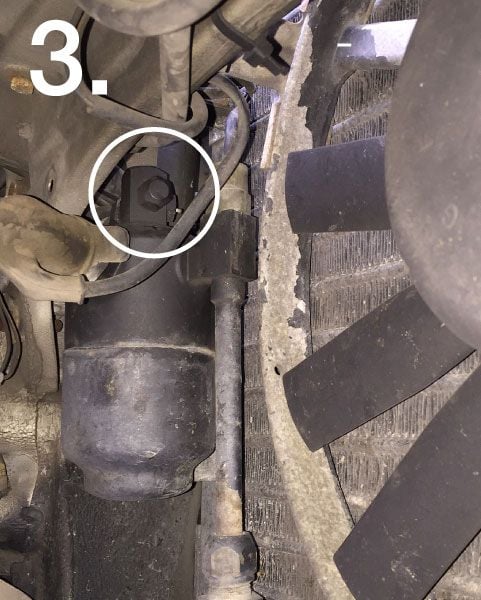
Your photo 3 shows the high-side charge port at the drier manifold. Photo 2, as Kevin shares, is the low-side service port.
On your compressor picture, 1a is the high-pressure discharge port, 1b is the high-side charge port that is not accessed once the compressor is installed. 1c is the low pressure or suction-side hose connection from the evaportor via the expansion valve. 1d is the low-side charge port. Both 1b and 1d need to have the Schraeder valves replaced along with new caps or at least new green AC o-rings in the caps. The two manifold plates that hold the hose connections and charge ports each has two o-rings underneath. Use an impact driver to get those allen bolts out, for sure use a torque wrench (16 lbs/ft) when you put them back on. Too much will break the manifold plate.
Thanks for the replies guys and particularly for helping to annotate those photographs. A picture paints a thousand words and all. Might be a useful thread for anyone else going down this road.
Slow progress as today I burned a lot of time and energy simply reinstalling the compressor. That was really no fun at all. I used PAG oil as that's what I had already bought as advised in the general chatter on this forum. I would have instead used POE as per your recommendation had I have known your concern with PAG. We'll see if there are any problems. Wasn't sure exactly how much oil to use so I guestimated it based on how much mineral oil I drained out of it.
I'll post some progress if it's likely to be useful.

 06-28-2015, 01:56 AM