When you click on links to various merchants on this site and make a purchase, this can result in this site earning a commission. Affiliate programs and affiliations include, but are not limited to, the eBay Partner Network.
Last weekend I was on a mountain tour with some other Porsche owners from work when I lost power steering in the middle of the trip. A short while later we stopped and I saw that the reservoir was empty. About 700mL of ATF restored power steering for about 10 minutes, then it was gone again. So as not to damage (at least any further) the pump, I cut the PS belt and finished the day with Armstrong steering.
This evening I pulled the undertrays, expecting to find a hose leaking out... I didn't find a leaking hose, but I did find that the right side rack boot was pretty wet. My current theory is that the seals are blown in the rack and the fluid is all squirting out that right side.
So, two questions:
1. How likely is this theory?
2. What's involved, and how successful am I likely to be, installing a seal kit in the rack? Or should I swap it for a rebuilt instead?
Recently happened to me. PS bled to death in my driveway.
One of the collars that tightens the end caps to the main body had loosened. In my case caused I think by v.e.r.y worn rack mount bushes allowing the rack ends to be pushed/rotated in different directions depending on the loads on each front wheel.
Tightened the collars with a C-spanner. Ta daaa.
Naturally my analytical mind was straight on to this cause/fix when halfway through fitting the 'good' rack from my S4.
Try tightening those collars on your rack before doing anything expensive.
Last edited by UpFixenDerPorsche; 09-30-2014 at 11:20 PM.
Here is my experience:
There are some posts that say rebuilding your own rack is not too hard. I've done most common repairs on my 928 so I felt comfortable with it.
Roger has the kit with all the parts and I bought it.
I stared at the kit on my bench for weeks. I read all the documentation I could find, and reviewed all the threads. I stared at the kit more.
I called 928 Intl and ordered a rebuilt rack from them and installed that rebuilt rack. It came down to hassle vs. cost, and their rebuilt racks are cheap enough that it just wasn't worth the hassle. And I know they do a good job, vs. my possibly ham fisted first attempt.
At this years Sharks on Ice, Colin did a demonstration of a steering rack rebuild. It looked really easy when he was doing it, however, he had already cleaned all the parts and knew all the tricks. Like, covering a new seal with paper before sliding the body over the shaft or it will slice the seal cleanly. Or making sure the parts and space is hospital clean as even a little bit of dirt can destroy the new seals.
I have installed rebuilt racks on two of my cars, one from 928 international and one from Roger. Both have worked great.
Agreed, I did one over two weekends, one to dissemble and clean and one reassembly, and after all the time and work that it took I was still hoping it didn't leak and it worked correctly.
Get a Rebuilt Rack from one of our trusted suppliers.
try calling around for drive shaft or CV joint repair shops. Some of these do rebuilds on driveshafts, CV joints, steering racks etc. Most will do these racks and most have ZF replacement parts and can rebuild the rack. Then you can remove it, and then replace it yourself
I stock rebuilt 91 to 95 rebuilt racks which are hard to find. Different to the earlier racks.
Every time I send out a bag of seals it reinforces my own conclusion to only use rebuilt racks and not try to rebuild them myself 8>).
Colin made it look easy but he has already left the learning curve way behind.
__________________
Does it have the "Do It Yourself" manual transmission, or the superior "Fully Equipped by Porsche" Automatic Transmission? George Layton March 2014
928 Owners are ".....a secret sect of quietly assured Porsche pragmatists who in near anonymity appreciate the prodigious, easy going prowess of the 928."
Dump a bottle of Lucas Power Steering Stop Leak in it and see what happens.
My MaxJax lift has has a bit of seepage since new. I originally thought it was fittings leaking, and by the time I got around to taking everything apart, it was out of warranty. It wasn't a fitting, rather a cylinder seal. I suspect that Gabe would have swapped a new cylinder, but I'd still get to pay shipping. A couple bottle of the Lucas stuff went into the reservoir as I was installing the lift in the new garage. After a few cycles and a few days, no more seepage.
'Seepage' is a British car owner's word for 'leaks'. Around $10/bottle at Walmart.
Thanks for the suggestions and feedback. I'm stubborn and like to fix things, so I'm still going to attempt the seal replacement myself. Between welders, angle grinders, bandsaw, and a 7x14 lathe, I think I should have good options to fabricate special tools or internal shims/bushings if needed.
Doc, I don't think any leak sealer is going to help here. I don't much like those kinds of solutions anyway, but here we're talking about losing most of a quart in a few minutes.... quite a bit more than seepage.
I have rebuilt my rack successfully about 10 years ago.
It is not rocket science and if you have a clean space to work and patience, you shouldn't have any problems.
IMO it is best to take out the seals/bushings one by one, meticulously noting the orientation and then matching them *exactly* with the correct replacement part. There are many seals in the kit which look very similar or have a small chamfer on one side.
I found that disassembling the rack housing was the most difficult job. Getting the correct size hook-wrench is a good idea to open the collars.
Once apart, press out the mounts and the brute-force part of the work is done.
Working on the internals is a couple of hours of relatively easy work and can actually be fun if you get into the "flow".
Kurt
____
90 S4 satin black metallic
928 OC Charter Member
1. Removed the rack from the car last Saturday. That went pretty easily. Cut down an extra 17mm socket to have a thin socket that could be used to hold the top sides of the rack bolts. The main hangup was the PS tie rod end, which didn't come out easily - took heat and a lot of banging - heat and the tie rod puller wasn't sufficient. Good thing I ordered new tie rods anyway.
2. Mistake one: trying to use the Allen holes in the banjo bolts to remove them. Two of them stripped rather than loosening (the Allen holes, not the threads). A pair of big Vise Grips removed them easily. I'd recommend just going with the big Vise Grips.
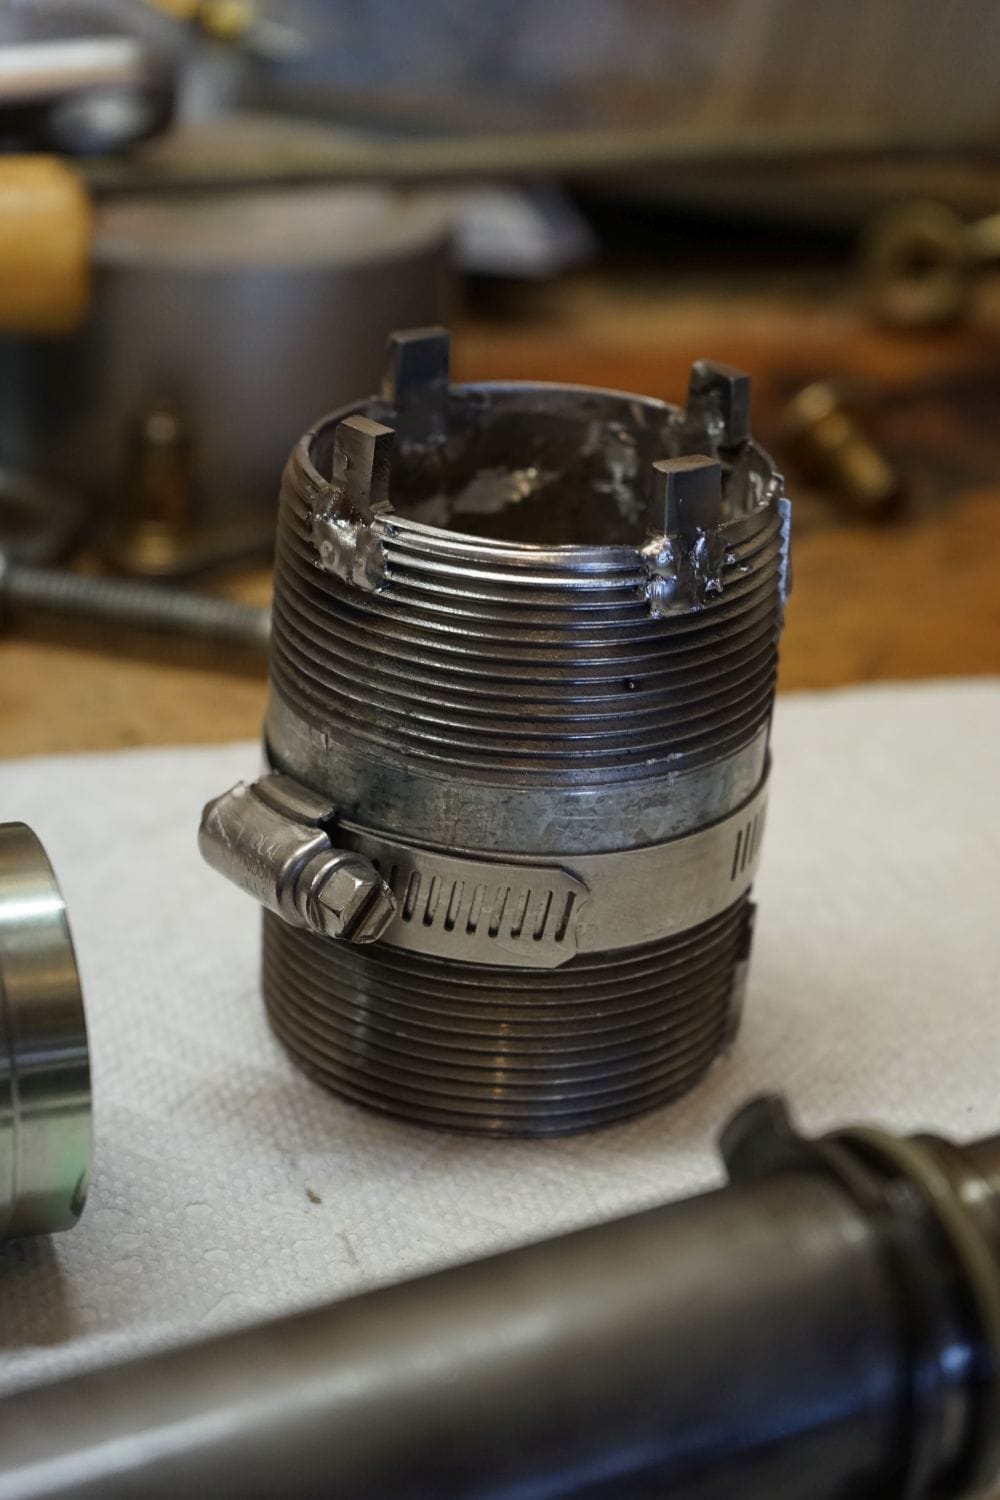
3. Nobody in my town stocks hook wrenches / hook spanners. Well, actually, Whisler Bearing does, but not the size needed. I also checked with Sears, Napa, Carquest, and a specialty place called Shop Tools.
3. I welded a one tooth hook wrench based on outlines I saw online. It wouldn't put anywhere near enough torque to the lock rings... basically, it could wiggle one ring back and forth a bit, but not do anything at all for the other.
4. Mistake two: some posts about rebuilding these racks said that, if you loosened the lock ring with a hammer and punch a bit, it would clear the peens that had been put into the metal of the housing (to keep them from loosening) and would then easily come out the rest of the way. I gave into temptation and tried a hammer and punch. For one ring this worked, though it took about three full turns before the ring would move at all easily. For the other ring, any progress in loosening required major application of force. Eventually I could see that the punch was doing too much damage to the flats of the ring and I was worried that I'd end up completely stuck with a ring that couldn't be removed at all.
5. Added a second, and eventually a third, tooth to my hook wrench, and made the teeth wider, so they would sit deeper into the slots... still couldn't apply enough torque before it slipped off the ring.
6. Finally got back to it tonight. I made a new tool by cutting a piece of 2" galvanized pipe in half lengthwise and welding four teeth to the end of it. When the two pieces are placed around the rack tube, the teeth fit into the slots of the ring, and I can then apply a hose clamp to hold the halves together. From there, I can wrap my chain wrench around the pipe halves and turn the ring. This worked well, and had the other ring out in a few minutes. It should work quite nicely when putting things back together as well.
So, I'm happy to have gotten past the sticking point. I'll get into the seal replacement maybe tomorrow, maybe this weekend, or maybe when I'm back from a trip next week....
OK. I was out of town for a bit, now back and have time to work on this again. I have the rack fully disassembled and am beginning to swap the seals. One thing I noticed is that that there seems to be grease on the teeth of the rack. Do the rack and the pinion gear get greased? If so, any recommendations on a good grease to use?
Well, I went with Lucas Red and Tacky grease for the pinion... We'll see how that goes.
Not done yet, but just a couple of comments in case others try this:
1. An assortment of sockets and extensions works well for pressing out and pressing in most of the seals
2. For the seal that sits under the pinion (about half-way down its body), I used a long toggle bolt so that the toggle part could be pushed through the seal and spring open and pull the seal out when the screw was tightened against a bracket across the mouth of the opening where the pinion goes in. This worked well.
3. The blue Teflon seals that go around the pinion valve body are easy to stretch or damage. I am not sure I'll be able to successfully reassemble the rack since I stretched one of those seals a bit too much getting it into place, and it got pinched a bit when reinstalling the pinion. The old seals are a bit thinner than the new ones, so I don't think it would be a good idea to reuse one of the old ones. From what I can tell, I would have been better off installing only the bottom seal from the bottom, and the three others from the top... I did the two bottom ones from the bottom, and it was the third from the top one that got too stretched. Right now I have moved the stretched one to the top and put a clamp around it to force it into the groove. I'm hoping that this will reform it enough to sit correctly... we'll see

 09-30-2014, 12:46 AM


 George Layton March 2014