Notices
928 Forum 1978-1995
Sponsored by:
Sponsored by: 928 Specialists

Started intake refresh today. (pics)

Thread Tools
 
Search this Thread
 
Old 03-02-2014, 02:06 PM
  #16  
granprixweiss928
Three Wheelin'
Thread Starter
 
granprixweiss928's Avatar
 
Join Date: Jun 2013
Location: Norcal
Posts: 1,390
Received 25 Likes on 14 Posts
Default

did 12 hour day yesterday. cleaned off the old gaskets, cleaned the heads, cleaned the spider parts ( 4 times (and a run thru the dishwasher!), and drained coolant ( again) and removed the water bridge, cleaned and replaced the 4 gaskets on the ends of the heads. the ones at the back were original and the block off plate was rusted. orginally I was not going to pull the bridge but glad I did as the round seal into the block was nasty. all gooey and sticky. looked like the seals at the heads were leaking too.

cleaned the throttle body:


the heads cleaned up:


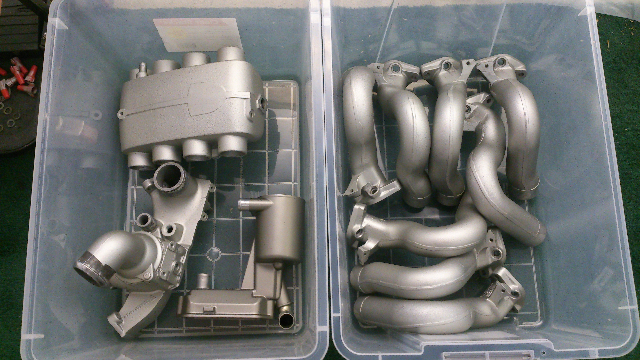
spider parts pre final clean with Eastwoods Pre and steel wool


parts all cleaned and ready for coat of eastwood aluma blast. decided to do the water bridge too and the oil housing.

Old 03-03-2014, 01:01 PM
  #17  
granprixweiss928
Three Wheelin'
Thread Starter
 
granprixweiss928's Avatar
 
Join Date: Jun 2013
Location: Norcal
Posts: 1,390
Received 25 Likes on 14 Posts
Default

Here are the intake parts post 3 coats of paint. I used red wire nuts to keep the paint out of the injector ports.

Name:  ForumRunner_20140303_090034.png
Views: 620
Size:  443.3 KB
Old 03-05-2014, 02:46 AM
  #18  
granprixweiss928
Three Wheelin'
Thread Starter
 
granprixweiss928's Avatar
 
Join Date: Jun 2013
Location: Norcal
Posts: 1,390
Received 25 Likes on 14 Posts
Default

Yesterdays progress. Water bridge reinstalled. Oil separator reinstalled. Throttle and lower housing in place. Air injection connected.

Name:  ForumRunner_20140304_224445.png
Views: 652
Size:  474.3 KB
Old 03-05-2014, 03:00 AM
  #19  
granprixweiss928
Three Wheelin'
Thread Starter
 
granprixweiss928's Avatar
 
Join Date: Jun 2013
Location: Norcal
Posts: 1,390
Received 25 Likes on 14 Posts
Default

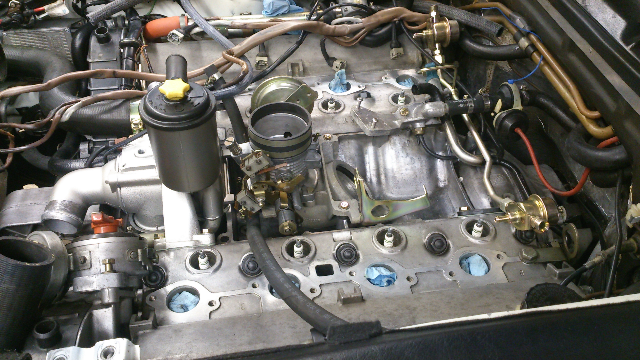
And today's progress. All new vacuum line. Fuel and regulators rough in. Wiring. Doing as much as I can before pipes get in the way. Tomorrow pipes and injectors.

Name:  ForumRunner_20140304_225809.png
Views: 592
Size:  462.5 KB
Old 03-05-2014, 08:25 AM
  #20  
CJ8 2 928
Instructor
 
CJ8 2 928's Avatar
 
Join Date: Oct 2008
Location: Arlington Tx.
Posts: 233
Likes: 0
Received 0 Likes on 0 Posts
Default

looking very very good
Old 03-05-2014, 10:17 AM
  #21  
j.kenzie@sbcglobal.net
Rennlist Member
 
j.kenzie@sbcglobal.net's Avatar
 
Join Date: Jun 2005
Location: Park Ridge, IL (near Chicago)
Posts: 3,243
Received 42 Likes on 35 Posts
Default

Very nice. Looks great! I enjoy watching your project, and thanks for posting.
Dave
Old 03-05-2014, 11:16 PM
  #22  
jmartins
Instructor
 
jmartins's Avatar
 
Join Date: May 2011
Location: São Paulo - SP - Brazil
Posts: 211
Likes: 0
Received 0 Likes on 0 Posts
Default

Very nice! This inspired me to do the same! Subscribed.
Old 03-05-2014, 11:23 PM
  #23  
Ed Scherer
Addict
Rennlist Member
 
Ed Scherer's Avatar
 
Join Date: Jul 2001
Location: Shawnee, KS, USA
Posts: 7,330
Received 108 Likes on 62 Posts
Default

Nice work! Damn satisfying, as well. Kind of nice just to watch without doing the work, too. BTDT
Old 03-06-2014, 01:26 PM
  #24  
granprixweiss928
Three Wheelin'
Thread Starter
 
granprixweiss928's Avatar
 
Join Date: Jun 2013
Location: Norcal
Posts: 1,390
Received 25 Likes on 14 Posts
Default

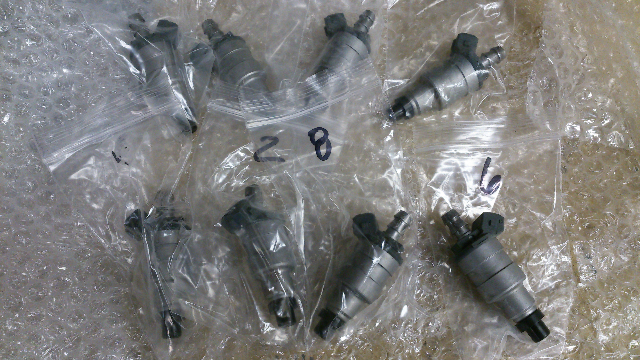
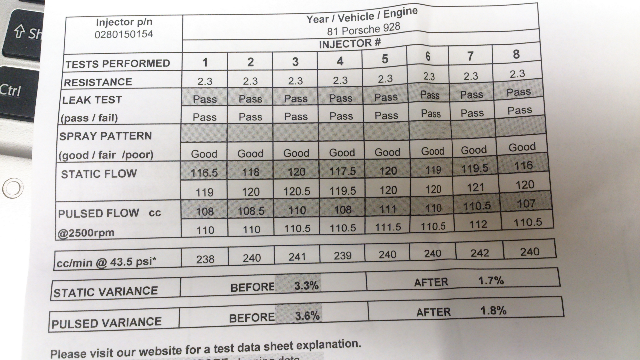
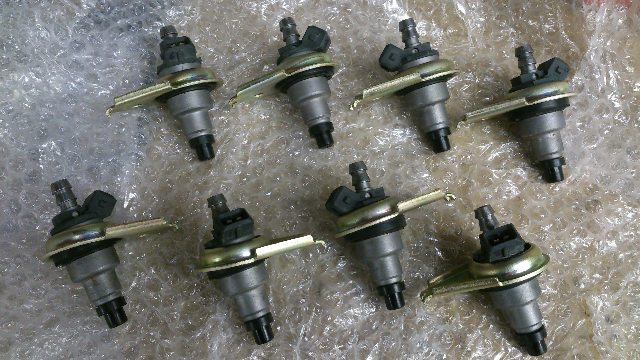
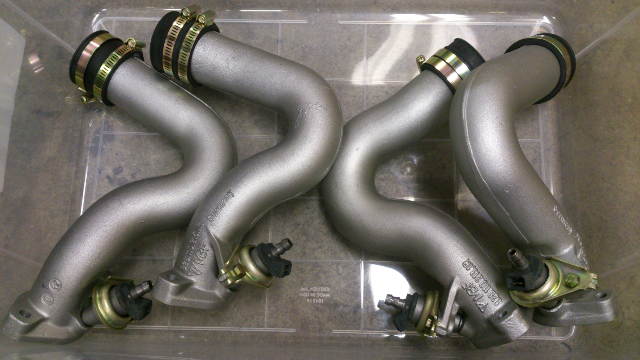
Got my injectors back from witch hunter last night and then installed them into the tubes, and the tubes onto the engine. Tomorrow new fuel lines from Roger arrive for the injectors and I'll install the fuel rails.


Name:  ForumRunner_20140306_092309.png
Views: 524
Size:  467.9 KB


Name:  ForumRunner_20140306_092325.png
Views: 489
Size:  394.8 KB


Name:  ForumRunner_20140306_092343.png
Views: 502
Size:  497.9 KB


Name:  ForumRunner_20140306_092404.png
Views: 499
Size:  413.4 KB


Name:  ForumRunner_20140306_092432.png
Views: 537
Size:  461.8 KB


Name:  ForumRunner_20140306_092447.png
Views: 542
Size:  435.7 KB
Old 03-08-2014, 02:40 AM
  #25  
granprixweiss928
Three Wheelin'
Thread Starter
 
granprixweiss928's Avatar
 
Join Date: Jun 2013
Location: Norcal
Posts: 1,390
Received 25 Likes on 14 Posts
Default

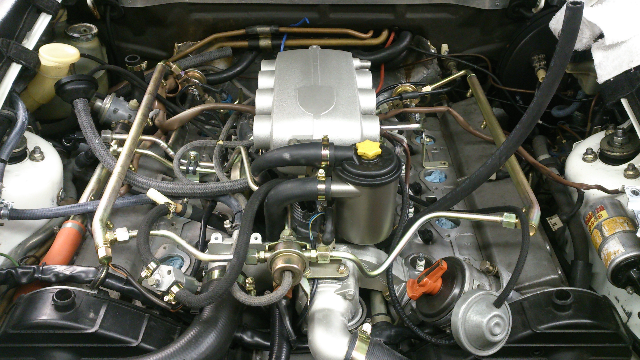
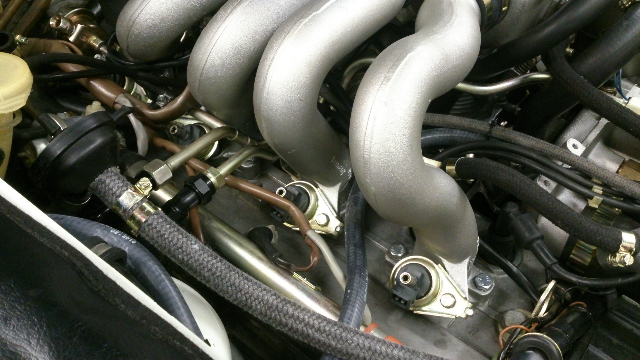
Installed the fuel rails today and completed my project. Did a test first with fuel pump bridged to check for leaks- none. started on first try!

DONE!!!!

Old 03-08-2014, 03:57 AM
  #26  
granprixweiss928
Three Wheelin'
Thread Starter
 
granprixweiss928's Avatar
 
Join Date: Jun 2013
Location: Norcal
Posts: 1,390
Received 25 Likes on 14 Posts
Default

some more shots.


Old 03-08-2014, 07:57 AM
  #27  
NoVector
Rennlist Member
 
NoVector's Avatar
 
Join Date: Oct 2004
Location: K-town, Germany
Posts: 2,868
Likes: 0
Received 254 Likes on 136 Posts
Default

Very very nice - sure to get that "wow" look when you pop your hood at car events. Great job restoring the coolest intake ever made
Old 03-08-2014, 08:53 AM
  #28  
Ducman82
 
Ducman82's Avatar
 
Join Date: Nov 2009
Location: Marysville WA
Posts: 6,981
Received 18 Likes on 11 Posts
Default

Very pretty! Well done
Old 03-08-2014, 09:14 AM
  #29  
69gaugeman
Nordschleife Master
 
69gaugeman's Avatar
 
Join Date: Dec 2004
Location: Guelph, Ontario, Canada
Posts: 6,164
Likes: 0
Received 5 Likes on 5 Posts
Default

Very nice. Seeing as you painted the spider, the only thing I would have done additionally is to sand the casting seams on the runners. Why they didn't do a better job initially puzzles me.
Old 03-08-2014, 12:30 PM
  #30  
Chuck Schreiber
Addict
Rennlist Member

 
Chuck Schreiber's Avatar
 
Join Date: Aug 2002
Location: Plano, Tx.
Posts: 3,453
Received 124 Likes on 81 Posts
Default

Holy S@@T, that looks great!!!


Quick Reply: Started intake refresh today. (pics)


All times are GMT -3. The time now is 04:13 AM.