
A 86.5 Intake Refresh Picture Thread from a first-timer
 08-29-2013, 05:56 PM
#16
Burning Brakes
Thread Starter
Mike and Jeff, I will follow your advice.
I got a set of intake covers from 928 Specialists. They fit perfectly over the intake ports, and now nothing will get in there. I highly recommend that if you are doing this for the first time, you have these covers ready as you are pulling the intake runners off. Before fitting the covers I decided to triple check and I vacuumed the intake ports one more time. When I checked to see if there was anything in my shop vac I found two small rubber chunks of spark plug wire insulation. I don't know if the shop vac picked them up in the intake ports or maybe afterwards. Makes me very nervous�
The "bonded rubber buffers" on which the air guide throttle body sit: one of them is good:
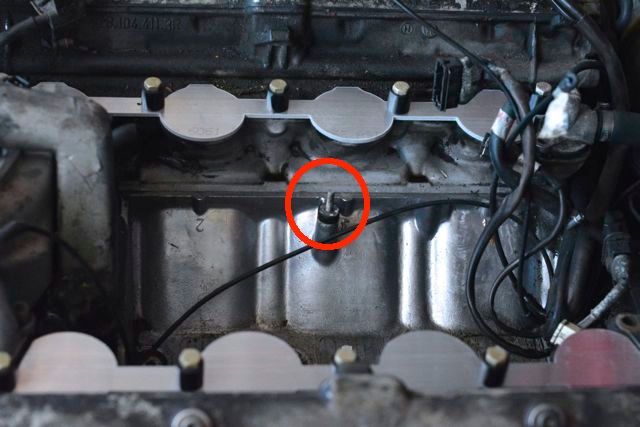
And one of them is not good:
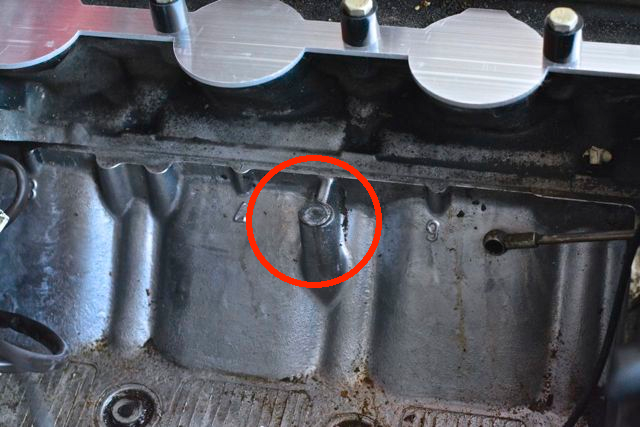
I have no clue how I'm going to take it out. There is no cross section so I can't get a vise-grip, wrench, anything on it. I am worried about drilling because the part is so small. I've searched Rennlist and nobody has documented how they've removed these broken bits.
I got a set of intake covers from 928 Specialists. They fit perfectly over the intake ports, and now nothing will get in there. I highly recommend that if you are doing this for the first time, you have these covers ready as you are pulling the intake runners off. Before fitting the covers I decided to triple check and I vacuumed the intake ports one more time. When I checked to see if there was anything in my shop vac I found two small rubber chunks of spark plug wire insulation. I don't know if the shop vac picked them up in the intake ports or maybe afterwards. Makes me very nervous�
The "bonded rubber buffers" on which the air guide throttle body sit: one of them is good:
And one of them is not good:
I have no clue how I'm going to take it out. There is no cross section so I can't get a vise-grip, wrench, anything on it. I am worried about drilling because the part is so small. I've searched Rennlist and nobody has documented how they've removed these broken bits.

 08-29-2013, 06:18 PM
#18
Nordschleife Master
Take a chisel and tap around the outside in an unscrewing manner, or go to sears and get their broken bolt extractors which are female (they go over the broken part)
08-29-2013, 09:25 PM
#19
Burning Brakes
Thread Starter
08-30-2013, 02:05 AM
#20
Burning Brakes
Thread Starter
Following Mike Frye's instructions, I tested the throttle body for leaks. Sure enough, the throttle position sensor (TPS) side of the throttle body axle had an air leak.
I decided to disassemble the throttle body to get at the two O-rings that were leaking.
Here's where my inexperience reared its head. I did not realize that the ends of the throttle plate screw had been flattened, or staked, until I started unscrewing. I didn't read about this in the other throttle body write-ups, but I should have checked. It is a little clearer in the right screw below.
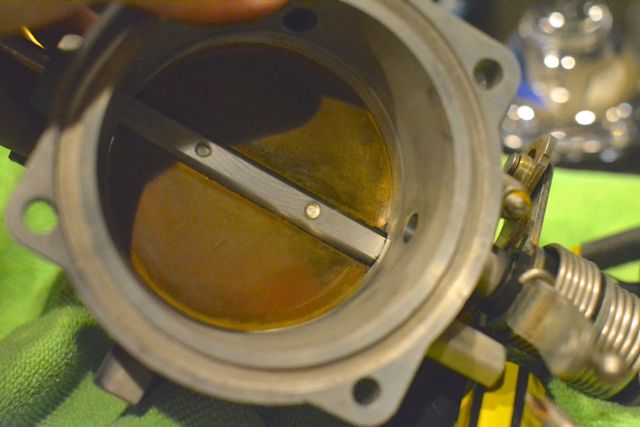
The staked screw slightly damaged the rod that holds the throttle plate. My screwdriver destroyed both screws.
I think I'm going to have to give Mark Anderson a call at 928 International and buy a used throttle body.
If you are disassembling your throttle body, make sure that the ends of the phillips-head screws that hold on the throttle plate are not staked.
I decided to disassemble the throttle body to get at the two O-rings that were leaking.
Here's where my inexperience reared its head. I did not realize that the ends of the throttle plate screw had been flattened, or staked, until I started unscrewing. I didn't read about this in the other throttle body write-ups, but I should have checked. It is a little clearer in the right screw below.
The staked screw slightly damaged the rod that holds the throttle plate. My screwdriver destroyed both screws.
I think I'm going to have to give Mark Anderson a call at 928 International and buy a used throttle body.
If you are disassembling your throttle body, make sure that the ends of the phillips-head screws that hold on the throttle plate are not staked.
08-31-2013, 02:23 AM
#21
Burning Brakes
Thread Starter
Going through the engine compartment, intake runners removed, it is easier to see other (intake unrelated) items that need to be refreshed.
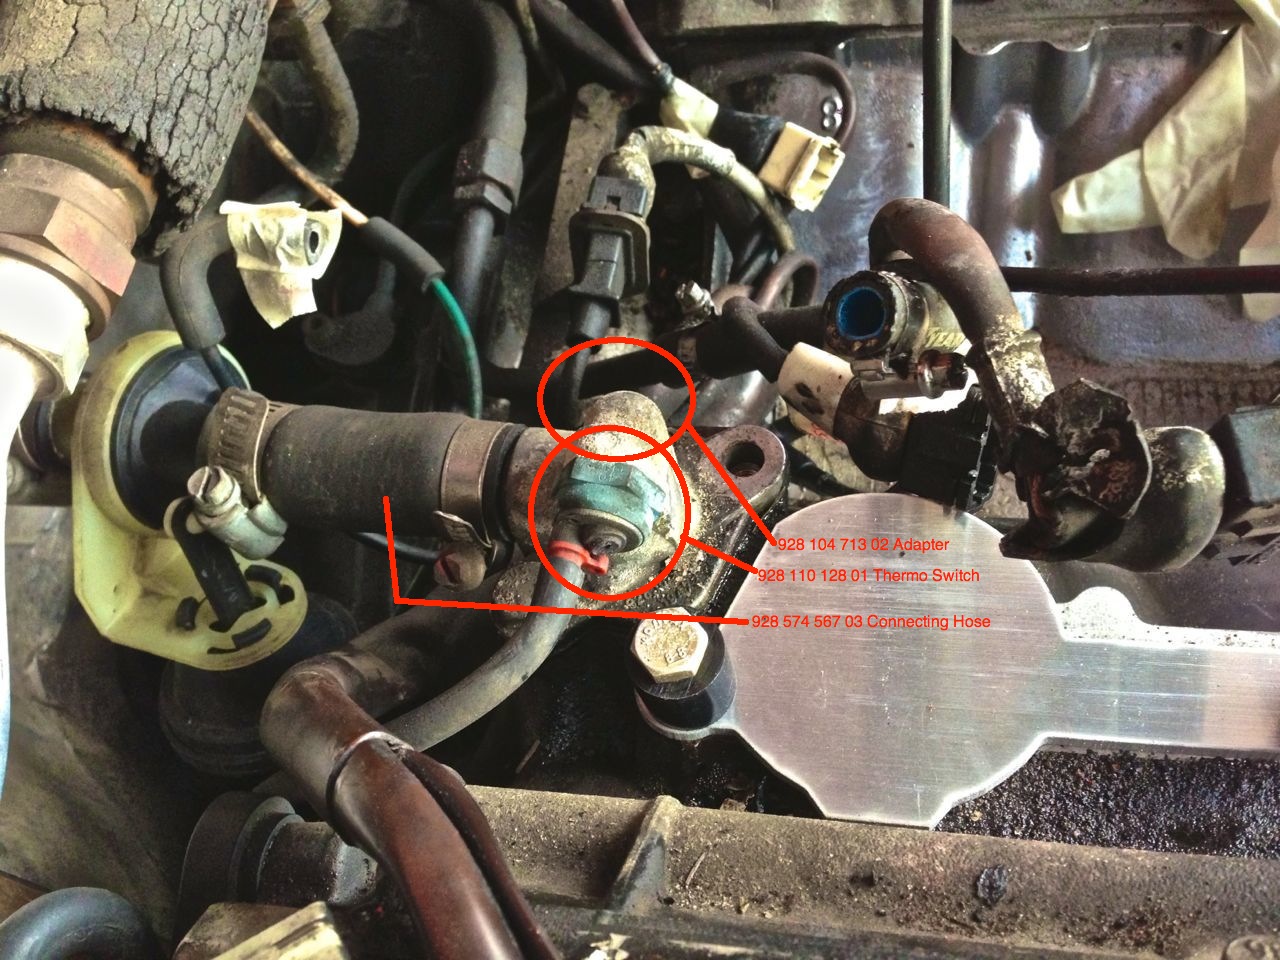
My "thermo switch" had a broken vacuum attachment, so I ordered a new one. Also, the "adapter" (as PET calls it) was crusty and was obviously leaking coolant at one point or another. Might as well change the hose from the heater valve at the same time.
My "thermo switch" had a broken vacuum attachment, so I ordered a new one. Also, the "adapter" (as PET calls it) was crusty and was obviously leaking coolant at one point or another. Might as well change the hose from the heater valve at the same time.
Last edited by syoo8; 08-31-2013 at 11:26 AM. Reason: Misprint
08-31-2013, 11:30 AM
#23
Burning Brakes
Thread Starter
My heater valve was replaced March of 2010, so its three years old+. However, it has been zip-tied for much of its life- there was no vacuum in the HVAC system until June of this year when I replaced a bunch of diaphragms. I will probably change it anyway since I have a new heater valve lying around.
09-01-2013, 08:20 AM
#24
Craic Head
Lifetime Rennlist
Member
Lifetime Rennlist
Member
Scott,
That stinks about your throttle plate screws. Mine had some locktight on them to keep them from backing out, but they came out without any issues for me. The only things I ran into during disassembly and reassembly were the typical throttle issues: springs, retaining clips and tiny tiny screws getting lost.
Sorry for your troubles on that one. Are you sure there is no way to salvage it?
09-01-2013, 08:35 AM
#25
Addict
Lifetime Rennlist
Member
Lifetime Rennlist
Member
These non standard size screws haven't been sourced yet I think, drill out and tap to a standard size was suggested. Then stake them the ends so that they don't come loose, or use loctite red.
09-01-2013, 09:25 AM
#27
Rennlist Member
Scott,
Did you actually get the screws out? If so I would think this should work:
I plan to do this job soon so am very interested in your progress.
Keep up the good work and reporting.
Did you actually get the screws out? If so I would think this should work:
I plan to do this job soon so am very interested in your progress.
Keep up the good work and reporting.
09-01-2013, 01:09 PM
#28
Inventor
Rennlist Member
Rennlist Member
Note that there are three isolators. The third is in the valley, just visible in the lower left of the second pic.
Two of the buffers are the same size. The third has a longer stud on one side to hold the IAC/ICV bracket, first pic.
Replace all three! The old one pictured will fall apart as soon as you have everything back together (BTDT).
Two of the buffers are the same size. The third has a longer stud on one side to hold the IAC/ICV bracket, first pic.
Replace all three! The old one pictured will fall apart as soon as you have everything back together (BTDT).
09-01-2013, 01:24 PM
#29

Clean, Clean, Clean; Powdercoat Powdercoat, Powdercoat. Order Parts.
Isn't that basically the top end refresh directions?
Isn't that basically the top end refresh directions?
09-01-2013, 02:52 PM
#30
Sharkaholic
Lifetime Rennlist
Member
Lifetime Rennlist
Member
