
928 RS Concept Sketch
 08-17-2013, 04:45 PM
#181
Rennlist Member
Most motorcycle fuel tanks (metal) sit right over the motor. Take the cap off and the fuel is boiling. Just don't run to much heat near the plastic fuel tank. T
Last edited by 77tony; 08-17-2013 at 05:12 PM.
 08-17-2013, 05:10 PM
#182
Drifting
Thread Starter
Going to be a tough one i think getting the lower corner of the bumper cover right, I am going to try and epoxy and laminate a Rubbermaid
material i have that feels similar. The edge has to be done so the piping will sit correctly.
08-18-2013, 12:50 AM
#183
Addict
Rennlist Member
Rennlist Member
I've had lots of trouble with over heated gas. Especially at high altitudes. I now wrap my exhaust pipes when they're near anything gas related and also insulate the fuel lines
when it passes by the exhaust or gets close to the engine. Also put in aluminum heat shielding where possible.
Engine Bay:

Fuel Cell:
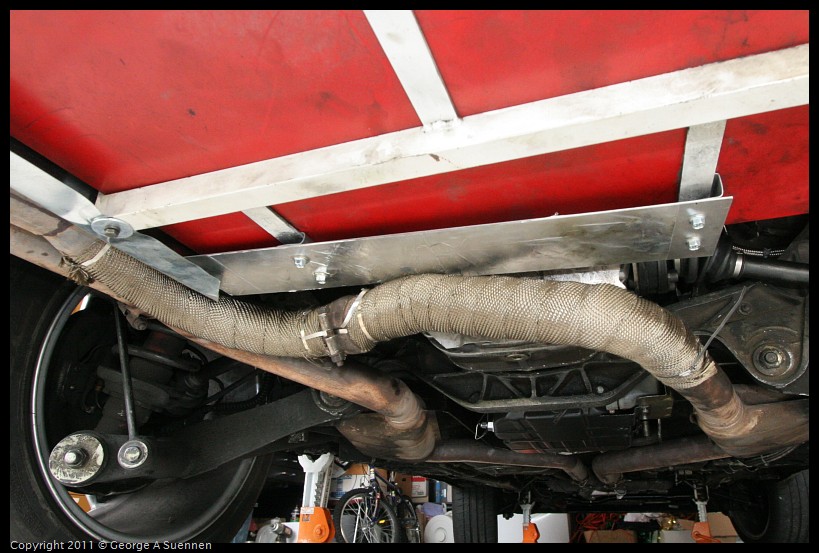
Of course my car puts out a lot of extra heat...
George
90 S4 Grand Prix White (Murf #5)
94 GTS 5-Speed Midnight Blue
06 Cayenne S Havanna/Sand Beige (PASM)
http://928.jorj7.com
when it passes by the exhaust or gets close to the engine. Also put in aluminum heat shielding where possible.
Engine Bay:
Fuel Cell:
Of course my car puts out a lot of extra heat...
George
90 S4 Grand Prix White (Murf #5)
94 GTS 5-Speed Midnight Blue
06 Cayenne S Havanna/Sand Beige (PASM)
http://928.jorj7.com
08-18-2013, 01:55 AM
#185
Addict
Rennlist Member
Rennlist Member
I would agree with this statement... Route the fuel lines outside the car.
George
90 S4 Grand Prix White (Murf #5)
94 GTS 5-Speed Midnight Blue
06 Cayenne S Havanna/Sand Beige (PASM)
http://928.jorj7.com
George
90 S4 Grand Prix White (Murf #5)
94 GTS 5-Speed Midnight Blue
06 Cayenne S Havanna/Sand Beige (PASM)
http://928.jorj7.com
08-18-2013, 02:37 PM
#186
Drifting
Thread Starter
I've had lots of trouble with over heated gas. Especially at high altitudes. I now wrap my exhaust pipes when they're near anything gas related and also insulate the fuel lines
when it passes by the exhaust or gets close to the engine. Also put in aluminum heat shielding where possible.
Engine Bay:
Fuel Cell:
Of course my car puts out a lot of extra heat...
George
90 S4 Grand Prix White (Murf #5)
94 GTS 5-Speed Midnight Blue
06 Cayenne S Havanna/Sand Beige (PASM)
http://928.jorj7.com
Thanks George will do, I can't wait to get past this boring paint phase and get to it. Guess i will wrap where it passes as well as make a heat shield.
Wasn't going to I was just hypothesising, you know brainstorming. It's my process dammit!

Anyway, removed the exhaust in prep for the rear end metal work. (weighs 36 lbs. what i put in it's place will be nowhere near that.
Very important thing done this morning; clean (with laquer thinner and wire wheel) and sealing behind rub-strip weld filled holes in rear quarter. If this is not done well there will be bubbling in the future. I have found this polyurethane sealant to be the best and most similar to the factory undercoating. Can be had at the Home Depot.
Thought I'd share for those DIYers like myself. I made this mistake long ago on a beautiful resto and had to repaint..
08-18-2013, 05:02 PM
#187
Drifting
Thread Starter
Wanted to show you guys (and gals) how to quickly fab sheet metal the right way the first time. here I use card stock and template the passenger side (which i want to copy) using locating points (attachment holes for rear bumper cover)
Then transfer paper to correct heavy gauge steel. (had the same ga. steel already from previous truck resto)
This whole process took 1 hour and 10 minutes. Still have to grind welds.
This area will be prone to corrosion unless done right, will epoxy over seam sealer then undercoat and paint.
Have a great night everyone. -Matt
-Matt
Then transfer paper to correct heavy gauge steel. (had the same ga. steel already from previous truck resto)
This whole process took 1 hour and 10 minutes. Still have to grind welds.
This area will be prone to corrosion unless done right, will epoxy over seam sealer then undercoat and paint.
Have a great night everyone.
-Matt
Last edited by The Fixer; 08-18-2013 at 07:19 PM.
08-18-2013, 07:17 PM
#189
Drifting
Thread Starter
If your routing the exhaust pipe(s) out the side and in front of the rear tires, check out
http://www.spintechmufflers.com/ T
http://www.spintechmufflers.com/ T
Doing exhaust and other mechanical work will be the fun stuff.
Sanded roof again until my shirt stuck to me. I'm so over body work.
08-18-2013, 07:46 PM
#190
Addict
Rennlist Member
Rennlist Member
If your routing the exhaust pipe(s) out the side and in front of the rear tires, check out
http://www.spintechmufflers.com/ T
http://www.spintechmufflers.com/ T
https://rennlist.com/forums/928-foru...with-pics.html
Lots of discussion about side exhaust and splitters.
George
90 S4 Grand Prix White (Murf #5)
94 GTS 5-Speed Midnight Blue
06 Cayenne S Havanna/Sand Beige (PASM)
http://928.jorj7.com
08-19-2013, 02:41 PM
#191
Drifting
Thread Starter
Great info above, please keep it coming Tony and the rest as a reference for everyone with interest, (beats a notebook) this is great for me as i don't have a lot of spare time. I will go back and re read this information for decission making
Wanted to show you the hood George, turned out very well. I put off cutting the hole until i had all the sanding done as to not stretch the hood while applying force while sanding..look fantastic, very pleased with size now that they are in.
Windshield squirter and hood crest holes filled of course..
Going to the Italian Market (South Philadelphia) for lunch.
Thanks again George for the Hood tech help and encouragement.-Matt
Last edited by The Fixer; 08-20-2013 at 03:03 AM.
08-20-2013, 10:48 AM
#192
Rennlist Member
So... Naked..!
08-20-2013, 12:20 PM
#193
Addict
Rennlist Member
Rennlist Member
Looking good. Very impressed with the quick progress.
George
90 S4 Grand Prix White (Murf #5)
94 GTS 5-Speed Midnight Blue
06 Cayenne S Havanna/Sand Beige (PASM)
http://928.jorj7.com
George
90 S4 Grand Prix White (Murf #5)
94 GTS 5-Speed Midnight Blue
06 Cayenne S Havanna/Sand Beige (PASM)
http://928.jorj7.com
08-20-2013, 07:00 PM
#195
Drifting
Thread Starter
That's funny i thought of that last night, no don't think so. I wanted to lighten the aluminum bumpers but not sure on that either.
The exhausting prepping for paint phase has begun, going over the wing bodywork, Looksing good (early pics) and will get a final finish coat of filler. Sanding bumper covers, filled headlamp squirter holes (modern RSs never have those)
Filled everything in the rear cover. They both need final sanding though. Coming along.
Keeping my single wiper modification, closed the appropriate wiper hole in cowel cover.
I touched up the shape of the rear lower quarter (was a little too pointy where it meets the rear bumper cover. sanded the undercoating and re applied undercoating and looks great( early pic, looks better now). I want to be epoxy priming with in a week. it will take a day of clean up and changing the garage space into a booth. Goal is to have everything painted and curing in the basement by the first week of September.