When you click on links to various merchants on this site and make a purchase, this can result in this site earning a commission. Affiliate programs and affiliations include, but are not limited to, the eBay Partner Network.
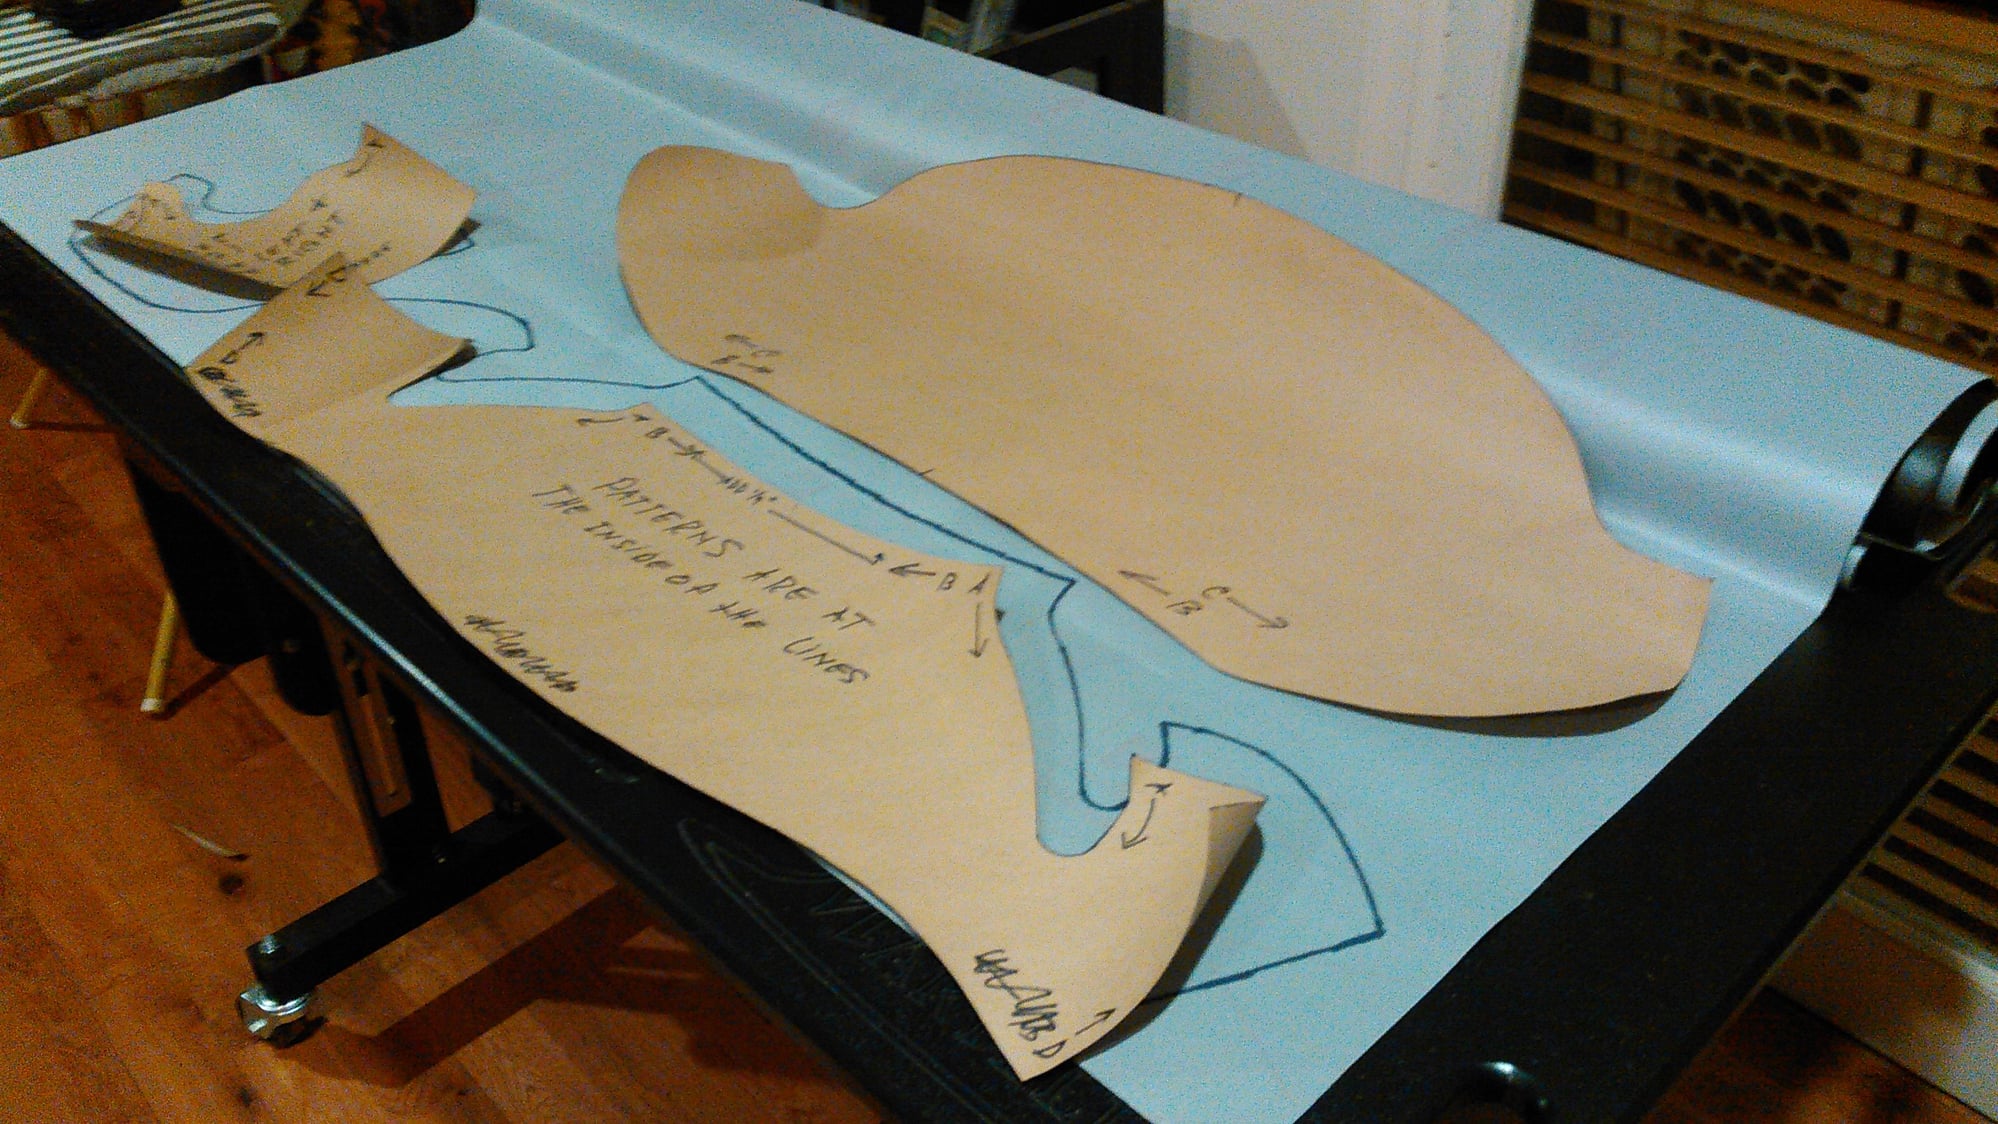
after reading back thru your post I see you say I need to add 1/4" to some of the patterns you sent. Which edges specifically do I add the 1/4" ???
Hi Dean. It is explained in post 66 in this thread. One edge of one pattern only.
Shawn, if you happen to be watching, you will need to review this thread in respect to the patterns I am sending you tomorrow. I need to get some of the instructions printed up in the morning then I'll get yours in the mail.
Dean, I think I was not too clear. There are three patterns, but one of them you will be making two of, one left and one right. It is that smallest of the three patterns that must be expanded on the outer edge by the quarter inch mentioned. The reason I say only one pattern is because you do not expand the mating pattern where those two pieces are sewn to.
Shawn and Ray, when you get the patterns and instructions I just sent, you need to make the same quarter inch adjustment in the smallest of the three patterns that Dean is asking about because I have not gotten around to changing the permanent pattern yet.
About to get started on this, Jerry. I bought some marine-grade black vinyl for the job. I'm glad I re-read the thread, because I had completely forgotten about adding the 1/4" seam allowance!
Holy thread resurrection Batman. This thread represents another of my unfinished projects. I am still looking occasionally at the pod as I left it in this thread. What I have almost completely lost track of is the contents of the picture of the forming washers and cones shown late in the thread. Having misplaced all of that is part of the reason I never finished the pod; so I still need to form the switch recesses. I'll try to put that together again and maybe offer some of the forming kits for use for anyone still planning to try this project on their own.
One thing I will suggest, Shawn, for your project is that first you cut out the piece of vinyl for the top--the largest pattern--then fit it over the top of the pod and see just how much stretch you might be dealing with in your material. I'm not sure which way you want it to stretch the most, but you may want to try to figure that out and cut your material so it stretches in the direction you want. I'm think the stretch might best be going front to back rather than side to side. Usually vinyl stretches more in only one direction.
So, I ironed the patterns flat, cut them out, sketched them onto my vinyl (allowing the extra 1/4"), and cut out the vinyl. I've done some sewing before, so I can see how it's supposed to go together. But, man! These are some complex seams and curves. This is going to be a challenge, especially since I can't pin the pieces together before sewing, as I would a fabric pattern.
Shawn, start at your AB/AC corners. Sew your full 3/8 inch seam. As you come to some tightness in the inside corner of one and the other work piece, use your scissors and snip the seam allowance around the corner of the pieces about a quarter inch in from the edge in several places so the seam will straighten out better. I think we showed that above where Doug was doing these seams. I don't mean to cut the seam allowance off, but rather to make your snip cuts perpendicular to the edge.
Are you planning to do french seams? If so, sew your seam allowance back from the basic seam about an eighth inch or slightly more. Then trim about an eighth inch of the seam allowance off outside your french seams underneath. I think we show Doug doing that also.
If you are not going to french seam, then I strongly suggest that you use some contact cement and butterfly each side of your seam allowance down underneath on either side of your seams. Otherwise you will not be able to control how it lays when you try to put the cover on the pod. You might even trim your seam allowance back to about a quarter inch underneath because it is going to telegraph through, and I think it will look better if it is not so wide. Don't assume that you can skip this step by just sewing with a quarter inch seam allowance to avoid it because then your cover will come out too big.
After you get your AA seams done you can do your BB and CC seams putting the whole thing together. Do like Doug does and start at the middle. First fold both of the big pieces in half and cut a tiny dart at the mid point of the edges that will be sewn together. Then match the two center darts face to face to sew. What I would do is staple these two pieces together all the way around in the seam allowance, but Doug says that that is sissy--only girls do that. What Doug does is start sewing at the middle and then see how the ends come out and then match the other ends like to ones sewn and start there and sew toward the middle for the other side. He always nails it, but I am not so confident.
Finally you will sew the DD seam. Then lets see how it is going.
__________________
ReDesign by FEATHER
by Jerry Feather
Producer for 928 of:
-Hatch Latch Receiver Liner--All Versions
-Replacement Heavy Duty Spare Tire Cover
-Flush Center Console Conversion
-Cowl Cover, Cowl Seal, & Shell Stickers--All versions
(RHD included)
-Aluminum Gas Cap Ratcheting Pawl
Yes, I'm planning on French seams. What would you recommend for stitch length on vinyl?
I have drill this weekend, so probably no further progress until next week. I also need to pull the electronics off the back of my instrument cluster to fix the speedometer and fuel gauge.
I'm also planning on using the remainder of the vinyl to do the rest of the dash, which is leather-covered, using the Cousin Dan in situ method:
Is anyone opposed to the idea of a two tone POD recover?
The outside being the same as the dash, but the internal section surrounding the cluster done in black.
Is anyone opposed to the idea of a two tone POD recover?
The outside being the same as the dash, but the internal section surrounding the cluster done in black.
Do you mean in some way other than what we have done or are doing in this thread? Or did you not bother to read the thread?
[QUOTE I'm also planning on using the remainder of the vinyl to do the rest of the dash, which is leather-covered, using the Cousin Dan in situ method: How To Recover A Dashboard - Vinyl, Leather - YouTube.[/QUOTE]
Shawn, I think that method might actually work for the 928 except that when you remove the leather off your dash you are going to find the original vinyl covering rather than foam. I don't think you are going to be able to remove the vinyl also in the manner shown in the video. I think the 944 dash and the 928 dash are not made in the same manner.
It has always been my impression that the 928 dash is pretty much made from the outside in. I think they had a mold of the 928 dash and its surface had the finish leather-like texture. Then I think they sprayed it with vinyl in the color desired, then put some framework into the mold and finally injected the whole thing with rigid form. Therefore the vinyl covering is not really a covering and it has no fabric backing between it and the rigid foam.
However, I still think the method shown might work ok, but over the original vinyl. As a note of interest, I think when you remove the leather from your dash you are going to find the original vinyl dash under it with various flaws that were repaired before it was covered with leather. I think the Factory used dashes that were seconds, with flaws, to cover with leather, rather than discarding them.

 09-04-2014, 05:49 PM