
Leaking Oil Filler Neck


 05-20-2018, 02:49 PM
#17
Rennlist Member
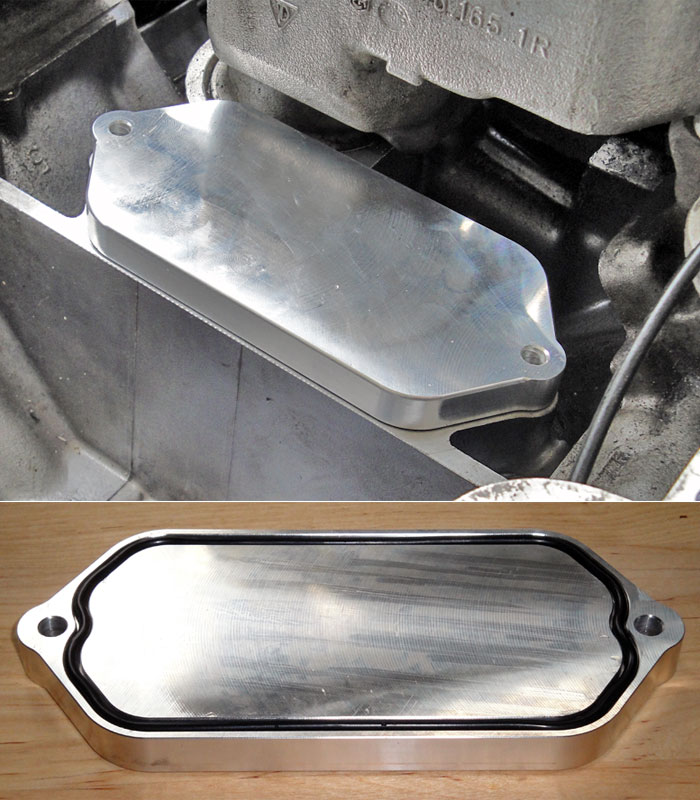
I put a metal neck on my GTS in 2015 and so far no issues. As you can see I did modify it to fit my breather hoses. The 2nd picture is mid-assembly and as you can see, plenty of clearance.
EDIT: I should have mentioned as Greg did below that I also used a 928 Intl oil baffle. I tried to use a 928 Motorsport oil baffle and a 928 Intl oil control plate with gaskets (in the 3rd picture) but it was too thick and not enough clearance. I used Drei-bond too. In hind-sight, I just would have bought Greg's and been done with it.


Last edited by NoVector; 05-20-2018 at 05:04 PM.
05-20-2018, 04:08 PM
#18
Rennlist
Basic Site Sponsor
Basic Site Sponsor
The metal neck fits fine.
it does not have the built in louvered baffle, you will have to find the NLA metal louvered baffle, also.
Just use the original neck with the stock rubber seal. A bead of Drei Bond will keep it from ever leaking again.
If you are interested in improving the oil separation to reduce oil getting to the intake, install one of my lower baffles under this.
Everything you need, in one shipment. Comes with Drei Bond and a new rubber seal.
05-20-2018, 04:31 PM
#19
Rennlist
Basic Site Sponsor
Basic Site Sponsor
05-20-2018, 08:24 PM
#20
Just use the original neck with the stock rubber seal. A bead of Drei Bond will keep it from ever leaking again.
If you are interested in improving the oil separation to reduce oil getting to the intake, install one of my lower baffles under this.
Everything you need, in one shipment. Comes with Drei Bond and a new rubber seal.
If you are interested in improving the oil separation to reduce oil getting to the intake, install one of my lower baffles under this.
Everything you need, in one shipment. Comes with Drei Bond and a new rubber seal.
can I do this without major surgery?? is there a simple method?
 05-21-2018, 10:40 AM
#22
It is simple enough when the inlet manifold is off.
so has anyone had good success without removing or even loosening intake?
05-21-2018, 10:55 AM
#23
Addict
Rennlist Member
Rennlist Member
Join Date: Oct 2003
Location: Gone. On the Open Road
Posts: 16,322
Received 1,542 Likes
on
1,006 Posts
05-21-2018, 12:25 PM
#24
Not possible. Intake needs to at least be up and moved back and that approach leaves little space for cleaning and application of ‘sealing goo.’
05-21-2018, 01:15 PM
#25
Rennlist Member
05-21-2018, 02:12 PM
#26
See Dwayne's thread: http://www.dwaynesgarage.norcal928.o...aterbridge.htm
can't be done, but clearly this write up says otherwise
05-21-2018, 09:43 PM
#27
Addict
Rennlist Member
Rennlist Member
Join Date: Oct 2003
Location: Gone. On the Open Road
Posts: 16,322
Received 1,542 Likes
on
1,006 Posts
Second, I dis-recommend breaking loose or torquing Alan bolts with a ball-end Alan wrench or socket unless there is no alternative. Round-off the head and you are screwed.
Last, loosening the intake sufficiently to lift it up and back an inch takes roughly an hour-and-a-half or less. On the other hand I would only do this if I knew that the gaskets weren’t 25 years old (edit: unless I had new gaskets on-hand, which I usually do.)
Last edited by worf928; 05-21-2018 at 10:02 PM.
05-21-2018, 10:02 PM
#28
Addict
Rennlist Member
Rennlist Member
Join Date: Oct 2003
Location: Gone. On the Open Road
Posts: 16,322
Received 1,542 Likes
on
1,006 Posts
Follow-up: IMO: Macgyvering-out the waterbridge, getting it back in, sealed and properly torqued, rather than scooching-back the intake to get to the filler neck doesn’t take sufficiently-less time (if any) and opens the risk of screwing-up the waterbidge bolts.
05-21-2018, 11:04 PM
#29
Rennlist
Basic Site Sponsor
Basic Site Sponsor
I tried this, years ago....once....and I'm never going to try it again.
__________________
greg brown

714 879 9072
GregBBRD@aol.com
Semi-retired, as of Feb 1, 2023.
The days of free technical advice are over.
Free consultations will no longer be available.
Will still be in the shop, isolated and exclusively working on project cars, developmental work and products, engines and transmissions.
Have fun with your 928's people!
greg brown
714 879 9072
GregBBRD@aol.com
Semi-retired, as of Feb 1, 2023.
The days of free technical advice are over.
Free consultations will no longer be available.
Will still be in the shop, isolated and exclusively working on project cars, developmental work and products, engines and transmissions.
Have fun with your 928's people!
05-22-2018, 12:12 AM
#30
Drifting
Agree with Dave and Greg. I tried to follow Dwayne's DIY a few years ago. I couldn't get the allen wrench to enter the head of the bolt straight. I sensed I was going to regret trying to force it...but not before the allen wrench rubbed paint off the intake runner. Had zero issues removing the water bridge with the intake off. Another example of having to remove half a dozen things to get to the thing you're trying to fix. There are moments I think it is nuts, but more often it's part of the charm and challenge of owning a 928. If yours is really spewing oil and it's not your daily and you have a garage I'd start the top end refresh. I'm discovering that things weren't as "nice" as they seemed under the hood. Unless you have documentation of some major services - the following are literally crumbling or will when you look at them: Knock sensors and connectors, Crank Position Sensor and connector, and Hall sensor connector. It's been an eye opening experience - 928s in good cosmetic condition are very good at hiding neglected and aged electrical and soft parts that needed to be replaced 10-15 years ago.

