

Front Shock Replacement
 01-31-2011, 10:05 PM
#1
Burning Brakes
Thread Starter
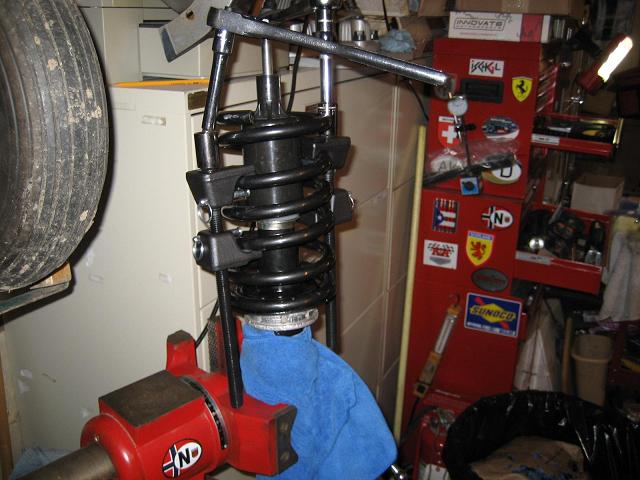
Replacing the front shocks on my '91 GT this week. As far as I know these are original equipment shocks with 70K miles on them.
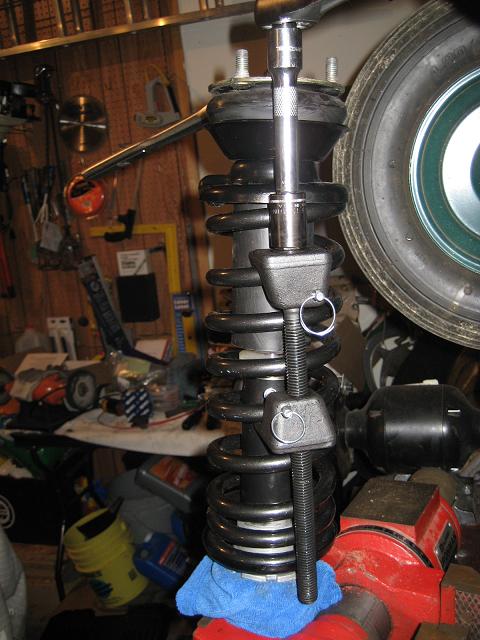
Sorry in advance for the small photos. I took them with my cell phone and forwarded them to my email account which reduced their size instead of blue tooth transfer to the laptop. Unfortunately, I deleted the originals off the cell before realizing this. 2nd photo is up into the well looking at the top mount after the lower arm has been dropped and the shock removed.
After some research on this forum (thanks to those who have gone before me!), I approached this job in the most straight-forward method I could determine. I decided that calipers could remain installed:
1. Loosen lugs on front wheels
2. Jack car at rear jack points and install jack stands
3. Remove wheels
4. Remove the wheel liners from inside each wheel well
5. Remove nut on bolt at base of shock with 19mm socket/breaker bar (wrench on other end of bolt)
6. Knock bolt out of bottom stanchion of shock (guiding sway bar linkage)
7. From above, remove the 3 shock mounting bolts in the engine compartment
8. From below, using a 17mm socket on short extension, remove the 4 bolts (2 front, 2 rear) holding the large U-shaped brackets at the back of the lower arm.
9. A small tap on top of the lower arm at the back and the lower arm falls away.
10. At this point the shock and spring assembly can simply be rotated and then the top tipped out and up through the wheel well and removed from the call.
It took maybe 20 minutes on the first one, and about 10 on the second.
Initial inspection reveals two concerns:
1. The Boot ( 928.343.507.03 ) on the driver side shock is completely missing
2. The rubbers on the Concave Washer Upper (928.343.047.07) are debraided
Tearing them down to inspect for further issues.
 02-01-2011, 12:12 AM
#2
Rennlist Member
Not really that bad a job is it? Just take them to a local autoshop and have them put them in the spring compressor and swap the shocks out. Can't cost that much to have them do it. Safer than using a spring compressor at home and possibly taking your head off. Remember to put anti seize on the threads of the shock and run the collar up and down to lube everything up.
Check the WSM for the proper orientation of the top and bottom plates, easy to mess up.
Check the WSM for the proper orientation of the top and bottom plates, easy to mess up.
02-01-2011, 10:33 AM
#4
Rennlist Member
When I remove the shock I just take out the upper a arm and leave the bottom one in. Seems to be easier for me. To each his own I guess.
02-01-2011, 11:15 PM
#5
Burning Brakes
Thread Starter
Jeff, thanks for the reminders to check the WSM for the correct orientation and for the anti-seize note.
Yep. Took them to a shop do have them do the spring swap. Waiting on those parts to arrive to complete the job.
Didn't see a description of the upper arm approach. Got any tips on the rears? They're up next!
Yep. Took them to a shop do have them do the spring swap. Waiting on those parts to arrive to complete the job.
Didn't see a description of the upper arm approach. Got any tips on the rears? They're up next!
02-01-2011, 11:46 PM
#6
Rennlist Member
Your upper mounts (928.343.047.07-- hard to call that a "washer") look the same as our S4 which we just had apart-- some sort of rubber coating that had deteriorated. I cleaned them up and called it good, they seem to work fine.

What shocks are you putting in?
The rears are easy, once you get the shaft ("bearing pin") out. On our cars, I am able to get the forward nut off with all the brake parts in place and just slide the pin out towards the rear. If it resists then I think you will need to get the rear brake calipers, rotors and shields off, in order to get in with the heavy artillery.
Tony has a good write'ups on this at http://members.rennlist.com/v1uhoh.htm, rear coilover's are here and here.
Note the orientation of the various washers as you disassemble, and get the two "conical" washers back in correctly-- Tony's picture, showing the washers on the shaft for illustration, is NOT correct. The convex side of the washers matches the concave recess on either side of the hub, it is obvious once you get in there.

Trending Topics
02-02-2011, 12:59 PM
#8
Burning Brakes
Thread Starter
The missing boot should be replaced. It also acts as a spacer as I recall, no remnant left?
Your upper mounts (928.343.047.07-- hard to call that a "washer") look the same as our S4 which we just had apart-- some sort of rubber coating that had deteriorated. I cleaned them up and called it good, they seem to work fine.
What shocks are you putting in?
Your upper mounts (928.343.047.07-- hard to call that a "washer") look the same as our S4 which we just had apart-- some sort of rubber coating that had deteriorated. I cleaned them up and called it good, they seem to work fine.
What shocks are you putting in?
There was a tiny remnant of the missing boot, essentially the collar that slides on the shaft of the shock with some plastic attached. Placed order for two new boots, as well as two new additional top springs (928.343.527.02).
I'll be "cleaning up" the rubber bits on the top washer as well.
Looking forward to moving to the back of the car after the parts arrive.
02-02-2011, 10:20 PM
#9
Burning Brakes
Thread Starter
@Jim - I went with Boges (Sachs). Originally thought about Bilstien/Eibach combo, but I just don't think I'm going to spend much time on the track with this specimen.
02-03-2011, 08:22 AM
#10
Rennlist Member

Sorry if this is a no-brainer to everybody.
 02-03-2011, 10:21 AM
#11
Drifting
It's really not that hard to do at home, I managed to do it. Anyhow, tons of pictures in this thread plus some ideas on what not to do:
https://rennlist.com/forums/928-foru...-calipers.html
02-03-2011, 11:56 AM
#12
Rennlist Member
or you can 'borrow' a set for free from Autozone:
Attachment 509625
Attachment 509626
It's really not that hard to do at home, I managed to do it. Anyhow, tons of pictures in this thread plus some ideas on what not to do:
https://rennlist.com/forums/928-foru...-calipers.html
Attachment 509625
Attachment 509626
It's really not that hard to do at home, I managed to do it. Anyhow, tons of pictures in this thread plus some ideas on what not to do:
https://rennlist.com/forums/928-foru...-calipers.html
02-03-2011, 01:52 PM
#14
Drifting
In my mind, these are no more dangerous than using a floor jack. Also, note how they are mounted in a vise and my head isn't above or below the spring/tool combo at any time. There are a lot of things that can hurt/kill you if you get stupid.
02-03-2011, 02:25 PM
#15
Rennlist Member
I agree. I just always remember the spring sticking out of the shop wall at our local Ford dealership. They leave it in there as a reminder to the mechanics.