When you click on links to various merchants on this site and make a purchase, this can result in this site earning a commission. Affiliate programs and affiliations include, but are not limited to, the eBay Partner Network.
I tried last summer to remove this ground point without success.
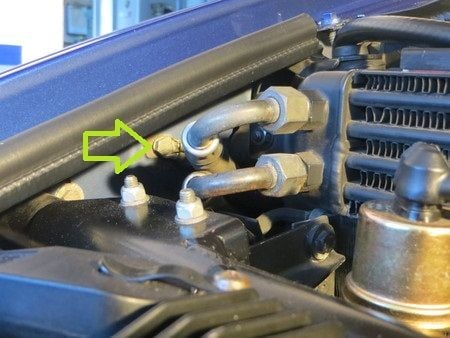
I can't get the tool (socket or key) in there. Not enough space.
Do I need a special tool or to remove the top oil cooler line to get to this one?
I want to do all the one I didn't touch yet next spring.
Thanks in advance.
Take a look at how that cooler is mounted. IIRC there are a few 6mm bolts holding it suspended there, with the rubber 'seal' across the top. Remove the bolts, hold the seal so it doens't fall, then move the cooler slightly for easier access.
I have a ball-end 1/4"-drive 'screwdriver' with a regular 1/4"-drive at the back ind of the handle. With a standard socket, no issues with access to that bolt with the cooler in place. IIRC there's easy room for a 1/4"-drive 10mm universal socket on the end of a long extension passed between the hoses. Don't be afraid to use a long extension, no need to try and crowd everything in that constricted area.
There is a great little tool that I use to clean electrical connections with. It is made for spot sanding paint chips. It is called 'PrepPen' and is made/distributed? by Pro Motorcar Products. Once you have one of these you will wish you had one years ago. It's like a fat pen that has 20,00 glass fibers in it that you use to sand with. No affiliation...
There is a great little tool that I use to clean electrical connections with. It is made for spot sanding paint chips. It is called 'PrepPen' and is made/distributed? by Pro Motorcar Products. Once you have one of these you will wish you had one years ago. It's like a fat pen that has 20,00 glass fibers in it that you use to sand with. No affiliation...
Use some caution with the glass fiber pens, tiny glass fibers that are sharp and may have bits that break off.
Harbor Freight has a set of wobble extensions that go on sale/coupon around $12, very handy to have.
That is true danglerb. They do continually break off as you use them. They are small and sharp and can make a little mess. They can irritate your skin if your not careful.
I have a 1990 GT. In the attached photos you can see the two locations of those ground points. In the photo, I have removed the air filter housing as well as the MAF. The two gound points are on top of the bell housing, on the bolts that hold the throttle cable pully bracket to the bell housing.
Resurrecting a thread...I'm cleaning my grounds now and trying to be as thorough as I can, and I am at this spot with MP IX and VII. I've removed the MAF and airbox and want to make sure I remove anything else that's in the way correctly. I'll upload a pic of the area and would love your recommendations of how to the to the ground points safely.
In order to get to MP VIII and IX on my '89, do I need to remove the fuel pressure regulators and hard line hoses to get to them? If so, I fear may do more damage to the car getting to them to clean them than anything.
I remember having to do them all twice, because initially I cleaned them and then used a Dielectric grease (thinking that was an conductivity enhancer). Once I realized that it is more of an insulator I had to go back in to clean the again.
I did remove the fuel pressure regulator so that I could check the Crank Position Sensor. If you are going to all this effort, it may be worth proactively replacing that sensor. If it goes out the car will be inoperable. I found that rodents had chewed on the wire insulation. It was not an expensive part, but a HUGE pain in the A$$ to get to.
Hope that help!
- Matt
Great suggestion, and would do that...if Stan hadn’t done the same about 2 years ago on mine. Those GPs seem best left for when you are experiencing EZK/LHK issues, or while you are doing a fuel line or intake refresh.
The ground is probably under the throttle pulley bracket, it was on my 87. When I pulled the bracket and cleaned the grounds, I replaced the bolts with a couple of studs, it was much easier to mount everything.


 01-25-2015, 05:36 PM