
Delrin Rack Bushings-What a difference!

 04-08-2011, 12:09 PM
#62
Rennlist Member
Resurecting this thread...
Did motor mounts, oil pan gasket and a set of these Delrin rack bushings over the winter. Took the car out for a run last night and settled the suspension.
All I can say is WOW! The difference in steering is unbelievable, can drive with 1 finger on the wheel and it steers with utmost precision and less tramlining. Great product!
04-08-2011, 12:32 PM
#64
Rennlist Member
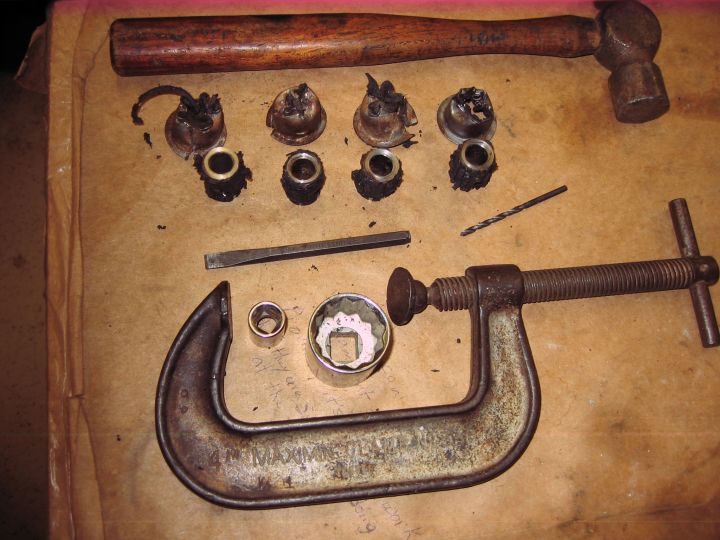
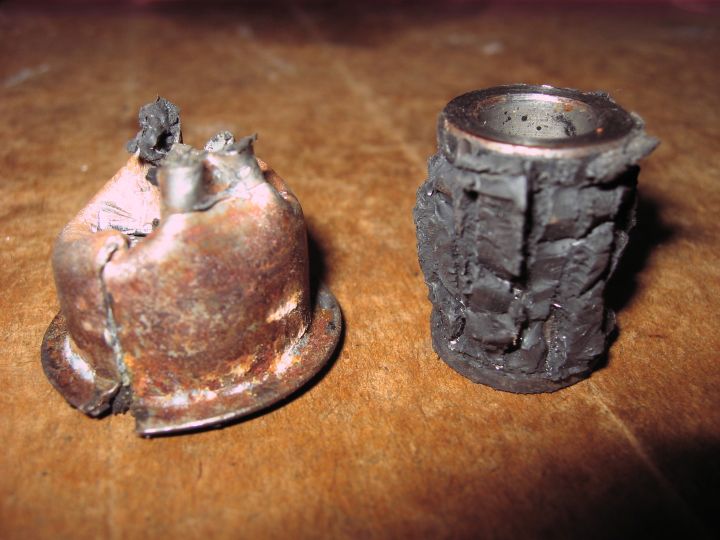
I would give about 2 hrs. The hard part is removing the old ones. I took a drill and reamed the rubber out the best I could. I then put a bolt and socket together to make a little press to push the center of the old bushing out. After the center is removed the outer ring chisels out fairly easily.
The new ones just pushed in so that was pretty easy.
The new ones just pushed in so that was pretty easy.
04-08-2011, 01:13 PM
#65
Administrator - "Tyson"
Lifetime Rennlist
Member
Lifetime Rennlist
Member
Resurecting this thread...
Did motor mounts, oil pan gasket and a set of these Delrin rack bushings over the winter. Took the car out for a run last night and settled the suspension.
All I can say is WOW! The difference in steering is unbelievable, can drive with 1 finger on the wheel and it steers with utmost precision and less tramlining. Great product!
Did motor mounts, oil pan gasket and a set of these Delrin rack bushings over the winter. Took the car out for a run last night and settled the suspension.
All I can say is WOW! The difference in steering is unbelievable, can drive with 1 finger on the wheel and it steers with utmost precision and less tramlining. Great product!
04-13-2011, 08:57 AM
#67
Drifting
Did mine yesterday. Can be done with the car on jackstands. Take a good chisel and fold over the edges of the old bushings metal housing, helps if you take a utility knife and cut as much of the rubber away as you can. Then take a puch and make sure it is completely folded over so it is smaller than the hole it has to go through. Take that punch and knock it out upwards.
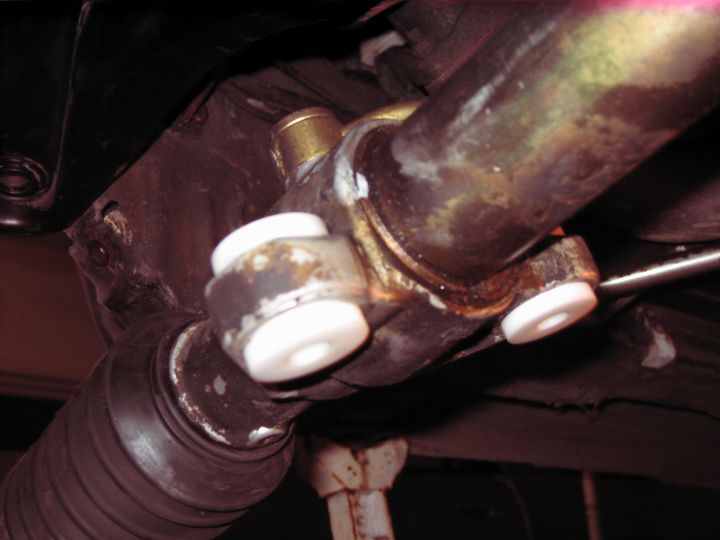
Be sure to block the steering rack so it is hanging down but can't go up when you are knocking on it to push it out. Also, getting to the tops of the bolts that hold the rack in place is a bit crazy. Best bet was on the drivers side rear a socket and ratchet fit, but on the rest plan on using a open end wrench, preferably a shorty. There is not much room to work. Rack bolts/nuts are 17mm and the small ones that hold the cover are 13mm. But the drivers side also has a bolt into the body I think that one was 19mm.
Good Luck.
04-27-2011, 09:31 AM
#68
Drifting
Drove the car yeaterday with the new bushings. Very crisp feel, feels more connected to the road. Going from pliable rubber mounts that give ~1/4" of motion in all directions to delrin (nylon) which gives very little motion it makes sense that the steering wheel is now more direct to the wheels.
Pretty awesome upgrade.
Pretty awesome upgrade.
 05-23-2011, 11:23 PM
#73
Rennlist Member
Join Date: Feb 2008
Location: Lillington, NC
Posts: 2,742
Likes: 0
Received 0 Likes
on
0 Posts
Just installed my Delrin bushings. Used an air chisel on the old bushings' metal flange (bottom side only need be done) then tapped out the bushing body using a socket and extension. Took about 45 minutes since I have a lift (getting car up and removing belly pans and all). I used a pair of large right-angle needle nose pliers for the bolts that hold the rack to the cross member since there is not enough room there to get a socket or wrench without adding a few entries to the "auto mechanics' language arts book".
07-21-2011, 10:19 PM
#74
Rennlist Member
Cuz I wish it's that simple...I'm really hoping someone can tell me the 'secret' to performing this upgrade in car. I read all the write-ups but I'm stumped...
To date...here's what I've:
Remove wheels
Unbolt steering rack mount plate
Unbolt sway bar
Removed the four bushings (that was actually the easy part)
- I suggest using the remove as much rubber from the old bushings as possible with a utility knife and then on a very low setting; an air chisel with a curved bit with split in the middle. (this worked very good and fast with minimal impact to the rack)
Now the rack is all jabber wonky, hanging down and UI started the process of putting the new bushings in.
I am finding it very difficult to line up the rack correctly without something binding over the studs hanging down from the crossmember. Plus, I see and feel no way of removing those studs.
I'm stumped ... help!!!
 I feel I could have replaced two steering racks completely by now...
 07-21-2011, 10:26 PM
#75
Rennlist Member
Rog, God love ya! ...
Cuz I wish it's that simple...I'm really hoping someone can tell me the 'secret' to performing this upgrade in car. I read all the write-ups but I'm stumped...
To date...here's what I've:
Remove wheels
Unbolt steering rack mount plate
Unbolt sway bar
Removed the four bushings (that was actually the easy part)
- I suggest using the remove as much rubber from the old bushings as possible with a utility knife and then on a very low setting; an air chisel with a curved bit with split in the middle. (this worked very good and fast with minimal impact to the rack)
Now the rack is all jabber wonky, hanging down and UI started the process of putting the new bushings in.
I am finding it very difficult to line up the rack correctly without something binding over the studs hanging down from the crossmember. Plus, I see and feel no way of removing those studs.
I'm stumped ... help!!!I feel I could have replaced two steering racks completely by now...
Cuz I wish it's that simple...I'm really hoping someone can tell me the 'secret' to performing this upgrade in car. I read all the write-ups but I'm stumped...
To date...here's what I've:
Remove wheels
Unbolt steering rack mount plate
Unbolt sway bar
Removed the four bushings (that was actually the easy part)
- I suggest using the remove as much rubber from the old bushings as possible with a utility knife and then on a very low setting; an air chisel with a curved bit with split in the middle. (this worked very good and fast with minimal impact to the rack)
Now the rack is all jabber wonky, hanging down and UI started the process of putting the new bushings in.
I am finding it very difficult to line up the rack correctly without something binding over the studs hanging down from the crossmember. Plus, I see and feel no way of removing those studs.
I'm stumped ... help!!!
I feel I could have replaced two steering racks completely by now...
My suggestion... take a break, relax, and come back to it tomorrow.
"Jus' hang loose, blood. She gonna catch ya up on da' rebound on da' med side."