
How to check timing belt visually easiest way? 928GT
 07-19-2009, 07:44 PM
#1
Instructor
Thread Starter

Join Date: Apr 2006
Posts: 206
Likes: 0
Received 0 Likes
on
0 Posts
Hello,
I want to check my timing belt (928GT) visually, the easiest possible way.
I looked in the engine bay, and removing the covers from the top seemed to be a lot of work.
Is there an easier way from underneath?
I know visually checking timing belts gives you no guarantee, but it can sometimes tell you if it has been changed at all at one stage.
Regards
B
 07-19-2009, 08:46 PM
#3
Rennlist Member
It's just two 10mm bolts that hold your passenger side timing belt cover on. There are a few wires/cables that hang down in front of it, making the job appear more intimidating than reality.
I unscrewed the blue radiator drain plug on the passenger side (to drain), then unscrewed the 2 metal hose clamps enough to allow me to first remove the large upper radiator hose cleanly (same for the 2nd small hose), but hey, if you don't care about a mess draining all over everything you could just remove the upper radiator hose via those two clamps without first draining the rad!
Two more 10mm bolts hold on your fan shroud to your radiator. Pull down to remove the white plastic electrical connections to each fan, remove those 2 10mm bolts, and lift your whole fan shroud out of the way to gain even more room (if desired).
With the 1 large and 1 small upper radiator hoses removed, and with the fan shroud out of the car, unbolting the timing belt cover on the passenger side is a breeze.
The advantage to having the cover off is that you can check (and adjust) the belt tension (17mm open ended wrench).
If you simply stick a flexible scope into the timing belt cover's top air hole, you will only be able to see the visual condition of the timing belt. That's too little information. Go the next step. Check the tension.
Even a $6 Crickit tensionmeter will get you in the right ballpark.
It's just not that tough to drain the radiator, remove the upper radiator hoses, pull the fan shroud out, and unbolt the passenger side (U.S. car) timing belt cover.
I took my time, had never done it before, and I was checking the tension within 2 hours. Then you adjust the tension as desired, put the fan shroud back in, reinstall the upper radiator hoses, tighten the blue radiator drain plug (again, on the passenger side for U.S. cars), refill and bleed the radiator, and you have just done the job right.
07-19-2009, 08:49 PM
#4
Burning Brakes
Join Date: Oct 2004
Location: Santa Rosa Beach, FL
Posts: 977
Likes: 0
Received 0 Likes
on
0 Posts
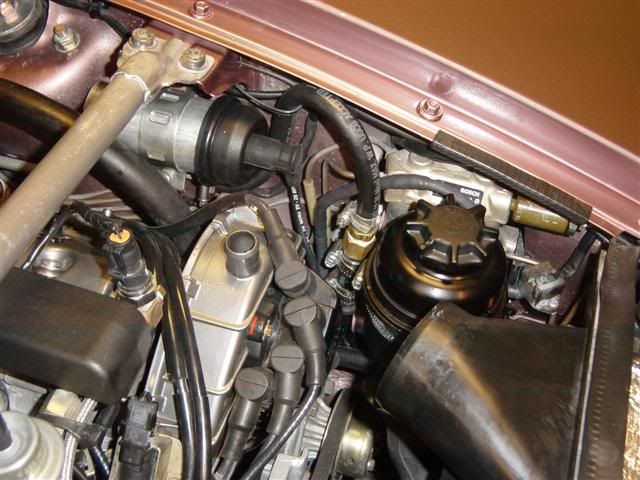
To get the first peek, look with a flashlight down the breather holes (one on top of each top cam gear cover under the intake tubes). You should be able to see the belt. Hopefully this area will be clean of debri and the belt centered on the cam gear.
Next is to remove the covers on the top left and right. If you want to check the tension and visually check the belt, remove the passenger side top cover. (2 bolts hold it in place)
Here is a pic. of the driver side hole I am speaking of.
Next is to remove the covers on the top left and right. If you want to check the tension and visually check the belt, remove the passenger side top cover. (2 bolts hold it in place)
Here is a pic. of the driver side hole I am speaking of.
 07-19-2009, 09:10 PM
#6
Nordschleife Master
This inspection isn't striking me as far removed from kicking the tires. Tension, tensioner, bearings and water pump are what need inspecting and/or replacing or rebuilding.
07-19-2009, 09:20 PM
#7
Rennlist Member
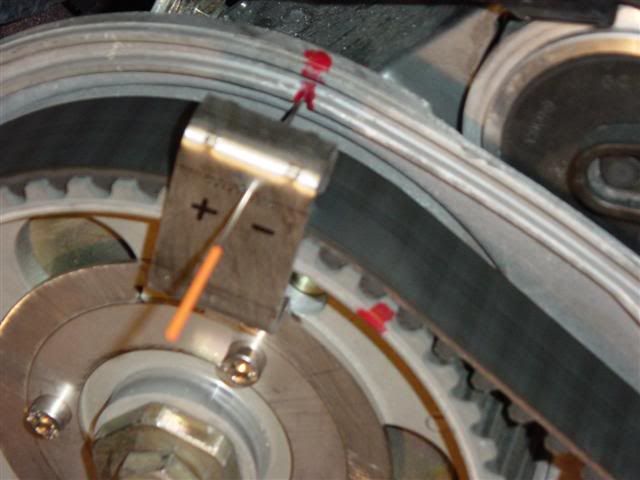
I have some pictures of where to drill an inspection hole to avoild the time consuming full tension check. You can make sure there is no gross misadjustment. I drill a 1/8" hole and use a 1/8" drill bit on the blunt side and push hard . I measure the difference of adjusted properly tension and what is slightly off. For between races, Its a good check to make sure things have not changed.
Trending Topics
07-19-2009, 10:49 PM
#8
Rennlist Member
I have some pictures of where to drill an inspection hole to avoild the time consuming full tension check. You can make sure there is no gross misadjustment. I drill a 1/8" hole and use a 1/8" drill bit on the blunt side and push hard . I measure the difference of adjusted properly tension and what is slightly off. For between races, Its a good check to make sure things have not changed.
07-19-2009, 11:53 PM
#9
Team Owner
dont forget that the belt must be checked at TDC.
ND I dont understand cutting a slot to fit a wrench???
ND I dont understand cutting a slot to fit a wrench???
07-20-2009, 12:07 AM
#10
Rennlist Member
Like I said, it was just a fleeting thought.
But I'm from the school of thought that timing belt covers and radiator hoses should be transparent so that conditions of belts and fluids can be readily examined.
07-20-2009, 12:18 AM
#11
Addict
Lifetime Rennlist
Member
Lifetime Rennlist
Member
They easy way is run it until the teeth shear off it is also the most expensive  The belts do not break the teeth break off and the rest of the belt LOOKS just fine.
The belts do not break the teeth break off and the rest of the belt LOOKS just fine.

