When you click on links to various merchants on this site and make a purchase, this can result in this site earning a commission. Affiliate programs and affiliations include, but are not limited to, the eBay Partner Network.
Has anyone else attempted this with success?
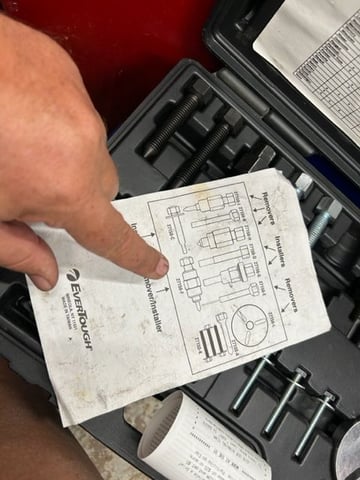
Seems straight forward from the 2 videos. Can't see the pictures Rob posted.
The 6E171 body and its variants were used on the 80 to 89 928, 83 to 85/1 944, Lincoln Town Car, and aftermarket kits for John Deere just to name a few.
Section 87, page 127 of the shop manual will provide some information on the clutch R&R and nose seal R&R.
On the 6E171,
You remove the clutch assembly, then the case bolts. Note if there are any shims on the shaft (the shims set your air gap). Be careful separating the front and rear head: keep the front parts with the front and the rear with the rear. If it has never been resealed, you will need some spray on gasket remover to get the original paper/fiber gasket off the front and rear heads and their reed valve plates (don't gouge up either of these mating surfaces or you will have a leaker). To replace the center case seal try keeping the pistons with shaft in either the front case or rear case otherwise you will have piston's and half bearings rolling on the floor and the challenge or putting them back together on the wobble plate. It's usually easiest to wipe the front shaft clean, hold it tightly and gently tap the rear case halve off, keeping the pistons inside the front case halve. Thoroughly inspect the thin wall sections of the cases where the case o-rings sit; this can be a problem area if the outer wall is damaged. You'll notice the cylinders have steel liners and the pistons have sealing rings; 98% of the time they are fine the way they are unless the compressor has seized, overheated or locked up do to lack of oil (this is the primary cause for clutch coils turning to toast). The nose seal is place on top of the shaft (note the flats) and aligned. The nose seal race with its o-ring is set in the front nose (shiny side facing the carbon on the nose seal. Shaft o-ring sealing area should be free of corrosion. Be careful setting the front head over the shaft and on the front case or you will crush the nose seal assembly. Torque case allen bolts to 18 ft pounds. Put clutch on, check air gap using 2 feeler gauges as a go-no-go, check 120 degrees around in 3 places.
Currently studying Griffiths site, lots of useful info and a comprehensive Seal Kit, but I can't work out how to get hold of a Seal Protector Tool for a 6E171.
Some lessons I've learned from my first attempt to do this:
1. Measure the depth the old front steel part of the seal is from the rear of the nose before removal. Otherwise, it's difficult to know if you;ve got the replacement is fully seated. The two side of the steel part of the seal are not the same, make sure you put it in correctly.
2. The 3 o-rings for the main case are not the same size. The middle one is larger.
3. To get to the steel shaft seal it is necessary to separate the top valve plate from the the nose. These are very difficult to separate without risking damage as, after 30 years, the inner seal is welded to the pieces. Bob suggested using a nut and bolt through a hole on the plate to jack the pieces apart. This worked for me but then it still took hours to safely clean the old gasket off the plate and nose.
4. I used a threaded rod with washers and nuts put through the mounting holes to help start the splitting of the middle of the case. The video shows how to lift the top section off without having parts fall out, this worked for me.
5. On assembly make sure there is no oil in the threaded holes in rear cover or you could crack the cover.
6. If you apply 12 volts to the magnetic clutch before removing the belt you can loosen the shaft nut easily. Same for tightening latter.
I've done this once but still seem to have a tiny leak somewhere in the system. I don't know if it's the compressor but I will probably repeat the resealing process using the lessons from my first try.
A couple small (hopefully helpful) additions:
If your front of your clutch does not just come off the way Rob's did you will need a puller. The free-rental unit at O'Reilly has the tool in the kit.
Here it the number on the kit The number of the tool The tool itself
I had a large collection of snap ring plyers, but nothing that was really big enough for the snap rings in the compressor. These
Husky model HSRPS8 got 'em out first try and the price is nice.
I admire the DIY approach but I�m pretty sure compressors are available pretty cheaply from Denso. Bet an hour of Rob�s time in the lab cost more. I bought one a few years ago to replace my old one and it is as flawless as you�d expect from Toyota�s keiretsu.
Everyone has their own definition of inexpensive. A reman from Denso is $526. If you buy the same compressor with a John Deere clutch on it, the cost is anywhere from $300 to $500. You will pay more than $500 for one dedicated for the 928.

 02-24-2013, 10:35 PM