
PS Reservoir Hose R&R with pics
 01-29-2008, 01:07 AM
#1
Rennlist Member
Thread Starter
Join Date: Sep 2007
Location: Ridgecrest, California
Posts: 1,363
Likes: 0
Received 143 Likes
on
28 Posts
While I was replacing the engine oil filler gasket and had the car already up on jackstands this last weekend. I also repaired a bad leak from the two hoses coming out of the PS reservoir on the '88. The fluid return hose had a crimped connection on it so I wasn't sure if it could be repaired without having to buy a whole new hose with the extra long cooling tube that is routed in front of the radiator. Jim at 928 Intl said that bulk hydraulic rated hose would work if I could manage to remove the crimp fitting. THANKS, Jim! - That was all I needed to give it a try. So here's another procedure for curing what seems to be a common leak problem without buying an expensive return line. This post it Newbie-rated.
In order to gain access to the two fittings at the underside of the PS pump, I needed to remove the alternator. First, I disconnected the negative battery terminal just to be safe (even though I had no plans to disconnect any wiring from the alternator itself). Then remove the alternator belt as well as the PS belt. Since I was replacting the PS belt any way, both belts came all the way off.
The alternator is held in place by a 17mm long bolt on top for pivoting and an adjusting bolt underneath. The pivot bolt and adjusting bolt were loosened from taking the belt off already so I simply took them both all the way out. The alternator still hung in place after removing the bolts so rocking it back an forth and pulling down it will work it's way loose - do not lay directly underneath the alternator while doing this! The red electrical connection was long enough to let the alternator hang down and rest on a cardboard box while repairs continued. Here's a picture of the long pivot bolt (17mm).
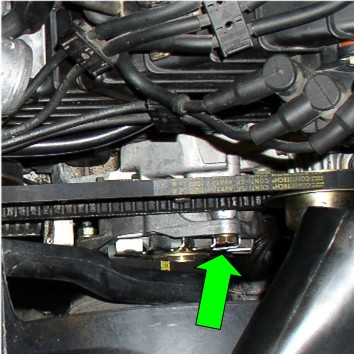
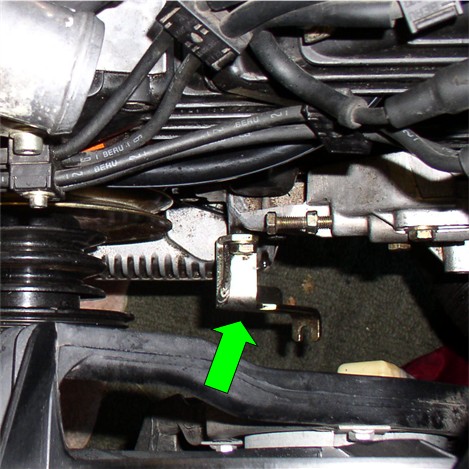
I left the adjusting bracket in place and only removed the adjusting bolt and adjusting threads. Here's a pic of the alternator adjusting bracket still in place after removing the alternator.
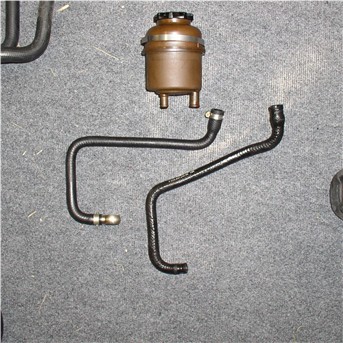
Next I set about draining the PS fluid from the reservoir. I used a clean suction bulb (looks like a turkey baster) to draw out as much of the fluid as I could from topside. Then I removed the suction connection at the bottom of the PS pump (the 22mm barrell bolt) and let the remainder drain into a bucket. After the fluid was drained from the reservoir, I disconnected the two hose clamps/hoses at the bottom of the reservior and disconnected the clamp that holds the reservoir in place. Then removed the reservoir. With the reservoir out and the suction hose disconnected from the pump, I simply pulled out the molded suction hose from underneath the car. Here's a pic of the reservoir and old hose and new hose cleaned up.
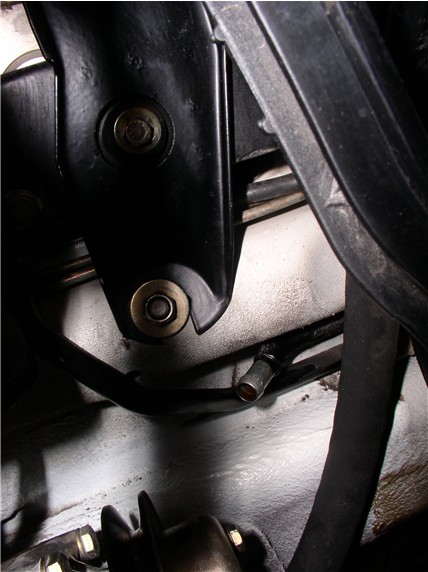
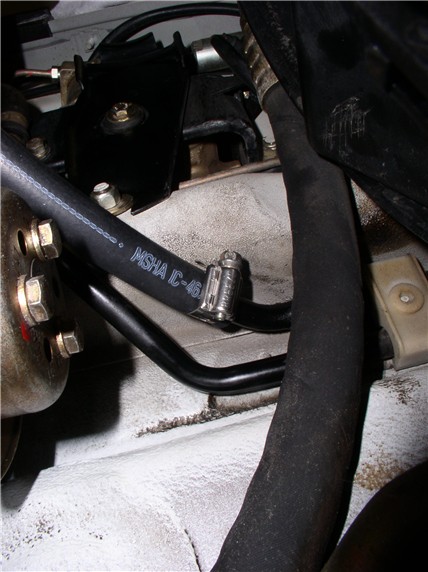
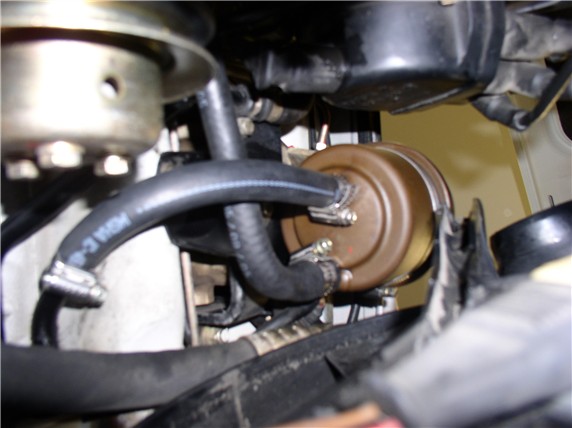
Here's the PS return line showing the crimped fitting (next to the engine compartment wall). I used a dremel metal cutting wheel to carefully cut through the crimp without cutting the metal tube. With the radiator hose already out on the other job and the fan belts removed and the reservoir removed, there was plenty of room to work with the dremel. Even if the lower radiator hose was left in place, I believe there is still room to work - although someone may need to verify they have done this repair with the lower radiator hose still in place.
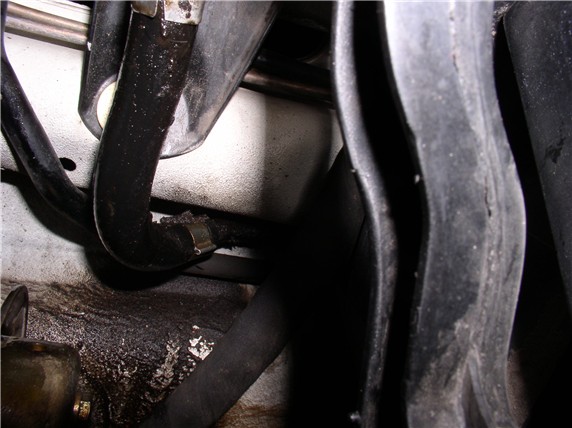
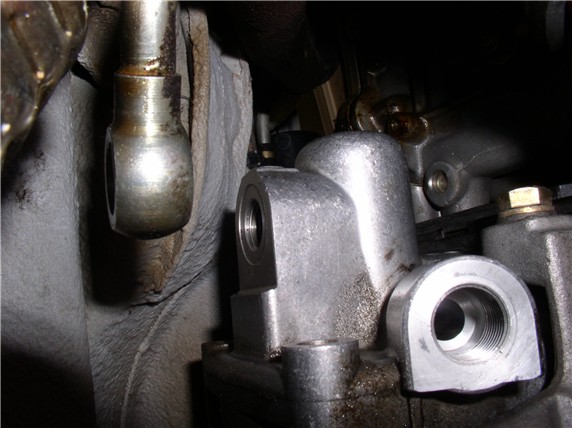
Here's the return fitting ready to accept the new bulk hose.
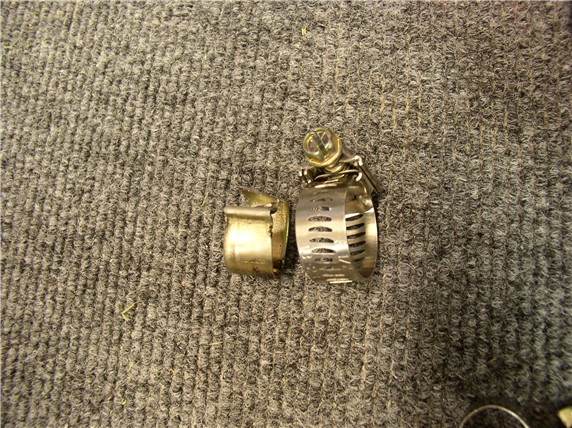
As I was looking at the original clamps used at the bottom of the reservoir, I began thinking I wanted to use something a little beefier to clamp. I needed a new beefy clamp to replace the cut crimp fitting anyway so here's what I replaced the existing clamps with. You can see for the crimp fitting on the return line, the clamping band is wider and is, of course, adjustable.
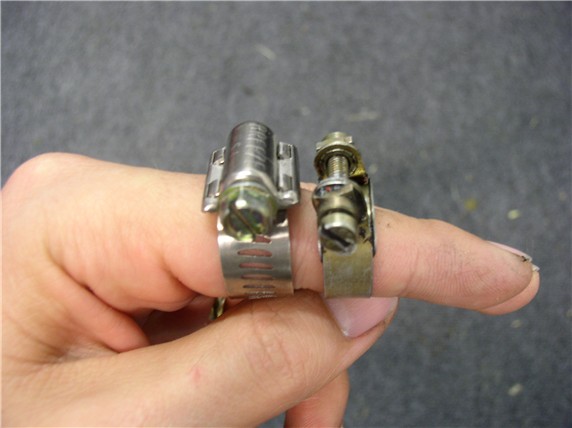
For the connections at the reservoir, I used the same beefier clamps. Here's a pic compared to the original clamps used. These clamps were the same inside diameter as the originals.
continued on next post....
In order to gain access to the two fittings at the underside of the PS pump, I needed to remove the alternator. First, I disconnected the negative battery terminal just to be safe (even though I had no plans to disconnect any wiring from the alternator itself). Then remove the alternator belt as well as the PS belt. Since I was replacting the PS belt any way, both belts came all the way off.
The alternator is held in place by a 17mm long bolt on top for pivoting and an adjusting bolt underneath. The pivot bolt and adjusting bolt were loosened from taking the belt off already so I simply took them both all the way out. The alternator still hung in place after removing the bolts so rocking it back an forth and pulling down it will work it's way loose - do not lay directly underneath the alternator while doing this! The red electrical connection was long enough to let the alternator hang down and rest on a cardboard box while repairs continued. Here's a picture of the long pivot bolt (17mm).
I left the adjusting bracket in place and only removed the adjusting bolt and adjusting threads. Here's a pic of the alternator adjusting bracket still in place after removing the alternator.
Next I set about draining the PS fluid from the reservoir. I used a clean suction bulb (looks like a turkey baster) to draw out as much of the fluid as I could from topside. Then I removed the suction connection at the bottom of the PS pump (the 22mm barrell bolt) and let the remainder drain into a bucket. After the fluid was drained from the reservoir, I disconnected the two hose clamps/hoses at the bottom of the reservior and disconnected the clamp that holds the reservoir in place. Then removed the reservoir. With the reservoir out and the suction hose disconnected from the pump, I simply pulled out the molded suction hose from underneath the car. Here's a pic of the reservoir and old hose and new hose cleaned up.
Here's the PS return line showing the crimped fitting (next to the engine compartment wall). I used a dremel metal cutting wheel to carefully cut through the crimp without cutting the metal tube. With the radiator hose already out on the other job and the fan belts removed and the reservoir removed, there was plenty of room to work with the dremel. Even if the lower radiator hose was left in place, I believe there is still room to work - although someone may need to verify they have done this repair with the lower radiator hose still in place.
Here's the return fitting ready to accept the new bulk hose.
As I was looking at the original clamps used at the bottom of the reservoir, I began thinking I wanted to use something a little beefier to clamp. I needed a new beefy clamp to replace the cut crimp fitting anyway so here's what I replaced the existing clamps with. You can see for the crimp fitting on the return line, the clamping band is wider and is, of course, adjustable.
For the connections at the reservoir, I used the same beefier clamps. Here's a pic compared to the original clamps used. These clamps were the same inside diameter as the originals.
continued on next post....
 01-29-2008, 01:33 AM
#4
Addict
Rennlist Member
Rennlist Member
I used a dremel metal cutting wheel to carefully cut through the crimp without cutting the metal tube. With the radiator hose already out on the other job and the fan belts removed and the reservoir removed, there was plenty of room to work with the dremel. Even if the lower radiator hose was left in place, I believe there is still room to work - although someone may need to verify they have done this repair with the lower radiator hose still in place.
01-29-2008, 01:43 AM
#5
Rennlist Member
Thread Starter
Join Date: Sep 2007
Location: Ridgecrest, California
Posts: 1,363
Likes: 0
Received 143 Likes
on
28 Posts
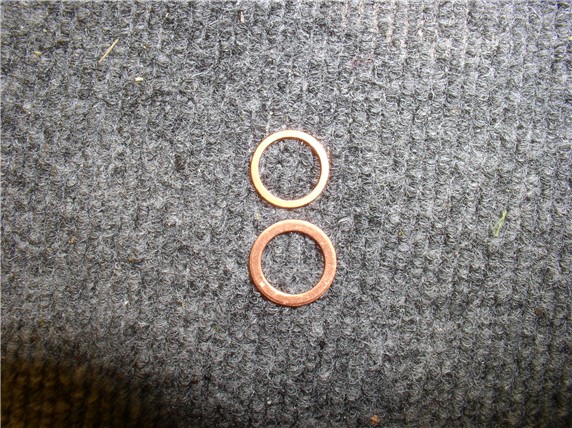
While I was at the imported auto parts store, I needed to pick up a new set of sealing rings for the barrell bolts connected to the pump. The manual gives sealing ring sizes as 14 X 18 for the pressure fitting (19mm barrell bolt) and 16 X 20 for the suction fitting (22mm barrell bolt). The shop also carried the same size inside diameter seals but 2mm wider so I bought a bunch of the recommended size as well as the wider size. The wider sizes are 14 X 20 for the pressure line and 16 X 22 for the suction fitting. Here's a comparison of the recommended size compared to the wider...
I also bought hydraulic rated hose to replace the return hose. It took 7.25" and I purchased 1/2" inside diameter hose which was very close to the original hose size. I attached this 7.25" length of hose to the return tube first and clamped it down with the new clamp.
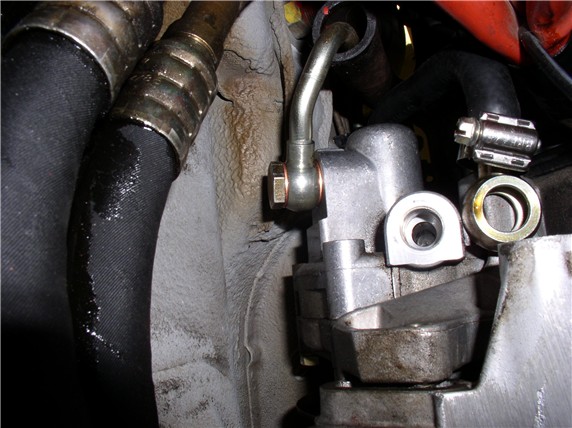
Then I moved to the conenctions at the PS pump. Here's a pic of the pressure fitting at the pump. Notice the recessed groove for the sealing ring.
I test fit the new wider sealing ring and it fit very nicely in the recess. So I went with the wider sealing rings figuring it couldn't be any worse than the thinner originals. Here's what they look like when fitted on the pressure side. I torqued this 19mm bolt to the same setting as the bolts (same size) at the steering rack (22ftlbs).
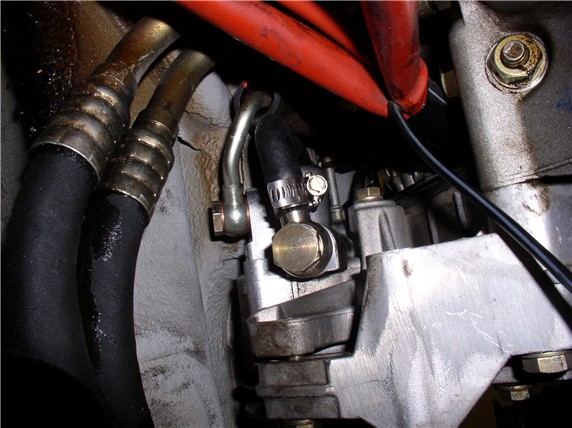
Then I connected the suction fitting at the pump (also using the wider sealing rings). The WSM recommends torqueing the 22mm barrell bolt here to 43ftlbs. Used the new beefier clamp here as well.
Finally, I re-installed the reservoir (return nipple - smaller one - toward the driver and the suction nipple - larger one - toward front of the car). Then connected the return line and suction lines to the reservoir with the beefier clamps. For all connections with the beefier clamps, I ensured the wider clamp would fit between the barb and the hose stop on each connection. Sorry for the blurry pic....
At this point, everything is connected and ready to fill with ATF. Probably a good idea to fill with ATF and check for leaks before re-installing the alternator and belts. If there are no leaks, putting it back to gether is the reverse of taking it out. Alternator first (long pivot bolt first, then adjusting bolt) then re-install the PS belt and tighten and reinstall the alternator belt and tighten. Reconnect the negative terminal on the battery. Start the car and continue to look for leaks and monitor the fluid level. I filled the reservoir full before starting the engine but after running, the fluid level went down to normal level (after the new hoses and the pump were filled).
Hope this is helpful to some - feel free to comment or suggest improvements to this procedure. THANKS for reading!
I also bought hydraulic rated hose to replace the return hose. It took 7.25" and I purchased 1/2" inside diameter hose which was very close to the original hose size. I attached this 7.25" length of hose to the return tube first and clamped it down with the new clamp.
Then I moved to the conenctions at the PS pump. Here's a pic of the pressure fitting at the pump. Notice the recessed groove for the sealing ring.
I test fit the new wider sealing ring and it fit very nicely in the recess. So I went with the wider sealing rings figuring it couldn't be any worse than the thinner originals. Here's what they look like when fitted on the pressure side. I torqued this 19mm bolt to the same setting as the bolts (same size) at the steering rack (22ftlbs).
Then I connected the suction fitting at the pump (also using the wider sealing rings). The WSM recommends torqueing the 22mm barrell bolt here to 43ftlbs. Used the new beefier clamp here as well.
Finally, I re-installed the reservoir (return nipple - smaller one - toward the driver and the suction nipple - larger one - toward front of the car). Then connected the return line and suction lines to the reservoir with the beefier clamps. For all connections with the beefier clamps, I ensured the wider clamp would fit between the barb and the hose stop on each connection. Sorry for the blurry pic....
At this point, everything is connected and ready to fill with ATF. Probably a good idea to fill with ATF and check for leaks before re-installing the alternator and belts. If there are no leaks, putting it back to gether is the reverse of taking it out. Alternator first (long pivot bolt first, then adjusting bolt) then re-install the PS belt and tighten and reinstall the alternator belt and tighten. Reconnect the negative terminal on the battery. Start the car and continue to look for leaks and monitor the fluid level. I filled the reservoir full before starting the engine but after running, the fluid level went down to normal level (after the new hoses and the pump were filled).
Hope this is helpful to some - feel free to comment or suggest improvements to this procedure. THANKS for reading!
Last edited by Dwayne; 01-29-2008 at 01:48 AM. Reason: Pics were missing.


Trending Topics
01-29-2008, 02:15 AM
#8
Archive Gatekeeper
Rennlist Member
Rennlist Member
There's a dremel ad out there where guy after guy is stuck in a job and the lightbulb goes off: Dremel it! I wish that light bulb had gone off in my head before I bought a whole new cooling loop and tore the front of the car off to R&R it. As usual, Dwayne, great writeup!
P.S.- Is that reservoir the original one, or is there a source for new brown reservoirs? The replacement I got was black. If that's the old reservoir, I'd like to know your cleaning secrets, 'cause that thing is supernaturally clean.....
P.S.- Is that reservoir the original one, or is there a source for new brown reservoirs? The replacement I got was black. If that's the old reservoir, I'd like to know your cleaning secrets, 'cause that thing is supernaturally clean.....
01-29-2008, 10:20 AM
#9
Rennlist Member
Thread Starter
Join Date: Sep 2007
Location: Ridgecrest, California
Posts: 1,363
Likes: 0
Received 143 Likes
on
28 Posts
THANKS for reading....it is the original reservoir - the car only has 22K miles on it but it IS 20 years old. I cleaned it with a liquid degreaser, I like to use Orange Blast - available at Wal-Mart. Rather than spray the reservoir with the cleaner and risk getting the degreaser inside, I sprayed a clean terry cloth rag with the cleaner and wiped it down. I suppose you could plug the holes on the reservoir and then douse the reservoir with the cleaner and let is sit a few minutes - that could work as well. This one wasn't that dirty.
01-29-2008, 10:27 AM
#10
Supercharged
Rennlist Member
Rennlist Member
Join Date: May 2002
Location: Back in Michigan - Full time!
Posts: 18,925
Likes: 0
Received 59 Likes
on
33 Posts
FYI... if you find the outside of your resevoir getting oily and dirty, chances are the o-ring on the cap is dead. I think both Specialists and International carry it. And if you asked Rogaa at 928's-R-Us, he could probably get it too.
01-29-2008, 10:59 AM
#11
Craic Head
Lifetime Rennlist
Member
Lifetime Rennlist
Member
I'd like to go on record as saying that every one of Dwayne's posts should go straight to the DIY section without delay. Another great post Dwayne!
Randy, how do I set it up so that all of Dwayne's threads are automatically bookmarked?
Randy, how do I set it up so that all of Dwayne's threads are automatically bookmarked?
01-29-2008, 11:06 AM
#12
928 Collector
Rennlist Member
Rennlist Member


