
Writeup - Reconditioning S4 Radiator Fan

 04-26-2021, 03:55 AM
#33
My thanks to Jon928se (Jon Holdsworth) for his help in posting this writeup.
Partial Reconditioning Instructions - Myles Garmonsway
Cooling Fan from 1990 Porsche 928 S4
PN 928 624 145 00
Bosch PN 0 130 304 210
Please note that I am an amateur mechanic with limited tools. I carried out the reconditioning on my garage floor. Once out of car allow 2 to 3 hours to complete the work for the first time.
Tools I used:
10mm socket
medium flat screwdiver
cold chisel
Pin punch
Centre punch
4 20mm brads
2mm, 3mm & 3.3mm drill bits
Variable speed drill
Pop rivet gun
Hammer
Two blocks of 4 by 2 wood
Penetrating oil
Cloths.
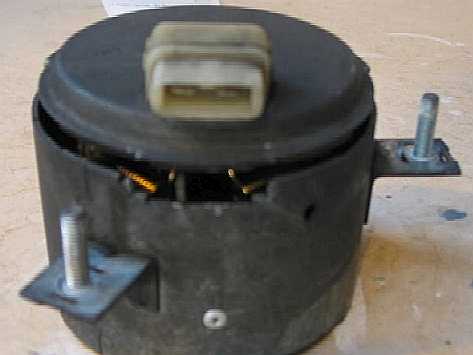
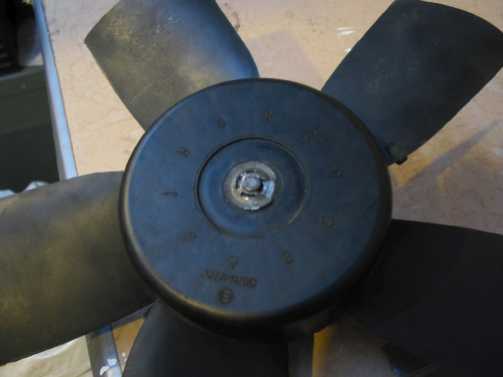
Remove fan.
I removed my left one, complete with blades, by manipulating the fan shroud into a suitable position.
Others have suggested removing the blades first then the motor by pressing off the fan retaining clip with a long lever. My blades were stuck fast to the motor so this wasn't an option.
Assembly is held on to fan shroud by 3 bolts (M6) with 10mm heads and a flat washer. Don't overtighten.
To remove the right fan requires removal of the shroud.
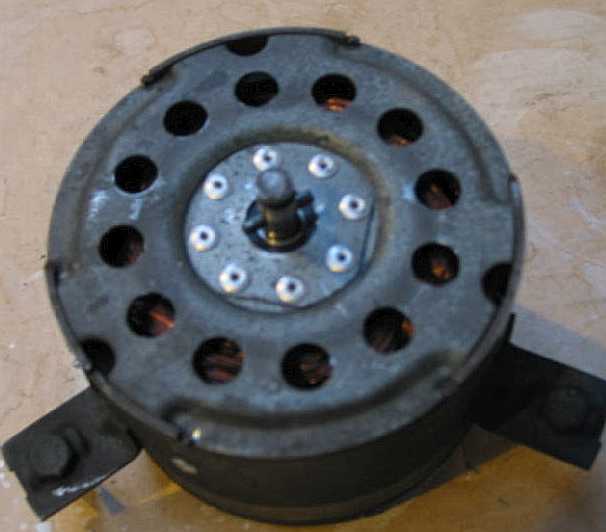
Disassemble fan.
Remove clip from fan onto shaft using screwdriver.
Press, tap, pull or shake fan blade off shaft.
Remove pin from shaft with punch.
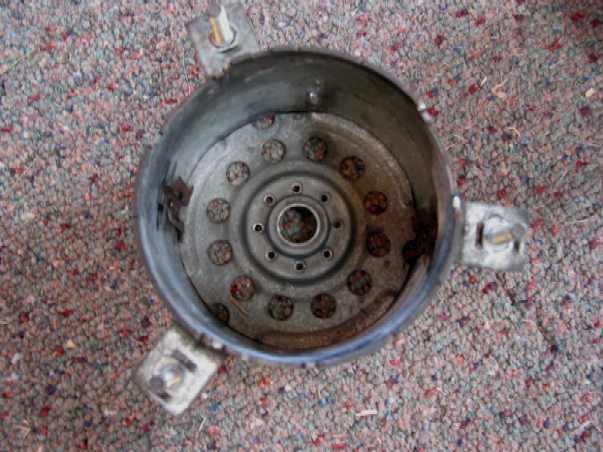
Carefully bend back tabs holding rear cover of motor onto housing. I ended up using a punch to close up the V groove that had been created when the tabs were made.
Pull off rear of motor. Careful of the small spring tab by the connector plug.
Press, pull, tap motor out of housing. I moved the windings on the shaft during this process so be careful. I reset mine flush at front of motor.
A small washer sits over shaft as a spacer between the motor & housing (against the bearing).

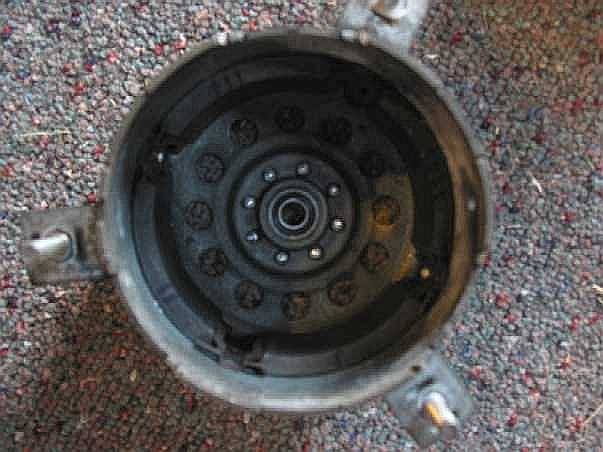
Remove Bearing
Centre punch the spot welds.
Mark position of plate for correct position on reassembly.
Drill out, in increments, to suitable size for rivets. I found this to be soft and easy to adjust for off centre starts.
Remove retaining plate.
Push out bearing. Mine was a NSK 608Z2 C4 which was shielded both sides and had an off centre groove running the circumference. The groove was towards the fan on mine. The replacement bearing was a NSK 608V with no groove.
Cleaning
Clean all the carbon & metal filings out of everything. In the end I drilled out the rivets holding two opposite magnet retaining plates and removed all the magnets to ensure I got all the metal filings.
I marked the magnets prior to this to ensure that I installed them in the same place.
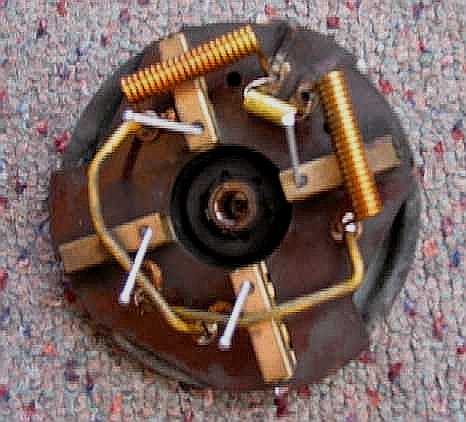
Brushes
I was told that the bushes were not able to be replaced (NLA?) so I had to leave mine in. I think they are probably a bit over half worn (100,000 km). This was the fan that comes on with the air con. If doing both fans you may find the brushes in the other motor are less worn. I would consider swapping the motors around if this was the case.
Reassembly
I used open aluminium 3.2mm diameter by 3.2mm grip rivets as these were locally available. Clearance to the windings did not seem to be an issue.
I used four small nails to retain the bushes during reassembly.
Lightly lubricate rear bush.
Place new bearing in position & rivet retaining plate in position (head of rivet on outside of housing). I pressed all the rivets through the holes before I started tightening to ensure that a small change in position did not mean I could not get the last rivet in.
Replace magnets & the two retaining plates. I put two plates in place, pushed the rivet through the hole and then compressed the plate against the side of the housing with a pair of vice grips & a suitable rod before tightening the rivet. This can be fiddly.
Reassemble rear plate onto motor with brushes retained. Remove nails. If you only just put the nails through the top hole on the brush housings they are very easy to remove.

Place assembly into housing, remembering the washer and the small spring tab on the side.
Place holding tabs back in position. I used a cold chisel for this.
Plug in & test.
Put pin through shaft.
Put on fan & retaining clip.
Reinstall in car.
Go and ENJOY!
Partial Reconditioning Instructions - Myles Garmonsway
Cooling Fan from 1990 Porsche 928 S4
PN 928 624 145 00
Bosch PN 0 130 304 210
Please note that I am an amateur mechanic with limited tools. I carried out the reconditioning on my garage floor. Once out of car allow 2 to 3 hours to complete the work for the first time.
Tools I used:
10mm socket
medium flat screwdiver
cold chisel
Pin punch
Centre punch
4 20mm brads
2mm, 3mm & 3.3mm drill bits
Variable speed drill
Pop rivet gun
Hammer
Two blocks of 4 by 2 wood
Penetrating oil
Cloths.
Remove fan.
I removed my left one, complete with blades, by manipulating the fan shroud into a suitable position.
Others have suggested removing the blades first then the motor by pressing off the fan retaining clip with a long lever. My blades were stuck fast to the motor so this wasn't an option.
Assembly is held on to fan shroud by 3 bolts (M6) with 10mm heads and a flat washer. Don't overtighten.
To remove the right fan requires removal of the shroud.
Disassemble fan.
Remove clip from fan onto shaft using screwdriver.
Press, tap, pull or shake fan blade off shaft.
Remove pin from shaft with punch.
Carefully bend back tabs holding rear cover of motor onto housing. I ended up using a punch to close up the V groove that had been created when the tabs were made.
Pull off rear of motor. Careful of the small spring tab by the connector plug.
Press, pull, tap motor out of housing. I moved the windings on the shaft during this process so be careful. I reset mine flush at front of motor.
A small washer sits over shaft as a spacer between the motor & housing (against the bearing).
Remove Bearing
Centre punch the spot welds.
Mark position of plate for correct position on reassembly.
Drill out, in increments, to suitable size for rivets. I found this to be soft and easy to adjust for off centre starts.
Remove retaining plate.
Push out bearing. Mine was a NSK 608Z2 C4 which was shielded both sides and had an off centre groove running the circumference. The groove was towards the fan on mine. The replacement bearing was a NSK 608V with no groove.
Cleaning
Clean all the carbon & metal filings out of everything. In the end I drilled out the rivets holding two opposite magnet retaining plates and removed all the magnets to ensure I got all the metal filings.
I marked the magnets prior to this to ensure that I installed them in the same place.
Brushes
I was told that the bushes were not able to be replaced (NLA?) so I had to leave mine in. I think they are probably a bit over half worn (100,000 km). This was the fan that comes on with the air con. If doing both fans you may find the brushes in the other motor are less worn. I would consider swapping the motors around if this was the case.
Reassembly
I used open aluminium 3.2mm diameter by 3.2mm grip rivets as these were locally available. Clearance to the windings did not seem to be an issue.
I used four small nails to retain the bushes during reassembly.
Lightly lubricate rear bush.
Place new bearing in position & rivet retaining plate in position (head of rivet on outside of housing). I pressed all the rivets through the holes before I started tightening to ensure that a small change in position did not mean I could not get the last rivet in.
Replace magnets & the two retaining plates. I put two plates in place, pushed the rivet through the hole and then compressed the plate against the side of the housing with a pair of vice grips & a suitable rod before tightening the rivet. This can be fiddly.
Reassemble rear plate onto motor with brushes retained. Remove nails. If you only just put the nails through the top hole on the brush housings they are very easy to remove.
Place assembly into housing, remembering the washer and the small spring tab on the side.
Place holding tabs back in position. I used a cold chisel for this.
Plug in & test.
Put pin through shaft.
Put on fan & retaining clip.
Reinstall in car.
Go and ENJOY!
04-26-2021, 12:50 PM
#34
Chronic Tool Dropper
Lifetime Rennlist
Member
Lifetime Rennlist
Member

I recently performed this task. My input: No need to remove the rear bearing plate unless you need to replace the brushes. Save a little bit of work by starting at the fan end, then inspect before the rear comes off. I bought a set of skateboard wheels, and splurged on the high-quality version with a higher ABEC rating. This rating refers to the finish on the ground surfaces and ultimately how smoothly the fan will turn. A local board or skate shop will have them if you need some immediately., else they are certainly available from many online sources. I did not need to replace the brushes, surprising after 100k of life in SoCal with AC on for pretty much the whole year. The rivets I used are 1/8 x 1/8 aluminum button-head pop rivets. One of the fans I disassembled was tight on the fan shaft due to some corrosion. I supported the fan on some 2x4 lumber spacers on the workbench, with the motor off the benchtop, and tapped on the end of the shaft with a punch to push it out of the bushing in the fan. Clean the holes and the shaft, and use a little bit of anti-seize there on reassembly. I cut 4 lengths of safety wire to pass through the holes in the brush holders to hold the brushes back. The wire routed out of the casing via four hollow rivets used to hold the magnets in place. I set the armature in place, then pull on each wire to free up a brush. Make sure the armature rotates OK, then fit the front plate with the new bearing. Know that the windings are held in position by that orange varnish, so you need to use care to not move any wires. It's fine to clean the armature in a detergent in the ultrasonic without risk, but you'll want to make sure it's completely dry before reassembly. Borland mentions using CRC Lectromotive electric motor cleaner, which is exactly the right stuff if you don't mind the safety concerns. DO NOT USE BRAKE CLEANER as it risks softening the varnish and ruining the motor. Stick with the detergent and water even if you don't have an ultrasonic washer. It's plenty. Support the end of the shaft when you put the drive roll pin back in. Tapping on a ball bearing is never a good idea, as it makes small dents in the races, then vibration, and the windings get loose and wear, and the motor fails.