
Advice on clutch removal please !!! Hit a snag...
 04-09-2007, 11:39 PM
#61
Addict
Rennlist Member
Rennlist Member
Join Date: Oct 2003
Location: Gone. On the Open Road
Posts: 16,322
Received 1,542 Likes
on
1,006 Posts
Originally Posted by FlyingDog
A mallet should take care of that.
 04-09-2007, 11:41 PM
#62
Craic Head
Lifetime Rennlist
Member
Lifetime Rennlist
Member
Thread Starter
Matt,
Why would I want to make anything easier? That would completely go against everything I've done here over and over and over again...
Once again, I really appreciate this.
Dave, thanks for the heads-up. I pushed the i-shaft back into the pilot bearing, so it's back away from the main shaft about 1-1/2 " until I can free up the ring gear. Just to be safe, I'll put the release arm back on and I've been working with a board on my chest the whole time (car is on jackstands). Seemed like a good idea based on what I've heard, but everyone made it seem much easier than this.
04-09-2007, 11:41 PM
#63
Burning Brakes
Join Date: Jan 2002
Location: Springfield, MO
Posts: 842
Likes: 0
Received 0 Likes
on
0 Posts
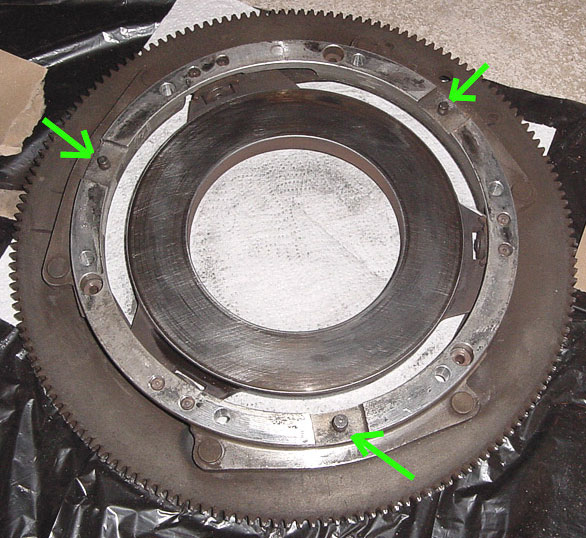
The pins on the intermediate plate are holding your clutch pack in. These are the pins that you tried to drive out through the flywheel. They need to stay in the intermediate plate and come out of the flywheel as you move (lever) the intermediate plate back toward the rear of the car. Also, the top of the clutch fork needs to be pried off of the ball socket.
04-09-2007, 11:42 PM
#64
Addict
Rennlist Member
Rennlist Member
Join Date: Oct 2003
Location: Gone. On the Open Road
Posts: 16,322
Received 1,542 Likes
on
1,006 Posts
Originally Posted by FlyingDog
Tap. Rotate. .... Tap. Rotate. (get frustrated) Whack. Rotate. Whack. Rotate. Whack. Rotate. Whack. Catch falling clutch assembly with face. Done.

Yup. Those ring gear teeth are as sharp as razors when they're pressed into your face by 50 pounds of falling clutch.
I'm always thinking "decline bench press" with the clutch NOT "incline bench press"

 04-09-2007, 11:46 PM
#66
Burning Brakes
Join Date: Jan 2002
Location: Springfield, MO
Posts: 842
Likes: 0
Received 0 Likes
on
0 Posts
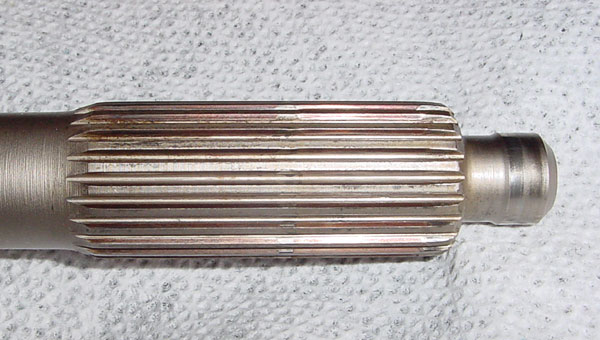
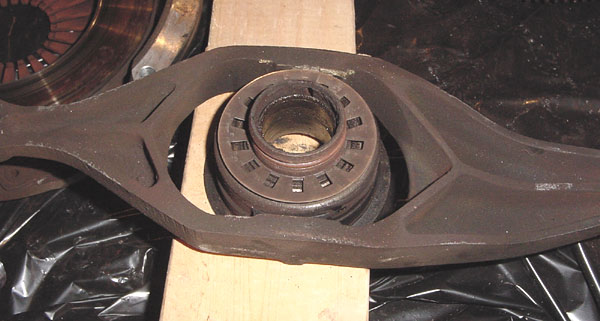
The coupler should go back further on the torque tube, but what you have now looks like enough for the shaft to clear the pilot bearing. This is what the pilot bearing side of the shaft looks like to give you an idea of how far it needs to slide.
04-09-2007, 11:52 PM
#67
Burning Brakes
Join Date: Jan 2002
Location: Springfield, MO
Posts: 842
Likes: 0
Received 0 Likes
on
0 Posts
The best order to take the clutch out is:
- Loosen the coupler and slide it back.
- Slide the intermediate shaft back and out of the pilot bearing.
- Pry the clutch fork off of the ball socket.
- Take the two 10mm bolts out of the thrust bearing sleeve.
- Take the bolts out of the pressure plate, which also go through the intermediate plate and into the flywheel.
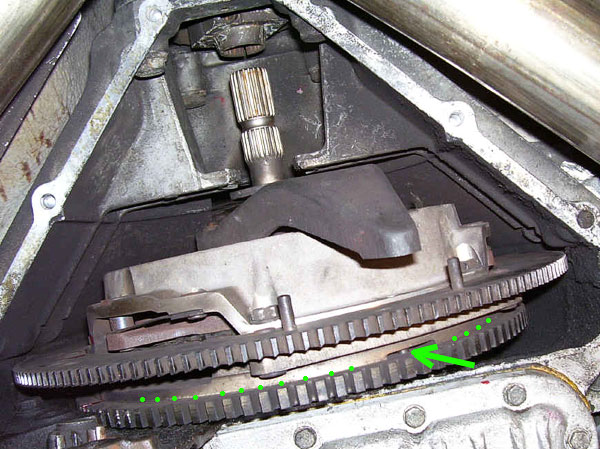
- Move the intermediate plate back, which moves the 3 pins out of the flywheel.
- Be ready to catch.
- Loosen the coupler and slide it back.
- Slide the intermediate shaft back and out of the pilot bearing.
- Pry the clutch fork off of the ball socket.
- Take the two 10mm bolts out of the thrust bearing sleeve.
- Take the bolts out of the pressure plate, which also go through the intermediate plate and into the flywheel.
- Move the intermediate plate back, which moves the 3 pins out of the flywheel.
- Be ready to catch.
04-09-2007, 11:56 PM
#68
Instructor

Join Date: Aug 2002
Location: Charlton, NY
Posts: 208
Likes: 0
Received 0 Likes
on
0 Posts
NJSF,
When I removed my clutch from my 86, everything was loose but there just wasn't enough clearance (I did not try to move the pins) to get the assembly out - so I moved the bell housing back.
I don't know why but perhaps the TT shaft is a little too far forward so there is not enough clearance. Perhaps loosening the rear TT coupler would allow the TT shaft to move backwards (I am guessing).
 04-10-2007, 12:29 AM
#70
Craic Head
Lifetime Rennlist
Member
Lifetime Rennlist
Member
Thread Starter
Thanks again everyone. The tap-rotate-tap technique is working. I can see some space at two of the three pins. I just need to get it to let go at the 'stepped' pin and I should be home free.
I'm at that point in the evening where I should stop before I break something, like my face.
I hit the last one with some PB blaster and tapped it once or twice before letting it soak for the night. I'm sure when I get in there tomorrow I'll get it out.
Couldn't have done it without everyone's input, thanks again.
BTW- it does look like there's some clutch damage so I'm in for the full monty. I was hoping I caught it in time, but, it wasn't meant to be. Oh well, at least I'll get a new clutch out of the deal, and a crash course in how not to remove one.
Good night all.
04-10-2007, 12:45 AM
#71
Burning Brakes
Join Date: Jan 2002
Location: Springfield, MO
Posts: 842
Likes: 0
Received 0 Likes
on
0 Posts
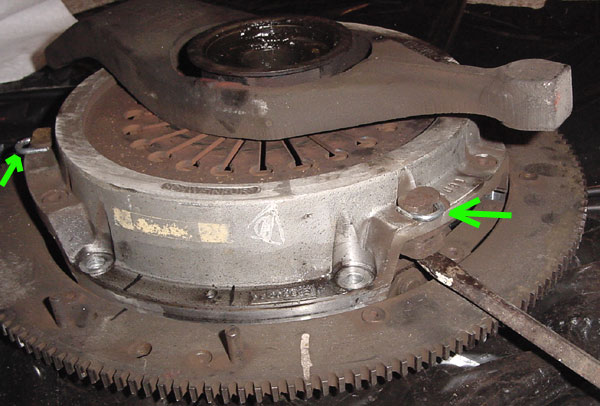
Once you get the whole pack out, you will need to shim the pressure plate to get the thrust bearing off. If you don't have a press, you can use a decent sized C-clamp and a couple of small pieces of wood to press each side enough to get a shim in. The shims in the photo (green arrows) were made from pieces of chain link, which were cut in half. Ignore the screw driver, it is there as a pointing device to show what needs to be moved up. You can't move it up by prying with a screw driver though. It needs to be pressed.

 . The pressure plate and bearing separate easily, then you can take the clutch fork off and get a new bearing.
 04-10-2007, 01:12 AM
#74
Burning Brakes
Join Date: Jan 2002
Location: Springfield, MO
Posts: 842
Likes: 0
Received 0 Likes
on
0 Posts
You'll also have to figure out how to pull the pilot bearing. There are several ways to do that. I think using a slide hammer is pretty common. I made a nifty pilot bearing puller with hardware pieces. The thread about it is here if you need: https://rennlist.com/forums/showthre...bearing+puller
The images didn't show up in that thread anymore, so I placed them back in on page 2.

The images didn't show up in that thread anymore, so I placed them back in on page 2.

