
5 Speed rebuild post - Process pics & tips (G28-05)
 12-30-2006, 08:41 PM
#16
Addict
Rennlist Member
Rennlist Member
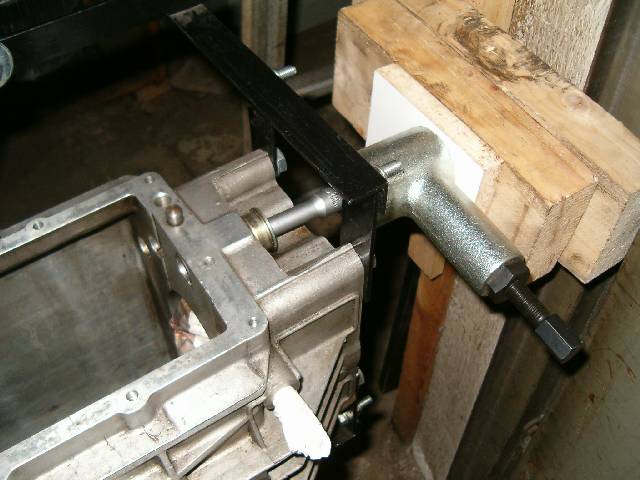
John, have to say your special tool is very innovative. Other way to do such tool it is to use worn out clutch shaft.
Layshaft should fall down enough to allow pinion shaft to come out, at least if reverse shaft is removed first to allow reverse gear to drop down also. Once pinion shaft is out of the way its possible to push input shaft out from the inside. I used pipe like press tool which can push up to 5 tonnes. Can't remember if I have pic of it up or not. In any case I filled box with pieces of wood to give tool backing to push against and put some rubber in between pipe tools piston and input shaft. Much easier to push than pull.
That pipe tool is useful in many gearbox jobs like pushing out selector rod bearings.
 12-30-2006, 11:11 PM
#17
Racer
Thread Starter
Join Date: Aug 2001
Location: Attleboro, MA
Posts: 470
Likes: 0
Received 0 Likes
on
0 Posts
Erkka,
yes, now that I've torn the case down, I would do it differently and not follow the manual exactly. It think it would be better to pull the input shaft after dropping the reverse gear and pulling the pinion shaft. The manual has you pulling the input shaft first and with everything still in place, it's very difficult to see if the lay shaft has fallen to it's lowest point.... mine did not but I could not see it.
Brendan -
I'm going to be ordering some a parts including a seal kit. It doesn't look like the seal kit includes the rubber bellows that covers the main shift shaft just over the torque tube- (it actually attaches to the gold colored bushing in Erkkas picture above). Did you get one of these?
12-31-2006, 02:05 AM
#18

Originally Posted by John V
E
Brendan -
I'm going to be ordering some a parts including a seal kit. It doesn't look like the seal kit includes the rubber bellows that covers the main shift shaft just over the torque tube- (it actually attaches to the gold colored bushing in Erkkas picture above). Did you get one of these?
Brendan -
I'm going to be ordering some a parts including a seal kit. It doesn't look like the seal kit includes the rubber bellows that covers the main shift shaft just over the torque tube- (it actually attaches to the gold colored bushing in Erkkas picture above). Did you get one of these?
Can you share where you will be getting the seal kit? I hadn't even gotten to that yet. Still mulling over three 200 dollar dog tooth rings for 1, 2, and 3. I have already purchased the synchros last year.
I feel like it would be a good idea to replace that selector rod bearing as well. And I want to have the case at least sand blasted. I was thinking of doing a thermal dispersant paint.
12-31-2006, 10:15 AM
#19
Racer
Thread Starter
Join Date: Aug 2001
Location: Attleboro, MA
Posts: 470
Likes: 0
Received 0 Likes
on
0 Posts
I'm still shopping around for parts. Right now I know I'll need the seal kit, the shift shaft bellows, 1,2,3 syncros, perhaps 2-3 shift sleeve (I want to see if the ID is worn along with the syncros since it looks to me like the two wear against each other). I don't think any of my dog teeth are bad enough to replace. To my way of thinking, the dog teeth rounding occurs when the syncros fail to match RPM's between the output shaft and input shaft. Rounded dog teeth could make engagement more difficult, but should not cause grinding. In a sense, the slight rounding of the teeth should allow the syncros more time to do their job. It's still a little early to tell but I plan on taking some dial indicator readings on a good versus bad set of syncro/shift sleeves to see if I find any trends.
I plan on sandblasting my case too but I'm don't think I'm going to paint it.
I plan on sandblasting my case too but I'm don't think I'm going to paint it.
01-02-2007, 11:11 PM
#20
Racer
Thread Starter
Join Date: Aug 2001
Location: Attleboro, MA
Posts: 470
Likes: 0
Received 0 Likes
on
0 Posts
Further along in this project, my box continues to be the exception in that it does not come apart without some persuation. I had to use a press to seperate the pinion shaft components. Here's a pic of all the bits laid out.

I found that of all my gears, second gears dog teeth and synchro were the worst. I do not believe the dog teeth are bad enough to replace and I will be re-using them. Here's a close-up.

The shift sleeves are a different story. I had suspected that synchros alone would not completely resolve my shifting concerns and I think the following sequence will confirm this. The shift sleeves wear along with the synchro's but there is some good news here that I didn't expect. My shifting problems concentrated on gears 1, 2 & 3. The good news is that only one shift sleeve is needed to repair all 3 gears. The reason is that the shift sleeve for 1st gear only wears on one side since reverse has no synchro. It looks like that sleeve can be installed backwards and it will work fine and provide a brand new surface for a new 1st gear synchro to work with. Here is a close up of the 1st/reverse shift sleeve.

The bad news is that the 2nd/3rd sleeve must be replaced to fully correct shifting. I measured the worn and unworn sides of 1st gears shift sleeve and there is measurable wear as can be seen here:

I measured the 2/3 shift sleeve as well as the 4/5 shift sleeve. 2/3 was very close to the worn side of 1st gear, while 4/5 was closer to the unworn side of the reverse side of the 1/reverse sleeve. Now, how does this effect shifting? Below are 2 pics. The first shows a good sleeve and synchro- Notice the space between the dog teeth and the shift sleeve teeth. That much sleeve travel is required while shifting, under syncronizer friction, prior to teeth egnagement. Conversly- picture 2 shows a worn shift sleeve and a worn synchro. Notice how much less distance there is under friction prior to teeth clash. I also tried a good syncho with bad sleeve and as expected, the distance was between the two.


Clearly, the interaction of both components will contribute to shift quality and longevity in a rebuild. The good news is that only one shift sleeve is needed since gears 2 & 3 share a shift sleeve. Gears 4 & 5 are fine and first gear should work by reversing that sleeve.
So far so good... hopefully things continue to go well.
I found that of all my gears, second gears dog teeth and synchro were the worst. I do not believe the dog teeth are bad enough to replace and I will be re-using them. Here's a close-up.
The shift sleeves are a different story. I had suspected that synchros alone would not completely resolve my shifting concerns and I think the following sequence will confirm this. The shift sleeves wear along with the synchro's but there is some good news here that I didn't expect. My shifting problems concentrated on gears 1, 2 & 3. The good news is that only one shift sleeve is needed to repair all 3 gears. The reason is that the shift sleeve for 1st gear only wears on one side since reverse has no synchro. It looks like that sleeve can be installed backwards and it will work fine and provide a brand new surface for a new 1st gear synchro to work with. Here is a close up of the 1st/reverse shift sleeve.
The bad news is that the 2nd/3rd sleeve must be replaced to fully correct shifting. I measured the worn and unworn sides of 1st gears shift sleeve and there is measurable wear as can be seen here:
I measured the 2/3 shift sleeve as well as the 4/5 shift sleeve. 2/3 was very close to the worn side of 1st gear, while 4/5 was closer to the unworn side of the reverse side of the 1/reverse sleeve. Now, how does this effect shifting? Below are 2 pics. The first shows a good sleeve and synchro- Notice the space between the dog teeth and the shift sleeve teeth. That much sleeve travel is required while shifting, under syncronizer friction, prior to teeth egnagement. Conversly- picture 2 shows a worn shift sleeve and a worn synchro. Notice how much less distance there is under friction prior to teeth clash. I also tried a good syncho with bad sleeve and as expected, the distance was between the two.
Clearly, the interaction of both components will contribute to shift quality and longevity in a rebuild. The good news is that only one shift sleeve is needed since gears 2 & 3 share a shift sleeve. Gears 4 & 5 are fine and first gear should work by reversing that sleeve.
So far so good... hopefully things continue to go well.
Last edited by John V; 01-02-2007 at 11:28 PM.
 01-03-2007, 09:00 AM
#23
Racer
Thread Starter
Join Date: Aug 2001
Location: Attleboro, MA
Posts: 470
Likes: 0
Received 0 Likes
on
0 Posts
Dangler - yes, but not by itself... it's still attached to the input shaft and is the flanged bearing right behind the aluminum bearing cap in this picture.

If anyone has a close up picture of a good reverse gear, I'd appreciate it so that I can figure out how to reshape the teeth leading edges.
If anyone has a close up picture of a good reverse gear, I'd appreciate it so that I can figure out how to reshape the teeth leading edges.
01-03-2007, 10:44 AM
#24
Addict
Rennlist Member
Rennlist Member
Originally Posted by danglerb
Do you have a picture of the input bearing, the apparently insanely expensive one?
 01-03-2007, 10:46 AM
#25
Addict
Rennlist Member
Rennlist Member
Originally Posted by John V
If anyone has a close up picture of a good reverse gear, I'd appreciate it so that I can figure out how to reshape the teeth leading edges.
01-03-2007, 12:34 PM
#26
Racer
Thread Starter
Join Date: Aug 2001
Location: Attleboro, MA
Posts: 470
Likes: 0
Received 0 Likes
on
0 Posts
Erkka,
anything you have will be appreciated. Mine is a '81 gearbox (which I think is similar to the '85). My reverse gears are not evenly worn... I posted a pic of the worst spot on the large gear. There are other spots where it it looks like the gear teeth have lead in features (like a shallower dog tooth profile almost)... but I can't tell if that was intended by design or a by product of wear. Even a good GTS reverse gear should give me some insight into how it "should" look.
anything you have will be appreciated. Mine is a '81 gearbox (which I think is similar to the '85). My reverse gears are not evenly worn... I posted a pic of the worst spot on the large gear. There are other spots where it it looks like the gear teeth have lead in features (like a shallower dog tooth profile almost)... but I can't tell if that was intended by design or a by product of wear. Even a good GTS reverse gear should give me some insight into how it "should" look.
01-03-2007, 02:43 PM
#27
Burning Brakes

Join Date: Apr 2004
Location: Indiana
Posts: 1,022
Likes: 0
Received 0 Likes
on
0 Posts
did you notice if the frame on some of your larger roller bearings are plastic or metal? my original ones were plastic and damaged. when i ordered replacements, they were steal. if your's are plastic, i'd consider replacing them while youre in there.
01-12-2007, 10:07 PM
#28
Rennlist Member
WOW This is great info! Im not a mechanic or engineer but as everyone knows I have to find a way to rebuild my tranny. I have a 28 /07 but any details is greatly appreciated. This is such a huge help as to guidance before the experiment.
John... Please keep the updates coming, this is greatly appreciated by many of us!
John... Please keep the updates coming, this is greatly appreciated by many of us!
01-12-2007, 11:31 PM
#30
Administrator - "Tyson"
Lifetime Rennlist
Member
Lifetime Rennlist
Member
Shouldn't a thread / project like this earn John a free membership? Randy?
If not, I'll buy him one - Randy or John, PM me how I do this.
Wow, very nice - I guess I've taken every other part off / back on this car, I should tackle this next.
If not, I'll buy him one - Randy or John, PM me how I do this.
Wow, very nice - I guess I've taken every other part off / back on this car, I should tackle this next.