When you click on links to various merchants on this site and make a purchase, this can result in this site earning a commission. Affiliate programs and affiliations include, but are not limited to, the eBay Partner Network.
Whilst playing around resealing my AC system I was contemplating changing out the blower but eventually decided to defer it until the next cool season arrives. Driving around over the last few days the thing seems to have got noisier and now I am thinking of surgery.
I removed the blower from my late 90S4 after the wreck. It did not come across as anything remarkable but then I was dismantling things with no perception of reinstallation. Now I am looking for opinions on how best to go about this task, specifically whether it is best done as a bonnet off job. I believe it can be done either way but if done with the bonnet on the airbox has to be dropped from the cabin side. I used to have a nice article about this written by our friend Herman but cannot find it at the moment.
Just about to dive into the WSM to see if I can find anything of use. Also appreciate any tips as to how best to evaluate the condition of the currently fitted blower. Hate it when those things start making noises.
Have you tried to spray a lubricant (like LPS2) on the fan bearing first?
Did that many years ago. No noise and works perfectly from "0" to "4".
To change the blower, I would remove the hood.
No idea what LS2 is yet alone whether it is available here but I will look it up to see what class of lubricant it is.
My BMW series 528 back in 1990 had a blower squeal that irritated the hell out of me. Blasted some WD40 into the cabin duct- probably the dumbest thing I have ever done on a car as the cabin stank to high hell for weeks but ironically it did calm the squeal down.
Any tips on how best to squirt something onto the bearings for optimal effectiveness if I try that approach? Nothing to lose but I have a feeling something on the air impeller is making contact with the stator it spins in.
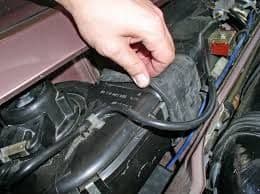
Bonnet off showing wooden block I used to support it whilst undoing the forwards most bolts Julian Assange's living room The fan bay after removal.
Well Did some more reading and followed the links Tony sent [thanks]. Decided this evening that it was time to do something about things and dived in. An hour later the bonnet, the windscreen wiper, the trim piece bolt and the glove box were off. I undid the three fasteners holding the motor in place [thankfully my passenger seat is out at the moment] and just lifting the windsceen trim slightly the blower was out - so easy I ma icking myself for not doing it earlier when the weather was still reasonable.
I then decided to try and remove the air handling box, undid the fasteners and that is basically as far as I go.
My suspicions about the blower proved correct - the bearing is shot. My spare blower feels fine by comparison. I then examined the flap and that was not fully home so some external air would have been entering the system. Then the "piece de resistance"- the evaporator- could not see too well into so took a pick with my nice new Huawei phone and holy moly- there was so much crap on the matrix it looked as though Julian Assange was in residence! How on earth any air got past the thing is a mystery. For those who read my ac thread I was convinced my ac compressor is tired but now I am not s sure!
The way forward-
tomorrow I will try to remove the air box so I can get at the actuator for a possible repair. I could remove it this evening after having had a go from underneath and above. I suspect they have to be well sealed to prevent condensed water from dropping onto the.central electrics. Suggests welcome as to how to break the box free and how best to seal it. Could not find Hermans file on this.
I then have to clean the evaporator front matrix. Now I am wondering if it is better to try some mechanical cleaning firsr followed by ac evaporator spray on cleaner or just spray the stuff on as currently is- thoughts? I will also give the blower from my late S4 a clean before installing it.
The best sealant for the recirc housing is 3M stripcaulk. Just layer it until it just exceeds the profile of the sealant on the box when you remove it. This method has worked well for me and others.
The best way to clean the evaporator is to remove it from the car and go to town but considering how much of a hassle it is the second best way is to use a spray evap cleaner and agitate it gently with something like a toothbrush.
You do not want to bend the fins. Rinse it off gently with a hose or spray bottle and let the drain do its job. I would make sure it isn't clogged first though. It drains just above the front of the cat
How did you break the joint on the recirc housing?
I did this on mine a few years back... For some reason it is out of balance and makes a hell of a racket. You might want to run it before you put it all back together.. I still need to pull it again and see whats what.
How did you break the joint on the recirc housing?
I have a spray evaporator cleaner standing by.
No cats though!
I undid the screws that hold it in. a few from underneath including some nuts that thread onto some studs that hold the housing itself and a the few screws that hold the blower in place.
I undid these, laid the ce panel flat in the footwell, put a towel over the panel, and pushed down. Many leaves followed lol.
The sealant is more like a butyl than a real adhesive so you don't really need to break a seal. It just lets go with some gentle pressure.
Actuator with split diaphragm Air Diverter box
Well I got the airbox out today- just needed some light pressure from above trying to rock it and slowly but surely the calking gave way and then it broke free. Undid the mounts for the central electrics module and that moved a little but not much- even so it was enough to get the diverter assembly out.
The actuator came off relatively trouble free- I liked the plastic clamp that fastened it to the actuator arm. Needless to say the diaphragm was completely split. Not sure what was used to seal the door- there is only what seems to be remnants of some kind of seal strip. One side could be cleaned easily but on the other side about half of the sealing surface is inaccessible. The door itself is not removable so that may be a problem. I seem to remember Herman cuts one side of the box out to facilitate removal although how did this without cutting out the bearing as well is beyond me at the moment.
So I need some of that calk and either an actuator or the diaphragm that goes in it. That or seal the door in a closed potion for ever but it would be a shame to do that given where I am currently at.
From the looks of things, you would think you had been in the Paris to Dakar ralley. A little dusty in the desert.
Really?
My wife is **** about house cleanliness - she runs round the villa semi permanently with a vacuum cleaner in hand chasing the dust as it settles and if she is not vacuuming it she is brushing it or mopping it- aargh - drives me crackers with it!
The only plus is that there were not too many leaves in there- not too surprising given there are not that many trees here! It sure looks a lot better after a good wash with soap and water!
Now i have to clean the layer of crap off the evaporator- i have a spray for that but wonder whether I need to attempt cleaning with soap and water first. A gentle brushing in the vertical plane with a soft brush to help prevent damaging the fins might work ok.
The seal on the recirc flap door is currently puzzling me- I suspect it originally had something like draft excluder but all that is left are some strands of the backing adhesive layer.

 05-18-2019, 09:38 AM