When you click on links to various merchants on this site and make a purchase, this can result in this site earning a commission. Affiliate programs and affiliations include, but are not limited to, the eBay Partner Network.
Is there supposed to be a border surrounding the headliner hole for the sun roof motor, like the sun roof has? My cover has both fingers sticking out but it'll drop down when I run over a bump or a speed bump in a parking lot. It's annoying as hell.
Any suggestions will be gladly accepted.
Thanks
Joe
The two fingers fit in little brackets in roof and the spring steel wire in the rear keeps it tight at the back.
Since the headliner has no support in the middle it makes it difficult to fit properly 'cause the headliner sags.
You have to press up on the headliner to get the fingers into the brackets and you're fighting the spring steel wire a bit since it doesn't want to let you move the trim too far forward.
I ended up, after years, breaking the plastic fingers on the trim panel. I bent some new 'fingers of steel' to take their place and epoxyed them to the plastic trim.
Given that the headliner is eternally bowed down (due to water leaks over the centuries and whatnot) is there a way to re-bend the headliner without taking the entire car apart? Does one need a steam generator, a super humid day, super glue, etc?
I ended up, after years, breaking the plastic fingers on the trim panel. I bent some new 'fingers of steel' to take their place and epoxyed them to the plastic trim.
I ended up, after years, breaking the plastic fingers on the trim panel. I bent some new 'fingers of steel' to take their place and epoxyed them to the plastic trim.
HTH.
I also would like to see how that's done.
I just attempted to reinstall the panel, using some adjustable hood support poles holding up the trim. I broke one of the plastic fingers attempting this, so I just held it up there temporarily with a pole. After getting in the car to drive it my elbow immediately hit the pole and knocked everything back down.
And yes, I put zip ties on the headliner. The previous owner pulled it way down trying to look at the sunroof, probably, and it was permanently sagging. I had tried using the screw to keep it up there but it eventually ripped straight off.
I’ll try to remember to find or take a picture of the panel ‘steel finger’ fix today and post it. It’s not pretty on the inside, but it works.
The headliner doesn’t take bizarre tools and master-level skill to remove. The trickiest part is separating the glued-down leather from the interior sunroof opening. Patience is the required tool.
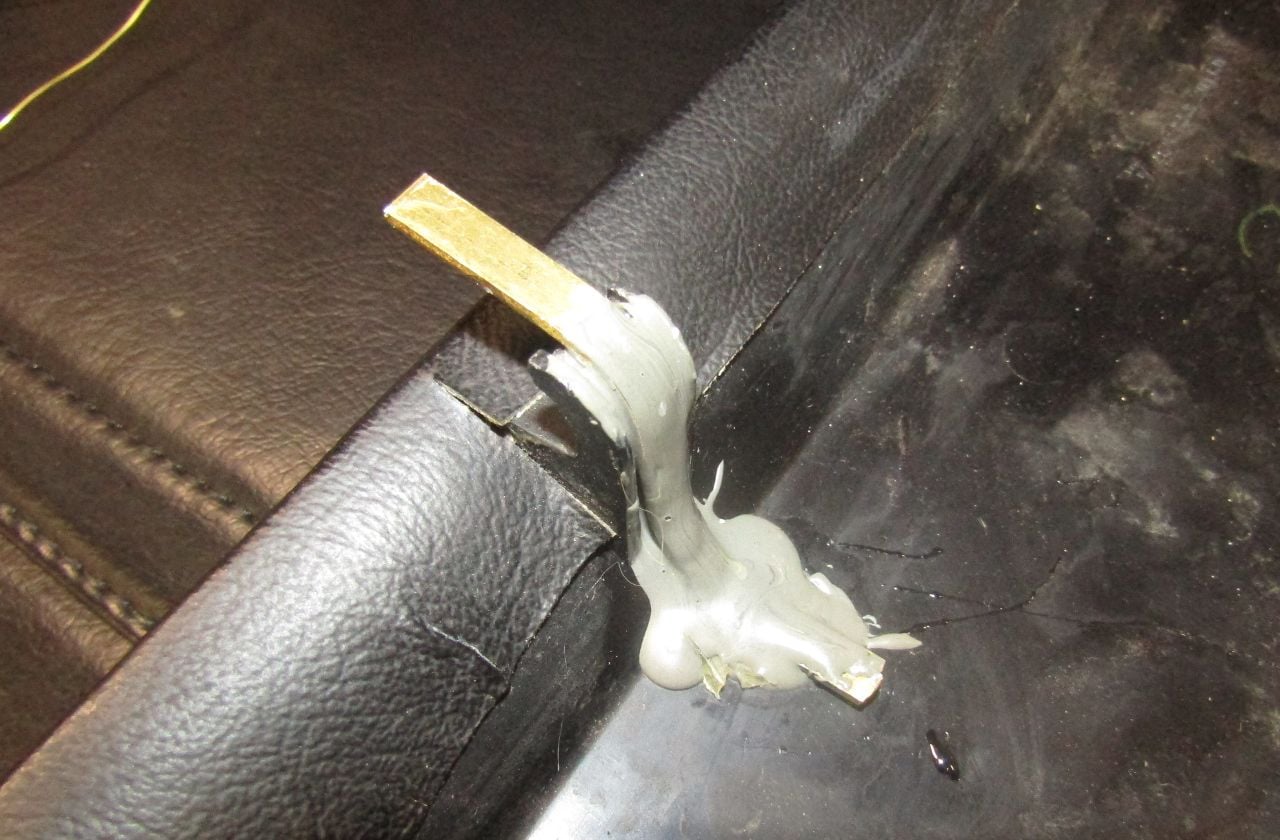
Here. It's embarrassing and not at all on par with repairs I usually do.
It's thick brass about 3/8" in width. You should be able to buy a 3' length at a good hardware store. I chose brass because it's easy to bend and has some 'give' to it.
I bent it to fit the curvature of the panel's original 'finger' and then slathered it in JBWeld. I'd recommend experimenting with a better 'glue' though. This repair has held up for years. Until tonight when I pulled it to take the picture. The other side debonded from the plastic. So, a 'plastic weld' glue or similar is called for.
Christopher: Did you apply some adhesive between the liner and the metal roof? I'm curious how whatever you did worked?
I have added the "fingers" as Dave did and am now waiting for the JB to dry; but I wonder how snug the fit will be and will I have to add something else to the mix.
Using the 2*4+Wetting the cardboard trick worked pretty well: The downpressure from the ceiling is a lot less which tends not to push the sunroof cover out of its slots.
However the big mistake was discovered at SITM: When I took apart the sunroof motor to regrease and repair it, I put the back strap on and slipped the front of the strap into the same slot in the roof that the sunroof cover uses. There's another slot to the left, and that's why the cover would never attach the clip to the roof. Moving the strap to the left allowed me to hook both of the sunoof hooks into their spot in the roof and problem solved.
But if the roof is sagging because it got wet over the years from a bad hatch seal I would say replace the hatch seal then do the 2*4 trick to push the roof back into shape and let it dry for a week or to to set it that way.
Note if you have a dark colored car the chances are good that the sunroof drip tray is cracked this tray attached to the rear edge of the sunroof and guides water to the drains
A cracked tray will allow water to wet the headliner

 05-05-2019, 10:04 PM