When you click on links to various merchants on this site and make a purchase, this can result in this site earning a commission. Affiliate programs and affiliations include, but are not limited to, the eBay Partner Network.
If anything their site is a great way to access PET effectively and find part numbers quickly just about anywhere.
Blake,
i managed to get the "official" sizes and I suspect there is some interpretation required as ac systems were specified in Imperial units of some kind. In now have a box full of green rings.
My "problem de Jour" is now compressor oil. No shortage of the stuff here but apparent the correct specification recommended by Denso is ND PAG46. I cannot find out what was used after the conversion- Porsche simply told me they "used the correct oil" 5 years ago after could no longer get R12. It seems that it is not absolutely necessary to use POE in a converted system so I intend the flush the evaporators and condenser and have a clean fill with the correct oil.
However as I have just come to understand, not all PAG oils are the same and what Denso recommend is what they call a "Double End Capped" PAG. It seems this is required to prevent longer term degradation of the PAG- fact or fiction who knows? Liqui Moly make this stuff, it is available here and they told this morning they sold the last bottle a few days ago- urrrgh! I was in there last week to get some engine oil for my Cayenne.
Now I am thinking whether to hold off and try to custom fit a universal type parallel path condenser in the hope that it may improve overall system capacity.
.
I'm glad you got it out, Fred! I suscribed to the thread as it will come in handy when I have to take the A/C out...
Originally Posted by worf928
They did. Until mid-way in MY'87.
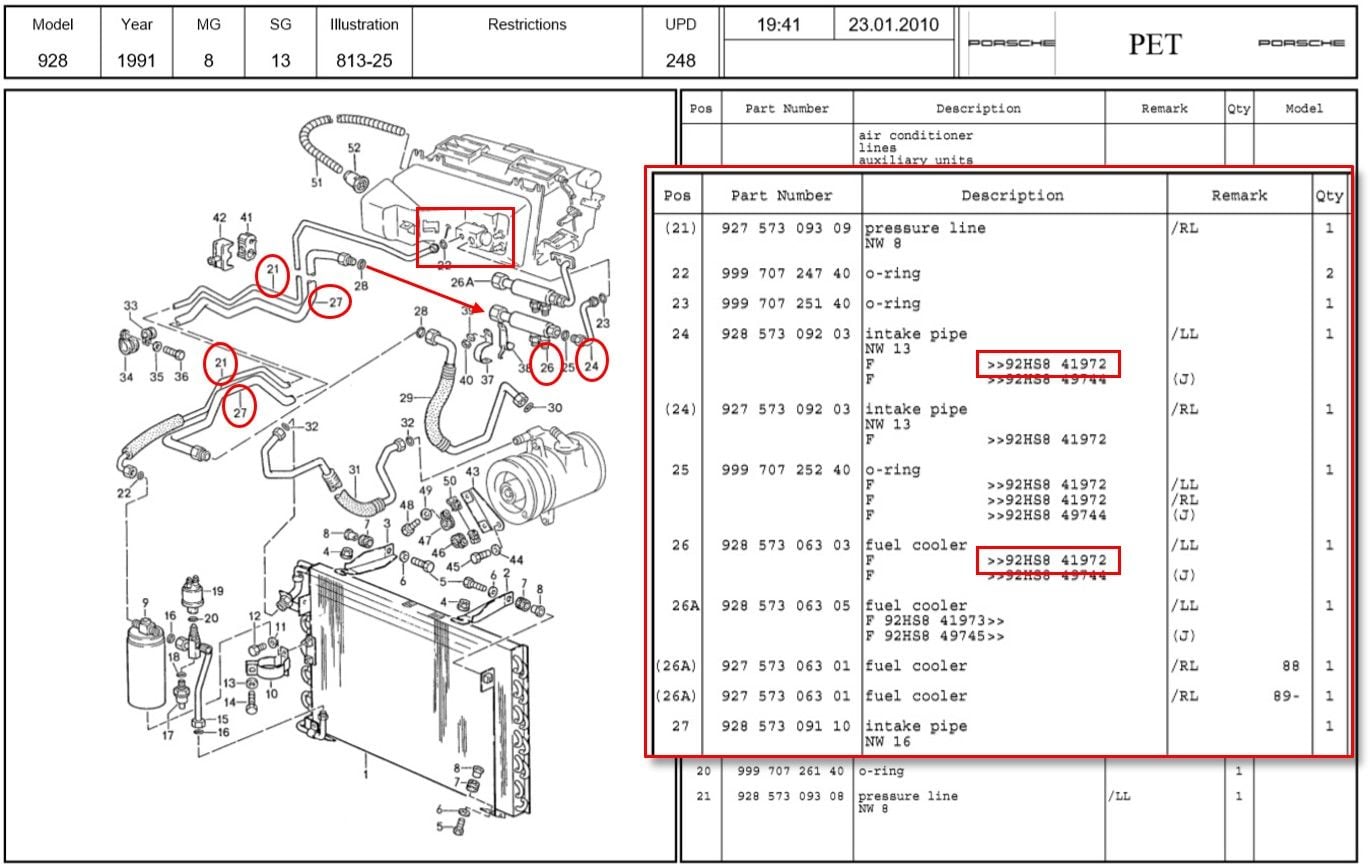
Now I understand why PET lists two types of fuel cooler for my MY...... (Pic is from my own write up so I can hopefully put it all back together again�.)
My early '87 has the unions on both sides of the fuel cooler, so I could undo the line to the expansion valve.
Good luck on re-installing the valve Fred, hope to learn more from your efforts for when I re-install my A/C later.....
I found that I can remove the hood, change the expansion valve, and reinstall the hood easier and faster than I can change the expansion valve with the hood in place.
I found that I can remove the hood, change the expansion valve, and reinstall the hood easier and faster than I can change the expansion valve with the hood in place.
Funny you should mention that. I have had some suspicious noises coming from the blower recently and was thinking to remove the hood if I change the blower- then it struck me that if I had removed the hood it might have made the expansion valve change over easier as well!
Note the icky condition of the green o ring on the evaporator inlet.
This afternoon I removed the rear expansion valve- as can be seen on the attached pic there were 3 black rings and one green one- however the green looked to be in a somewhat grotty condition albeit no signs of leakage. How or why it should be like that I have no idea but it should clean up ok.
Getting the outer cover out of the way however was a whole different ball game! According to the WSM you remove a couple of screws each side and it should lift up- but it didn't. In the end I pulled the driver side rear cushion away from the frame, managed to get my hand behind the side of the cover and then something seemed to break away. I was not aware of any fasteners there- maybe something just stuck with aging. Once freee the unit lifted OK but it did not seem to want to come right off. I looked for but could not see any retaining screws at the rear but rather than force matters and do some damage I reckoned I could do what I needed to do with the cover at about 45 degrees above horizontal and sure enough it worked.
I now have both expansion valves of, the drier disconnected and ready to remove, and the elements of the system are ready to flush/blow out. Doing the flush should be easy but I am a bit concerned that the air out of my compressor may have a little oil and possibly some moisture in it albeit the latter should not be an issue when the system is vacuumed. A few molecules of air compressor oil should be no problem either but I would prefer to blow it out with moisture and oil fee air.
Then, just when you think you have seen most of the quirky things this car has to offer one finds something else truly DF stupid! Just as I was wrapping up my afternoon session and then on to watch the F1 from Azerbaijan, I was playing around in the drier area and decided to whip the old unit out. As I did that and the local area opened up a bit to my astonishment I saw that the line coming out of the drier going towards the evaporator has a short hose section in it. Never saw that before given how well it is obscured, never upgraded that with barrier hose and from the look of it, there is no effing way to get the thing out or a replacement in whilst the engine is in situ - WTF???
What cretin did this? If nothing else surely they could have put a union in the line? For company that makes such a brilliant piece of kit did they never stop to think about the poor chap who has to work on these things every 20 years or so? I guess I will have to just leave it as is and hope for the best- anybody got any creative suggestions? With refrigerant in that a tline operating at pressures up to 300 psig one does not want to fool around with Heath Robinson mods at this location.
You do not have to be a crackpot to own a Porsche 928 but it surely might help!
Made further progress today- dropped the lines under the car feeding the rear ac- that went well and some oil came out but not a huge amount. I removed the solenoid valve and blew out the lines and evaporators best I could with air. I really wanted to flush them with solvent but could not fathom out a way to do so- at the rear there was the danger of spraying crap over the interior. I also cleaned up the high pressure manifold- rather disconcerting was the fact that external surfaces had a lot of crud on them. I suspect it is historical rather than concurrent but...? Tomorrow i will strip the manifold down and reseal it. I reinstalled both expansion valves this evening and started doing the o rings in the engine bay. All the unions came apart relatively easily- no gorilla imitations glad to say.
With each seal I made a record on my check list, collected the old seals, recorded the size of the seal going in after matching it with the seal coming out. Some of the seals I removed were green, some were black and generally they looked as though they needed replacing.
Tomorrow I will install the compressor, replace the remaining seals, fit the new drier and then vacuum the system to test if it holds.
Still having a problem getting hold of the PAG46 compressor oil I want. The oil that came out was geenish but I do not know if that was the oil or whether it was dye- either way it smelt a bit like anti freeze so it probaby is PAG. At least the oil looked clean and I saw no signs of crud or nasty black bits.
Hi Fred - FWIW, note page 87-121 of the WSM for the torque values on the expansion valve clamp screws. They're surprisingly low; the M5 bolt is 6 Nm (4 ftlb) and the M6 is 9Nm (7ftlb).
Hi Fred - FWIW, note page 87-121 of the WSM for the torque values on the expansion valve clamp screws. They're surprisingly low; the M5 bolt is 6 Nm (4 ftlb) and the M6 is 9Nm (7ftlb).
The micro wrench that I used on the expansion valves has a lever arm of about 3inches. Cannot see anyway to get my quarter inch drive torque wrench in there. I measured those bolts as being M5 on the outer and M4 on the two inner positions for whatever that is worth.
What surprised me was how easy the unions came apart- just hope I have not overcooked them at all. I just wound them in until they started to bite and then gave the wrench another pinch. Three of the joints on the return line needed a 30mm size wrench to move them according to the scale on my adjustable wrench- even with that thing on the joints I just wound it in and gave it a little pinch just like the other joints.
Ironically I suspect the most difficult joints to get right will be the pressure switch and the pressure transmitter. All the other joints compress the ring but those two the joint faces are moving across the O ring relative to each other so I figured those are the ones that probably are more fragile and need more care/attention. I guess we will soon find out whether what I did was correct! All the joints I cleaned fastidiously and then using a small artists paints brush, smeared them liberally with compressor oil and then slid the rings into their final resting places.
At the moment I am now little confused as to how and when to lubricate the re-sealed compressor. Some web sites seem to recommend having lube in the compressor and manually turning the thing over about 10 times after it is installed to prevent hydraulic lock, some websites recommend adding the oil under vacuum into the high pressure port. I do have a neat little piece of ac kit permitting oil injection pushed through by refrigerant if I can work out how to purge it with the oil in it.
For the compressor, I installed it and attached the lines at the compressor and then poured the oil down the other end of the disconnected hose going to the compressor. To avoid blowing out the seals/hydraulic lock, I spun the clutch (not the pulley) around a few times too. I've tried adding oil using the extra hose on the gauge manifold, but found out later that not all the oil had made it into the system. I.e., some oil ran out of the gauge set hose when I hung it up.
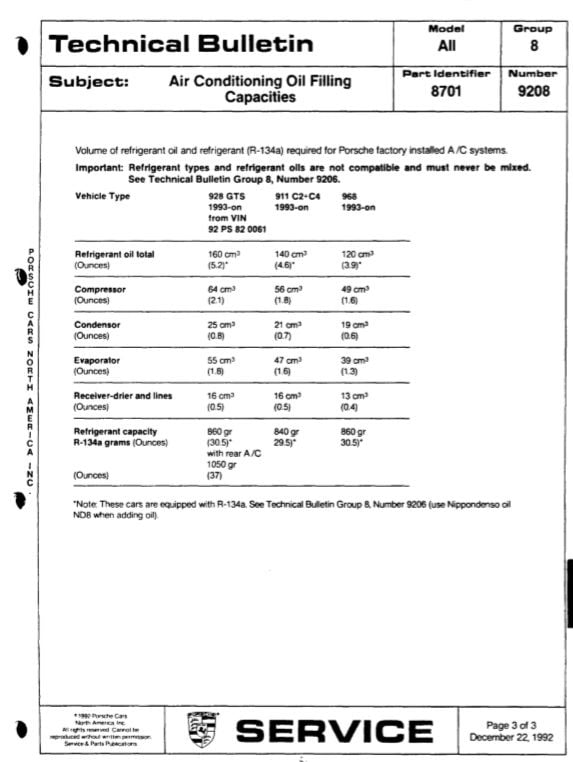
I'm sure you already have this, but just in case, here's the oil and Freon capacities from the tech bulletin (not the WSM):
For the compressor, I installed it and attached the lines at the compressor and then poured the oil down the other end of the disconnected hose going to the compressor. To avoid blowing out the seals/hydraulic lock, I spun the clutch (not the pulley) around a few times too. I've tried adding oil using the extra hose on the gauge manifold, but found out later that not all the oil had made it into the system. I.e., some oil ran out of the gauge set hose when I hung it up.
I'm sure you already have this, but just in case, here's the oil and Freon capacities from the tech bulletin (not the WSM):
Thanks for the data sheet- it seems to align with the WSM numbers but will cross check anyway.
Now that I have nearly completed the mechanical work I need to take stock of what to do next. I had hoped to solvent flush the evaporators and the condenser. The latter looks possible but I had difficulty determining how to hook up some kit to get the solvent into the system. Although I blew both evaporators out with air, that alone cannot guarantee all the oil is gone. Add to that the fact that I do not know what oil the local agents used and I fear a recipe for disaster coming on.
The reading I have done suggests not to flush through the expansion valves so obviously do not want to risk any issue with the new ones. Flushing through the compressor is not too clever [to say the least] so the problem is "what is left in the evaporators" and can it cause an issue. I am reliably informed that once the oil in the system reaches a total of about 250cc the performance takes a big dump.
The other issue I am fretting about is the hose in the line from the drier to the evaporators as that never got changed out. Now I am wondering if it may be viable to cut the line and reinstate it with one of those double compression fittings designed for such. Not too keen on the idea but a hard coupling cannot be fitted [brazed] in-situ. I feel as though I have missed a coupling somewhere along the way but if I did there is no sign of it in PET!
The rear evaporator is easier to flush [I suspect] but my whitish carpets might take a non recoverable beating if something splashes. The main evaporator is much more difficult to get at- urrrgh!
... I guess I will have to just leave it as is and hope for the best- anybody got any creative suggestions?
I replace that section with barrier hose and new properly-crimped ferrules. I have a nifty hand-held hydraulic crimping tool from Mastercool. You don’t want to buy one for one hose, but maybe you can borrow one?
I replace that section with barrier hose and new properly-crimped ferrules. I have a nifty hand-held hydraulic crimping tool from Mastercool. You don�t want to buy one for one hose, but maybe you can borrow one?
I watched a youtube vid last night with a chap using one of those- very neat!
Getting new hose and getting it crimped is not a problem here- getting the line out to work on is the issue. A couple of unions like the ones under the floor pan leading to the rear ac would have been ideal or just one in the area close to the expansion tank as long as there is access. I am thinking about using one of those double compression fittings- you just cut the line and bolt them back in. Not sure I want to try it without direct knowledge of ho well they work.
I now have 21 of the 24 O-rings replaced- just have to fit the new drier and cross check everything. Despite tons of compressor oil in the country I cannot find the Denso recommended oil. I may have to go with the regular PAG46 or possibly a POE oil. I also found what looks like a POA oil made in the Emirates but could find no technical data about it so canned that idea.
A bit of an update since last week for those so interested:
1. I blew out the condenser and both evaporators was not sure how much oil might be left in them but saw no signs of residual oil.
2. Got myself a flush kit- flushed the rear evaporator but saw no signs of anything coming out in the wash. Could not get the flush kit into the main evaporator due to the access restrictions so gave that a miss. Figured that since I lost the charge I probably lost most of the oil so must be little left in there. There was a bit of oil in the piping sections into/out of the rear ac unit but not a great deal.
3. After completing the O ring change out I connected the rebuilt compressor and the old drier and did a vac test- failed miserably.. Put some air pressure into the system [100 psig] and with my soapy water tester found one of the new O rings was leaking badly at the rear ac solenoid valve inlet. Opened up the joint and found the new ring was chewed up for whatever reason. Replaced the faulty ring.
4. Put the system on vac test and although better, it was still not holding vacuum. So had to break the system down into segments- removed the compressor, used the bungs in my Mityvac kit on the hose ends- vac tested and still it did not hold.
5. Next test I bunged the compressor discharge piping and the discharge of the drier- this time vacuum held so the condenser/instrument manifold and drier are out of the leak scenario.
6. Next test- I removed the rear new expansion valve and vac tested the coil- held vacuum. Good but this suggested the problem was at the front evaporator- urrgh!
7. Next test- I removed the old front expansion valve, jury rigged a test adapter for the space available- and the evaporator held vacuum. Assumption was that the old expansion valve was leaking.
8. Fitted a new expansion valve and did a full system vacuum test - it held! Then fitted the compressor and did another test- it held [thank goodness].
9. Now I had to deal with compressor oil and what to use. Went to the VW/Audi dealer and asked if they had ND8 PAG46- they did - at $130 a small tub- urrgh. I then went to the Mitsubishi dealers who know me and asked them what they used in my wife's Pajero [4x4] that is kitted with a Denso ac compressor- they showed me a can of PAG they use- it is not double end capped as Denso use in new compressors but then it dawned on my why they use this spec- probably because of the time between manufacture and installation and thus they cannot control the time it is exposed to moist air. Oil problem solved!
10. I then fitted my new drier -or tried to- my local ac shop supplied what looked like an identical unit but the end connections were smaller- took the old unit and matched it with correct size item and fitted. Immediately vacuumed the total system, for 1 hour, left it over night for 24 hours and the vacuum gauge did not change. Vacuumed it for another 1.5 hours this afternoon and connected up my gas bottle- purged the line between the bottle and the manifold- now ready to add gas.
11. A the same time as the vacuuming, I boxed everything back up, reconnected various bits and pieces and now ready to add gas.
Now I have a small query- the switch on the underside of the drier manifold is a straight switch and no issue connecting it as the terminal block can mount either way round [I think]. Te instrument that mounts on the top side is listed in PET as a transmitter whereas in the wiring diagram it is called a " Pressure Switch Frigen" which I presume is "pigeon English". Looking at the wiring diagram I would think the terminals can be connected either way but if it is a signal transmitter then logic says it should be uni-directional. I cannot see any markings on the instrument to suggest which terminal is which but the wires in and out are coloured differently- so- is the wiring on this item critical or can the terminals be reversed without issue? Can anyone explain what exactly this item does and how it helps system control?

 04-28-2019, 07:55 AM

 (Pic is from my own write up so I can hopefully put it all back together again�.
 )
)