Tie Rod Installation
#16
Rennlist Member
If you want to get a quick assessment of what the front wheels are doing toe wise stand about a metre or so to the rear of the car and squat down on your knees- with one eye closed move from a position slightly wide towards the car and stop when you can only see the side of the front wheel. If you have a toe in condition [as you should] then the position you stop at should be a bit wide of the car. /If you have a toe out position you will not be able to find such a side on position of the front wheels because it will be obscured by the car.
You could also take pics from this position so that we can confirm same. Not possible to comment from the pics you posted.
You could also take pics from this position so that we can confirm same. Not possible to comment from the pics you posted.
#18
Basic Sponsor
Rennlist
Site Sponsor
Rennlist
Site Sponsor
Thanks everyone and it looks like we have got our late and earlier mixed up.
Replacement set on the way to Ashley and we will do some backtracking on recent orders.
Replacement set on the way to Ashley and we will do some backtracking on recent orders.
__________________

Does it have the "Do It Yourself" manual transmission, or the superior "Fully Equipped by Porsche" Automatic Transmission? George Layton March 2014
928 Owners are ".....a secret sect of quietly assured Porsche pragmatists who in near anonymity appreciate the prodigious, easy going prowess of the 928."

Does it have the "Do It Yourself" manual transmission, or the superior "Fully Equipped by Porsche" Automatic Transmission?
 George Layton March 2014
928 Owners are ".....a secret sect of quietly assured Porsche pragmatists who in near anonymity appreciate the prodigious, easy going prowess of the 928."

#19
Chronic Tool Dropper
Lifetime Rennlist
Member
Lifetime Rennlist
Member
FWIW, trying to guess at toe settings with the naked eye is, well, no better than a guess. I saw the movie but the camera angles and lens choices just made it worse.
The jackstands-and-strings method works very well, keeping in mind that the toe will change a lot as the car settles on the suspension. For work like this where I know that the toe setting is OK when I start, I'd raise then lower the car back onto the tires, and take a toe reading. Replace the two tie rods, setting each of them as close as possible to the length of the old tie rod it's replacing. Set the car back down, and fine tune the toe setting so it matches what you measured after the initial raise-and-lower. It would be a help having the rack centering bolt installed for both measurements but that's not really critical. This method gives you a really good chance of settling the suspension (75-100 miles driving) without scrubbing the tires too badly. Then do a normal full alignment without lifting the car at all.
The jackstands-and-strings method works very well, keeping in mind that the toe will change a lot as the car settles on the suspension. For work like this where I know that the toe setting is OK when I start, I'd raise then lower the car back onto the tires, and take a toe reading. Replace the two tie rods, setting each of them as close as possible to the length of the old tie rod it's replacing. Set the car back down, and fine tune the toe setting so it matches what you measured after the initial raise-and-lower. It would be a help having the rack centering bolt installed for both measurements but that's not really critical. This method gives you a really good chance of settling the suspension (75-100 miles driving) without scrubbing the tires too badly. Then do a normal full alignment without lifting the car at all.
#21
Team Owner
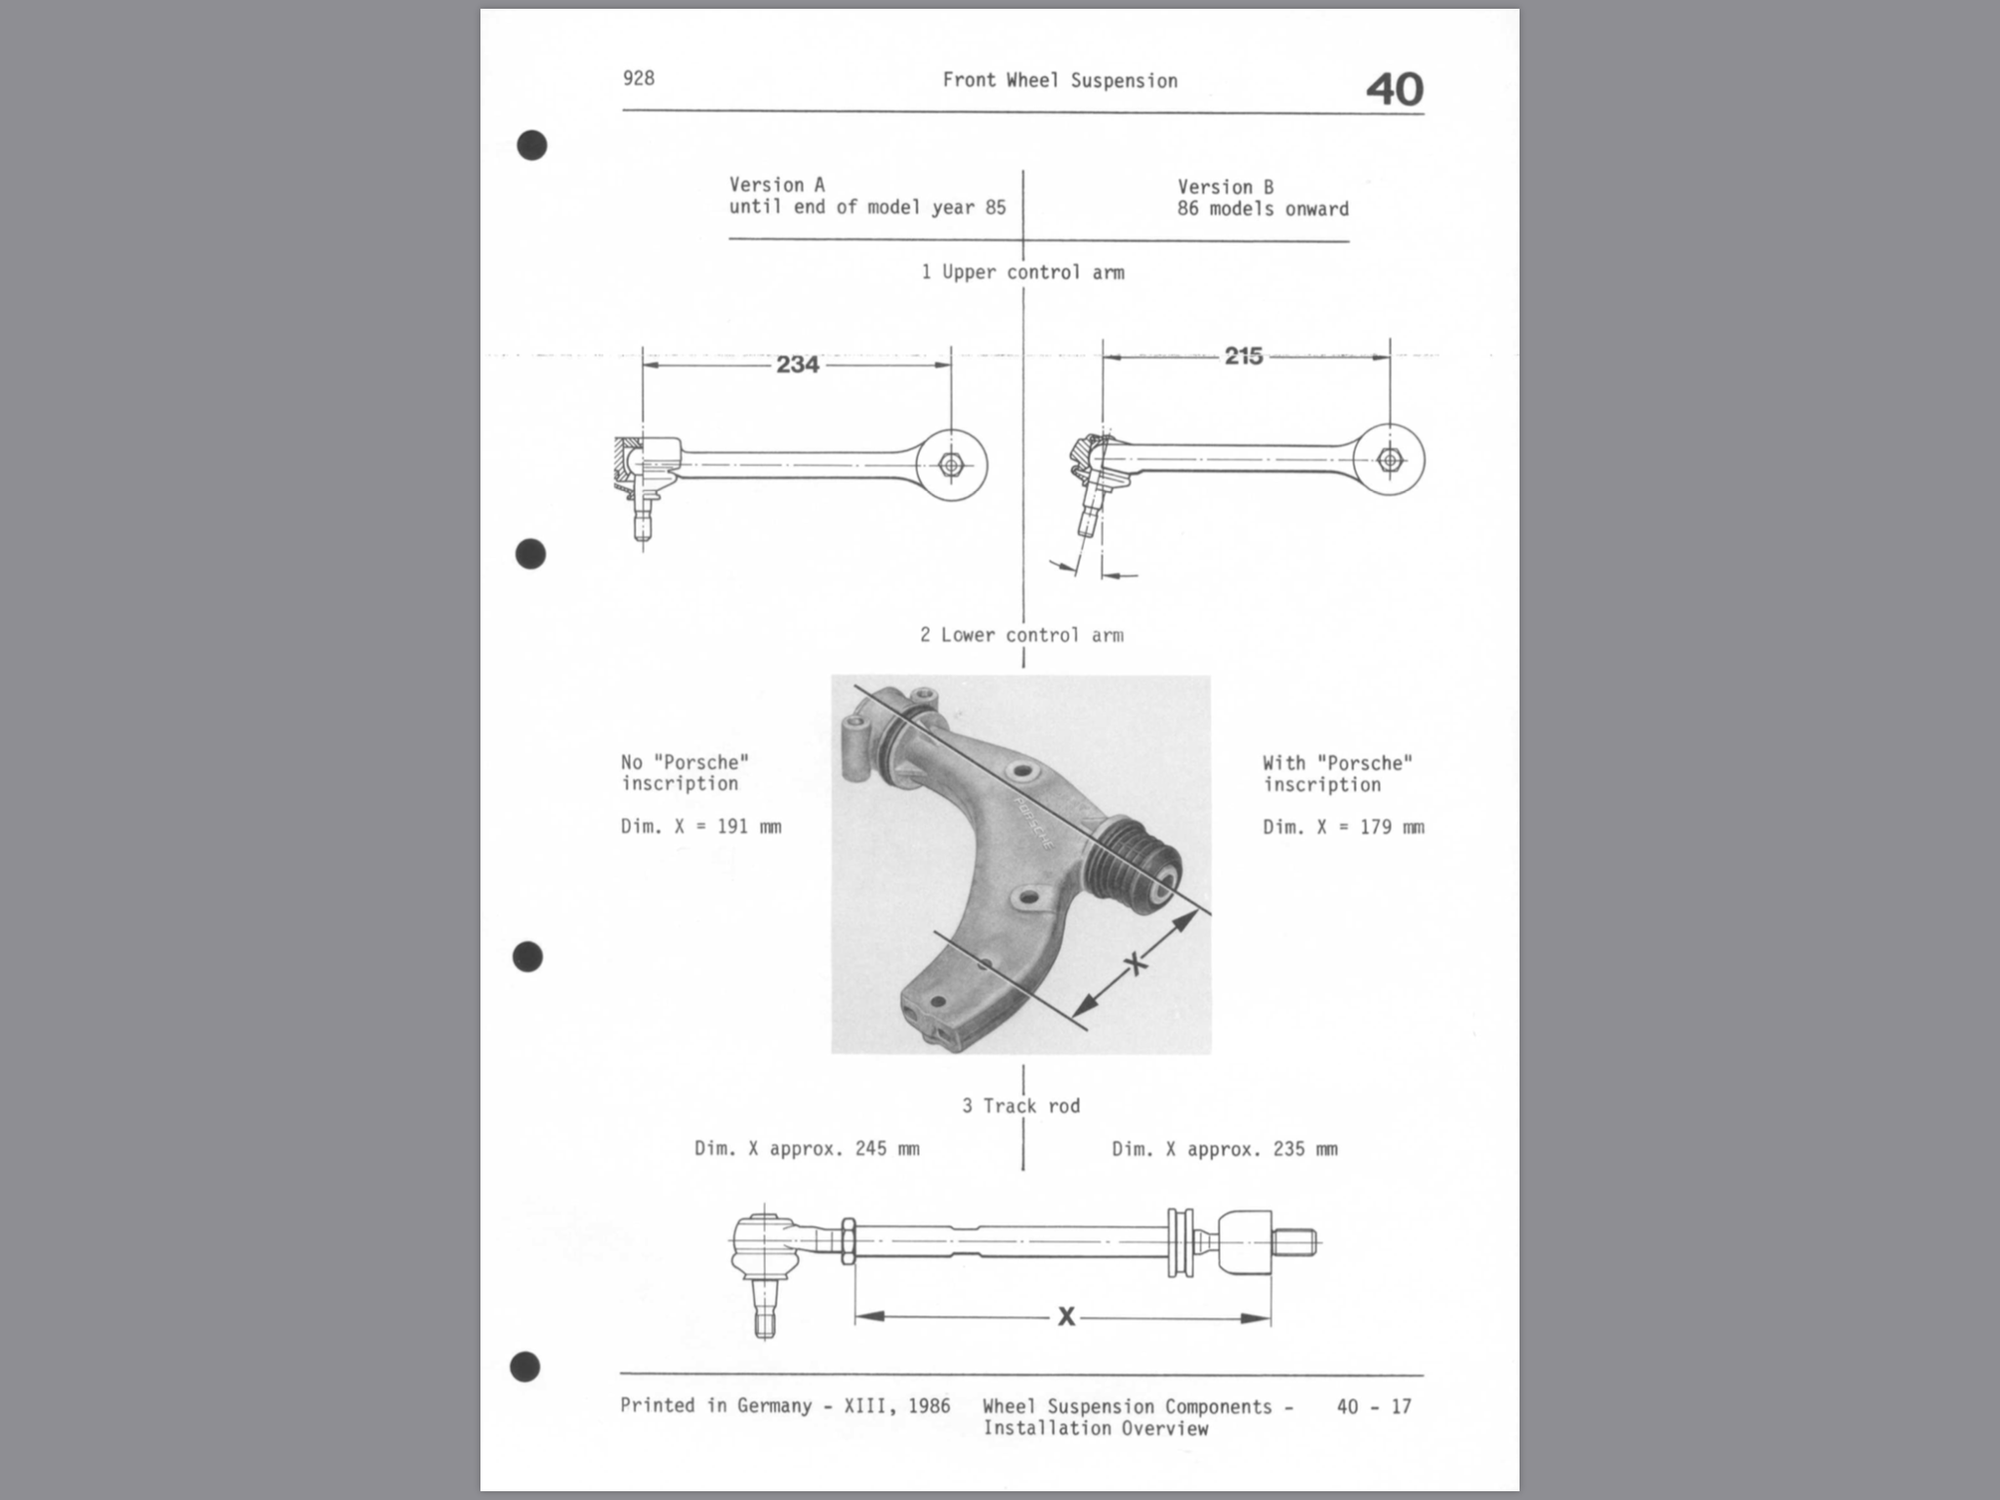
Post 17 has your answer look at the bottom of the WSM its either 245mm or 235mm
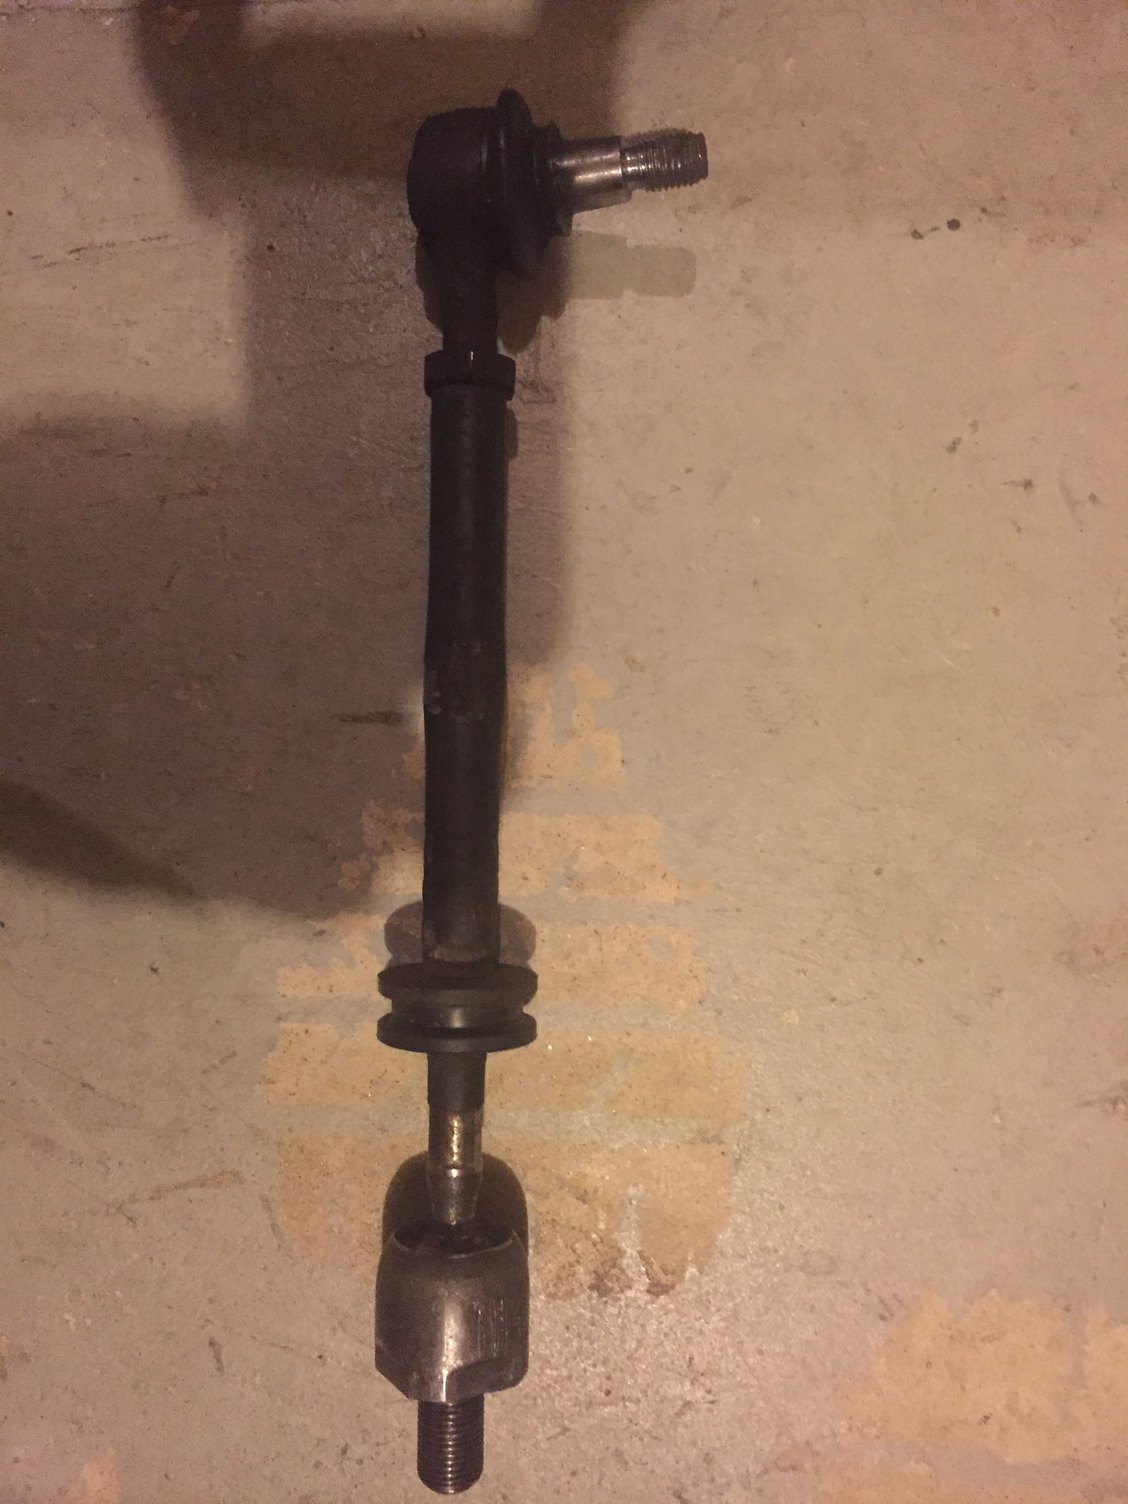
It looks like a short version to me.
It looks like a short version to me.
#22
Based on the configuration of the flats (4 not 2) on the end that threads into the rack, and a comparison to Roger's pictures, it looks like it is the late model (shorter) version. It also doesn't show the 4 crimps?, which is additional confirmation.
#23
Rennlist Member
Thread Starter
Join Date: Oct 2010
Location: Memphis, TN 1987 S4
Posts: 1,005
Likes: 0
Received 27 Likes
on
15 Posts
And the saga continues... I got the replacements from 928sR us. Thanks Roger. I got the passenger side off and the new one installed with no problems. I didn’t even damage the boot on that one. The drivers side will not come out of the hub on the brake assembly. I have a separator and have completely destroyed the boot trying to get it off. If will not budge. What now? All suggestions welcome. The separator I have is the wedge
#24
Rennlist Member
You need one of these. Dont ruin boots, dont (usually) require as much hammer beating.Tighten as much as possible , smack the end over the ball joint with hammer, repeat until it separates. Leave the ball joint nut flush with with the end of the thread to reduce damage to threads.
On small ball joints (eg Miata), some care is required re thread damage, as that part seems quite soft.
jp 83 Euro S AT 57k
On small ball joints (eg Miata), some care is required re thread damage, as that part seems quite soft.
jp 83 Euro S AT 57k
#25
You need one of these. Dont ruin boots, dont (usually) require as much hammer beating.Tighten as much as possible , smack the end over the ball joint with hammer, repeat until it separates. Leave the ball joint nut flush with with the end of the thread to reduce damage to threads.
https://www.amazon.com/Powerbuilt-94.../dp/B00GJJZ0EC
On small ball joints (eg Miata), some care is required re thread damage, as that part seems quite soft.
jp 83 Euro S AT 57k
https://www.amazon.com/Powerbuilt-94.../dp/B00GJJZ0EC
On small ball joints (eg Miata), some care is required re thread damage, as that part seems quite soft.
jp 83 Euro S AT 57k
Thats the tool to get.
#26
Basic Sponsor
Rennlist
Site Sponsor
Rennlist
Site Sponsor
Yes we screwed up. After getting new stock in we put the shorts in the long box and the longs in the short box.
There are no defining marks on either tie rod to give you an idea if they are long or short and the difference in length between early and late is circa 15mm.
We now compress the tie rods to there shortest length to distinguish between the two as a final check.
Original OEM Lemforder are NLA in the after market. So the choice is Porsche or aftermarket.
#27
Rennlist Member
Thread Starter
Join Date: Oct 2010
Location: Memphis, TN 1987 S4
Posts: 1,005
Likes: 0
Received 27 Likes
on
15 Posts
Alright guys. I got the new tie rods in. Took it back to my guy to see if adjustments would allow for alignment. Still wonít adjust enough. My question is, could I have caused this problem when I removed the rack? I didnít center the wheel printout putting the rack splines back into the steering knuckle. Iíve got it back on stands now and will pull the rack AGAIN if you all think this may be a problem. The dimple you speak of on the rack, is that visible through the hole in the rack plate?
#29
Rennlist Member
Alright guys. I got the new tie rods in. Took it back to my guy to see if adjustments would allow for alignment. Still wonít adjust enough. My question is, could I have caused this problem when I removed the rack? I didnít center the wheel printout putting the rack splines back into the steering knuckle. Iíve got it back on stands now and will pull the rack AGAIN if you all think this may be a problem. The dimple you speak of on the rack, is that visible through the hole in the rack plate?
Something does not quite add up here. The car can be aligned without the centering bolt but that presumes that everything is centered correctly- thus the alignment shop will position the steering wheel to be visually central and should be able to complete the alignment. If the rack was off centre the steering wheel would be displaced proportionately when driving straight ahead. Thus if they cannot align the car something else has to be incorrect whatever it may be. If you remove the centering bolt cover you should be able to visually tell when the rack is centered and the steering wheel should then be aiming straight ahead- you should also have to turn the steering wheel equal amounts to reach both limit stops.


