When you click on links to various merchants on this site and make a purchase, this can result in this site earning a commission. Affiliate programs and affiliations include, but are not limited to, the eBay Partner Network.
impacts of wider wheels on alignment specifications
My car is needing an alignment after replacing the tierrods. I am curious to know if changing the dimensions of the wheels has an impact on the alignment. I've noticed putting wider wheels on the rear tends show positive camber. On my 1988, if we are running wider rear wheels do we adjust the camber?
I am running 8"x18" rims up front and 10"x18" rims in the rear and I am wondering if I should be providing the alignment shop any additional instructions to deal with the different wheel size? Or should I put the original manhole covers wheels back on for the the alignment work?
As a side note I'll be bringing my 928 to my friends repair shop to the alignment. He has done one 928 before but I will be there to help him with all the 928 specific precautions like: don't lift the car off the wheels, following the specific sequence in the WSM, etc. I can't think of any place here in Portland that has 928 alignment experience so at least this way I can provide my friend with the technical documentation and guidance.
With a competent alignment guy you can get our cars with in spec with almost any combination of wheel/tire. I've had 18" 295/30/18s on the rear, 245/40/18's on the front and had no issue getting the right settings on a Hunter. Countless customers cars up on racks. Took me going to 4 different locations that had constant techs who where there for longer than 3 months to find a happy shop. Most people who do alignments don't realize it is a balancing act to get our cars done right. You can't just adjust camber on one side and expect it to stick when you go to the other side. Each setting needs to be adjusted at about the same time and it usually takes 3 arms/hands to do it right. I've trained so many techs how to do it it's crazy, I wish I had room for a Hunter DSP of my own so I'd not have to deal with it.
What Sean says is spot on. Do the rear end first and then move on to the front then cross check the numbers on the rear end. The main interaction is between camber and toe but changing a setting on one side can impact settings on the other side. I suspect the problem with most alignment shops is the time related pressure to get the job done and thus once the setting is within in the "acceptable" range they simply move on to other adjustments.
The trick is to have a user friendly shop that one has a built a good relationship with. Try to explain the critical nature of the iterative approach to get the side to side numbers very close to each other. I try to get them to within 0.1 of a degree either side for both camber and caster. For toe there is no excuse for not getting them identical up front. I also take my toque wrench and specifically check the torque settings on the front camber and caster and rear camber. I have not found a method to check the torque on the rear toe -in bolts Also take a look at the shoulders of the rear camber adjuster- on many examples that gets damaged making adjustment difficult. If hey are badly bruised as mine were, you can fit the camber adjustment pockets Carl of 928 Motorsports offers as a relatively easy rectification.
Beyond the above you may wish to select specifically targetted values depending on your needs. Porsche changed the front caster setting for later models to 5.0 degrees from 4.0 degrees and advise this can be applied to earlier models and I have always used this both my 90S4 and current GTS chassis. For front camber I set about 1.5 degrees to optimise cornering using the wider rubber I and I set front toe to the smaller end of the permissible spec range to help turn in and reduce the steering effort caused by the wider rubber but that is with either 265 or 255 sections. On the rear end the car seems to like toe-in set to mid range values and a bit less camber than the front wheels. At the end of the day there is no "one size fits all" when it comes to alignment and it is something one has to work at to get the most out of it. Remember that as one tunes to improve one particular characteristic, the gain has to be offset against the invariable loss on something else. Optimal camber helps cornering but at the cost of straight line braking to some extent. Less front toe-in helps turn in but makes a car a bit twitchier etc etc.
Finally, if you are using a Hunter shut the alignment bay doors if it is a windy day- gusts of wind can change the readings they are that sensitive! I write this anecdotally as your friend will know this only too well I suspect unless the location is wind free.
I do my own alignments and have the following comments to consider:
1) The more outside of stock the ride height is, the more camber adjustment is needed to compensate, and there is only so much camber adjustment available. So, if they are having trouble getting the camber within spec, consider checking the ride height.
2) The steering rack centering bolt is cheap and makes the alignment much much easier. I highly recommend it. Any of the vendors should be able to supply it. You could make your own, but it's cheap enough not to be worth it.
3) The WSM has a very easy to follow guide on which adjustments to make in which order along with photos of where the adjustment points are. If you follow it, the alignment process goes very smoothly. The process is the same as most cars, so it's not a stretch. In general: do the rear axle first (camber first, then toe), then do the front axle (camber first, then caster, then recheck camber and adjust and recheck caster as necessary, then toe).
If you're interested in doing your own alignments, I use the following equipment:
To allow the wheels to move freely while making adjustments I have some steel turntables that have degree markings on them to make caster measurement easy. Mine are very heavy, but now they have aluminum versions like this: https://www.ebay.com/itm/One-Pair-Al...UMgH:rk:1:pf:0
I only use one set of turntables. I've found that a 2x10 board is almost exactly the same thickness as the turntables, so I just drive axle that I'm not adjusting onto those boards. I also use 2x10 boards that I cut an angle into the end of to use as ramps to drive onto the turn tables if I'm doing it on the ground. If I'm on the lift, I use my bridge jacks to pick the car up by the lower control arms and place onto the turntables.
You could come up with much cheaper ways of accomplishing the same results as the above tools, but the tools are consistent, durable and ready to go. Worth it to me, especially since I align all of my vehicles, not just the 928.
I've also created a spreadsheet that converts measurements taken with a ruler into the degrees needed for alignments. I'm happy to share it if you would like it.
It takes me between 15 to 30 minutes to set everything up and about 5 minutes to take and record all of the measurements (toe, camber, caster). I've found alignments on the 928 to be very easy and I can make and confirm the adjustments on all four corners in about 30 minutes. I did it on the ground several times before I got my lift. The lift is easier, but doing it on the ground is easy as well. In that case, I used wood ramps that I built from 2x10s for all four corners, one set of which has a removable section that the turntables fit in. I can post photos if it helps.
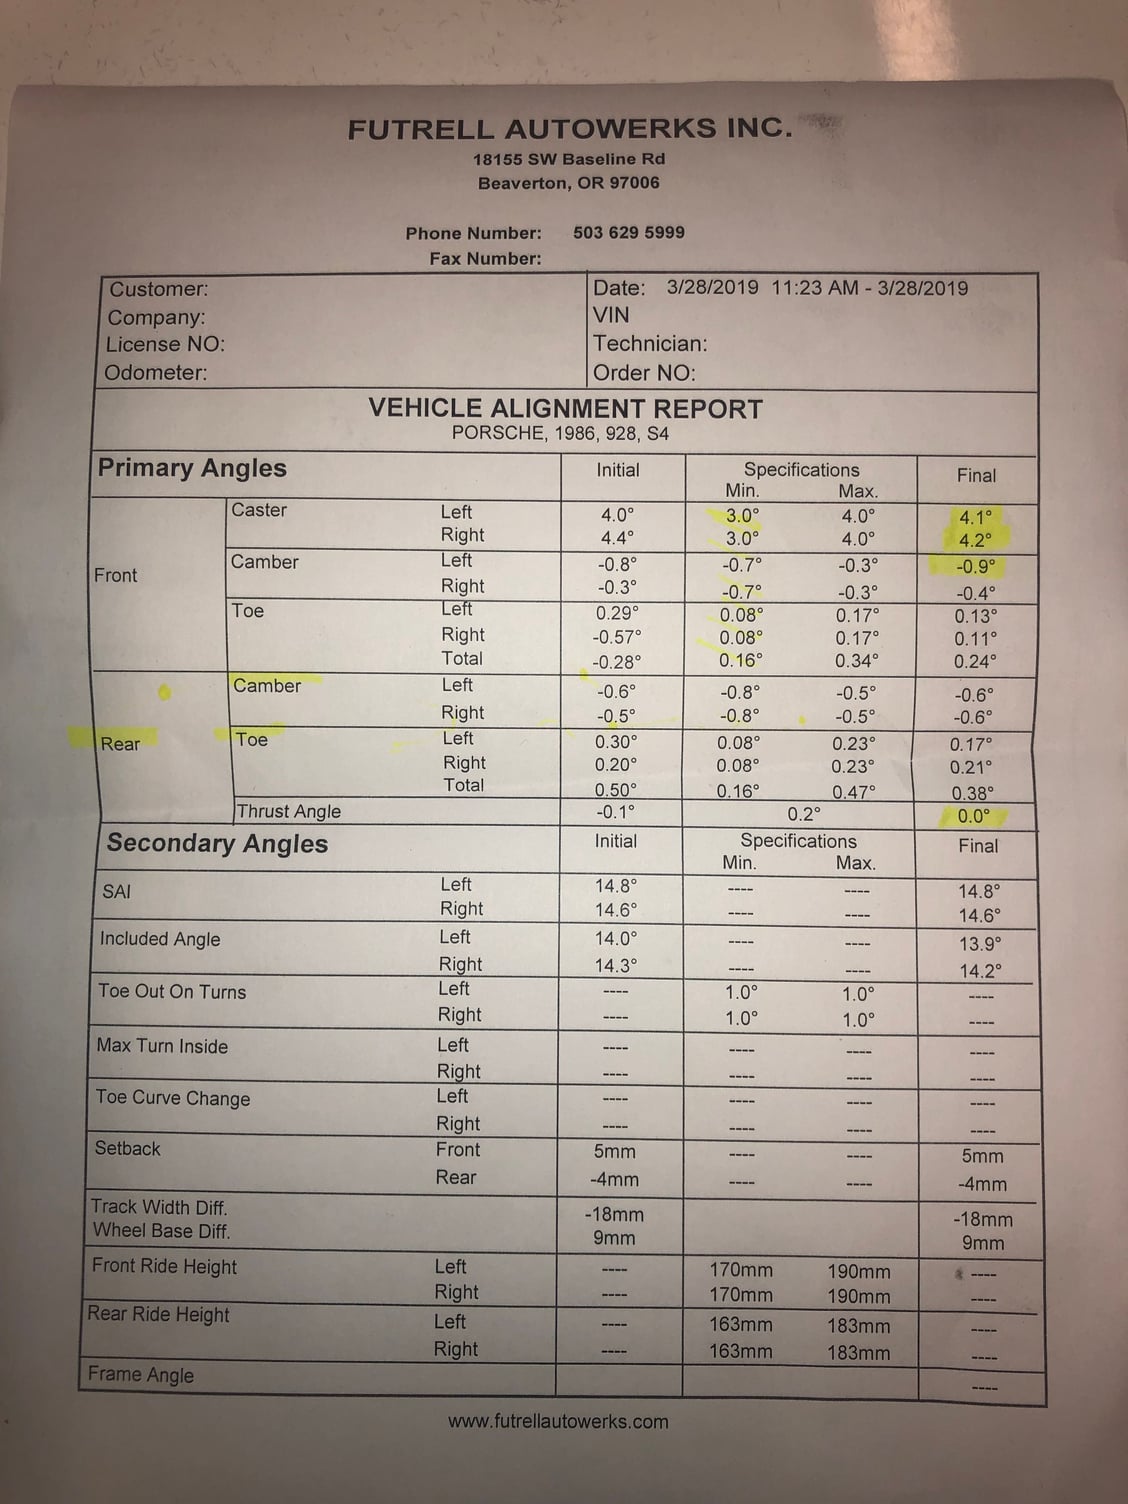
Thank you all for your help on this. Today I brought my car in and helped them set up the car on the hunter alignment rack. The cool thing about the rack it that it helps to monitor all four wheels at once. So if you are making a change to camber/caster/toe on one corner you can see how it is affecting the other recently adjusted side. It made the balancing a lot easier. I should mention the car drives and steers better now mostly from the improvements to the rack adjustment and toe remedies.
The rear of my car was easy, everything was well within specified ranges. We just did some fine tuning; making the camber equal on both sides and dialing in the toe be more equal left to right. The specification calls for as much as 0.17-degrees (10') of difference, we were able to get Toe to 0.04-degrees (2.4') of difference.
The front was a bit more challenging. The steering rack was off center and the toe values were all out of specification. Since I had recently replaced the tie rode ends and had the centering bolt we were able to easily adjust all that to within spec and equal L/R. The camber and caster adjustments were much more difficult. The adjusting eccentrics would very difficult to adjust turn and the HEX hole on the Left Camber was stripped. We were not able to make much progress in the time allowed in these measurements. Caster adjustments are at the top en of the allowable range and L/R differences are within specification. My final camber measurements have one side slightly more negative camber than spec -0.9 degrees vs -0.7 degrees spec. and the L/R difference .5 degrees difference versus the .33 allowable degrees difference.
The tech had a really hard time moving the eccentrics. So my assumption is that they are frozen. One of them needs to be replaced. I am thinking next time I have the car on stands. to overhaul each eccentric one at a time, or just remove the ball joint completely and give it a good cleaning so everything can be adjusted properly.
The eccentrics get burred up when folks try to adjust them without unweighting or unclamping the balljoint adequately. The prep process includes some cleanup on the end of the control arm and -maybe- some lubrication on what becomes the top surface of each adjuster. The adjuster cams are used to help move the balljoint, but are relaxed before tightening the nuts underneath them. Getting the adjustments just right is an iterative process, since the spot you adjust to with the cams and a small tapping hammer may not show up as correct on the Hunter display until the nuts are tightened again. The balljoint definitely moves as you tighten the nuts, so what looks perfect as you are adjusting will not be perfect when you finish tightening. I end up making some index marks on the pieces so I have a better sense of where something is even before I take a measurement.
For those that like to play with this stuff at home, the instructions that come with the SmartRacing equipment that Bulvot references are very good and very informative. I came up with slightly different hardware bits with lasers and digital levels, but I do rely on the SmartRacing camber tool instructions as a regular reminder of how to calculate caster from a couple camber readings. Even if you don't do any of this yourself, it's worth it to be an informed owner when you take it to your local bubba.
Pretty difficult to talk about alignment numbers without knowing where, on the camber curve, your car is sitting. (Ride height makes a tremendous difference.)
Semi-retired, as of Feb 1, 2023.
The days of free technical advice are over.
Free consultations will no longer be available.
Will still be in the shop, isolated and exclusively working on project cars, developmental work and products, engines and transmissions.
Have fun with your 928's people!
Pretty difficult to talk about alignment numbers without knowing where, on the camber curve, your car is sitting. (Ride height makes a tremendous difference.)
The trouble with anything that is infinitely adjustable is that there is one correct setting and an infinite number minus one incorrect settings! That in a nutshell summarises the 928 suspension system dilemma.
Porsche designed the 928 such that weight distribution was evenly distributed across all four wheels give or take a bit. The suspension design is intended best I can ascertain to pivot around certain ride height values and it seems there is debate about how to interpret this. Porsche clearly recognised that getting this spot on was nigh on impossible so they give guidelines as to the kind of differences that should be considered acceptable. I concluded that their aim was to try to make the front arm sit at 90 degrees to the vertical axis when the system is settled and static. There is also a difference of 7mm between front and rear wherein the rear is lower than the front and I try to maintain that. Thus by my interpretation your rear end is too high something that is very common in 928's as the front seems to sag more than the rear with age..
Thus the starting point is corner balance wherein each wheel should carry in the region of 400kg give or take 30kg if my memory serves me correctly. Changing corner balance numbers invariably involves changing ride height as does the actual weight the vehicle is carrying hence things like fuel load and weight of the driver can come into the equation- Porsche give specific criteria which you may have followed. As the car loads it sits lower and as it sits lower the alignment changes a little. To sit lower the control arms pivot upwards and the distance between the steering ball joints changes but the steering arm length is fixed so with compression the front wheels tend to toe out. Thus why alignment in the fully settled condition is critical. Worse still, even as adjustments are made to one parameter the Hunter will show slight changes to other parameters and thus as Sean mentioned already the whole process is something of an iterative process.
Thus during an alignment I first of all set the rear of the car [that is comparatively easy] and then move to the front. Porsche changed the caster setting to 5 degrees for later models and gave an advisory saying it was OK to apply this to earlier models. If you tell the Hunter you have a 1988 model it will guide the tech to a caster setting of 4 degrees. So tell the thing you have a GTS and it will guide to 5 degrees. The Hunter has trafficators in its programming and when the set values fall into the allowable range the display turns from red to green. This is where you need to educate the chap doing the alignment as to acceptable side to side variance. If he knows what he is doing he will trim the adjustments to improve side to side balance whereas a moron will simply look for the indicator to turn green and call it a day. I get the impression your alignment chap understood this.
Thus referring your alignment, I would not accept that front camber difference given I look for 0.1 degrees side to side difference maximum and I would be looking for caster of 5 degrees. Whether such difference will have any impact on your day to day driving remains to be seen- probably not I suspect.
As and when you really get into alignment settings you may even request settings that are outside the normally acceptable range but that is another matter altogether. Bottom line you really need to make sure the tech knows what you are looking for before he starts and the applicable boundary criteria for aligning the 928 which it seems you did. The front eccentric adjusters need to be free of crap and even the position of the caster eccentric can limit the camber adjustment range if not set correctly such is the interaction of the two [which is why the ball joint has such a seemingly strange shape behind the caster adjuster]. I have had the tech unable to get the camber I wanted simply because the caster adjuster was not maxxed out first. In your case I take it the problem you had was getting the higher camber number reduced whereas I would have increased the lower number. Modern rubber with their levels of grip need more camber and for a street alignment the minimum I would settle for would be 1 degree. Start fitting wider rubber as I do and the number goes up- I typically run 1.5 degrees with my 255 front rubber but I also have a 928 motor sports front lower brace and a custom upper brace to stiffen things up.
^^^ What Fred said especially on the camber. I think that modern tires certainly love a little more camber for better absolute cornering, while the effect of front wheel offset on steering and handling is exacerbated with more camber.
Getting caster correct is tremendously interactive with camber adjustment. Not just with the cams themselves as Fred shares, but with the combined effects on the steering. The factory caster numbers changed mid-stream in the S4/GT series, with the later higher recommendation applicable to the earlier cars. The increase in caster makes the steering a little more self-centering, but it has the interactive effect of making the car a lot more sensitive to camber change as the dynamic ride height changes. Smaller offset wheels make the interaction a lot more acute as you add the effects of increased bump steer and tramlining to the mix, and reduce the NSR effect on steering.
As far as the differences between front and rear ride height recommendations, remember that the measuring points on the suspension are hardly at the same spots (height) relative to the floor and the rocker sills. American drivers have come to love the nose-down look, when in fact the ideal setup supports a front suspension with longer travel, particularly compression, to help absorb impacts with road stuff. By the time the rear of the car goes over the same object, the front suspension compression has already unweighted that rear tire slightly. Public roads around here are nowhere near as smooth as race tracks, so while we might want to imitate a race-car profile we are much better off lowering the [sacrificial] front splitter for looks but keeping the chassis height correct.
Try to do your ride height adjustments and alignment with the car weighted as it's typically driven. Absent the weight in the driver's seat for instance, the car will be right-rear heavy with fuel tank anywhere close to full. Drop a few sacks of sand in the driver's seat, and corner weights are suddenly a lot easier to balance.
If you don't have easy access to corner balancing scales, work to get the collar heights the same left to right on an individual axle. Trying to adjust the ride height on one corner is impossible without messing with the weighting and height of the opposite corner (inverse) and the adjacent corners (direct). Manufacturing tolerances for the tub and suspension plus any unevenness in your measuring surface will affect the measured height and corner-weighting measurements, so don't invest time in trying to fine-tune measured heights with spring collar position without having the corner weights measured at the same time.
Beating a dead horse to death: Any adjustment that includes spring loading for either height or weighting needs to be "normalized" by driving/settling the car, then remeasuring. Ditto measuring for correct alignment after adjusting. Stooped stuff like the angle of approach on to your measuring surfaces will affect the numbers. It's a seriously iterative process.
The good news is that the suspension is pretty stout, so once you get things dialed in for alignment with parts that aren't worn too much, the alignment will last until something wears, something sags, or there's some serious suspension impact that moves an adjustment. Or you work on something.
Perfect front ride height has the centerline of the lower balljoint ball at exactly the same height as the centerline of the lower inner control arm bushings, with normal weighting applied. It's a rather granular description of what Fred described as a level lower control arm. The balljoint height from the floor changes some with tire wear, and variations in your tire and wheel selection plus tire pressure. That explains a lot of the 20mm sag/wear allowance in the WSM guidance.
There really is some science that goes in to how the height and alignment numbers were determined.

 01-30-2019, 10:39 PM