When you click on links to various merchants on this site and make a purchase, this can result in this site earning a commission. Affiliate programs and affiliations include, but are not limited to, the eBay Partner Network.
be sure to tighten the check valve onto the pump first... you need to grind down the outside edges of a good quality 17mm open end wrench so it fits between the pump electrical connectors and counter-holds the pump when you tighten the check valve. Needs to be tight to allow the copper seals to work. You also need another seal ring between the banjo pipe and the end cap. Then you need to counter-hold the check valve to tighten the end cap. Doing this in the wrong order allows leaks.
Regarding the garbage in your fuel pump inlet. You can inspect the bottom of your tank from the top.. but the view is limited. There's a baffle in the way. The fuel supply from the tank must be crystal clean (it is currently not) or you will be fighting it forever. If you find crud in the system, plan on cleaning everything out at the same time. You can clean your tank, but if a distant 40 year old hose in the return system is crumbling apart from within you just introduce crap into the tank. The fuel supply must be crystal clean all the way to the fuel distributor, through the injection system, and all the way back into the tank. the fuel circulates round and round over and over as the injection system uses it. Every section of rubber hose in the system is a suspect of crumbling apart from the inside. . CIS has no tolerance for dirt. The entire path should be checked , in this order :
Tank (can have dirt in it)
In tank strainer (holes in it or clogged)
tank to pump hose (interior crumbling)
Pump (gets junk in it from above list)
Filter (gets junk in it from above list)
pipe/ hose to accumulator (interior crumbling)
accumulator (junk from above list)
Accumulator to long supply pipe hose (interior crumbling)
Supply hose near passenger cam box (interior crumbling, sometimes burns car down too)
Injection system (usually will not "produce" contaminants)
Return hose near passenger cam box (interior crumbling, again, can burn car down)
Return hose going into top of tank (interior crumbling)
I'm to the point where if i see crap in the tank, I clean out the system and replace the filter and every rubber hose, minimum. Then i circulate the fuel with the return line going through a paint strainer and into a clear glass bottle. That return line does not go back into that tank until it runs crystal clean.
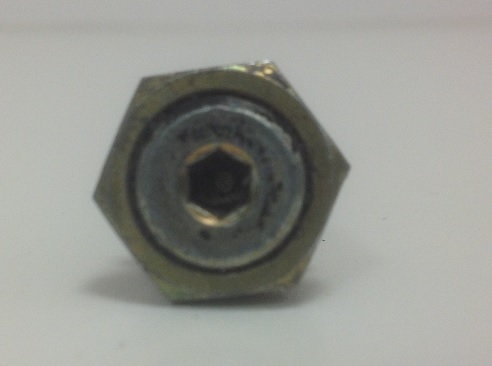
According to the car shop where I buy my parts , the leak at the pump outlet at the check valve are likely caused by a too thick copper shim closest to the pump.
You can see that there is a small groove in the check valve. If the shim exceeds its wideness just across this groove, it will not seal properly.
So I need to have a copper shim that is smaller so that the banjo fully covers this groove..
As for the tank itself, I fully cleaned my fuel tank 8 years ago. The strainer was still OK then. And up till now, I drove about 20000 miles. So normally there will not be much crud in the tank.
As for the rubber hose from tank to pump, this is still in good shape.
Fuel lines (supply + return) + accumulator are all new since 1 year.
But to make sure my tank strainer is OK and there is no crud inside, I will check with a small endoscope camera.
I'll keep you informed.
Use new copper washers. The washers are one-time-use. The copper will "work harden" is service when you crank down on the banjo bolt. It's possible to rescue used washers with VERY CAREFUL hand lapping to eliminate scratches, then anneal with a torch and slow cooling. New are better/safer.
I use Teflon thread-sealing paste on the faces of the washers and on the threads of the bolts. Tightening torque can be reduced ~~20% with the reduced friction. The Teflon reduces any galling on the washer faces as you tighten, allowing for reuse of the washers at the next change. Plus makes it a lot easier to get the banjo bolts back out later.
Connect and tighten the banjo fittings at the pump and filter before you mount into the support brackets. Counter-hold the pieces as you tighten. This allows everything to line up well and seal before mounting everything relatively rigidly in the support.
Use new copper washers. The washers are one-time-use. The copper will "work harden" is service when you crank down on the banjo bolt. It's possible to rescue used washers with VERY CAREFUL hand lapping to eliminate scratches, then anneal with a torch and slow cooling. New are better/safer.
Bob,
You raise what to me is an interesting point. In my younger days I used to own several British motorcycles all of which used copper gaskets to seal the heads. Close to where I was brought up a local motorcycle shop was run by a well known ex-TT racer who very generously taught my impoverished student self how to work on my bikes. He advised me to anneal all copper gaskets whether new or to be reused by heating with a plumbers blow torch until all the surface had glowed red hot and then to rapidly quench it in a bucket of cold water. Always did this and never had an issue even with the heads [BSA and Royal Enfield] that had a push rod tunnel cast into the head. The Triumph heads were less of a problem to seal but they had two push rod tubes with rubber seals either end that was a bit of a sod to get oil tight but that is another matter altogether.
Ironically just a few days ago I was reading about this on a British bikes website and the chap writing the article said exactly the same thing-anneal the things and quench them in a bucket of water as new items quite often are regularly not supplied in the fully annealed condition. The interesting bit was that he said exactly what my old pal said nearly 50 years ago, whether new or old anneal the things. I have often wondered about whether throwing them in a bucket of cold water after the heating makes engineering sense [or not]. I can understand why manufacturers might not do this as the copper loses its nice new sheen but whether they have reduced performance [or not] I really have no idea- the pupil simply did what the master told him to do! Bottom line to make the gaskets the base material had to be rolled [cold work?] before being stamped out of the sheet- same for copper washers I suspect- thus they have [presumably?] been "cold worked" during the production process.
Interesting the seemingly simple things we take for granted! When I use new copper washers I would never think to anneal them but now I wonder...?
Use new copper washers. The washers are one-time-use. The copper will "work harden" is service when you crank down on the banjo bolt. It's possible to rescue used washers with VERY CAREFUL hand lapping to eliminate scratches, then anneal with a torch and slow cooling. New are better/safer.
I use Teflon thread-sealing paste on the faces of the washers and on the threads of the bolts. Tightening torque can be reduced ~~20% with the reduced friction. The Teflon reduces any galling on the washer faces as you tighten, allowing for reuse of the washers at the next change. Plus makes it a lot easier to get the banjo bolts back out later.
Connect and tighten the banjo fittings at the pump and filter before you mount into the support brackets. Counter-hold the pieces as you tighten. This allows everything to line up well and seal before mounting everything relatively rigidly in the support.
hi dr Bob ,
very interesting procedure . I will surely try it. Makes sense to use Teflon and/or anneal the washers.
I'll keep you posted.
Btw I tried to fix my fuel pump at freezing temperature so perhaps washers are then also to hard .
You raise what to me is an interesting point. In my younger days I used to own several British motorcycles all of which used copper gaskets to seal the heads. Close to where I was brought up a local motorcycle shop was run by a well known ex-TT racer who very generously taught my impoverished student self how to work on my bikes. He advised me to anneal all copper gaskets whether new or to be reused by heating with a plumbers blow torch until all the surface had glowed red hot and then to rapidly quench it in a bucket of cold water. Always did this and never had an issue even with the heads [BSA and Royal Enfield] that had a push rod tunnel cast into the head. The Triumph heads were less of a problem to seal but they had two push rod tubes with rubber seals either end that was a bit of a sod to get oil tight but that is another matter altogether.
Ironically just a few days ago I was reading about this on a British bikes website and the chap writing the article said exactly the same thing-anneal the things and quench them in a bucket of water as new items quite often are regularly not supplied in the fully annealed condition. The interesting bit was that he said exactly what my old pal said nearly 50 years ago, whether new or old anneal the things. I have often wondered about whether throwing them in a bucket of cold water after the heating makes engineering sense [or not]. I can understand why manufacturers might not do this as the copper loses its nice new sheen but whether they have reduced performance [or not] I really have no idea- the pupil simply did what the master told him to do! Bottom line to make the gaskets the base material had to be rolled [cold work?] before being stamped out of the sheet- same for copper washers I suspect- thus they have [presumably?] been "cold worked" during the production process.
Interesting the seemingly simple things we take for granted! When I use new copper washers I would never think to anneal them but now I wonder...?
Indeed very interesting information about the motorcycle engines. I often find english handcrafted people very reliable in what they are doing.
Oldschool techniques still rule-
You raise what to me is an interesting point. In my younger days I used to own several British motorcycles all of which used copper gaskets to seal the heads. Close to where I was brought up a local motorcycle shop was run by a well known ex-TT racer who very generously taught my impoverished student self how to work on my bikes. He advised me to anneal all copper gaskets whether new or to be reused by heating with a plumbers blow torch until all the surface had glowed red hot and then to rapidly quench it in a bucket of cold water. Always did this and never had an issue even with the heads [BSA and Royal Enfield] that had a push rod tunnel cast into the head. The Triumph heads just a few days ago I was reading about this on a British bikes website and the chap writing the article said exactly the same thing-anneal the things and quench them in a bucket of water as new items quite often are regularly not supplied in the fully annealed condition. The interesting bit was that he said exactly what my old pal said nearly 50 years ago, whether new or old anneal the things. I have often wondered about whether throwing them in a bucket of cold water after the heating makes engineering sense [or not]. I can understand why manufacturers might not do this as the copper loses its nice new sheen but whether they have reduced performance [or not] I really have no idea- the pupil simply did what the master told him to do! Bottom line to make the gaskets the base material had to be rolled [cold work?] before being stamped out of the sheet- same for copper washers I suspect- thus they have [presumably?] been "cold worked" during the production process.
Interesting the seemingly simple things we take for granted! When I use new copper washers I would never think to anneal them but now I wonder...?
Besides my bike experience (including factory "training" on Hondas, Nortons, Guzzis, and CZ as well as working on my Velo Thruxton, Beezer Hornet, RE and various others) my dad showed me the same quenching process to soften copper tubing- heat to red, quench immediately in cold water. From others' testimony here it seems air cooling also works well, but I've never tried it- for sixty some years water quenching has worked just fine for me.
Today I installed the new fuel pump from Bosch.
Apparently with the new copper shims/seals it finally sealed, although first usage still showed leaks at full pressure but after a while they were gone.
As if seals had to adapt...
I had about 1100cc fuel flow, but system pressure was still max 5,2bar. (75psi)
But when I tried to start the car, it immediately fired up.
Cold control pressure was 1bar (14psi)
Warm pressure was 3,6bar (52psi) but I did not drive the car since it was bad snowy whether.
Also when warm engine put off for 10, 20 & 30 min, the measured rest pressures were very good :
10min : 2,9 bar (42psi)
20min : 2,8 bar (40psi)
30min : 2,7 bar (39psi)
60min : still 2,5bar (36psi)
To do :
- setup correct mixture so that CO emission is within acceptable range
- drive the car for about 50miles
Great news Gerrit !
Your are on the right way .
You say cold start 1 bar . but what is the temperature and if engine started ? For vacuum ...
5,2 bar is limit low for main pressure but rest pressure is perfect !
Now , may be you need to adjust the fuel regulator on the fuel distributor .
I think a shim of 0,6 mm more will be good to have the correct fuel pressure .
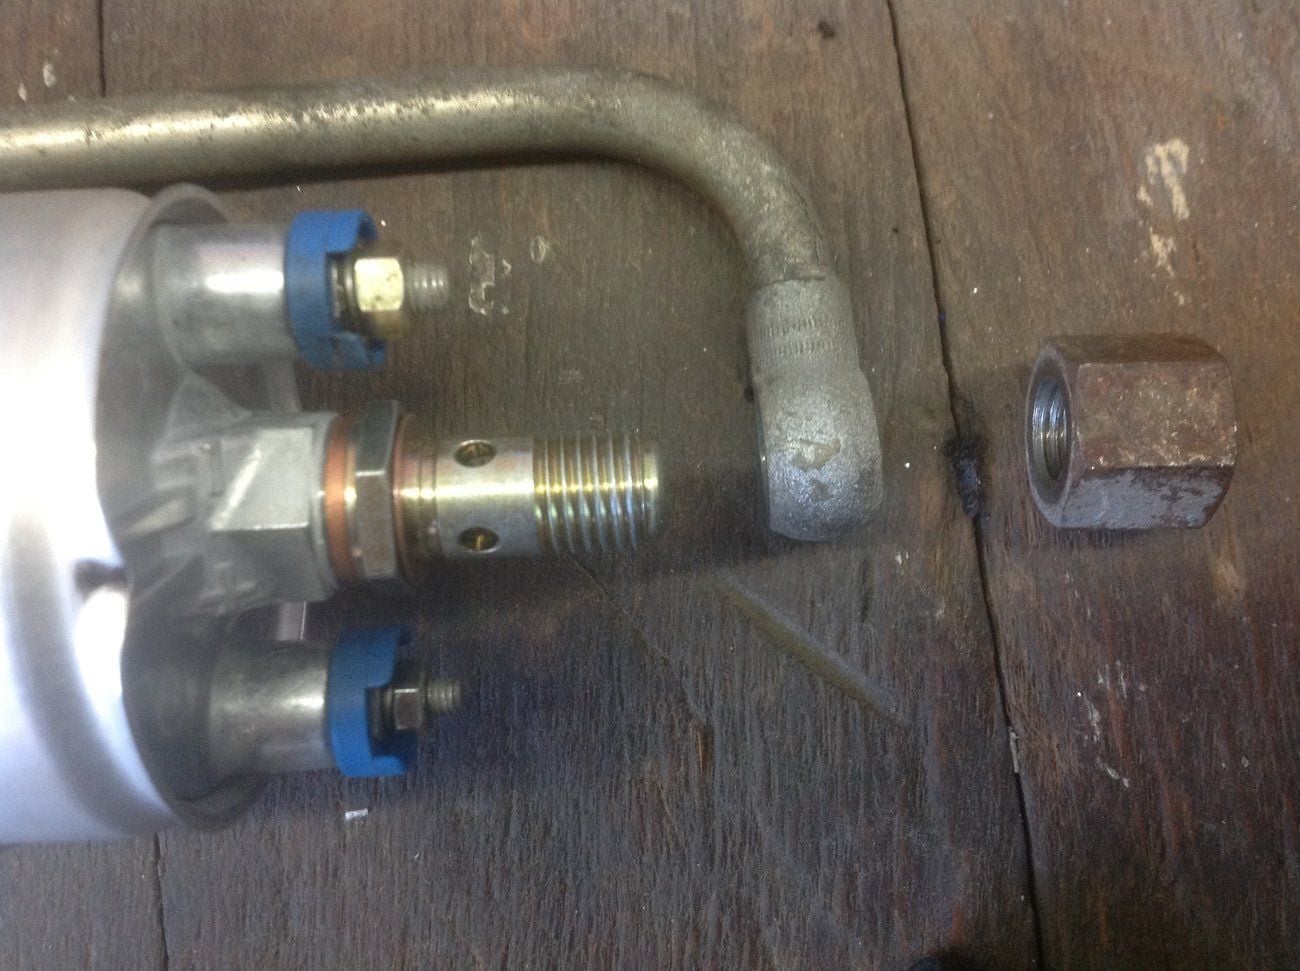
On this picture , where is the third copper ?
You need one copper between fuel pump and anti return valve , one between anti return valve and hose and an other between fuel hose and the final nut .
Take care with the thickness of the copper .
Great news Gerrit !
Your are on the right way .
You say cold start 1 bar . but what is the temperature and if engine started ? For vacuum ...
5,2 bar is limit low for main pressure but rest pressure is perfect !
Now , may be you need to adjust the fuel regulator on the fuel distributor .
I think a shim of 0,6 mm more will be good to have the correct fuel pressure .
Hi Allan,
the 1bar was measured at 5�C with vacuum just when engine started .
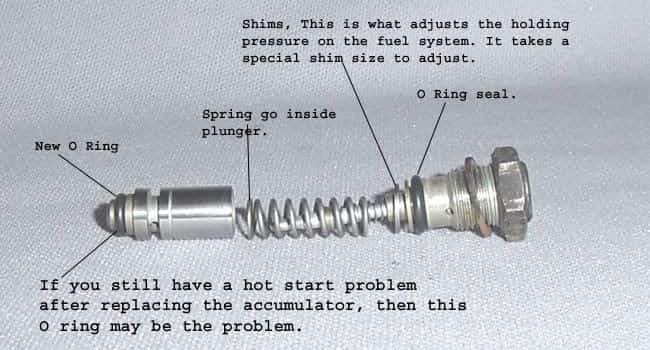
About the shims and O-ring, any idea where I can buy them new? I probably need new O-rings when I remove the fuel regulator
since old O-rings will probably not seal anymore when I put them back
On this picture , where is the third copper ?
You need one copper between fuel pump and anti return valve , one between anti return valve and hose and an other between fuel hose and the final nut .
Take care with the thickness of the copper .
I just put a photo of the fuel pump to show the groove in the check valve.
Indeed there are 3 copper rings. I used copper rings that have a double layer that can be squeezed easily.
It finally sealed.
if you want , no problem !
With a good Belgium beer !
Allan,
WUR and beer is coming your way !
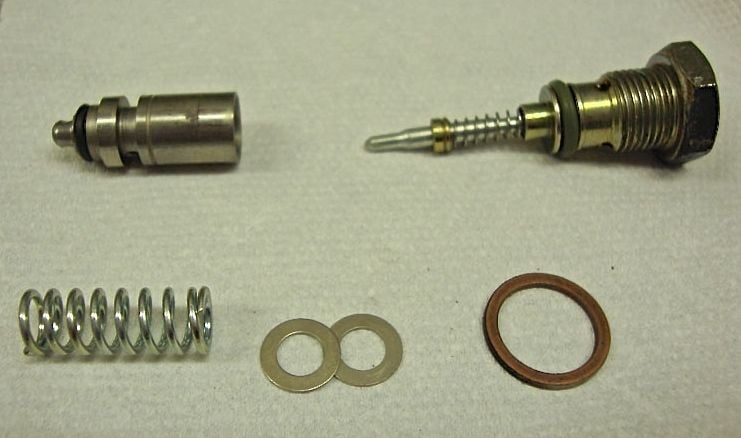
ABout the pressure regulator. Here are some pics : I unscrewed this bolt but still could not remove the plunger
Any idea how I could safely remove the plunger in the FD?

 01-21-2019, 01:40 PM