When you click on links to various merchants on this site and make a purchase, this can result in this site earning a commission. Affiliate programs and affiliations include, but are not limited to, the eBay Partner Network.
- Where do you order the timing belt kit usually from?
- I need to replace the fuel pump. I connected the current one with the 12 volt battery and I see only sparks. the pump will not turn. Anything you would suggest me to do to reuse the pump or should I reorder one? If so, Where to order and which brand ?
Looks like I need to reorder fuel hoses too.
Thanks and Happy Thanksgiving!!
Originally Posted by jrnicl3
Thank you for all your help. No worry. The pump had to go. I already ordered a new pump and fuel filter,, timing belt and water pump.
- The fuel tank is removed. What a dirty and smelly one. The gas is back to thick unrefined oil. I pressure washed it, let it soak with white mineral, and wash again and again. It still smell and something thick at the bottom of the tank.
- The fuel sender is soaking in vinegar. Need to clean it more.
- I need to replace the fuel hoses around the tank and engine area. Should I get them from an auto part company? They must sell the hoses by ft.
I noticed, there is no power from the fuel line wires. I checked with a tester and the key turned on. Any advice?
Have you read the 'New Visitor' sticky at the top of the forum?
One of the thing it lists is what I call the "Usual Suspects". Trusted vendors who supply us with the parts we need to keep these cars on the road.
One of them is Roger Tyson at 928s R Us. He posts on here as "ROG100."
He knows and loves these cars as well as just about anyone.
I would not pay a whole lot of attention to his site, simply e-mail or call him and tell him what you are doing.
He has spreadsheets for the jobs we do (timing belt/water pump is a very common one) and he will let you know all the parts typically needed for the job.
I get most of my stuff from him (for the 928 and the 944 and the Cayenne too).
He sells the Greg Brown fuel lines. They are direct replacements, and guaranteed for life. Not cheap, but well worth the price.
He also sells good water pumps. There are cheap knock offs out there, but there's no way I'd put one of those on my car.
As far as power to the fuel pump, I think you car won't get any power to it until the car 'sees' the motor turning. It's a safety feature. You can jump the relay to power it if you want to test it.
Thanks everyone for your help. II will wait reinstalling the fuel pump to test the connectivity. I will also call Roger on Monday for the hoses.
I worked on the electrical this weekend. I was finally able ti fix the front side lights and also the front fog lights. The wires were burned and had to replace them.
I'm facing some challenges with the turn signal. There is not turn signal on the dashboard flashing. If I press on the emergency button, I do see the Green light on the dashboard, but it does not flash on an off with the noise.
I replace the turn signal light bulbs, clean every connectors. I replace the relay 'V'. Still the same. Not sure what is the next step.
I ended opening the pod to remove the emergency warning switch. I think it was a mistake. Now some of the lights from the cluster are not on when I turn on the key. I do not see the center warning light on and also I do not see the gas level light, the oil level light, the coolant level. Other lights are on , such as coolant, parking light, break light.
Need help on this. Not sure if I unplug something. I checked in the back and all are connected. The dash light is on.
The pod connectors (3 - L,M,R) have quite soft metal blades inside that are easily bent out of contact - re-tension with a small right angle tool (like a dental pick) after a brush with deoxit. Also the copper traces on the flexible circuit on the pod can get corrosion on them, and need a light clean - BTDT myself. There are 3 ground connectors (to share the load?) on the R connector, make sure these are clean, or you can get strange results - turn on side lights, temp gauge goes up is one symptom. Volt gauge moving with turn indicator flashes is another. Also clean and deoxit the connectors that go on the back of the pod switches (lights etc).
jp 83 Euro S AT 57k
Thanks a lot. I finally got it fixed. I had to glue 3 soft metal blades. I used Krazy glue was quite simple. I basically removed the the steering wheel, and disconnected the pod connectors(3 - Left,Middle,Rright) , then removed the dashboard. I cleaned with Deoxit.
Back to the turn signal, Still no turn signal flashing. The turn indicator flasher green light stays on without flashing. Any Idea on this? I cleaned the fuses 30,31,32,33 and still no result. How to test the relay?
Ordered a new turn signal relay. Need to switch to a new project. I was ready to put back the Gas tank together. However,, the fuel filter collar at the bottom of the tank is stuck and can't unscrew it.
The filter(or internal pump) is infamous for getting stuck due to corrosion on the threads. Usual result of putting too much force into it is to spin the threaded insert in the tank plastic, and the tank is then mostly scrap. Some have had success with lots of penetrating fluid behind the rubber gasket, and fitting a hose clip around the tank plastic where the threaded insert lives. Very risky. If you can pick the rubber gasket out where accessible you might get more penetrating oil into the threads - I have found 50/50 ATF and acetone works well as a penetrator. Can you see the filter body inside through the top and its condition? Mine was all broken up, and I eventually replaced the tank - watch out for one on 928International's half off sale.
jp 83 Euro S AT 57k
Yes, it is completely stucked. Unable to remove it. I did spin the corroded thread knurled insert in the plastic tank. I hope I can glue it and reuse the tank. 928 International sell them for $600... OOOUCH!!! This is a first bite.
Questions:
where to find the knurled insert?
Who has a tank for sale?
Well.....After I spun my insert I was able to seal it up with lots of PC11, never leaked a drop in several years.
Option 2. Pull the whole filter and insert out with brute force. Separate the filter from the insert - heat, penetrating stuff etc.Clean up threads, get the filter screwing into the insert cleanly and smoothly. Rough up the insert seat in the tank. Run a wire (8 G with a washer large enough to hold the insert on the end) in through the top hole, out through the filter hole, with the insert on it already.Smother the insert seat with PC11, pull the insert into place flush with face of the filter screw in area.
OR
look up here the man who makes a new alloy threaded adapter!
jpm 83 Euro S AT 57k
The turn signal relay is ordered and replaced. Turned signal is still not fixed. I went and check the fuses again. they look fine. But there is no power coming there.
The turn signal relay is ordered and replaced. Turned signal is still not fixed. I went and check the fuses again. they look fine. But there is no power coming there.
Any idea where should I focus next?
It looks to me the turn signal fuses don't get power unless they are operating.
It the emergency flasher switch connected good? That's where the power goes through to the relay
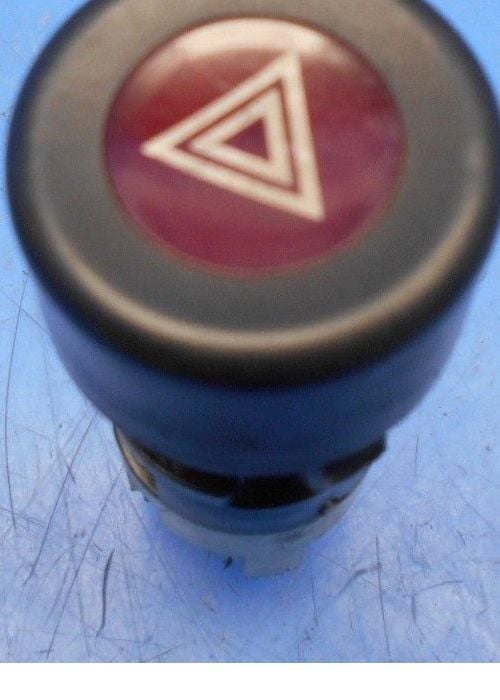
Thanks for the response. I believe you are referring to the below picture as the emergency switch. Please correct me if I am wrong.
When I pressed on it. a strong solid green light with the 2 arrows were on from the dash board. They were not flashing at all. But if I use the turn signal from the steering column, The turn signal light from the dash board will not turn on or make any noise.
I would begin by testing for potential at fuses 30 through 34. If you have power here skip to step 6 & 8.
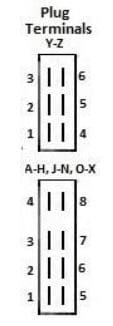
1. With ignition on, test at the CE panel pin E7 (solid red) to verify switched power and E8 (solid black) should have constant 12v. These are the color coded plug connectors at the bottom with wires coming out. You will not be disconnecting anything, only put your probe into the correct connector to contact the metal terminal inside and ground your other probe to any chassis ground such as the bolts above the CE panel where the grounds are bolted down. See the key below for pin numbering.
Those two wires feed the emergency flasher switch in the pod. You could test for power from the same red and black wires at the switch but for now you can make another test at the CE panel that will show whether power is getting through that switch or not.
2. With the switch unactivated, power flows through the switch and back to the CE panel to pin E3 (black/yellow). Test then push in the emergency switch and test again for 12v.
3. If good so far, remove the turn signal relay (V) and test terminal 49 (fed from E3 in the last step) to 31 (ground). The pins on the relay should be labeled.
4. If good, reinstall the relay and test pin E4 (2x black/white/green). If good, this proves the relay is working, if not replace it. You may be able to bypass it for now by installing a jumper between terminal 49 and 49a but DO NOT DO THIS unless someone else confirms this is correct. If you do have power here these wires go back to the emergency flasher switch and turn signal stalk.
5. Turn on your turn signal to the left. Now test E5 (black/white). This feeds fuse 30 & 31 which you can test as well.
6. Next test N3 (black/white) this is front left turn signal and S3 (black/white) for rear left turn signal. The last test would be to remove those bulbs and test power to ground in the bulb socket.
7. For the right turn signals and test E6 (black/green). This feeds fuse 32 & 33. Test these.
8. Next test N4 (black/green) for front right turn signal and S4 (black/green) for rear right turn signal. The last test would be to remove those bulbs and test power to ground in the bulb socket.

 11-24-2018, 12:53 PM