When you click on links to various merchants on this site and make a purchase, this can result in this site earning a commission. Affiliate programs and affiliations include, but are not limited to, the eBay Partner Network.
I have always pulled the bung with the tank in the car. Just be careful. I have never had a problem with it stripping but others have. Its possible that '78 is different but the two configurations I have seen are internal pump with a filter attached to its inlet, and no internal pump and the filter built into the fuel bung. You can buy the latter assembly for not too much $, as I recall. Before I bought that I tried to build my own fuel sock out of some other fuel filter I found, but it came apart.
I did some checking, and confirmed what many here probably already realized... This is an early car, and is equipped with the early size fuel tank bung, which is NLA.
The later cars had the option for the pump/screen assembly or the screen alone. The early cars would only have come with a screen.
That all said, I'll have to see what I can think up, since it's not available outside the second hand market.
I did end up pumping the tank dry, by using a pneumatic vacuum generator to suck it all into a vacuum bottle. There is still a bit of debris in the tank, but the bad gas is out.
While the fuel level sender was out of the tank, I realized that it didn't sound correct when I inverted it to check it's mechanical operation.
Disassembling it revealed that the wire that connects the empty tank circuit was broken free at the bottom tab, and that the tab was so fouled with corrosion and deposits that it was not taking solder.
After a bit of head scratching, I ended up grabbing a couple of inches of 12 AWG solid copper wire, and secured one end of the solid wire where the interconnecting wire was anchored, and with it hanging out beyond the fuel level float. It took a few tweaks to it's bend angle, but it allows the float to move freely while still supporting the bottom end of the interconnect wire not touching the float.
I'm actually taking a look at whether the fuel level sender assembly from a 944 will match up anywhere near the same dimensions of the 928.
They appear to be the same general design, but they have two hose nipples on top.
If the one that I'm picking up from a guy in the local area who's parting a few cars does work, I should be able to use a "normal" bottom attached strainer sock, and move the fuel pump to the wheel-well location used for the second pump in later cars.
I just can't see paying ~$450 for a used tank from a later model car, another $150 for a replacement bung most likely, and then another ~$120 for a strainer insert.
I have a non-leaking tank, I am hoping to find a way to use it, rather than having to replace it outright.
If it is the same as the '79 in this regard you only need enough straining there to protect the pump and the real filtration for the injection is done in the wheel well. If you went to a Wabro fuel pump (performs great, usa made, $100, and about 2/3 the diameter of the Bosch) you might have extra space in the pump area for a small external strainer. There is no real pressure before the pump, so I would think something like a VW bug filter would work. I would not move the pump any higher than the bottom of the tank without an internal pump.
Well, in the interest of seeing if the engine would even run after this long neglected, I finally added some fuel and tried to crank it up.
After making sure that everything was clear of the belts, and that I had a fire extinguisher near at hand, I cranked the engine. Around and around went the engine, but nothing else. I noticed that there was no whirring sound from the rear, with key on, or with the key in the start position... Apparently it wants me to focus on the central electrical panel next, as the pump never turned on.
I knew it had electrical gremlins, as many of the systems don't work at present. (The headlights pop up, but don't turn on. NO interior lights other than a battery warning and a brake light warning. No blower fan...)
A bottle of contact cleaner is already waiting, and I'll be following in the steps of numerous others here in going through the whole panel and trying to clean and protect all the connections, as well as chasing all the ground points. Hopefully it won't be anything worse than the expected corrosion.
I did check in with the guy who had 944 parts, and looked at the fuel level sender, but he now wanted $$ for it, and though it is nearly identical to a 928 sender, the one difference is something I could modify the 928 sender to accomplish if I ever decide that it needs a top pickup instead of a bottom of tank pickup location.
The infamous "green wire" from distributor to spark box deteriorates just sitting there, Without reading back through the thread, I think you mentioned that you taped it up or otherwise tried to fix some damage. dr's prescription is to just replace it. The signal from the distibutor is what give you spark, and also what indirectly triggers the fuel pump relay and the tachometer.
The ignition gets voltage support via an auxiliary contact in the starter solenoid to the mid-point between the two ballast resistors that feed the coils. That "auxiliary contact" is part of the solenoid, connecting the battery, starter motor windings and that contact with a copper disk on the back of the plunger. The copper disk gets grungy with age and non-use, so it's worth troubleshooting that system. For testing purposes you can bypass the resistors temporarily, knowing that any extended operation risks coil overheating and damage.
You can add a switched jumper in place of the fuel pump relay to test the pump and fuel system. Most experienced 928 owners end up with this jumper setup in the ride-along tools and parts bag.
It appears that the green wire, or the whole distributor, was replaced at some point in the past, likely when the PO's friends were working on it after getting it from a tow auction.
The green wire is slightly stiff, but nowhere near being brittle or crunchy/cracked.
The damage that I found is to the fender side of the harness, where the green wire is connected to it.
The insulation has cracked off of the wires as they leave the male connector body, so it will require either a replacement short harness from there to the ignition control module, a new connector, or some creative repair to the damage already present (maybe de-pin and heat shrink?)
I will have to test the fuel pump by using a jumper on the relay socket.
I found a new bit of "special" in the car while sitting there, seeing what else in the cabin electrical system was not working.
The button to the right of the clock seemed to be a little wobbly when I got to it, and after giving it a bit of a tug, it popped out of the center console. It turns out it was just another **** for one of the left side gauge hood controls, with a good bit of electrical tape wrapped onto it and then stuffed in the hole where the seat belt reminder is supposed to be located.
I finally got back to the car after being sent out of state by my employer.
I separated the wires on the fender side of the distributor green-wire harness, and wrapped it in automotive friction/electrical tape for testing purposes.
The right rear pin of the 14-pin connector (#2?) was missing, and the blue/black wire (oil pressure?) was hanging in open air, so I salvaged a pin from a spare harness to replace it, and soldered it onto the wire.
Using a switched jumper wire to bypass the fuel relay, I found that I had: nothing, no pump operation.
After rolling the fuses and working them back and forth a good bit, it started working, and also worked once the fuel pump relay was reinstalled.
Minor victory achieved!
That said, it was only a minor victory, as the car would merrily crank, but not even attempt to catch on any cylinder.
I'll have to see if I actually have spark, but based on the lack of any fuel odor in the exhaust after all the cranking I had it doing, I'm going to assume that there is a fuel issue in the CIS distributor, WUR, sprayers, or all of the above.
My plans are to pull the CE panel and go through it cleaning terminal by terminal. I found more than a few that were either corroded or flat out rusty on the blades of the relays, and the fuses were all a bit nasty, to say nothing of the one fuse with the aluminum strip, which was corroded in place onto the holder...
Note that in the bullet fuse CEBs the top fuse contact will readily pull off its base, which can make it easier to clean and re-tension. While the top contact is off its easier to clean the bottom contact. Clean and Deoxit all contacts. Disconnect the battery while you are at this, or put an isolator switch in the earth lead. Also check the earth lead for corrosion - these have been known to corrode inside the black covering. Clean all ground/earth points you come across. Get Watsons book on Bosch FI and follow his trouble shooting tips - much more effective than attacking components randomly.
jp 83 Euro S AT 57k
Regarding refurbishing the CIS, I'm strongly leaning toward swapping to the intake from an L-jetronic engine, since I have one here, and then using Megasquirt to run the engine, since I have a couple MS ECUs here as well.
The simplest and cheapest route to getting the engine up and running, at least for testing purposes, and without any physical alteration other than unbolting the whole CIS intake mess.
I have a good few of the CIS manuals from when I had a Mercedes 500SEC that was K-Jetronic, but don't have any of the gauges or much in the way of spare parts any more, since that car was in an accident, and I sent it down the road to an enthusiast with better bodywork skills and motivation.
I just don't really have any interest in fighting with CIS, as well as the availability issues when the problem parts are identified.
Thanks for pointing out that the fuse holder top contact is removable, it'll allow a lot better access to the other contacts as well.
I already have a bottle of D100 here, and plan to use it liberally when done cleaning the contacts, hopefully to put off the necessity of doing so again any time soon.
I think most folks that try to go the MS route find it to be a real rabbit hole. Lots of projects on here where folks make good progress and started out on a MS conversion and the project just stalled there. May not be that way for you, but consider carefully. I would seriously think about putting some time into the CIS system before giving up on it. Three CIS test you can do with no tools or costs. The three main parts of the system are the pump, the warm up regulator (WUR), and the fuel distributor (FD).
1) Test the complete fuel supply: Disconnect the rubber fuel feed hose from the metal line on the cis system. Slip a hose over the fitting and run it into a can or bucket. Energize the pump and make sure you get fuel coming out. There is actually a spec for what the flow rate should be in the WSM.
2) Test the WUR: pull the return line from your WUR and energize the pump. There should be a trickle of fluid coming out of it. Not much, just a small stream or even drips. If not your WUR is clogged. Probably is.
3) Test the FD: pull the injectors, slip fuel lines over the lines and run to a catch can or mason jars or something. Energize the pump and see what is coming out of each injector. Play with the control flap and see how it changes.
This will at least give you a good idea where you stand.
Agree strongly with Karl! Fuel flow rate (out the return line) should be ~ 1350ml/30 secs. Next test will require a gauge set to check pressures - system 65-75 psi, cold control ~15-20psi rising to ~45 hot.
If you can get CIS running well it works extremely well. Mine has been reliable and responsive in all weathers for the last 15 years - pumpand accumulator replaced as a preventive measure, WUR replaced with a used one. Just use it at least monthly.
jp 83 Euro S AT 57k
Well, I dug into the CE panel last night, and what a can of worms this is turning out to be.
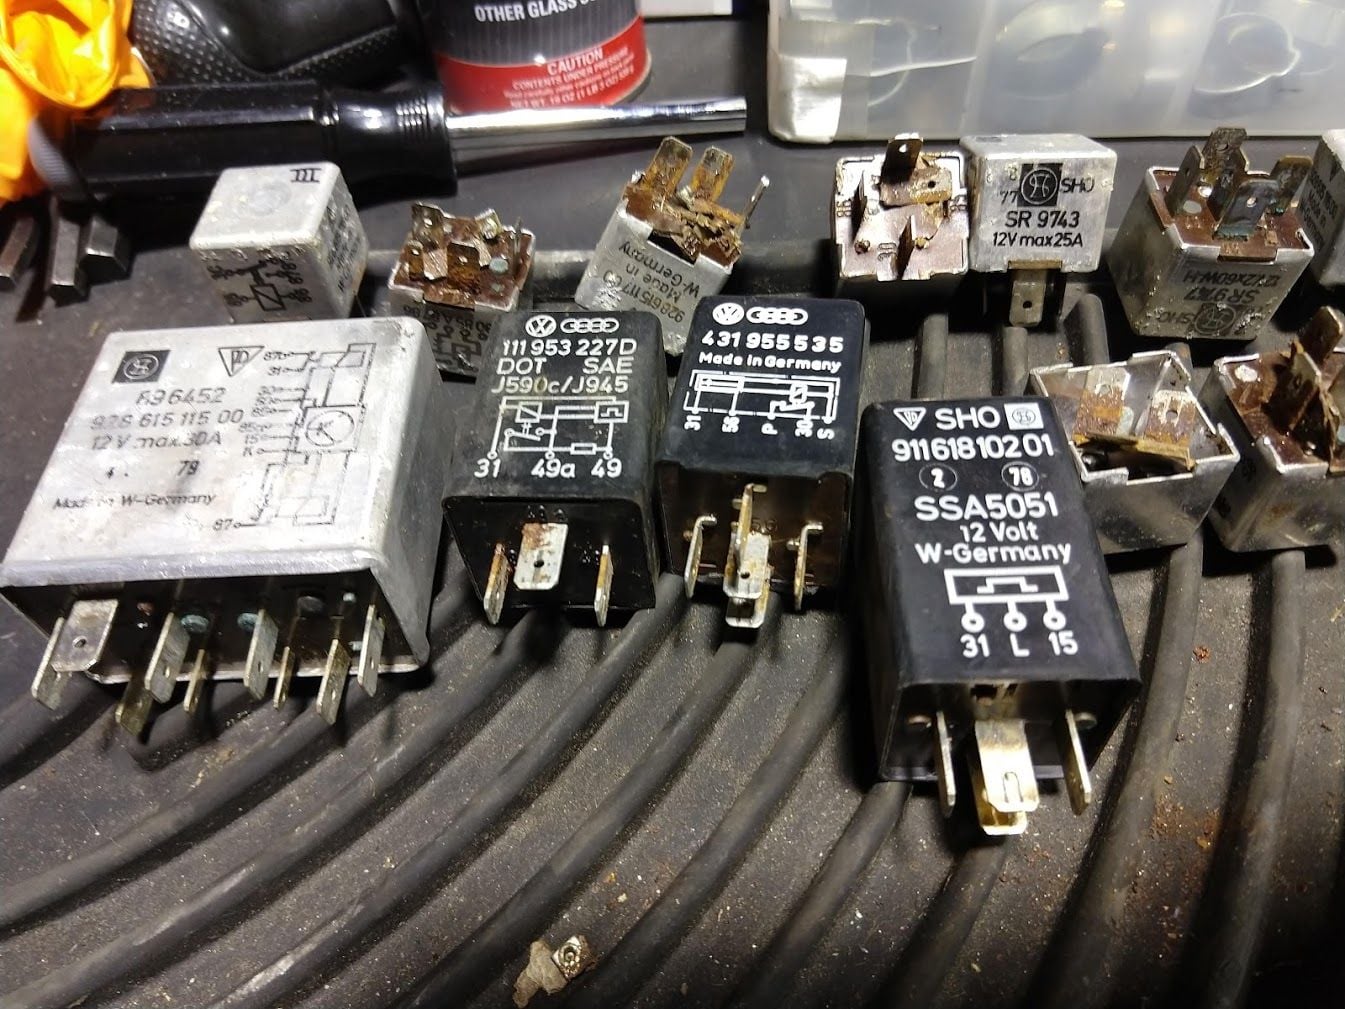
Multiple relays that are either in the wrong position, or are wrong part numbers entirely. Multiple were mismatched for the last two numbers, but those might be revision updates?
Three relays do not match the parts that I see listed on the diagrams I've found, in positions V, VII, and IX. There is a VW/Audi 111 953 227 D relay in V, another VW/Audi relay PN:431 955 535 in position VII, and a Porsche 911 618 102 01 in position IX.
Also many relay pins rusty and stuck. Thankfully it was mostly the general purpose relays, but I had a few relays rusted to the sockets, and lost a terminal from three or four.
I'm going to be digging through the threads, but I don't think I've seen any tutorial on how to clean out sockets that have had the terminals start rusting..
Brushing them with a wire brush only goes so far, and the same goes for DeoxIT, even in the 100% strength.
The fuses were entertaining in their own right, as there were a number of the 8A fuses with hairline cracks across the middle, and which fell apart when I looked closely at them.
There were also a number of the fuses which had incorrect values installed, some (many) with 25A fuses where 8A fuses should have been. Thankfully I have not noted any charred electrical issues, other than possibly some on the WUR heater connection, but that may have been someone brushing on liquid electrical tape.
The good news is that you only need a couple of wires for your engine troubleshooting and even to get it running, and you can hotwire those if needed. Personally, I would try to get it running, and then, if that is successful, buy a used CE panel in better condition. Ebay price seems to be about $300. Mark's price is $250 but I don't see any listed for early cars.
In theory it should be totally possible to take a CE panel all apart and replace individual internal wires. In practice I have had bad luck trying to get the connectors to release from the plastic. I suspect that if you only had the right tools it could be done.
As to cleaning the corroded contacts that is clearly the first thing to try if you don't have a spare panel, but if the female connectors are as bad as your male connectors it might be a bad sign as you can also get corrosion between the female connector and the wire as they are crimped and not soldered.

 09-25-2018, 03:58 AM