When you click on links to various merchants on this site and make a purchase, this can result in this site earning a commission. Affiliate programs and affiliations include, but are not limited to, the eBay Partner Network.
Steering rack reseal… some questions to start with.
Since I bought my '78 euro the steering has always had a slight resistance to turning, most annoying when going straight, the small adjustments to the trajectory need more input than normal. I thought at first it was a mechanical problem like a rusty universal joint, but with the front wheels in the air and engine off the steering is as smooth as one would expect, but the effort seemed high.
The tires have no unusual or uneven wear so I deduct that the alignment was OK when I bought the car.
As usual I have decided to go counter to the numerous suggestions here and to reseal the rack myself. As well as the initial cost of the seal kit vs a rebuilt rack (and having to take into account the current US-Canada exchange rate) return shipping of the core will eat up more cash and add additional hassle. Last winter I resealed the rack of my 924S and it seems to be working fine and lead free, so I am not in totally uncharted territory.
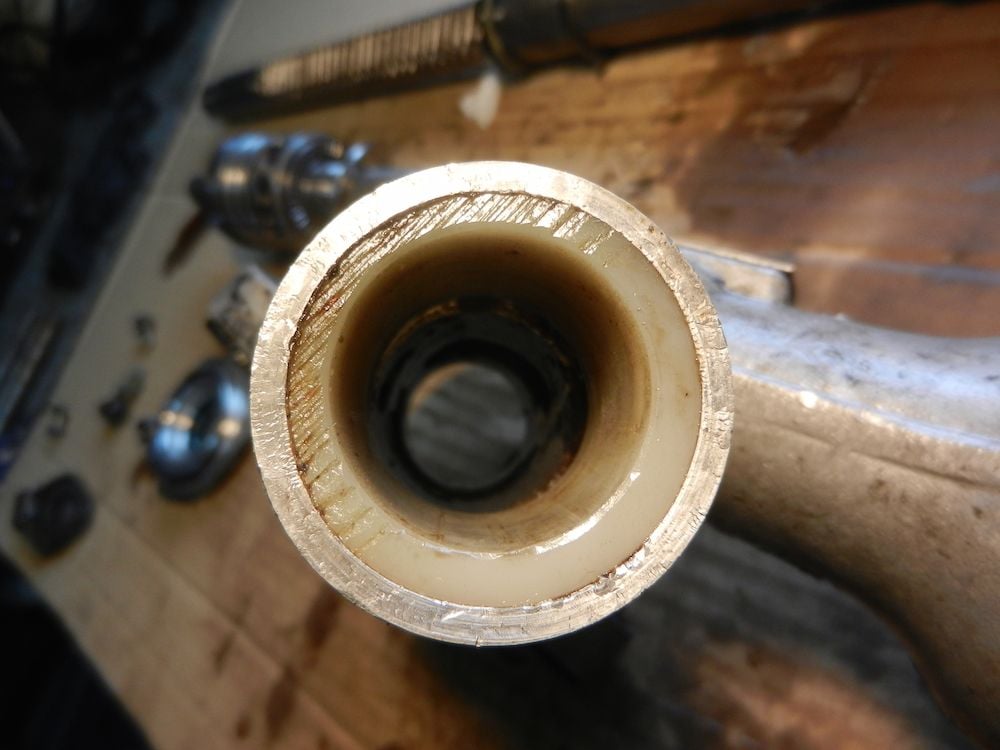
The rings that hold central tube to the cast aluminum ends have obviously been pounded on so the rack has already been taken apart for a reseal or rebuilt. Also the pinion is not properly clocked, judging by what I have read.
So… some questions to start with. 1) I understand that the fluid reservoir should be changed… but mine is the “tin-can” reservoir which costs over $200… is there a filter in it that can be cleaned? Or can it be replaced by the more recent plastic reservoir?
2) I have read about adding a delrin or similar bushing to the passenger end of the rack to reduce radial play due to wear on the internal bushing. ( https://rennlist.com/forums/928-foru...dial-play.html ). But on my rack there are already bushings that go right to the end in both ends of the rack. Both of these bushings seem to be worn so the ID is oblong rather than round. I assume this means that early racks like mine cannot be retro fitted with an add in bushing. Is there anything that can be done?
3) When I was removing the circlips in the middle of the shaft one of the circlips snapped as soon as I put the pliers on it! Anyone have a source for a replacement?
Last edited by elgy; 06-08-2018 at 10:15 AM.
Reason: spelling
The circlips are common items and available at an autoparts store, or place like fastenal.
The reservoir can be changed to the plastic one, but you will have to make your own brackets to hold it. Alternatively you can clean and flush the old unit.
On the center tube that you have pictured, you should be able to upgrade that to a later tube which will make it easier to get the parts for.
The more I look at the photo in my original post the more I wonder if that bushing is original... this saw marks look less than OEM.
Getting the rack mounting bushings out was a PITA. I used the method mentioned in other threads of drilling small holes in the rubber all the way around (and wiggling the drill bit around to break up the rubber), then I grabbed the end of the central metal piece with my vice-grips and twisted it till it broke free. I then used a hack saw to cut a slot in the outer metal fitting, a chisel to deform the edge and pliers and vice-grips to bend and finally extract the pieces. New Delrin bushings are on order from Roger.
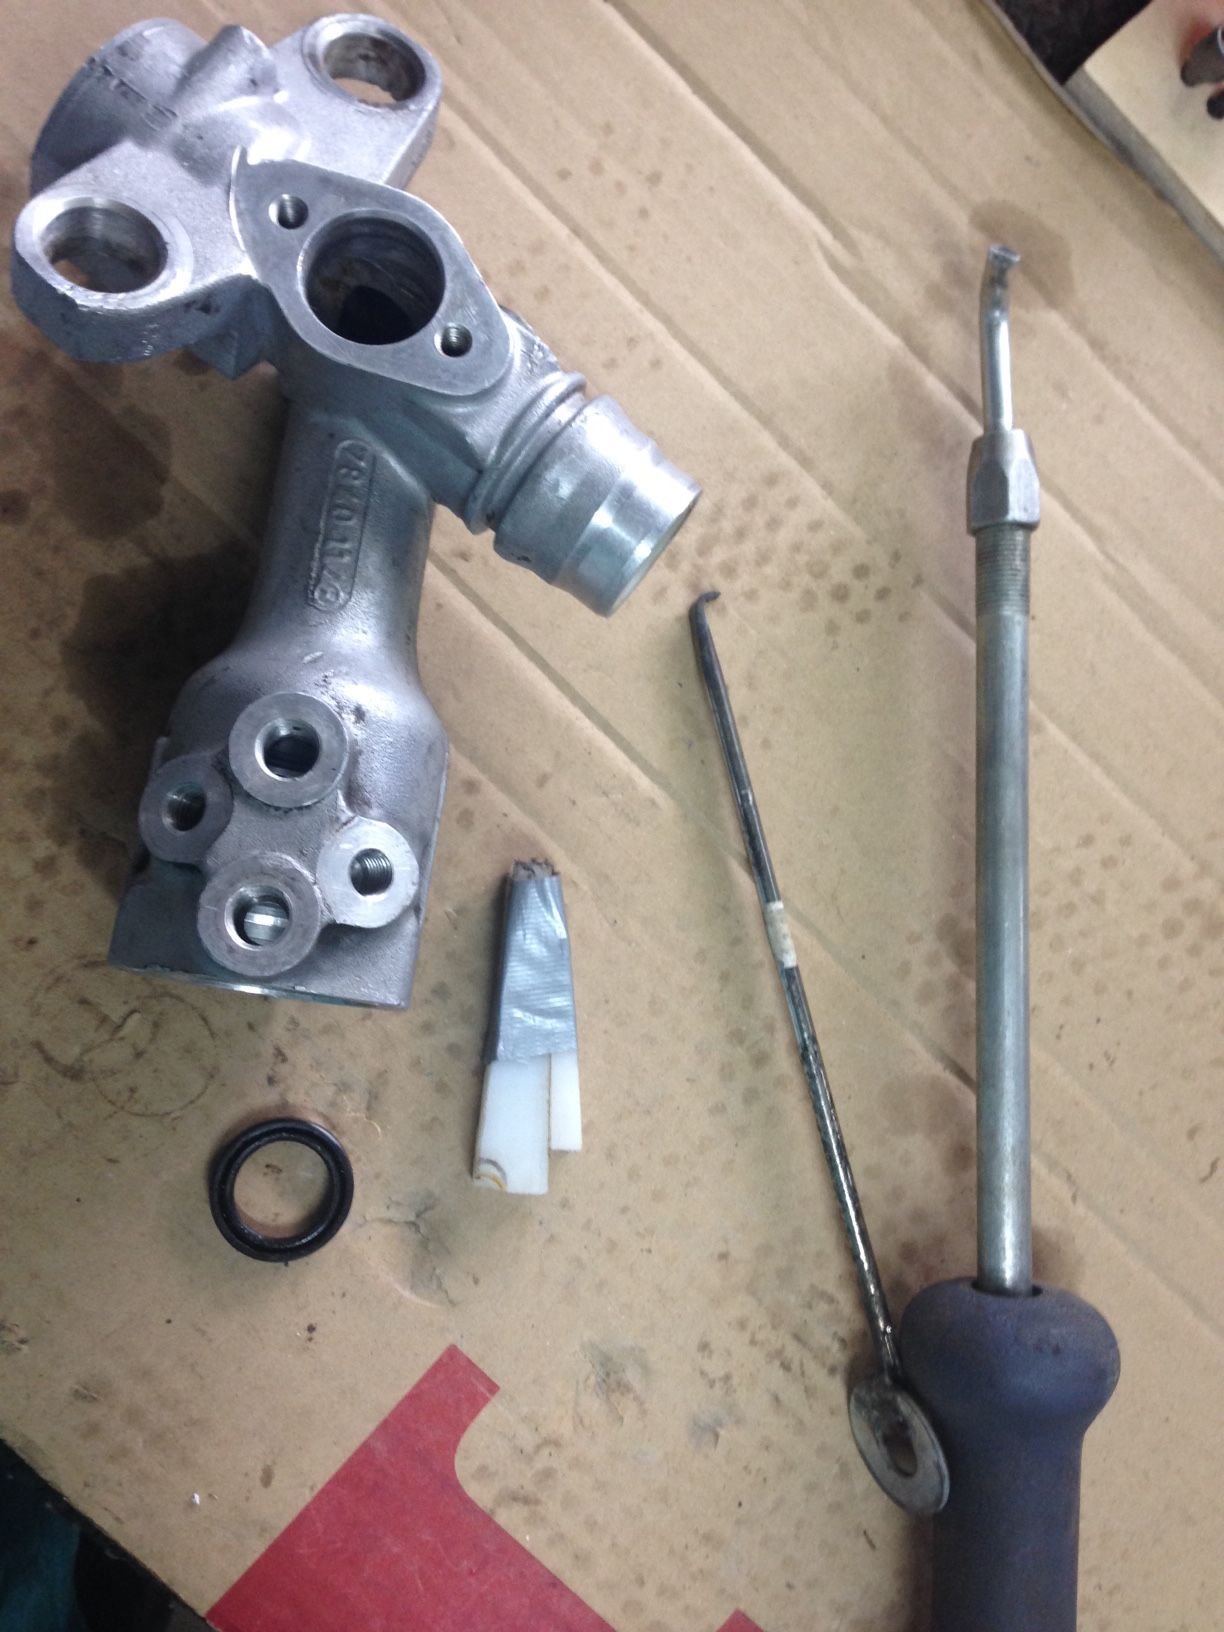
The rack is almost completely disassembled, I am still stuck trying to get the old pinion seal and the passenger side seal out, I am trying to find a blind hole puller locally… if not I will try to make something.
The reseal kit is a bit intimidating with all those parts mixed together in a plastic sack, but once you separate the various o-rings and seals by where they go it seems a lot less daunting.
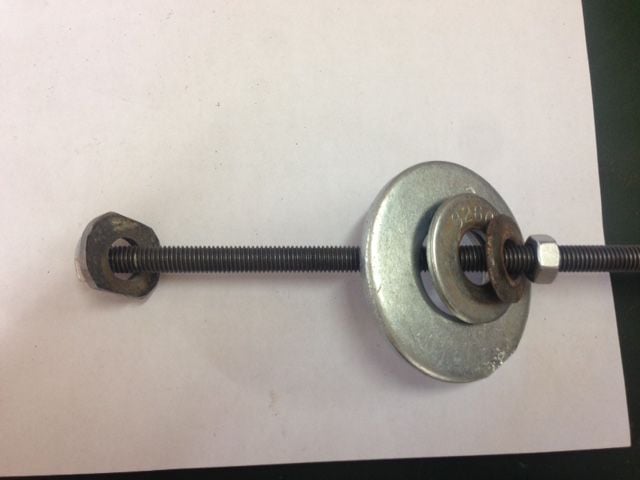
I ended up making a simple blind hole puller that got the right side seal out. I formed a washer that would slide through the seal at an angle and then pull up flush, it took a lot of grinding to get the right diameter but worked fine once it was done.
This leaves the pinion seal which has almost no lip available to grab from below with my puller. Is it possible to get the seal out using needle nose pliers to twist and rip it appart? I am a bit wary as I don't want to scratch the housing.
To get the pionion seal out I made a hook from an old screw driver and welded a washer to the end. After placing the hook at the bottom of the pinion seal I used a wedge made of teflon to force the hook behind the seal. Then hooked my slide hammer into the washer on the top of the tool to pull the seal free. Not the cleanest method, but is worked for me.
Reassembly was relatively easy... as mentioned I separated the parts according to where they go, carefully comparing them to the old parts (which means being careful during disassemble to keep the parts in the proper order) and reinstalling them in reverse order.
The exception was the seal in the passenger end of the rack. On disassembly there was a metal spacer behind the seal, so I reassembled it with that spacer and the new seal. Once finished I found that the spacer was loose, that is not snug against the rear of the seal. I also had a nylon seal of the proper diameter left over!? So I pulled the seal again and placed both the original metal seal and the nylon spacer behind the seal and once it was back together everything seemed to be fine.
...
The reservoir can be changed to the plastic one, but you will have to make your own brackets to hold it. Alternatively you can clean and flush the old unit...
The plastic reservoir has a screen in it if it is like the 944 reservoir, I just took my metal reservoir apart and there is no screen or filter. Is this normal?
The rack has now been installed, ATF added and it has passed the first tests of driving from the garage to the sidewalk and back, weaving from side to side. No external leaks and lifting the lip of the boots doesn't reveal any fluid. I'll report back when I have done some proper road testing... which has to wait till I replace a couple of CV joints.
Looks great! Nice job. This is something I’m going to tackle in the near future on my ‘78. Thanks for the writeup
Thanks for the compliment.
When you get around to doing it this write up is really useful: https://rennlist.com/how-tos/a/porsc...ng-rack-383853
One tip... put the "power steering line clamp", that is located above the control valve housing, on before attaching the universal joint to the input shaft. I didn't and learned the hard way that it is possible to install that clamp with the universal joint in place... it just takes a couple of hours and results in putting up with a certain amount of pain from working inside a very limited space with sharp edges all around. I ended up getting it in from the top, which I imagine would be impossible with a 32 valve engine.
I have about an hour of driving with the resealed steering rack. Still no leaks (I stuck the end of a screwdriver under the lips of the boots and it came out clean and dry.
The steering also feels a lot better, the initial resistance to input mentioned in my original post is gone. I hope that this will turn out to be one of the successful reseal experiences... although I'll give it more time before celebrating.
Ron I have no doubt you could do this... the hardest part is getting the old seals out. You have rebuilt your CIS system which sounds a lot more fiddley then doing a rack. As long as the parts are in good shape and you keep the work area clean it is pretty simple. But who knows, my seals may blow out tomorrow!

 06-05-2018, 12:50 AM