When you click on links to various merchants on this site and make a purchase, this can result in this site earning a commission. Affiliate programs and affiliations include, but are not limited to, the eBay Partner Network.
did you drain the block before heating it?
Find another store and buy a Mapp gas cylinder,
drain the block,
heat the standoff ,
it might just come out with the vice grips and the block hot enough,
NOTE your trying to heat the block to about 250 degrees to get the loctite to soften.
did you drain the block before heating it?
Find another store and buy a Mapp gas cylinder,
drain the block,
heat the standoff ,
it might just come out with the vice grips and the block hot enough,
NOTE your trying to heat the block to about 250 degrees to get the loctite to soften.
Stan,
Didn't drain the block. It's the top of the bell housing so I wouldn't think coolant would have much effect.. I've already tried vice grips. I won't have any time to work on it for a couple of days but I might have to try the stick welder when I get back to it! What could go wrong?
the aluminum in the block transfers heat so fast that any heating you do will be quickly removed into the block ,
with coolant this will happen faster and reduce the amount of heat soak time the screw will see.
I know it seems like a PITA to drain the block, but it will increase your chances of being successful on your next attempt.
Same goes for welding on a nut to the screw, drain the block first.
Remember you need to get the area up to about 250 degrees, then remove the screw.
I finally got some time this evening to work on this. The 1st attempt with the stick welder (1/8" 6011 rod) didn't look that good and the nut came off easily. The 2nd attempt looked much better (below) and it seemed to be turning the bolt but eventually broke lose. Looks like I'll be cutting the bolt off and using the reverse drill bits and extractor. Using the stick welder for this was pretty easy since the rods are about 12" long and can easily reach into tight areas.
I did get the map gas torch, but it really didn't work too well for this application since the flame is much bigger than my propane torch and there's a button you have to hold down. After I turned down the gas to get the flame smaller, it was a yellow flame that was probably not as hot as my propane torch. I ended up going back to the propane torch and it's small blue flame. Still, it's a very cool torch and I'm glad I have it for other purposes. Somewhere along the way I smoked the vacuum hose to the tranny, completely melted though, so the job is expanding :-)
To be more clear, when I said "broke lose" I mean the nut broke lose of the bolt, so the weld failed.
Wet rags would have been a good idea, but I didn't think I needed them. Not sure I'll try any more welding. Will probably try the dremel and drill next.
Don,
I feel your pain. I'm doing an intake refresh on my 87 and all the water bridge bolts were frozen and the heads stripped out. I cut off the bolt heads and was able to pull the water bridge off the remaining "studs." I used my stuck bolt extraction tool to get three of them out, but the 4th was stubborn and sheared off near the head. I welded on a nut with my MIG welder and heated the block, soaked it in penetrating oil overnight, but then it sheared off level with the head. I drilled into it and tried to use my "easy out' with no luck so far. I think the next stop is drilling it out completely and using a heli-coil. My only advantage is access compared to the bell housing.
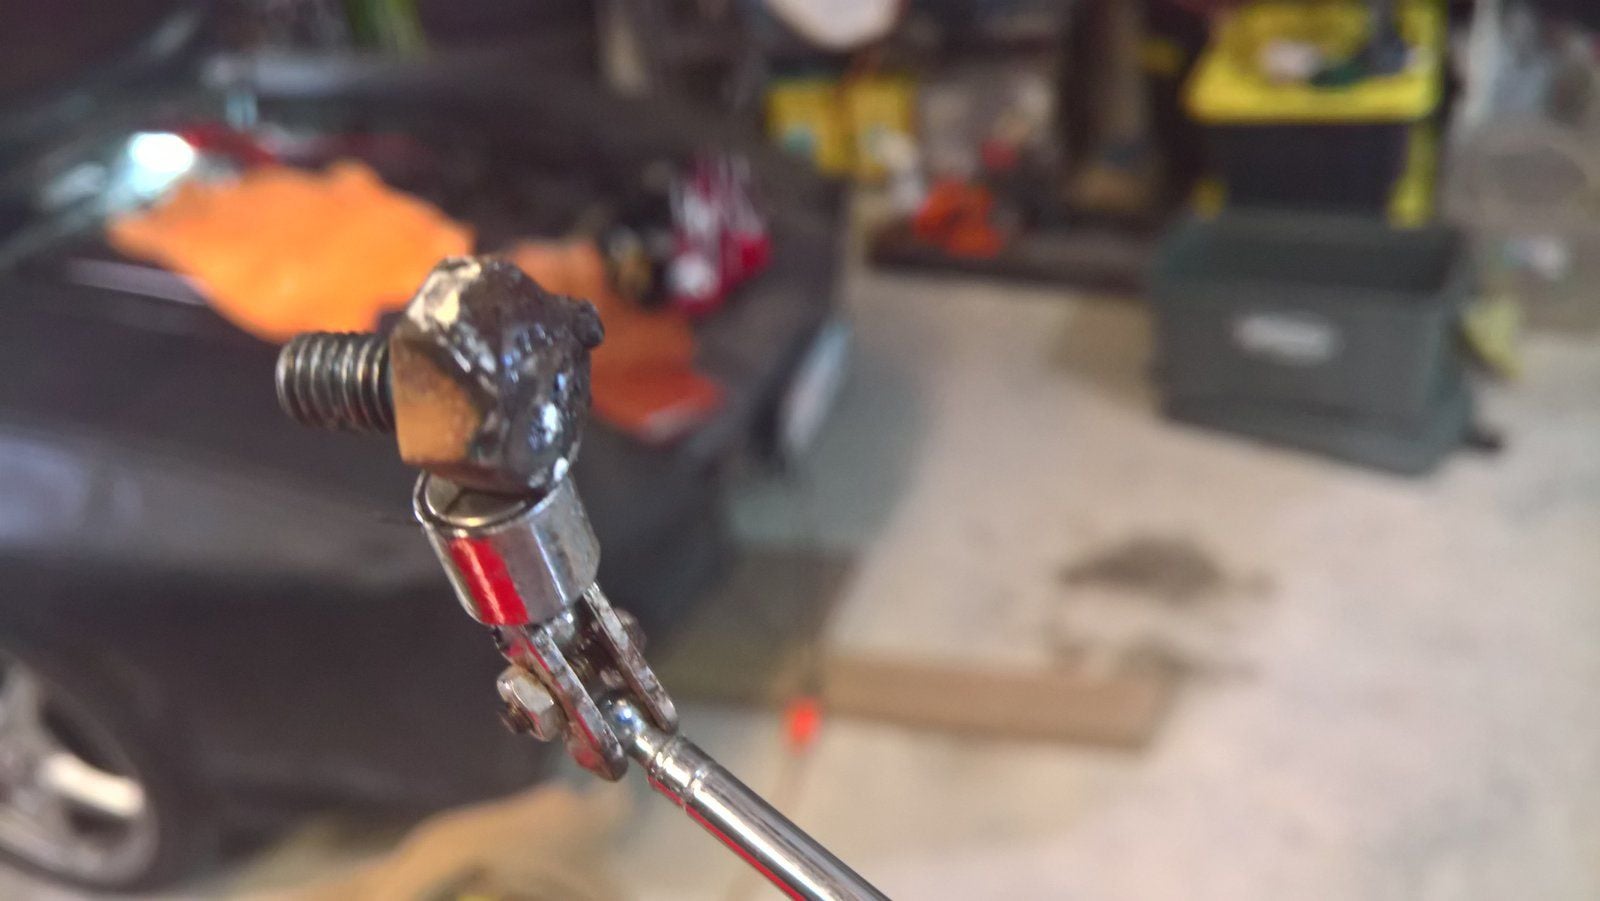
Today I decided to give the nut welding one more try and it worked! I used a larger 12mm nut with more gap for the molten metal to penetrate between the stud and the nut. It wasn't pretty but it worked. You can see in the pic that the stick welder melted some of the nut away, but there was still enough surface area for the 6 sided socket to grip the nut. I also heated the riser with the propane torch for about 5 minutes before trying to remove the nut. Thanks for all the tips and advice. I should have the car back on the road very soon.
Last edited by Don Carter; 05-25-2018 at 08:55 PM.
Yes, I could see some blue thread lock on the bolt. Do you know if the hole is threaded all the way through and a longer bolt can be used? I have a bunch of matching 5mm hex head bolts that are about 1/2" too long. Otherwise I'll go looking for the right size bolt tomorrow.
I definitely won't be adding threadlock and I have no idea why the factory did. I've owned the car for 23 years, so I'm sure this was the original CPS.
I figured Lowe's or Ace might have the bolt, I'll check it out.

 05-04-2018, 09:25 PM