When you click on links to various merchants on this site and make a purchase, this can result in this site earning a commission. Affiliate programs and affiliations include, but are not limited to, the eBay Partner Network.
Hello everyone, I have started to undertake the removal and replacement of my shocks, since they were original to the car (32 years old). I am having some difficulty removing the rotors at the rear to be able to remove the long pin. I was very happy to see that this long pin was not seized !
Hi Andre,
As others said no need to remove brake shield. Just remove the front nut, install in on the rear jamming into the original rear nut, use an Air Impact on the nuts to spin the whole pin while prying out at the washer with a suitable tool, I use a pickle fork ball joint/tie rod tool...and it will come right out towards the rear.
It seems the screw issue has been covered already. But even if you don't have to remove those to get the Shock pin out now, it is a good idea to take care of rusted/stuck hardware when you notice it. Murphy's Law will dictate that that screw will cause you problems when you really need to get the rotor off. Plus you can bet it will be in even worse shape down the road.
Also as mentioned, you have to back of the parking brakes a good bit so they can clear the "lip" that has formed on the outer edge of the rotor from normal wear.
Hope that helps,
Dave
__________________
David Roberts
2010 Jaguar XKR Coupe - 510HP Stock - Liquid Silver Metallic
928 Owners Club Co-Founder
Rennlist 928 Forum Main Sponsor www.928gt.com
The screws are a standard rotor set screw that is usually included with a set of new rotors. This isn't a screw you'll likely find at a hardware store; order the correct screw from Pelican or similar vendor.
Oh, and drill it out already. If you mangled it with a conventional screwdriver, it is because it normally requires an impact driver to remove.
If the rubber hammer doesn't work grab a short 2x4 hold it against the rotor surface and hit it with a 5 pound sledge. It will fall right off.
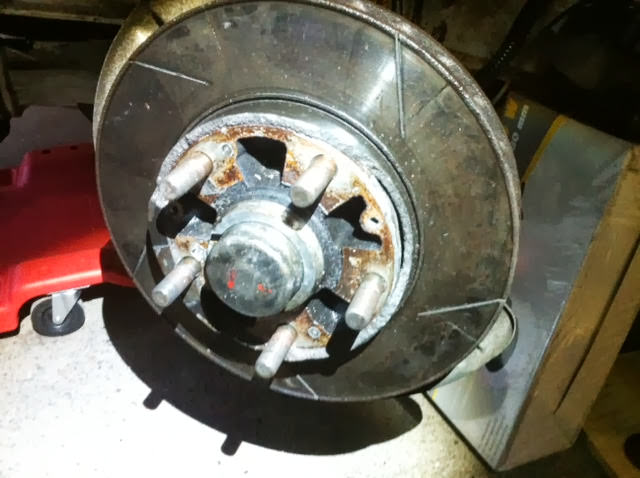
Yup there are two threaded holes in the rotor which take M8 bolts. I keep a couple of longish ones handy and they never fail to push off stubborn rotor.
Also note MrMerlin's advice to bank off the parking brake shoe star adjuster. If the shoes are pressing against the inside of the rotor hat they will be pulled off with the rotor, and you'll have to reassemble the shoes on the hob which is fiddly!
I will have to see I have no idea what that is, I have removed the regular caliper, I thought that was all ?
I will have to check PET to see !
I just did this to my 83 this past weekend and also removed the rotors and back plates to get better access to the pin.
For the screw, first and foremost use the correct side phillips head, which is typically one side up from the standard phillips head (can't remember the number). Here is a pic of a regular screwdriver (top) vs the next size up (bottom), which is what I used. Just make sure the screwdriver is the correct size and not undersized.
I always put a pair of vice grips on the screwdriver handle and then have someone constantly tap the end of the screw driver with a hammer as you place slight pressure on the vice grips to unscrew the screw. I would initially give it several good whacks with the hammer before you start the backing out process. This has never failed me thus far and I posted a mock up picture below to show you what I mean.
Thank you twin turbo, I will see if I can still do this !
Hi Andre,
As others said no need to remove brake shield. Just remove the front nut, install in on the rear jamming into the original rear nut, use an Air Impact on the nuts to spin the whole pin while prying out at the washer with a suitable tool, I use a pickle fork ball joint/tie rod tool...and it will come right out towards the rear.
It seems the screw issue has been covered already. But even if you don't have to remove those to get the Shock pin out now, it is a good idea to take care of rusted/stuck hardware when you notice it. Murphy's Law will dictate that that screw will cause you problems when you really need to get the rotor off. Plus you can bet it will be in even worse shape down the road.
Also as mentioned, you have to back of the parking brakes a good bit so they can clear the "lip" that has formed on the outer edge of the rotor from normal wear.
Yup there are two threaded holes in the rotor which take M8 bolts. I keep a couple of longish ones handy and they never fail to push off stubborn rotor.
Also note MrMerlin's advice to bank off the parking brake shoe star adjuster. If the shoes are pressing against the inside of the rotor hat they will be pulled off with the rotor, and you'll have to reassemble the shoes on the hob which is fiddly!
+1.
Andr�, what we're talking about here is just use two regular M8 bolts to press the rotor out.
Those are the threaded holes Stratford talks about:
They're there for that purpose. Just make sure they're clean and you should be good.
Last edited by Bertrand Daoust; 01-18-2018 at 05:46 PM.
Yup there are two threaded holes in the rotor which take M8 bolts. I keep a couple of longish ones handy and they never fail to push off stubborn rotor.
They sometimes do! Here from my formerly owned 83 S But I haven't seen or heard of others..
I always start on the disc screws with the impact tool. 50/50-ish chance that it comes out or the tool shatters the head. If the latter I just get the drill.
Since no one has mentioned it...
When you get your new screws for the brake discs, put a small dab of anti-seize on the screw's collet (or on the 'indented' part of the disc) and then when you turn them in, make them finger tight.
Those screws are only needed to hold the disc on until you bolt-on the wheels. There is zero reason to make them super-duper tight unless you like using your impact tool and drill.
+1.
Andr�, what we're talking about here is just use two regular M8 bolts to press the rotor out.
Those are the threaded holes Stratford talks about:
They're there for that purpose. Just make sure they're clean and you should be good.
I always start on the disc screws with the impact tool. 50/50-ish chance that it comes out or the tool shatters the head. If the latter I just get the drill.
Since no one has mentioned it...
When you get your new screws for the brake discs, put a small dab of anti-seize on the screw's collet (or on the 'indented' part of the disc) and then when you turn them in, make them finger tight.
Those screws are only needed to hold the disc on until you bolt-on the wheels. There is zero reason to make them super-duper tight unless you like using your impact tool and drill.
Thank you Dave, I thought it was weird to have 2 small screws hold a rotor in place but now that you mentioned the wheels hold them in place it makes a whole lot of sense !
Kevin with the axle pin nuts tight, put a good box end wrench on the forward nut and loosen it once the nut comes free,
then use a screwdriver and the same wrench to walk the rear of the pin out

 01-18-2018, 01:55 PM


 But I haven't seen or heard of others..