When you click on links to various merchants on this site and make a purchase, this can result in this site earning a commission. Affiliate programs and affiliations include, but are not limited to, the eBay Partner Network.
Removing socket head bolts during engine out procedure.
I am working through the manuals to get the engine out. Until now everything goes really well. I stumbled upon a page where i am not sure if i understand the procedure correct, i hope the Rennlist forum can give me some extra pointers.
This is the page:
In my car it looks like this:
My question is, how do i get the pinch bolts aligned so i can get them both out? I think the whole engine/clutch/transaxle is fixxed and does not move at this point? I put the engine in neutral just before i got the clutch slave off. (Its a '79 manual btw).
I have read something about move the engine? How could i do that the best?
With the transaxle in neutral you should be able to rotate the driveshaft with your hand so that you can line up the rear pinch bolt with the inspection hole in the torque tube.
If you can’t rotate the driveshaft, release the parking brake
Read the clutch removal instructions carefully. You'll want to release the clutch using the pedal while everything is intact there, and insert the metal U clips in the cover as described in the workshop manual instructions. This leaves the clutch disk free to rotate as Dave describes above, with the gearbox in neutral. Then free the stub shaft for the clutch by removing the bolt in the forward clamps, slide the stub shaft back out of the clutch disk. With the bellhousing bolts removed, the engine can lift off the mounts slightly, moves forward so the clutch can clear the big end of the bellhousing, then comes forward up and out.
After watching a couple engine removals, there may be a case for removing the clutch assembly from the flywheel before unbolting and removing the engine. It looks like it gains you a few precious inches of clearance as you start the engine removal. Others will comment on this, as it's armchair engineering guidance.
Definitely remove it ... it makes it a whole lot easier without the clutch and stub shaft in the way, and you need to remove it eventually anyway.
I've removed and installed engines multiple times with the clutch as well as front bell housing installed. If the radiator is removed along with the front drive pulley it is an easy exercise. I also usually unbolt the trans and scoot it back some. I've even pulled 928 engines with the MSDS headers installed. Very much like a chevy dropping in at an angle and using an engine leveler. I also ditched the factory engine hooks years ago for some much more sturdy out of 1/4 inch steel. The factory ones always bend and twist.
If that last picture is from your car,
you will need to use a pry bar on the release arm , pry to the rear of the car this will free the clutch disc to turn.
Then with the trans in neutral and E brake off ,
turn the driveshaft so the hex bolt faces down remove it.
Tthen turn the shaft 180 degrees and remove the other pinch bolt..
NOTE before you remove the pressure plate bolts get some 3MM wire and bend them into a U put some contact glue on them so when you fit them to the pins on the PP they wont fall out.
you use the prybar on the re;lease arm to fit the spacers
The spacers must be installed so you have room to remove the throwout bearing and also have that extra clearance to remove the release arm from the ball.
NOTE the clutch must be removed before you lift the engine , slide the front bell back and leave the 4 big bolts in about 2 turns each and remove the clutch pack , then remove the 4 big bolts
NOTE remove the 2 trans mount to cross member bolts and slide the TT/transaxale assembly back this will give you room to lift the engine out
NOTE remove the 4 bell housing upper bolts and put a 2x4 block under the front of the TT to lower crossmember,
Hi! Thanks everybody for the feedback. As i try to put your feedback together to make the plan, i guess i will be removing the clutchpack from the car first. So i have read a bunch of posts about removing the clutch but i am still not sure if i get it.
@MRMerlin your feedback looks like a really straightforward howto, i got some questions though. I think i need the next steps:
This is clear to me:
1. With a pry bar i will free the clutch disk.
2. Turn the driveshaft and remove the hex bolts.
3. Use the pry bar get some space and push in the U's (spacers) with some glue.
Her it gets less clear:
4. I read somewhere that i should mark the pressure plate, inter-mediate plate and flywheel in relation to each other for installation later. Why? Doesn't it come of like one peace?
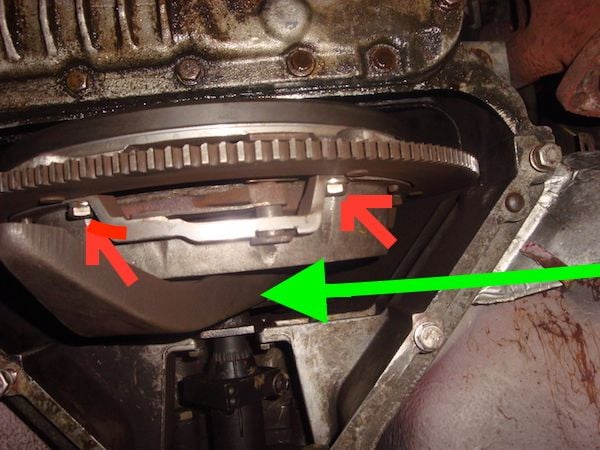
5. I think i then i need to unbold the pressure plate bolts (see red arrows) which are in this picture and get off the release arm (how?) from the ball (see green arrow):
6. Pull back the whole clutch assembly and remove it from the car.
To get the assambly in reverse steps.
Hope your answer will be a simple YES! Thanks!
The clutch cover unbolts from the flywheel, flywheel stays bolted to the rear of the crankshaft. Make those index marks so the balance stays the same when you reinstall. There are indexing pins that will help you, but a couple good paint-pen marks make things a little more obvious.
Do Not Drop The Clutch On Your Head as you unbolt it. With the stub shaft retracted, the disk will succumb to gravity at about the same time, so be ready to catch that too.

 12-17-2017, 04:59 PM


 i will check that brake, thanks Dave