When you click on links to various merchants on this site and make a purchase, this can result in this site earning a commission. Affiliate programs and affiliations include, but are not limited to, the eBay Partner Network.
Quite right Bob to point this out. I will edit my original post to point out that it is a 2 phase approach. Phase 1 was to get the system rejuvenated with a few new parts to eliminate sources of potential issues and to replace seal/oil for r134a conversion. Then test the whole system to check the health of others parts which remain largely unknown until you test it, here I am thinking of the HVAC control module, relays, the compressor and general wiring. Phase 1 would include fixing any issue until the system passed testing.
Once I am satisfied that it is functioning correctly and is not loosing pressure then phase 2 would be a full evacuation and refill to get the maximum performance out the system.
3 days on and the system is holding exactly the same pressure and is providing reasonable cool air. I do need to hunt down details about how to test for normal operation - any suggestions?
Hi Marti,
sounds like you're making progress. With some refrigerant in you system, you might consider taking it to a pro AC shop. They could check it with a sniffer for leaks, then do a good evacuation and fill by weight.
Good luck,
Dave
There's a "truth table" in the workshop manuals that describes the operation of flaps and the heater control valve relative to control head lever positions. The fans and flaps have similar section in the WSM under Cooling System, that describes the fan operation relative to AC system pressure. AC pressure (related to temperature) is sensed at a transducer that sits on the drier manifold -- the little can with the two binding-post connections on it next to the high-side service port. The fan controls depend on seeing that the AC is engaged via the second set of contacts in the little clutch relay in the control head.
On checking the pressure last night there has been a drop in pressure ☹️
Welcome any feedback please - am I looking at upgrading the flexible hoses and rebuilding the compressor?
I believe the hoses should be straight forward but what are the options on DIY rebuild of the compressor?
No surprises here- getting the hoses done should be straight forward- just a question of where the nearest such workshop is relative to your location.
The compressor is not really a difficult job for those who know what they are doing and have the appropriate tooling but as a DIY project I would recommend you delete such notions from your memory banks. The a/c compressor is a Nippon Denso item and used by quite a number of top end marques so getting it rebuilt should be viable in the UK if the mechanicals are in a suitable condition. Such rebuild will involve new bearings, new seals and a new clutch would not go amiss. I think they can also replace the swish plate. You should also replace the drier. With the expansion valve[s] it is pot luck.
First task may be to find the leak before you disassemble anything. Easy method is using an electronic leak detector, one that picks up traces of refrigerant leaking out. They are commonly available in the US for well under $100, and are on Amazon if you like to shop that way. AC shops would like to add a UV dye to the system, let you drive it some, then look for the telltale stains in visible areas using a black-light and some special glasses. That works if everything is perfectly clean to start with, and only works on places you can see. From your pictures, the car doesn't meet the first requirement. Since it's a 928, it doesn't meet the second requirement.
Common leakage places:
-- Hose connections. You replaced the o-ring seals in all of them. The seals get a bit of refrigerant oil on them prior to installation so they don't get scuffed or torn while everything goes together. There's a Dow Corning lubricant which -may- help in some situations, but an oil-lubricated o-ring should be fine. If you didn't lubricate those o-rings, you may decide to replace them again.
-- It's tempting to over-tighten the hose connections, but that's likely to cause a leak as the o-ring is distorted as it gets squished by the added pressure. It needs just enough pressure to seal, not so much that it gets squeezed into a square cross-section.
-- The compressor shaft seal and compressor housing seals, originally spec'd for mineral oil used with R12, may not like the PAG oil that you put in with the conversion.
-- There are o-rings under the two "manifold plates" on the compressor, where the hoses connect to the compressor body. They are easy to forget. Mine failed a day into my car's R134a life. They don't show up in PET or the supplementary manuals.
-- Cars with the rear "auxiliary" evaporator add more failure points, including some soldered connections at the rear evaporator, at the rear expansion valve, at the solenoid under the passenger's seat, the bulkhead fittings where the lines pass through the tub, and at the connections to the main lines under the bottom edge of the firewall. These shouldn't apply to you.
Anyway, spend some time now while the system is still operating, looking for the leak(s). That way you can focus your efforts and attention where it will do the most good.
Careful visual inspection may yield a clue as to the leak path as a gas escape invariably carries some oil with it and more often than not can be seen. I generally use the dye method with the UV lamp but the main problem with that is that you cannot see the evaporator but you can get the sniffer probe up close. Nontheless if external checks reveal nothing then the evaporator becomes the suspect.
Given your history chances are it will be the compressor seal but as Dr Bob quite rightly says, trying to locate the leak source at this stage is preferable. Remember it only takes one small leak path.
The problem with the seal is that if the compressor is not used the lube on the seal face dries out and if the compressor is spun with a dry seal face it gets damaged very easily thus why even during winter months it pays to run the a/c system for a minute or two upon start up once a month [or more] whilst the heater is warming up as it were.
So so a few months on and I am back to working my way through any sources of leakage with the ac system.
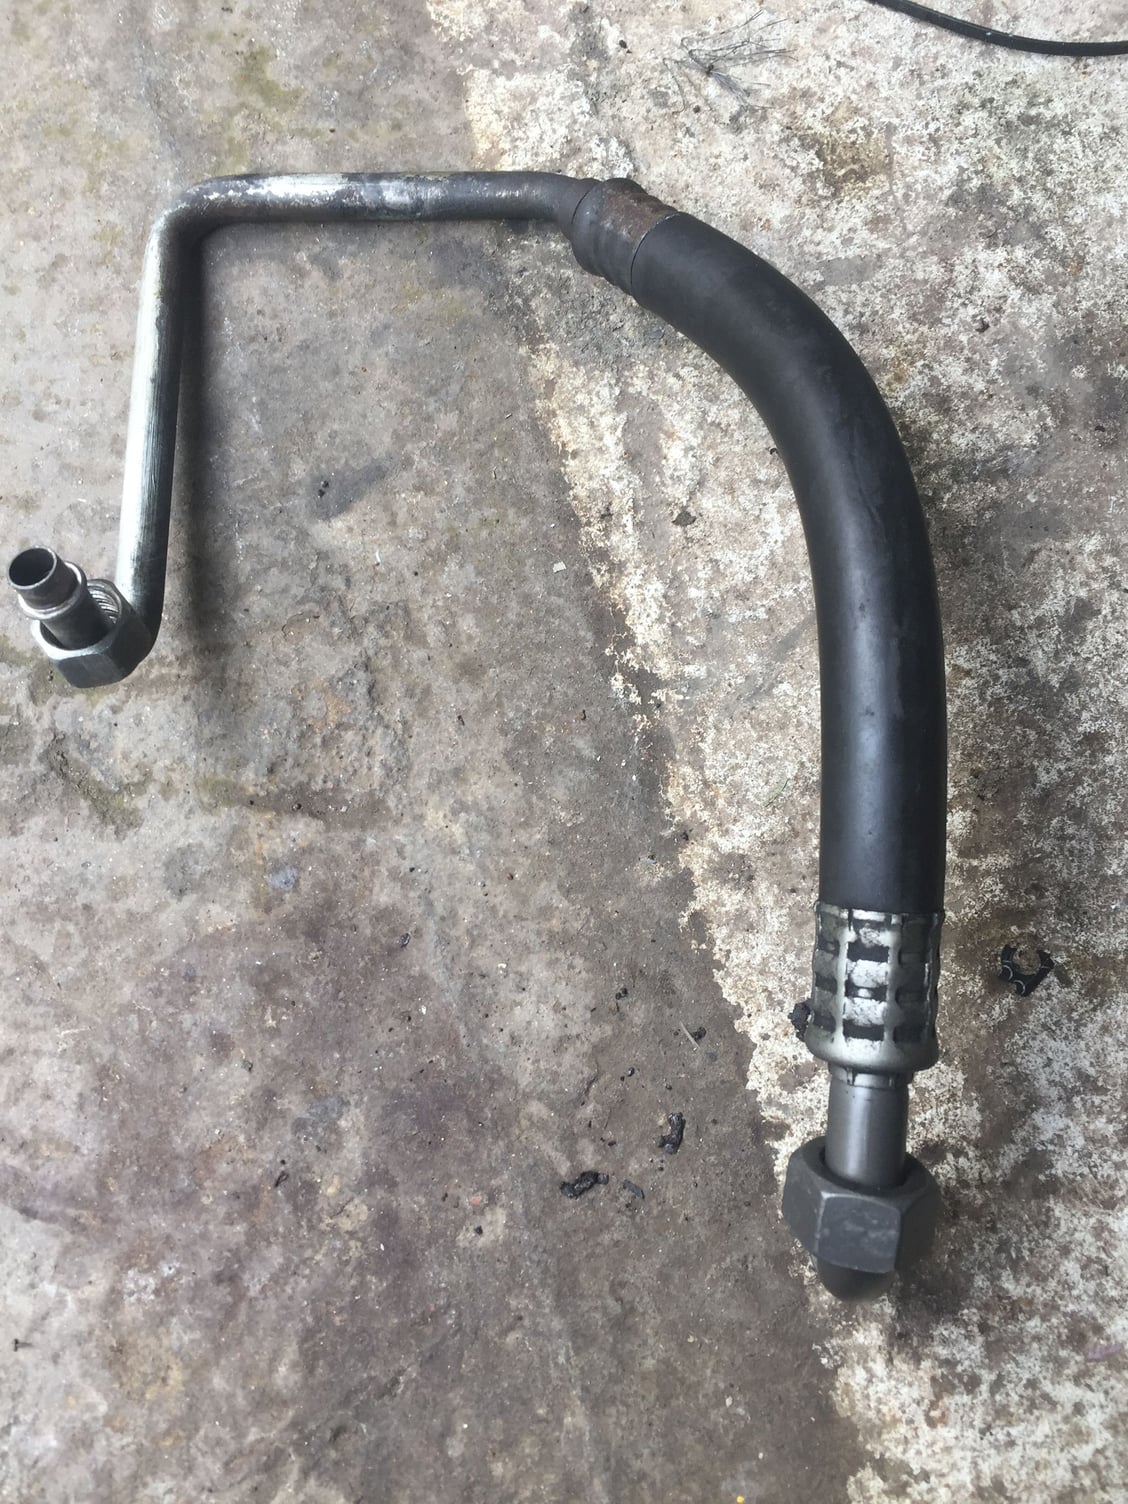
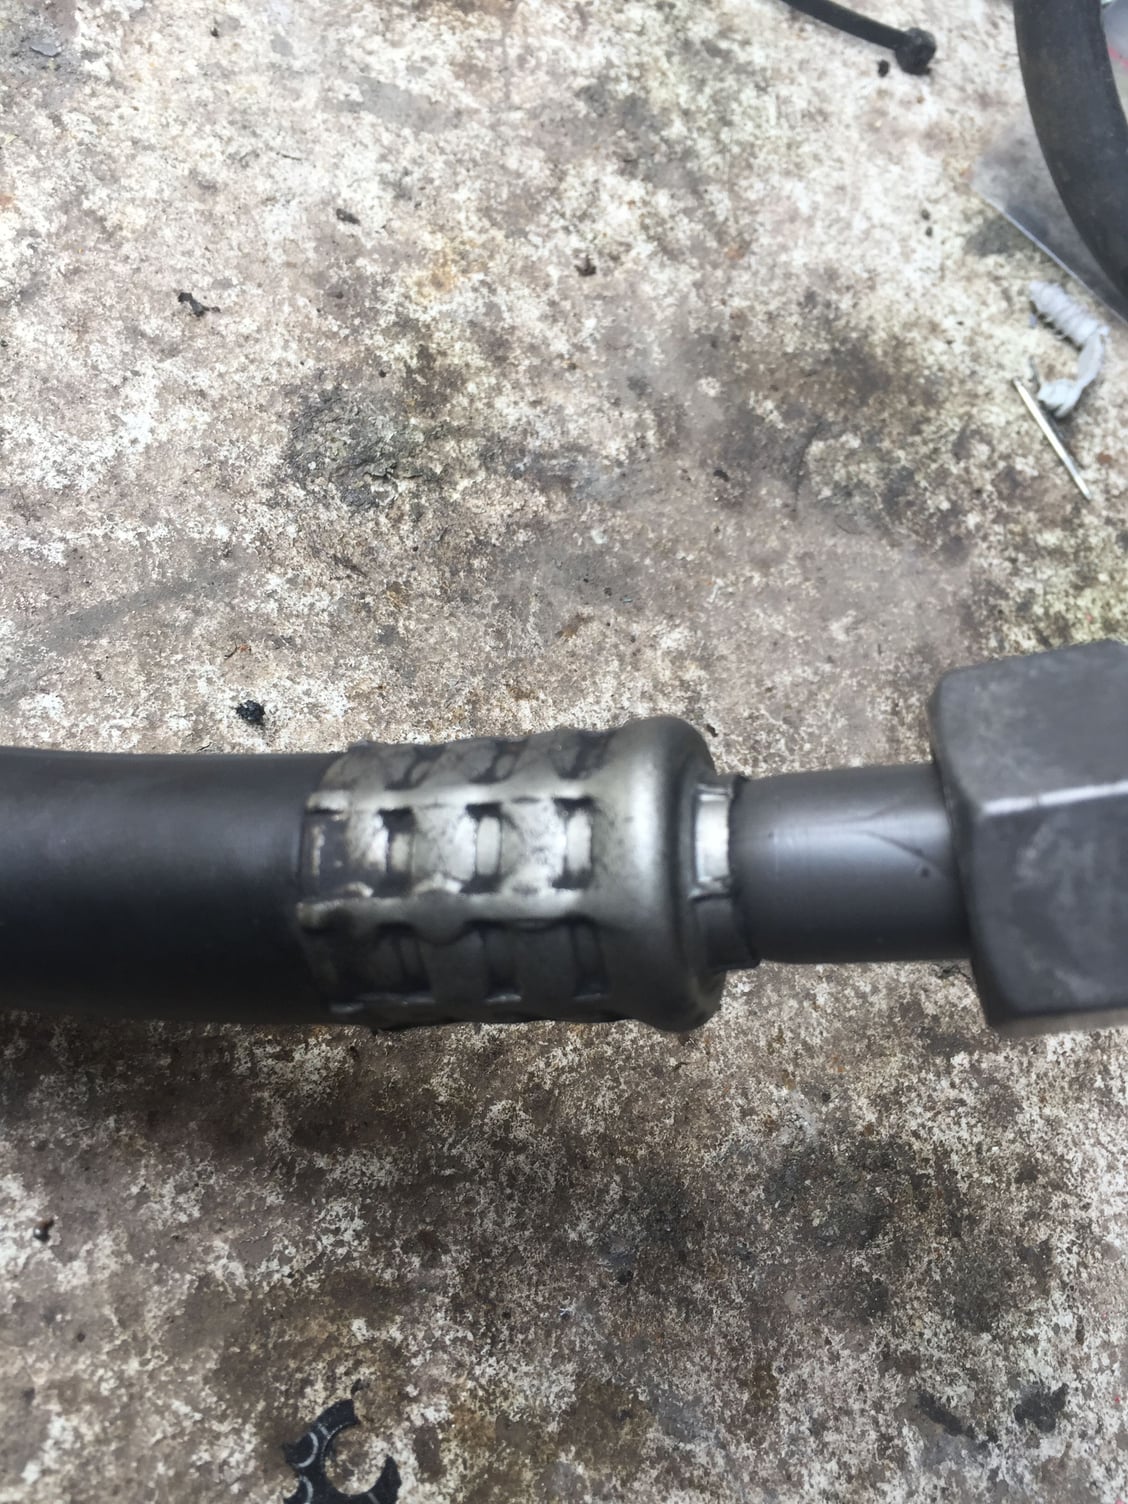
I rebuilt the compressor with all new seals and have inspected both flexible hoses. I can�t see any signs on either hose of leaking but I did find the below pictured hoses had one end (close up picture) could swivel unlike the others which are tight.
Thoughts please on whether this could be the culprit?
Definitely! Swivel = loose = leak. You can send that out to be rebuilt. I would rebuild all the hoses while you're at it.
Good luck,
Dave
I had the same issue with the hose. I had both hoses rebuilt for $100 from a local AC/Radiator shop. They rebuilt the hoses with new barrier flex lines. In my case they cut the hard line and welded on new flares new hose and crush fittings. Ideally it would have been nice if I could have found someone who reused the lines without cutting the flares. I had this done with my power steering line.
When you are shopping around, ask them about how they are going the repair and see if you can find someone who can rebuild without cutting the line. In the end cutting/welding was just as effective, just not an good looking as the factory look. Sorry no pics, too ugly.
Last edited by Michael Benno; 04-15-2018 at 12:01 PM.
Quite right Bob to point this out. I will edit my original post to point out that it is a 2 phase approach. Phase 1 was to get the system rejuvenated with a few new parts to eliminate sources of potential issues and to replace seal/oil for r134a conversion. Then test the whole system to check the health of others parts which remain largely unknown until you test it, here I am thinking of the HVAC control module, relays, the compressor and general wiring. Phase 1 would include fixing any issue until the system passed testing.
Once I am satisfied that it is functioning correctly and is not loosing pressure then phase 2 would be a full evacuation and refill to get the maximum performance out the system.
3 days on and the system is holding exactly the same pressure and is providing reasonable cool air. I do need to hunt down details about how to test for normal operation - any suggestions?
Jump forward in time and I can now reveal how phase 2 of the project went.
After about 2 weeks of filling the system with refrigerant as part of phase 1 it was clear that the system was loosing pressure. There was still a small leak somewhere although there were no obvious signs.
The only things left in the system to change were the expansion valve, compressor and barrier pipes, so I set out to refurbish/replace these.
I had already had the pump off and cleaned it up. During live testing it did engage and pump refrigerant round the system. Research on Rennlist told me that you can either try rebuilding your pump or take a safer route and buy a new one. One of the weak points of the pump appears to be the shaft seal in the top cover which could have been contributing to the small leak. Since my pump seemed to work ok I decided to rebuild it myself.
My pump is the common earlier Denso pump which was fitted up to about 89/90 MY.
Everything looked clean when taken apart and everything looked fairly good condition except one of the spring valves in the top squish plate. One of the spring valves had broken, I am guessing fairly recently.
I sourced a replacement spring valve and rebuild it with kits supplied by Roger. I was initially concerned as to whether the rebuild kits were suitable for R134a however I was assured by a fellow Rennlister that they were. Right enough when the kits arrived there was a reference on the seal to It being compatible with R134a.
Rebuilding was fairly straight forward replacing all available seals and adding universal PAG oil, I was mindful of the clash between oil types causing sludge but since I have replaced my entire system I did not believe there would be any oil left in the system. Pictures to be added
Moving onto the barrier hoses which looked good revealed the bigger diameter pipe which connects to the fuel cooler to have a loose union. The union that connects to the solid metal pipe ( not to the pump) had movement in it = leakage.
Given the nature of my restoration I opted to buy a new set of barrier pipes from Porsche. The price was reasonable and it got rid of the headache of finding someone in the UK capable of rebuilding the old pipes.
A replacement expansion valve which was inexpensive completed the set of components that were left to look at.
I fitted everything and took the additional step of vacuuming the system. I first tested whether the system could hold a vacuum for 3 days, It passed that test holding a very strong vacuum without any loss of pressure.
I filled the system with R134a and tested the system, compressor engaged as it should and I can see a healthy flow of refrigerant in the dryer sight glass. The system is blowing cold air and this time it seems to be cooler than before, I noticed the fuel lines attracting condensation as well as the pump to fuel cooler metal line that runs up the side of the engine bay.
The system has been charged for a week now and there has been no loss of pressure.
I am going to test the system in a week, then periodically after that to monitor any changes.
Having gone through a second stage of work on the AC restoration I think a better approach would have been to replace the barrier pipes and rebuild the compressor as part of the first phase. It is not inconceivable that these could have been in good health but given the age of the components the question would be how long would they last until further work was required.
Now you have got past the first hurdle it will be interesting to see how well the system holds gas long term. I consider if one can avoid top ups for more than a year that is OK and if one can get two years out of a run that is a good result.
One thing I advise folks about, especially in colder climates, is to ensure the compressor is run at least once every two weeks to ensure some oil hits the seal face. If this does not happen the face can dry out and/or start to leak gas. Worse still, upon start up a dry seal face runs the risk of damaging the lip seal. During cold winter seasons it is quite understandable that owners feel no need to run the system but that is the worst thing they can do and most probably the single biggest reason for system failure. Simply switch on the a/c when starting up and let it run for a minute or so and then switch on the heater once some heat is available. Do that once every couple of weeks and the system should be more or less indestructible.

 07-26-2017, 03:22 PM