Hybrid turbo and FMIC on 931..
 06-03-2015, 02:19 PM
#1
Pro
Thread Starter
Thread is here http://924board.org/viewtopic.php?t=...er=asc&start=0
But I can use as much feedback/tips as I can get because I've never done this sort of thing before..
But I can use as much feedback/tips as I can get because I've never done this sort of thing before..
 06-03-2015, 11:32 PM
#2
Pro
Thread Starter
Updates, progress, and a bunch of new pics there if anyone cares..
Where do I want my BOV? closer to the TB or closer to the turbo compressor outlet?
Where do I want my BOV? closer to the TB or closer to the turbo compressor outlet?


 06-04-2015, 10:43 PM
#7
Pro
Thread Starter
It seems no 2 931 intercooler installs are the same, each one is one off and everybody goes about it in different ways.. I happened to have a different compressor housing that allows me to spit out the bottom of the turbo..
Trending Topics
06-04-2015, 11:10 PM
#8

Might not hurt to find someone with a tubing bead roller or make one yourself. It will help keep those intercooler hoses from walking off under pressure. Low psi you might be fine. I dig the grassroots path you took, keep t up.
06-04-2015, 11:34 PM
#9
Pro
Thread Starter
more done today, pretty much finished except the BOV, and a couple pipe-chassis mounts, then pull all this piping and clean clean clean, that and pull the turbo, build a turbo, reinstall turbo and everything, test test test..
2x4 cut 27" to mock IC inlet/outlet..
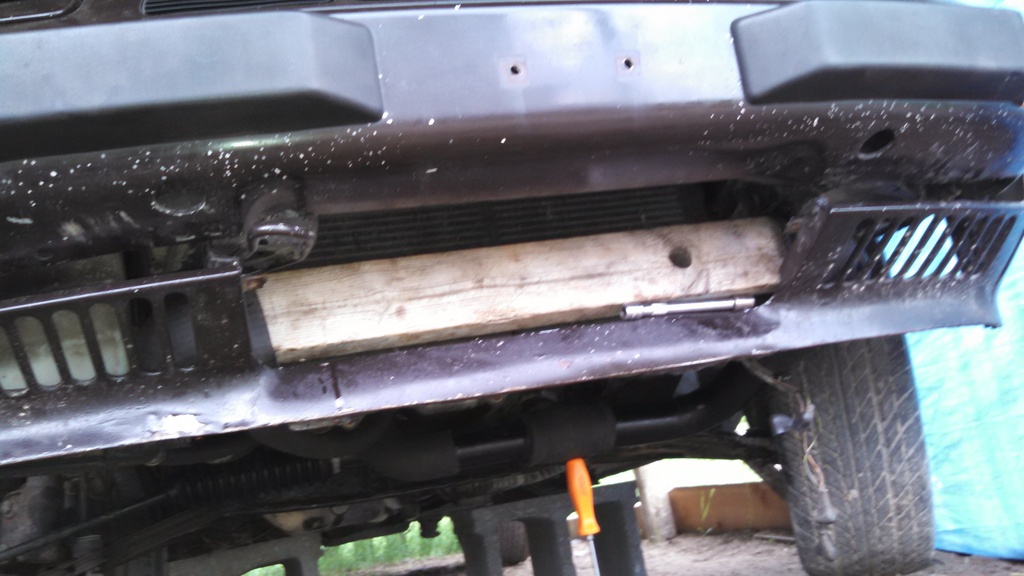
pretty busy down there, another 1" line is going down there too for the recirculating BOV
2x4 cut 27" to mock IC inlet/outlet..

pretty busy down there, another 1" line is going down there too for the recirculating BOV
 06-23-2015, 11:55 PM
#10
Pro
Thread Starter

Yup I tweaked some fins... I'll go back and straighten em out later the best I can.. See how its face is almost flush with the lower valance, its actually pulled down to it quite a bit tightening it onto its mount from the bottom..

You can tell that hood stays up a bit eh? look at the dust difference, lol..


All looks original under the hood except the BOV, yes the pop up lights and washer bottle and everything remain untouched...


Bunch of crowded pipes, see the turbo tag, also the connection to the bottom of the lower charge pipe..


Very crowded area there infront of the turbo compressor, lot going on thats for sure.. I need to customize that lower RAD hose a bit, moving the rad back made it kink a bit, its OK but I'll pull it and shorten it eventually, maybe flat out replace....


RAD spacer/IC mount/oil cooler mount turned out awesome.. Probably won't weld it up, wouldnt want to mess it up..

I need to shorten one of those pipe 90's there so the pipe across the steering rack isn't pushed down low like it is, where that couple with the crooed hose clamp is, that middle hose clamp actually is a mount and its crooked to pull forward a bit because it needs shortened inside that coupler..


Originally Posted by leadfoot
most intrusive aspect of that area is the tow point brace....
Yeah anyway sliced it and then carefully folded the rearmost interfering portion of it up and to the chassis rail with a BFH.. Very carefully (not to hit the RAD) and not really that big of hammer, 22oz estwing carpenters to be precise..
It sat in there fine to the driver's side a bit because of the tow hook and everyone was saying just to leave it to one side like that, no one will ever notice they said, not worth it, NOPE cant have crooked stuff, its nice and straight..

Yup, very satisfied..
Feast your eyes on that there...
Impressions on the IC itself..
Sure aint from USA...
Smells terrible of rubber and who knows what, I would hate to work in a place that smells like that..
The unexpected bolts and brackets it shipped with were floating around in the box, a few fins were bent a bit on arrival probably from them..
The welds are not constant beads, they are multiple overlapping tacks like steel tank wanted me to do on the tank feet, stupid for inexperienced welders idiot proof method..
Also I notice a couple places where the weld tacks are cheese holed like bubbles, trying to skimp on shielding gas or welding in the wind do this.. It does not cause a leak, but I noticed..
All the mounting lug things on it are threaded and then have helicoils in them.. The first one I noticed I thaught it was a fixed mistake but they are all like that, even the 2 identical separate lugs that came with it are like that with a helicoil..
It is surprisingly heavy, I don't know what I should expect but its heft surprised me.. Guess 10 lbs?
Exactly what I expected for cheap, it will do very nicely

I have to put the WG, J-pipe, exhaust all back together before I can run it, I tryed starting it with no exhaust (I've done it before) but the battery was flat (click) probably from leaving the key on so I can turn the wheels by the wheel from under, and playing with the CIS testor, it hasn't actually ran in weeks.. And change the oil/filter..
This was a lot lot of work..
 06-24-2015, 02:35 AM
#13
Pro
Thread Starter
Surely not one equipped with a GTX3076R... Yet... 
I was just kidding..
This turbo should be good for 1 bar almost to redline before losing efficiency.. Not rushing into big boost right away..
I was just kidding..
This turbo should be good for 1 bar almost to redline before losing efficiency.. Not rushing into big boost right away..
Last edited by fasteddie313; 06-24-2015 at 03:15 AM.
06-24-2015, 04:58 AM
#14
Professional Hoon
Rennlist Member
Rennlist Member
Join Date: Jan 2010
Location: Melbourne, Australia
Posts: 7,090
Likes: 0
Received 4 Likes
on
4 Posts
My dad has a 1982 924 with the 5 stud and all the cool stuff on it. I would like to build his motor or the spare 2L block i have sitting around. But i would love to do a high comp na with ITBS, cam ect.
I love how you've done the ic. plans for ducting? If you ever plan on a new turbo. I recommend a GT2860rs "disco potato"
06-24-2015, 12:53 PM
#15
Pro
Thread Starter
Bigger valves (sodium filled exhaust), better flowing ports, spark plugs on the intake side, better by all measure.. Loose a bit of comp with the 931 head chambers though but your looking at custom hi comp pistons anyway..
If I had an NA and wanted power I'd just add a big shot of n2o and be done, maybe a couple smaller stages of n2o so you wouldn't just have a + 100hp on off switch..
A couple guys are over 300hp-350hp turbo/vems on OG 2.0 NA internals, therefore I think the NA engine could handle a big hit of n2o just fine if its tuned well..
What ducting do you mean? Cut out bumper for more RAD ducting? Cut out under nose vent panel for more RAD ducting? Front brake cooling ducting?
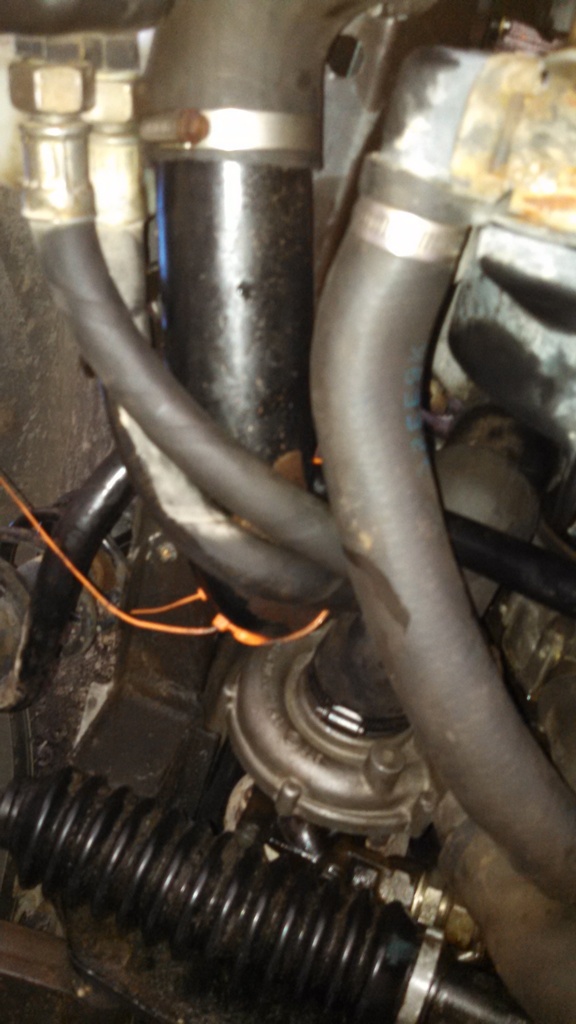
Actually I have been toying with the idea of a cold air intake with a ram air scoop in the bottom drivers side valance where the horns go, pretty much exactly opposite of where the oil cooler goes.. Plumbed right to the bottom of the original airbox..
see the hose behind the valance..
[img]
 [/img]
see the hose next to the airbox intake, it's run down there as is, yes that particular hose is too small and it would mean trimming the curved air box intake there into a nipple for a hose..
[img]
 [/img]
no AC bottle there gives a great straight shot..
[img]
 [/img]
This will have to be re-designed due to the driver's side IC 90 there now but there is still room..
[img]
 [/img]
Maybe I could use a fleece blanket and glass in the ram duct... IDK
I have too many things going on with this car all at once..
Big 4 38mm pot front calipers on there way, looking for solution for big rears and proportioning valve, line routing etc..
Permanent install CIS test gauge and valve prototype on the way, special fittings in the mail from across the pond..
Wastegate needs to go back in with all exhaust, straight pipe all the way baby, SSsswwweeewww....
MBC and boost/vac gauge and its lines/routing in progress.
Custom dash center speaker panel in stainless (Bunn coffee pot) for gauges and MBC half way done.. Plenty of speakers in the subie, Porsche needs zero..
Of Course work out bugs in FMIC system if any..
Need G31 2nd syncro and rear shift linkage bushings and do that job yet..
Need window switches still..
And things yet to break..
0 budget
Last edited by fasteddie313; 06-24-2015 at 01:35 PM.