Can't Remove Control Arm Bushing Liners
 08-20-2014, 11:35 PM
#1
Rennlist Member
Thread Starter
I'm trying to remove the liner things for the control arm bushings so I can install my new Elephant Racing bushings. The new bushings came with directions for removing them and after following these directions I've concluded that these ****ers aren't going anywhere. I've tried pounding them out, heating up the control arm then pounding on them, soaking them in penetrating oil for a few days then pounding on them, but nothing works. The directions say that I can cut a slit in them, so I tried that, but this is some tough metal. None of my metal cutting blades can cut this stuff. All they can do is scratch it. Has anyone else removed these before? If so, how did you get them out?
Thanks,
Jeff
Thanks,
Jeff
 08-21-2014, 08:37 AM
#4
Rennlist Member
Thread Starter
How much did they charge? I considered giving in and seeking professional help, but I'm saving that as a last resort.
08-21-2014, 10:06 AM
#5
Rennlist Member
I remove them with an air impact hammer and chisel bit. Sometimes it makes a gauge in the aluminum, but if you file it smooth, it won't impact the performance of the new bushings.
Another way to remove them is to weld a washer and nut onto them and use a bolt as a "spreader".
Another way to remove them is to weld a washer and nut onto them and use a bolt as a "spreader".
 08-21-2014, 10:33 AM
#7
Three Wheelin'
Tried that and all I've managed to do is scratch them. I can't seem to cut them with any of my hack saws.


Trending Topics
08-21-2014, 01:46 PM
#8
Rennlist Member

I remove them with an air impact hammer and chisel bit. Sometimes it makes a gauge in the aluminum, but if you file it smooth, it won't impact the performance of the new bushings.
Another way to remove them is to weld a washer and nut onto them and use a bolt as a "spreader".
Another way to remove them is to weld a washer and nut onto them and use a bolt as a "spreader".
08-21-2014, 03:22 PM
#9
Rennlist Member
Thread Starter
I remove them with an air impact hammer and chisel bit. Sometimes it makes a gauge in the aluminum, but if you file it smooth, it won't impact the performance of the new bushings.
Another way to remove them is to weld a washer and nut onto them and use a bolt as a "spreader".
Another way to remove them is to weld a washer and nut onto them and use a bolt as a "spreader".

Have you tried with a brand new blade? I used this method and it was not too hard. The tricky part is that it's very difficult to cut with even depth the along the whole length of the bushing. You'll tend to cut deeper near the outer lip, risking damage to the aluminum. What I did was I cut 2 parallel slots about 1/4" apart but didn't cut all the way through the steel, so I would not damage anything. Then take the blade out and continue the cuts around the corner onto the outside. On the outside you can see how deep the steel of the lip is so you can safely cut all the way through. Then I used a flat bladed screwdriver as a chisel, and peeled out the 1/4" strip by tapping gently with a hammer, always tapping away from the aluminum. Easy to avoid damaging anything this way.
08-21-2014, 05:51 PM
#11
Rennlist Lifetime Member
Lifetime Rennlist
Member
Lifetime Rennlist
Member
Join Date: Jul 2002
Location: Northern Virginia
Posts: 2,130
Likes: 0
Received 0 Likes
on
0 Posts
I just went through this myself. Huge pain in the ***. I pried off the metal caps and pressed out with a 4WD balljoint press. Worked fine, and just left the metal liner. I used the hacksaw blade method for that and still had a miserable time. PITA job.
08-21-2014, 09:17 PM
#12
Rennlist Member
Thread Starter
I picked up some new blades so we'll see how that goes. I wasn't sure how many teeth per inch the blade should be, so I bought 18 (lowest they had) and 32 (highest one they had) teeth per inch blades. I sure hope these do the trick....
08-21-2014, 11:04 PM
#14
Rennlist Member
Thread Starter
It wasn't easy, but I got them out! A new blade made a HUGE difference. I didn't think the blade I was using was that dull from one or two prior uses, but I guess I was wrong.... I did cut a little too deep and scratched the wall of the hole on both arms. On one of them I accidentally pounded the screwdriver between the wall of the hole and the liner and left a nasty mark. Will these mistakes cause any problems, or can I just sand them smooth and press in my new ones?
I've attached some pictures of my screw ups. I'm posting from my phone so they may or may not show up. If they don't work I'll repost them tomorrow after work.
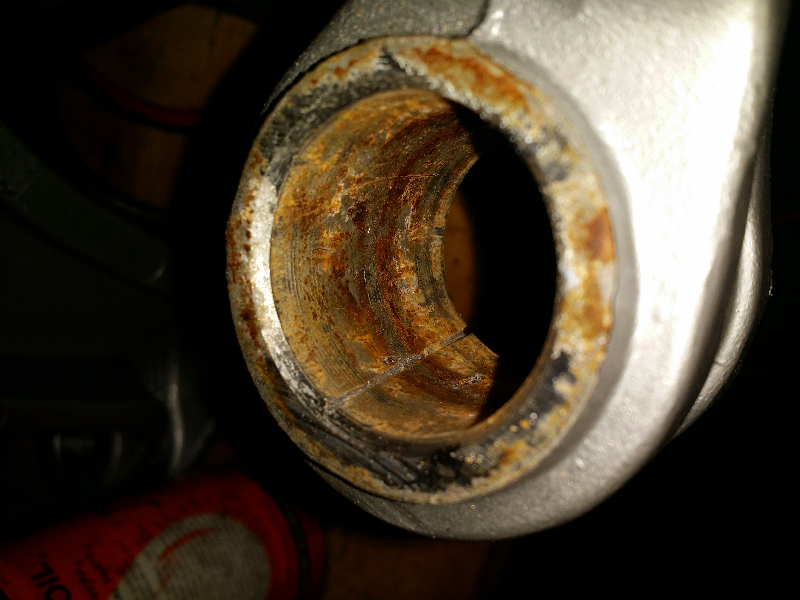
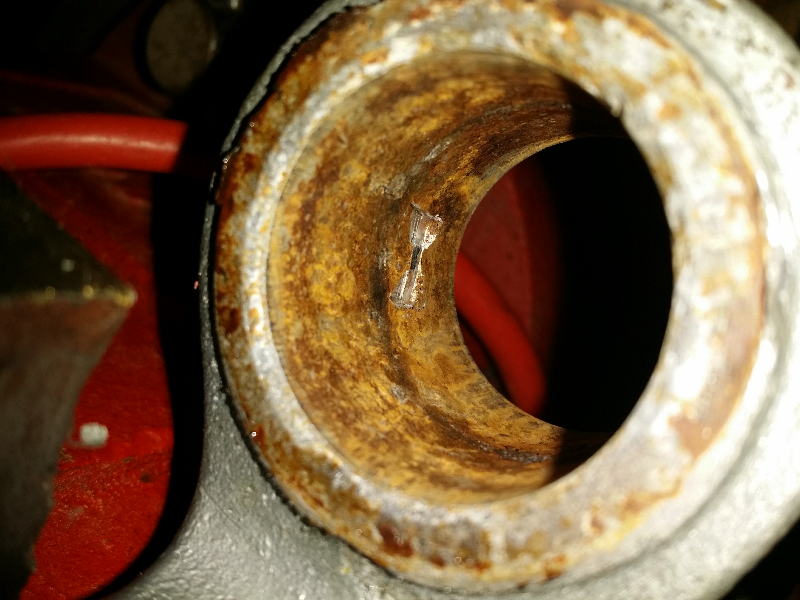
I've attached some pictures of my screw ups. I'm posting from my phone so they may or may not show up. If they don't work I'll repost them tomorrow after work.
08-22-2014, 12:06 AM
#15
Rennlist Member
Do you have butterfingers? You seem to have poor manual dexterity ") Maybe you should farm out any mechanical work to a professional
Maybe you should farm out any mechanical work to a professional 
But seriously, I would not use the one with the neat line cut in it. Cast aluminum is brittle. That is a huge stress riser in an already stressed part.
Maybe you should farm out any mechanical work to a professional But seriously, I would not use the one with the neat line cut in it. Cast aluminum is brittle. That is a huge stress riser in an already stressed part.