structure of battery tray/firewall/wheel arch area
 05-04-2013, 09:53 PM
#1
Three Wheelin'
Thread Starter
I posted recently about my badly rusted battery tray. I'm trying to figure out exactly what I need cut from the donor car but the area at the front of the battery tray is a little confusing. The corner where the floor of the tray meets the firewall (top in the pic below) is full of a rubbery foam like substance which is peeling away:
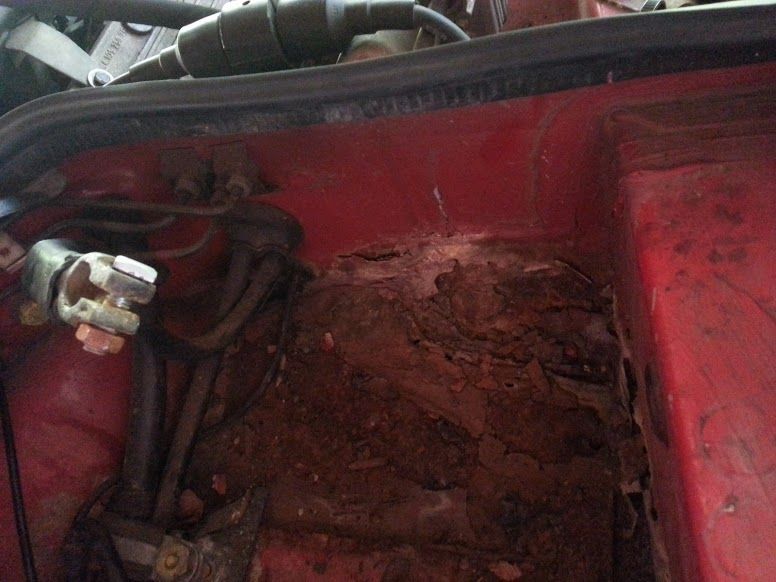
I pulled the wheel arch liner and found that the area right behind that is soft to the touch...the paint looks intact but it feels like I could put my finger through it (it's the area just above the pipes in this pic...you can see the seam line of the vertical firewall piece):

So is this part of the wheel arch actually part of the battery tray? I know that the rust goes up a few inches along the wall...so it looks like I will need to cut through the wheel arch just forward of the wall, is that right?
I pulled the wheel arch liner and found that the area right behind that is soft to the touch...the paint looks intact but it feels like I could put my finger through it (it's the area just above the pipes in this pic...you can see the seam line of the vertical firewall piece):
So is this part of the wheel arch actually part of the battery tray? I know that the rust goes up a few inches along the wall...so it looks like I will need to cut through the wheel arch just forward of the wall, is that right?
 05-06-2013, 03:30 PM
#2
RL Community Team
Rennlist Member
Rennlist Member
That rubbery foam substance is called "seam sealer", and it's brushed on at the factory over seams in sheet metal to prevent rust.
You should also get under your dash and look for rust, or soft areas.
I have a battery tray from a donor car at home. I'll take some pics of it for you, maybe the edges can answer your question.
You should also get under your dash and look for rust, or soft areas.
I have a battery tray from a donor car at home. I'll take some pics of it for you, maybe the edges can answer your question.
05-06-2013, 03:38 PM
#3
Three Wheelin'
Thread Starter
That rubbery foam substance is called "seam sealer", and it's brushed on at the factory over seams in sheet metal to prevent rust.
You should also get under your dash and look for rust, or soft areas.
I have a battery tray from a donor car at home. I'll take some pics of it for you, maybe the edges can answer your question.
You should also get under your dash and look for rust, or soft areas.
I have a battery tray from a donor car at home. I'll take some pics of it for you, maybe the edges can answer your question.
I know for sure that there is a hole rusted through under the dash. There is actually some solid metal around the centre of the tray but I don't know if it will be worth trying to save that. I think I will end up cutting out and replacing one big piece. Lots of disassembly to do first though!
05-10-2013, 04:09 PM
#4
Three Wheelin'
I fixed my battery tray with fiberglass (first time--it was very straightforward). It had a few holes (the largest about an inch across). I wire-brushed everything down to bare metal with a drill, then fiberglassed, then painted...Maybe I painted first. It didn't look great, but it was under the battery and held water like a bucket.
05-10-2013, 07:44 PM
#5
Drifting
I did the same as Tremelune. My box wasn't as bad as yours looks, however. When I finished glassing the box (making sure that I didn't glass over the battery box drain hole on the fender side), I sprayed the whole area with truck bed rubber liner spray. It's available at most auto parts stores. In your case, I'd cut out the box, build a cardboard mockup of a new one, make it fit as perfectly as possible and then pour candle wax over the whole thing and use it as a mold for a few layers of fiberglass, basically making a new box. Then, glass it in, onto virgin metal and spray the inside.
05-10-2013, 08:21 PM
#6
Three Wheelin'
Thread Starter
I did the same as Tremelune. My box wasn't as bad as yours looks, however. When I finished glassing the box (making sure that I didn't glass over the battery box drain hole on the fender side), I sprayed the whole area with truck bed rubber liner spray. It's available at most auto parts stores. In your case, I'd cut out the box, build a cardboard mockup of a new one, make it fit as perfectly as possible and then pour candle wax over the whole thing and use it as a mold for a few layers of fiberglass, basically making a new box. Then, glass it in, onto virgin metal and spray the inside.
05-10-2013, 09:18 PM
#7
Proprietoristicly Refined
Rennlist Member
Rennlist Member
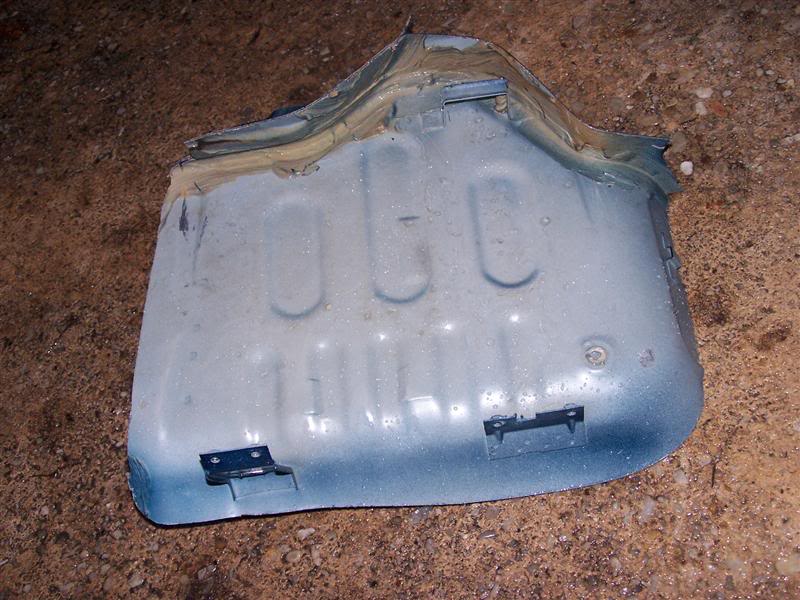
These pictures are from an ebay seller who cut the tray out to sell--just for reference. Picture credit wandry1
Top View
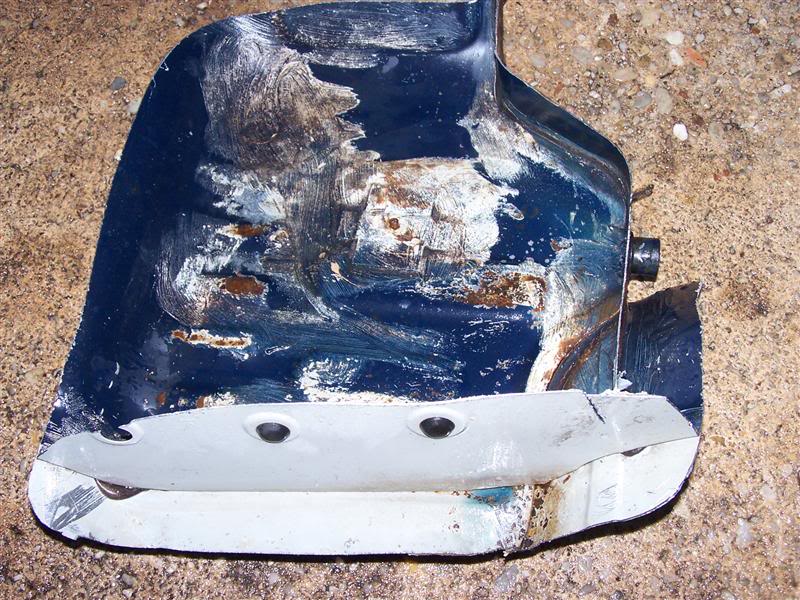
Underneath view
J_AZ
Top View
Underneath view
J_AZ
Trending Topics
05-11-2013, 12:18 PM
#9
Three Wheelin'
Thread Starter
Yeah I don't have a welder or know how to use one either
 But I will seek help for that part. I want as close to a factory fit & finish as possible.
 Right now the plan is to remove the dash, glove box and everything under the battery tray area, the wiring through the firewall etc. Then I will grind away the paint to find the edge of the rust, cut it out and then fit in the new piece. At that point my car obviously won't be mobile so I will see if anyone can come over with a welder and help out. If not, then I'll have it towed to the nearest welder!
The tricky part is that I will have to cut through the firewall and maybe some of the wheel arch. But I absolutely want to keep the area with the VIN plate intact.
Just curious, with the fiberglass approach, are there any problems getting it to stick to the metal long term?
05-11-2013, 01:55 PM
#10
Three Wheelin'
I only had the glass in for a year or two before I sold the car, but it solved all of my battery box problems. I used to get a gallon of water in my back seat if I parked facing uphill in the rain.
I really think you should consider it as an alternative to welding in a new piece. Unless the spots under the battery box are lost to rust, it will make your life much easier not to cut out any metal that is there. Once the tray is glassed and the drain is clear, the bits underneath will no longer be directly exposed to rain/acid, etc.
It took me something like an hour or two of actual work. If you don't like it when you're done, you can still cut it out and weld...
I think your first move should be to wire-wheel the rusty bits down to bare metal and see clearly what you're really working with.
05-11-2013, 02:20 PM
#11
RL Community Team
Rennlist Member
Rennlist Member
My battery tray looks like the one John_AZ posted. If you need different pics, let me know. I've had a busy weekend - going to the ALMS race!
For anyone with less severe damage to the battery tray, I used por-15 por patch and it has held up great.
https://rennlist.com/forums/924-931-...ould-i-do.html
For anyone with less severe damage to the battery tray, I used por-15 por patch and it has held up great.
https://rennlist.com/forums/924-931-...ould-i-do.html
05-11-2013, 10:41 PM
#12
Instructor

Join Date: Oct 2012
Posts: 108
Likes: 0
Received 0 Likes
on
0 Posts
I have done this repair several times. There are basically three pieces that come together in that area; the firewall, battery Trey and wheel housing. They need to be seperated and welded in individually. The parts must be cleaned well. Welding with a tig welder is the best way, a mig will burn through easily, warp the metal and put on too much metal that will need to be ground down. The rubber coating isn't really a seam sealer, it is an undercoating that is made by wurth and is sprayed on with a special spray gun for that and other coatings.
05-12-2013, 12:36 AM
#13
Three Wheelin'
Thread Starter
I have done this repair several times. There are basically three pieces that come together in that area; the firewall, battery Trey and wheel housing. They need to be seperated and welded in individually. The parts must be cleaned well. Welding with a tig welder is the best way, a mig will burn through easily, warp the metal and put on too much metal that will need to be ground down. The rubber coating isn't really a seam sealer, it is an undercoating that is made by wurth and is sprayed on with a special spray gun for that and other coatings.
05-12-2013, 02:28 AM
#14
Instructor
Join Date: Oct 2012
Posts: 108
Likes: 0
Received 0 Likes
on
0 Posts
What I cut out and weld back in depends on where the rust is. From your pics, I'm going to say you're going to need almost the whole bottom of the battery tray, the bottom couple inches of the panel that contains the chassis number, the bottom 2 inches of the box section on the passenger side of battery box (it has three rubber plugs in it) and a part of the wheel well about 4"x6". The new pieces come from solid donor cars. Because of the way the pieces are attached and the way I do it, I get pieces from two donor cars. I think I have pics of a repair on my computer, ill see if I can find them.
Last edited by jc85G; 05-12-2013 at 03:13 AM.
05-12-2013, 10:09 AM
#15
Drifting
Regarding the question about fiberglass sticking to metal, if you have taken the metal down to where it's shiny and wiped down with acetone, the glass should adhere. Because of the weight and vibration a battery puts into the structure, it should be several layers of glass and a goodly amount of metal available for the glass to adhere to. Otherwise down the road you'll be seeing a failure of the whole assembly.