
De-powering the steering rack
 02-21-2013, 11:52 AM
#16
Sport version is 944 347 015 00, that is my part number. Looks like I got lucky. Thanks for the info.
 02-21-2013, 11:56 AM
#17
Rennlist Member
Thread Starter
IMO, if you are going to go thru the trouble of having your rack out and taking it apart, why not just replace all those seals anyways, and keep the power steering. It will probably be another ten years before you get another ps leak anyways, and plus, you will still be able to easily turn your vehicle below 10mph.
02-21-2013, 06:32 PM
#18
Rennlist Member
According to Porsche documents (including motorsports parts), that PN does not exist - steering racks are all 347 011 series, -00 thru -24.
02-21-2013, 07:05 PM
#19
Ok, so I am in the middle of rebuilding my power rack due to all the seals leaking, and before I decided to do so, I considered de-powering it. Now I am reading all of these responses, and it sounds like, in order to de-power it the correct way, you have to take it all apart and modify a couple things. Hmmmm. IMO, if you are going to go thru the trouble of having your rack out and taking it apart, why not just replace all those seals anyways, and keep the power steering. It will probably be another ten years before you get another ps leak anyways, and plus, you will still be able to easily turn your vehicle below 10mph.
On that note I think I will attempt to post some pics of just how easy the whole thing is. Much easier than doing an actual rack reseal.
02-21-2013, 07:39 PM
#20
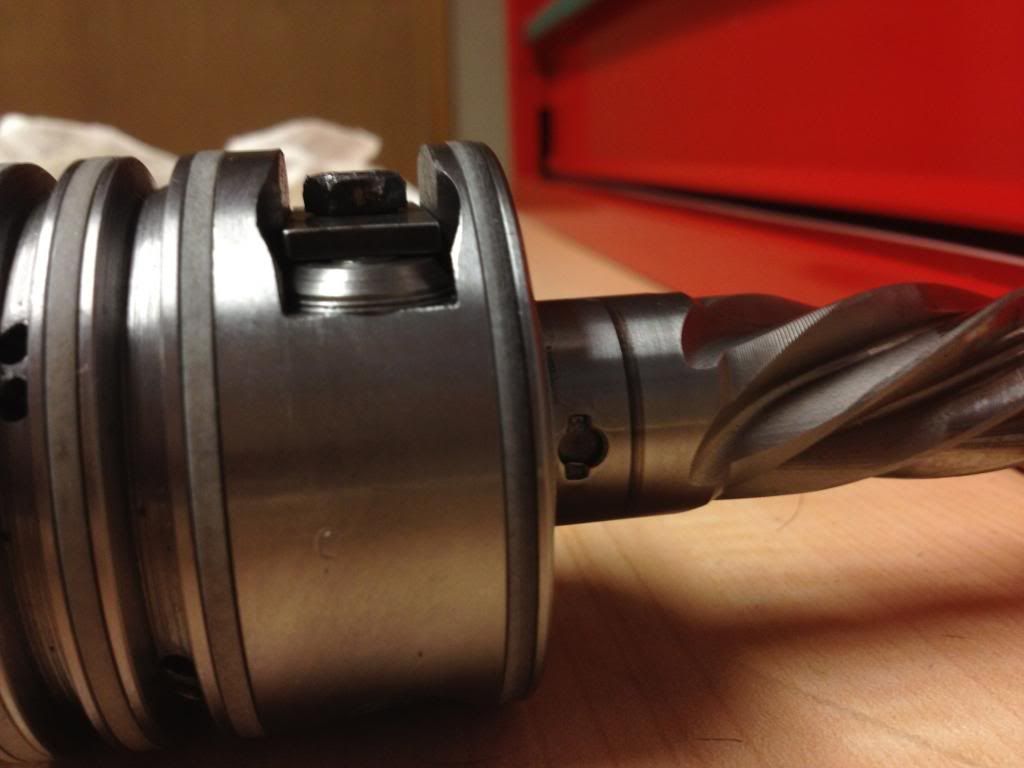
THis is the piston you get rid of. In this picture I had initially just drilled notches in the outer most ring, then later decided to just grind the whole outer ring off. Easy either way.
Heres the part that can potentially be confusing:
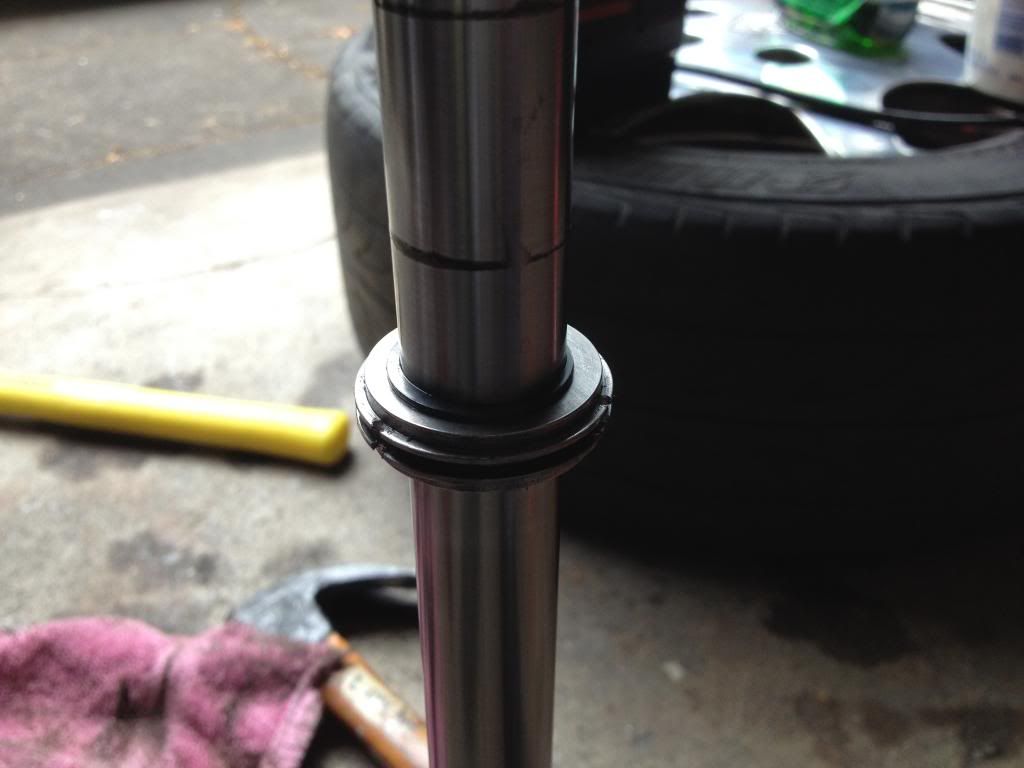
This is the input shaft part you need to mess with when you pull it out
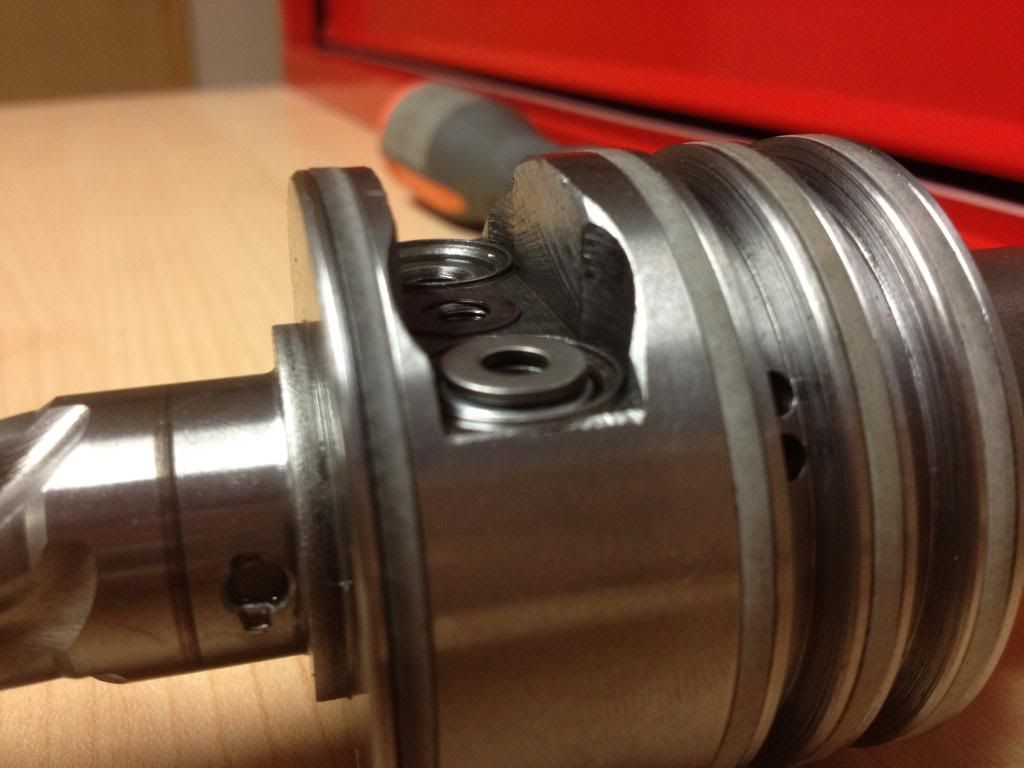
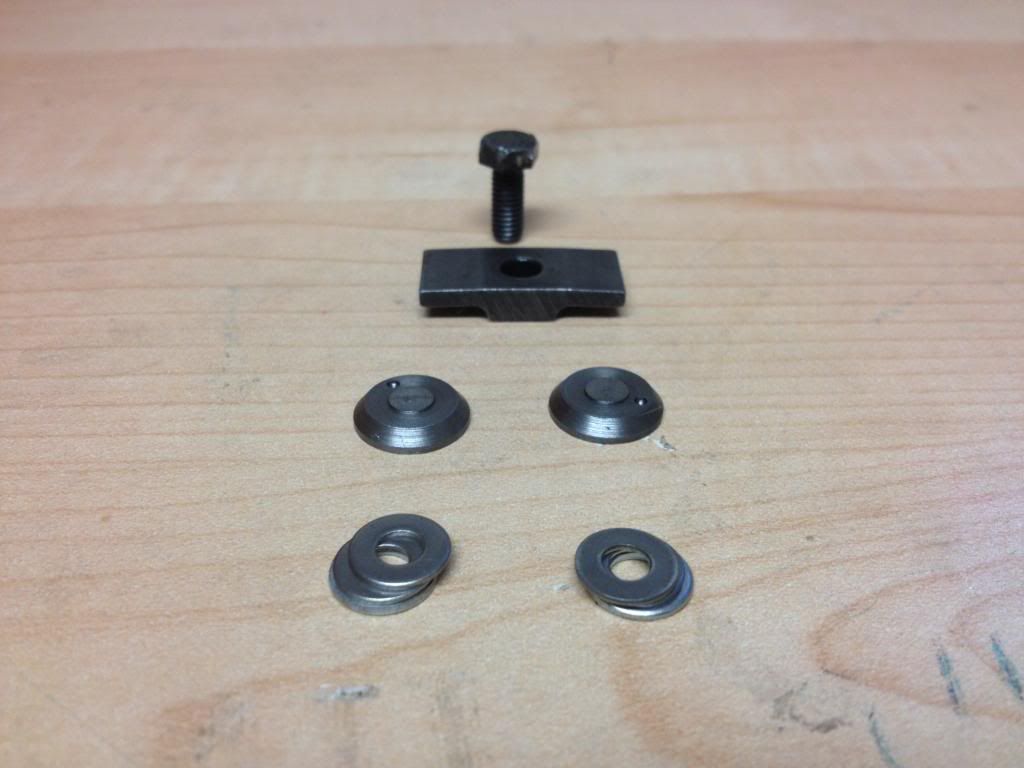
This is what things look like when taken apart:

The holes will have springs in them when you first open it up. Throw them away, they are not needed. You then put together a washer stack that fits on the inner-most-lower-most shelf you see in the above picture. The lower shelf(s) actually move. The washer stacks needs to be high enough to not let it move but low enough that the little caps will still seat in the rim. Like so:
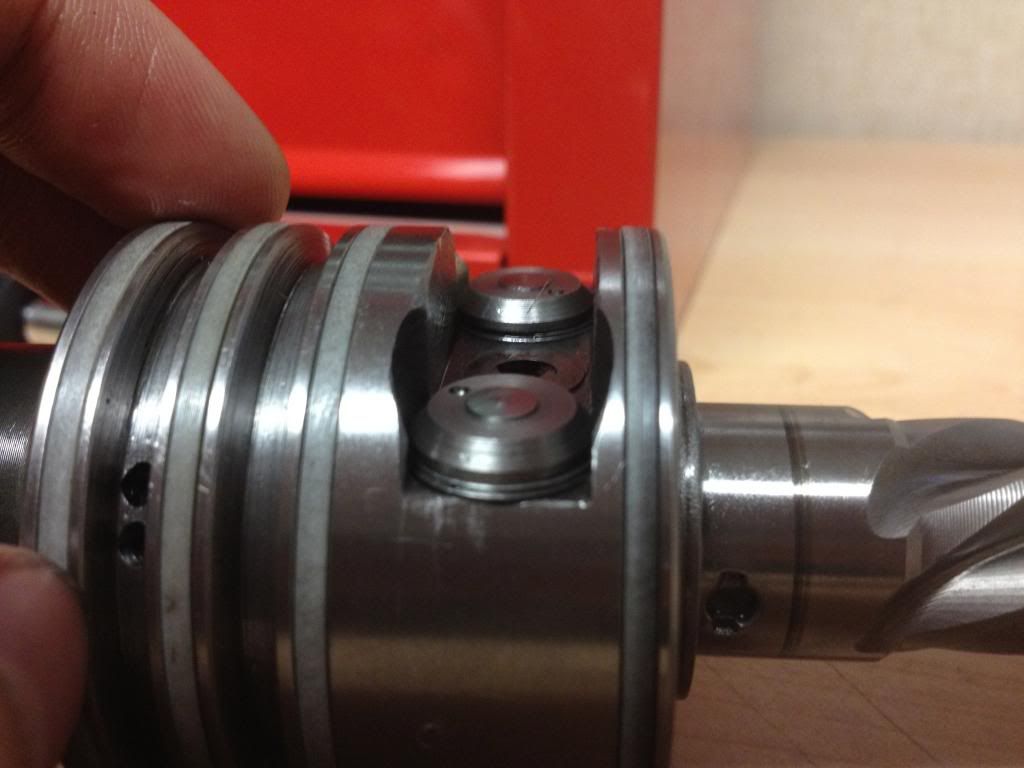
I found a good hight for the washer stack is equivalent to the more thin parts of the retaining bracket:

This is the order things go on from front to back:
Bolt back together:
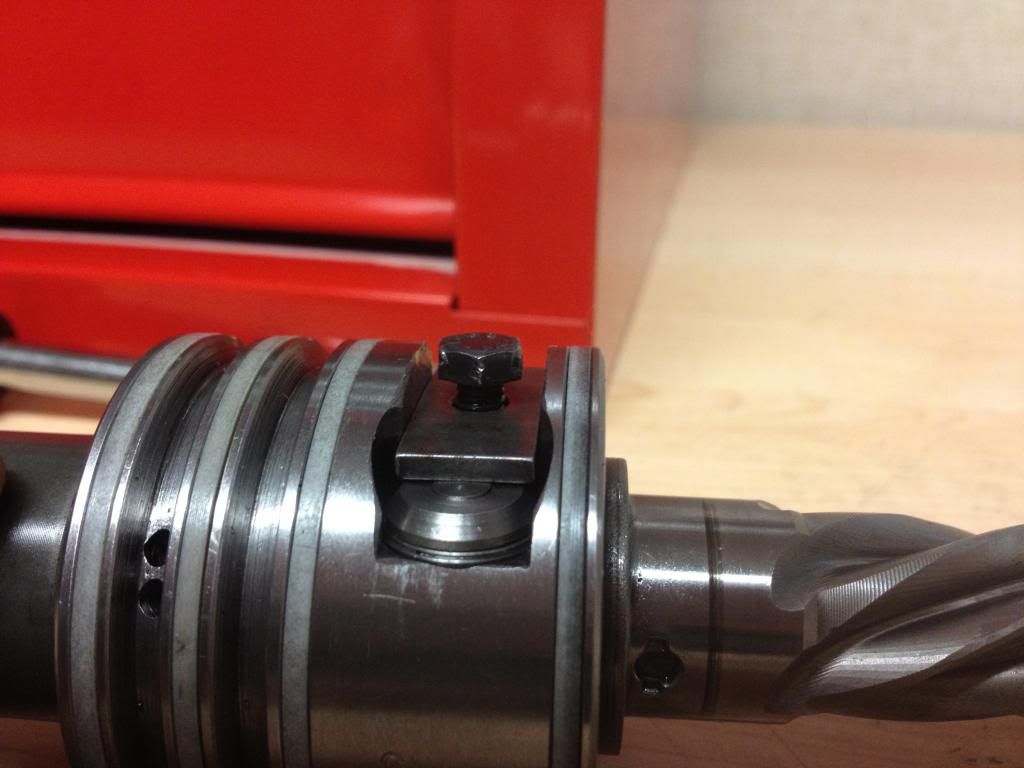
Voila!!
Heres the part that can potentially be confusing:
This is the input shaft part you need to mess with when you pull it out
This is what things look like when taken apart:
The holes will have springs in them when you first open it up. Throw them away, they are not needed. You then put together a washer stack that fits on the inner-most-lower-most shelf you see in the above picture. The lower shelf(s) actually move. The washer stacks needs to be high enough to not let it move but low enough that the little caps will still seat in the rim. Like so:
I found a good hight for the washer stack is equivalent to the more thin parts of the retaining bracket:
This is the order things go on from front to back:
Bolt back together:
Voila!!
02-21-2013, 08:52 PM
#21
https://rennlist.com/forums/924-931-...many-pics.html
02-21-2013, 10:40 PM
#22
Nordschleife Master
Are you looking at US docs? Don't forget the Turbo Cup cars ran in Europe only, iirc Germany & France. There are a few parts I've identified in the past from those cars but only in the European part of the MY85 PET supplement. Stuff like the magnesium intake and oil pan appear in there but the Matter cage doesn't and even the pre-968 manual mirrors fitted to them don't appear anywhere. Never found any option codes that refer to any of those parts either. If you find further info please post.
02-22-2013, 01:54 PM
#23
Rennlist Member
Are you looking at US docs? Don't forget the Turbo Cup cars ran in Europe only, iirc Germany & France. There are a few parts I've identified in the past from those cars but only in the European part of the MY85 PET supplement. Stuff like the magnesium intake and oil pan appear in there but the Matter cage doesn't and even the pre-968 manual mirrors fitted to them don't appear anywhere. Never found any option codes that refer to any of those parts either. If you find further info please post.
I have quite a lot of factory Cup documentation, including full part number lists from the German, French, Canadian, US Escort/Cups and Firehawk S2 Clubsports. And the only part number that I have seen for the Cup steering rack is 011-02.
I also have a list of factory part numbers that is relatively complete and includes 356 all the way thru 996 parts. Every Cup part number I have ever looked for is on this list, though all the parts have been long gone (via Porsche Motorsport) for well over a decade. There are 13 different 944 steering rack part numbers, including the documented 011-02 Turbo Cup rack, but there is no 015 part number series at all. The numbering jumps from 011 series to 017 series.
Very likely the 015 number on these manual racks is just the housing casting number, not the assembly part number, which is why it doesn't show up as an existing part number for steering racks. Same as the casting numbers on control arms, intake manifolds, and many other parts that do not match the assembly part numbers. High probability these racks in question are all just the standard manual racks.
But, it would be interesting to find out that there is some unique rack w/ a different ratio only used on the 86 Cup cars. So if you have some documentation to support it (prove that bigfoot exists, instead of me trying to prove it doesn’t), I would very much be interested in seeing it.
By the way, the black plastic “cup” mirrors are shown even in the US version of PET, under the M637 option. The only other Cup parts that you can find in PET are production parts like manual window cranks, AC delete parts, and some of the interior parts. None of the M754 or M637/638 performance/motorsport parts are listed in the PET versions I have seen. Which version of PET do you have that lists the mag engine parts?
04-11-2015, 03:49 AM
#25
Rennlist Member
I've done this on my S. I did it the "correct" way by pulling things apart.
Basically this is what you do:
Pull it apart
Locate the piston
Eliminate the Piston
Eliminate all hard lines + other lines and plug holes
Molly grease the hell out of everything
THEN:
The input shaft has a sort of directional hydraulic damper that basically lets it twist in either direction about 15�, this acts as a damper of sorts.
That part needs to be eliminated or else you will have a lot of slop and play in your steering.
Pictures you say? Yep I've got em. I'll post them a little later for those who are interested. Bit busy right now.
In the mean time heres a video of me driving the car around town with the manual setup:
http://www.youtube.com/watch?v=6-iPpvx7KF8
Then, at sort of the last minute, I asked myself why I wanted to spend time and money rebuilding a power rack? I don't really want a power rack, I'd rather have a manual. Then I found out manual racks are a little more pricey than rebuilding the power rack.
Finally, I stumbled on an article that said the original Porsche Motorsport cars used de-powered racks like the ones described here. Is that just a rumor or can someone with a Turbo Cup or Firehawk confirm the cars had depowered racks in them?
Either way, I'm going to try this technique, it seems reasonable and quite a few folks have written glowing reports. I found a scrap power rack yesterday that leaks for $30 so if it doesn't work for me I'll only be out that plus the time and grease

Thanks again for detailing how to do this.
04-11-2015, 04:11 AM
#26
Rennlist Member
Just so I'm clear, you say first:
Then follow up with photos:
The pictures are of the part that needs to be changed to remove the slop you and others have talked about? There's a fellow in Colorado Springs that has a method too, I'm wondering if it's the same fix?
The pictures are of the part that needs to be changed to remove the slop you and others have talked about? There's a fellow in Colorado Springs that has a method too, I'm wondering if it's the same fix?
04-11-2015, 07:48 AM
#27
Nordschleife Master
16 valver and others are doing a good job but there are a million threads like this. one such thread from when i was still a noob(still am?):
https://rennlist.com/forums/924-931-...pressions.html
https://rennlist.com/forums/924-931-...pressions.html
04-11-2015, 08:13 AM
#28
Rennlist Member
16 valver and others are doing a good job but there are a million threads like this. one such thread from when i was still a noob(still am?):
https://rennlist.com/forums/924-931-...pressions.html
https://rennlist.com/forums/924-931-...pressions.html
04-20-2015, 04:19 PM
#30