Check out my new winter rims!
 10-06-2009, 03:58 AM
#1
Race Car
Thread Starter
A few weeks ago i scored some pretty sorry looking phone dials on Craigslist for $120. I was on the hunt for some winter rims and they fit the bill exactly! of course i knew going into this i would have to refinish them and i'm pretty happy with the results. It cost me 2 days over 2 weekends and about $30 in model paint/rattle cans of duplicolor wheel paint... I also blew $40 on new media for dads blast cabinet, as his media was very tired.
I blasted them in a blast cabinet with glass bead, then filled in the little pits left from the corrosion with finishing putty. Sanded them down, cleaned them with oil and grease remover, tac ragged em and laid down 3 coats of color (bronze), then let them season for a week. In the meantime i painted the crests by hand with tamiya acrylic model paint. Then i sanded the color coat, applied one more coat of color and 3 coats of clear and now they are good to go. I did have some issues with the color building up on the surface that leads to the lip of the rim, lots of little bumps (like sandpaper), but i got that off with the sanding. They didn't turn out perfect, as i didn't have that much time to get them done. I should have spent more time at the finishing putty stage and at the color sand before the clear. But still for winter rims i'm happy.
*Update* Ok, i got the wheels on the car today in honor of our lovely ice laden storm so here are the pictures as requested! The tires are 4 new dunlop graspic DS-3's, they feel pretty squishy after having the Direzzas on but thats to be expected. They are not directional so i'm hoping to get 2 good winters out of them with a cross rotation, something i couldn't do with the yokohama IG20s last year.
now for the good stuff, pictures!
A Nasty looking lot
.JPG)
They look even worse in person :P
.JPG)
Halfway through blasting, I decided to leave as much factory primer as i could.
.JPG)
Post color coats, looking ok now! yes i'm crazy for having that giant bucket of glass bead right next to them.
.JPG)
These took 45mins a pop to do.
.JPG)
All said and done, clear coated and ready for my snow tires (the duplicolor clear did not melt my acrylic model paint)
.JPG)


I blasted them in a blast cabinet with glass bead, then filled in the little pits left from the corrosion with finishing putty. Sanded them down, cleaned them with oil and grease remover, tac ragged em and laid down 3 coats of color (bronze), then let them season for a week. In the meantime i painted the crests by hand with tamiya acrylic model paint. Then i sanded the color coat, applied one more coat of color and 3 coats of clear and now they are good to go. I did have some issues with the color building up on the surface that leads to the lip of the rim, lots of little bumps (like sandpaper), but i got that off with the sanding. They didn't turn out perfect, as i didn't have that much time to get them done. I should have spent more time at the finishing putty stage and at the color sand before the clear. But still for winter rims i'm happy.
*Update* Ok, i got the wheels on the car today in honor of our lovely ice laden storm so here are the pictures as requested! The tires are 4 new dunlop graspic DS-3's, they feel pretty squishy after having the Direzzas on but thats to be expected. They are not directional so i'm hoping to get 2 good winters out of them with a cross rotation, something i couldn't do with the yokohama IG20s last year.
now for the good stuff, pictures!
A Nasty looking lot
They look even worse in person :P
Halfway through blasting, I decided to leave as much factory primer as i could.
Post color coats, looking ok now! yes i'm crazy for having that giant bucket of glass bead right next to them.
These took 45mins a pop to do.
All said and done, clear coated and ready for my snow tires (the duplicolor clear did not melt my acrylic model paint)
Last edited by Arominus; 10-11-2009 at 12:53 AM. Reason: added pictures of the wheels on the car
 10-06-2009, 11:23 AM
#5
Race Car
Thread Starter
Ndrk, it is bronze, i almost went gunmetal but a friend of mine and i had a big debate about it and bronze won out. Mostly because i love the color on the Volk te-37's 
I should have tires on them in the next week or so, winter is sneaking into colorado soon and my summer tires will not be fun! lol
I should have tires on them in the next week or so, winter is sneaking into colorado soon and my summer tires will not be fun! lol
10-06-2009, 01:55 PM
#6
Pro
Join Date: Jan 2002
Location: Milwaukee, WI
Posts: 537
Likes: 0
Received 0 Likes
on
0 Posts
Can you mount the tires yourself or will you have a shop do it? I'm interested to see if they are careful enough not to mess up all your work. Very nice job. Is it for the red car, or another color? Looking forward to seeing them on the car.
10-06-2009, 02:04 PM
#7
Where in Colorado are you?
We have been working on refinishing a couple of sets of Phone Dials. I need to get 3 of mine stripped bare.
Those wheels look good. I had gunmetal on my Auid S4 and EVERYONE commented on how dirty my wheels were even when they were spotless! They ALWAYS look like they are covered in brake dust.
We have been working on refinishing a couple of sets of Phone Dials. I need to get 3 of mine stripped bare.
Those wheels look good. I had gunmetal on my Auid S4 and EVERYONE commented on how dirty my wheels were even when they were spotless! They ALWAYS look like they are covered in brake dust.
Trending Topics
10-06-2009, 04:57 PM
#8
Race Car
Thread Starter
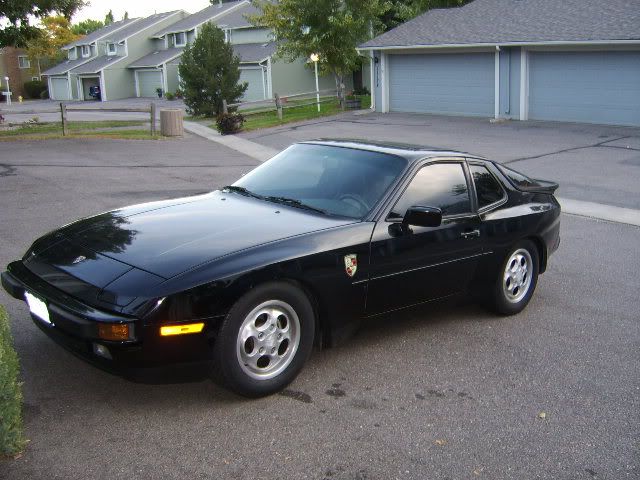
Elf, I have a friend with his own tire mounting machine, he won't let me take them anywhere as he wants to make sure they get put on right with no damage. My tires come in thursday so i should have some pictures this weekend of them on the car. They are going on my Red 924, its my only Porsche at the moment.
Cole, I'm in colorado springs, the glass bead was awesome for taking the paint layer off but it was having a hard time with the factory primer. I was happy to leave that though as the factory primer was still in pretty decent shape, it was a good base. I just clear coated the inside of the rims to help with brake dust.
Cole, I'm in colorado springs, the glass bead was awesome for taking the paint layer off but it was having a hard time with the factory primer. I was happy to leave that though as the factory primer was still in pretty decent shape, it was a good base. I just clear coated the inside of the rims to help with brake dust.
10-06-2009, 06:14 PM
#9
Sweet! Too bad you are so far south.
We fully stripped a pair of Phonies for a 944 and the factory primer is TOUGH stuff. Took lots of aircraft striper to get it off.
1 of my 951 wheels is totally bare and all the others still have factory paint with primer showing through. I want to strip the rest down and polish a bit.
We fully stripped a pair of Phonies for a 944 and the factory primer is TOUGH stuff. Took lots of aircraft striper to get it off.
1 of my 951 wheels is totally bare and all the others still have factory paint with primer showing through. I want to strip the rest down and polish a bit.
10-06-2009, 10:33 PM
#11
Race Car
Thread Starter
Yes they are, i should have mentioned that in the FP lol thats what i get for 1am posts. They came off another 924s that was being parted out, the guy was talking about cutting the tub into sections then crushing it when he was done  I think the engine pissed him off, it spun the #2 bearing pretty bad. He had a really nice 84 944 though, silver w/ fuchs and low mileage.
I think the engine pissed him off, it spun the #2 bearing pretty bad. He had a really nice 84 944 though, silver w/ fuchs and low mileage.
10-07-2009, 11:42 AM
#13
Race Director
Hmmm, living in a snow state, we get like 200" a year of snow, I can appreciate snow rims. WTF!! You did such a great job now to go out in the salt with those puppies!!

10-07-2009, 01:48 PM
#14
Pro
Join Date: Oct 2002
Location: Colorado springs Co.
Posts: 657
Likes: 0
Received 0 Likes
on
0 Posts
The salt level is low in Colorado, they mostly use sand. Not band on the bodies, but bad on the paint and windsheilds. I have gone through 3 windsheilds in 7 years. Your happy to get it raplaced after 2 years from the sand pitting. Harbor Freight has the blast cabinet for about $260.00. It's great for doing intakes.