Headgasket progress thread
 10-09-2006, 02:22 PM
#1
Nordschleife Master
Thread Starter
Going to use this as one place i can ask any questions related to this. Background information that lead up to this can be found here..
https://rennlist.com/forums/924-931-944-951-968-forum/303556-blown-headgasket-nooooooo-with-a-few-related-questions.html
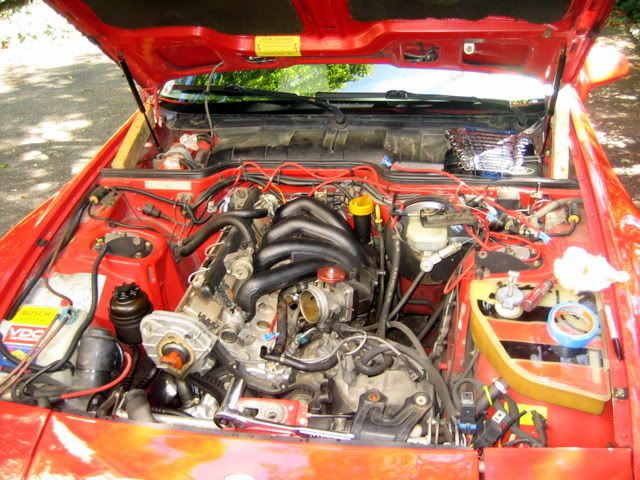
Anyhow i am about one hour into taking the top end apart and making good progress. My goal is to get the head off today, clean up whatever i can and get it ready to go back together this weekend.
This is as of 1:21pm...
And so i arrive at my first question
#1: As usual i pulled the j-boot to find some oil had collected inside the boot and on the throttle body it self. Not a ton, but enough that it had pooled at the bottom of the thorttle body. I changed the air/oil seperator o-rings a couple thousand miles ago. Was wondering if there is anything else that i can change while i have this apart to stop this from happening? The oil appears to be coming through this vacuum line which T's off, one line to the top of the air/oil seperator (or fill tube if you want to call it that) and i didnt follow the other one.

Any ideas on this?
https://rennlist.com/forums/924-931-944-951-968-forum/303556-blown-headgasket-nooooooo-with-a-few-related-questions.html
Anyhow i am about one hour into taking the top end apart and making good progress. My goal is to get the head off today, clean up whatever i can and get it ready to go back together this weekend.
This is as of 1:21pm...
And so i arrive at my first question
#1: As usual i pulled the j-boot to find some oil had collected inside the boot and on the throttle body it self. Not a ton, but enough that it had pooled at the bottom of the thorttle body. I changed the air/oil seperator o-rings a couple thousand miles ago. Was wondering if there is anything else that i can change while i have this apart to stop this from happening? The oil appears to be coming through this vacuum line which T's off, one line to the top of the air/oil seperator (or fill tube if you want to call it that) and i didnt follow the other one.
Any ideas on this?
 10-09-2006, 03:13 PM
#3
Three Wheelin'
Join Date: Mar 2002
Location: nj
Posts: 1,296
Likes: 0
Received 0 Likes
on
0 Posts
c'mon that is like a 5 hour job, if you need any help, pm me i have done this job like 30 times. tools needed
10 mm hex socket (for came tower covers)
6mm reduced body hex socket
12mm for exhaust manifolds
13mm
19mm socket
screwdrivers bot -/+
hose pinch pliers (coolant in hose and core)
plastic dead blow hammer
pry bar
extensions
t belt tools you do not need to touch the balance belt!!!
before you try to use any allen hex, firmly hit it (the end of an extension its on) so it seats well in the bolt head...especially critical on the cam tower bolts!!!
10-09-2006, 03:23 PM
#4
Campeck Rulez
Rennlist Member
Rennlist Member
Originally Posted by Techno Duck
Going to use this as one place i can ask any questions related to this. Background information that lead up to this can be found here..
https://rennlist.com/forums/showthread.php?t=303556
Anyhow i am about one hour into taking the top end apart and making good progress. My goal is to get the head off today, clean up whatever i can and get it ready to go back together this weekend.
This is as of 1:21pm...
And so i arrive at my first question
#1: As usual i pulled the j-boot to find some oil had collected inside the boot and on the throttle body it self. Not a ton, but enough that it had pooled at the bottom of the thorttle body. I changed the air/oil seperator o-rings a couple thousand miles ago. Was wondering if there is anything else that i can change while i have this apart to stop this from happening? The oil appears to be coming through this vacuum line which T's off, one line to the top of the air/oil seperator (or fill tube if you want to call it that) and i didnt follow the other one.
Any ideas on this?
a little oil is normal. the vacuum from the intake is routed to the crankcase to keep it under vacuum. and no matter how new your seals are oil vapor will always get through. the solution is an oil catch can in line with that vacuum line.
10-09-2006, 08:36 PM
#5
Nordschleife Master
Thread Starter
Thanks all for your input about the oil.
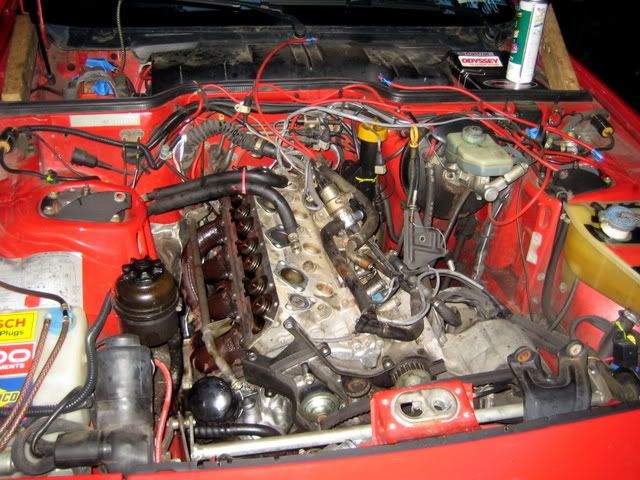
Unfortunetley i was unable to get the cylinder head off as i ran out of light. I was able to get the cam housing off just as it started to get dark. I ran into a problem with getting the cam housing bolt closest to the firewall (and inside the housing) off. I had taken all other bolts off and couldnt get the last bolt to budge..and it was starting to strip. After about a minute or so of cursing and wanting to give up, i put in half of the bolts back in and tightened it down again. Then hammered the allen key into the stripped screw and gave it another go. After a tense moment of applying torque it finally broke loose with the affirmative creaking sound.
Its going to have to sit until friday when ill have time to pull the head off.
10-10-2006, 12:34 AM
#6
Nordschleife Master
Thread Starter
Regarding the exhaust manifold. What is the best way to go about taking it off so i can get the cylinder head out?
Ive read its possible to pull the headers out as one piece with the head if i simply undo the 6-bolts at the two flanges. But i am also reading that does not work.
Was wondering if it would be possible to remove the studs from the old head using the 'double nut' method and leaving the headers connected to the rest of the exhaust as i pull the head out.
I am planning on putting the Saturn torx style exhaust studs into the new head. Hopefully that makes things easier if i ever need to take this thing apart again.
Trending Topics
10-10-2006, 01:09 AM
#8
Drifting
I just did this on my 87. If you unbolt the 6 bolts at the junction, the upper headers stay attached as you pull the head. The heater pipe above them does need to come out though. Pulling the studs is stupid work, in every sense of the word.
10-10-2006, 01:30 AM
#9
Nordschleife Master
Thread Starter
Thanks for the info Patrat. The heater pipe is defenetley going to come off, i just didnt get the chance to undo the hoseclamp yet.
I am going ot try and do the Saturn exhaust studs on the new head and see how that works out. Hopefully it makes life easier if i ever need to do this over again (which hopefully will never, ever ever ever happen). Mark my words, the next car i buy is going to be something with a freaken warranty! And a EXTENDED ONE at that!!!!!
My only concern now are the two allen head bolts for the head. Was reading a few older threads and seems a couple of people have had trouble with these breaking off.
One thing i wish i did differently was putting a garbage bag or something over the exhaust manifold before i took the cam tower off. Its going to be one smokey mess when i start the car up again!
Another question, is it necesary to let a head gasket break in for a few hundred miles?
Obviously i am not going to redline it as im pulling out of the driveway, but was just wondering if i should be taking it easy the first couple hundred miles. Makes me think if i get this thing back together in time i am going to drive 1k miles to break it in over one week so i can auto-x it at the end of the month.. . Probably a bad idea....
I am going ot try and do the Saturn exhaust studs on the new head and see how that works out. Hopefully it makes life easier if i ever need to do this over again (which hopefully will never, ever ever ever happen). Mark my words, the next car i buy is going to be something with a freaken warranty! And a EXTENDED ONE at that!!!!!
My only concern now are the two allen head bolts for the head. Was reading a few older threads and seems a couple of people have had trouble with these breaking off.
One thing i wish i did differently was putting a garbage bag or something over the exhaust manifold before i took the cam tower off. Its going to be one smokey mess when i start the car up again!
Another question, is it necesary to let a head gasket break in for a few hundred miles?
Obviously i am not going to redline it as im pulling out of the driveway, but was just wondering if i should be taking it easy the first couple hundred miles. Makes me think if i get this thing back together in time i am going to drive 1k miles to break it in over one week so i can auto-x it at the end of the month..
. Probably a bad idea....
Last edited by Techno Duck; 10-10-2006 at 02:16 AM.
10-14-2006, 07:06 PM
#10
Nordschleife Master
Thread Starter
I got the head off today. Was easier than expected. I started by loosening all of the header nuts and 6 out of the 8 were coming out with the stud still attached. I decided to double nut the first runner (both of these only had the nut come loose) and the studs came out very easily. With the studs out the headers fell back a little giving me more than enough room to work the cylinder head off.
The cylinder head nuts were super freaken tight, my 19mm 12pt socket was actually slipping and Sears was sold out of 6pts. Impact socket was to fat to fit into the space. I ended up using a 6pt 3/8's drive socket with a 3/8's breaker bar and a 1ft pipe. With my father pulling and me pushing we were able to get all the nuts off (with alot of effort).
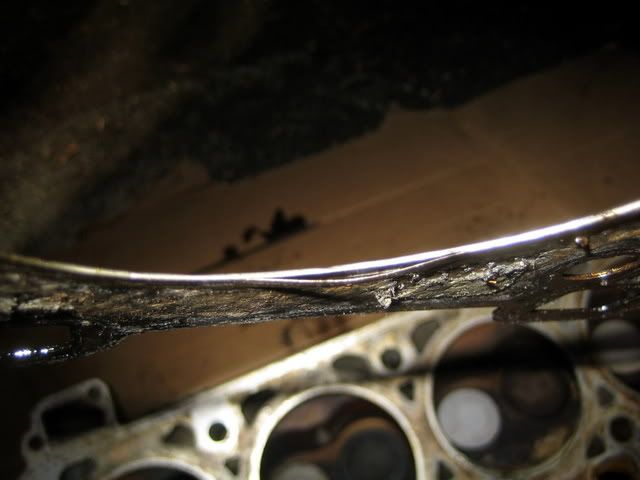
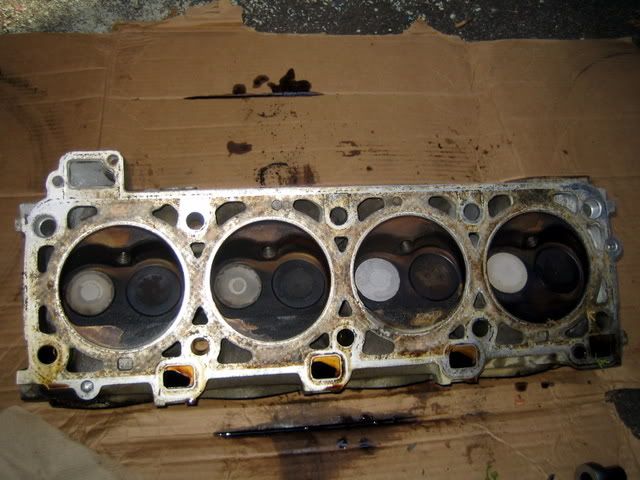
With the head out of the way i saw that the fire ring had split in two on the #3 cylinder which had the leak.
Everything else looks good though. The cylinder head is going to the machine shop monday for new guides, stem seals and to be cleaned up in general.
What are some good techniques for cleaning up the block side of the sealing surface? I was going to use acetone and papertowels.. looks like i may need to get more involved than that. Is a brillo pad a good idea?
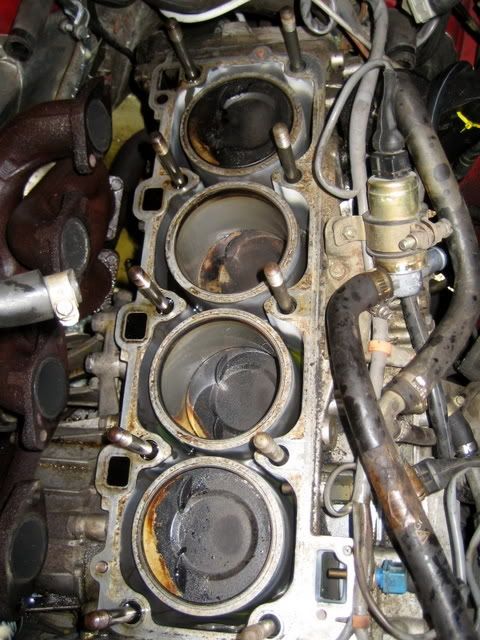
Also on reassembly, should i coat the 2 and 3 cylinders with oil of any type? How long should i let the head gasket 'break in'.
Wont be able to get everything back together until next week. Hopefully i can finish by next sunday night.
The cylinder head nuts were super freaken tight, my 19mm 12pt socket was actually slipping and Sears was sold out of 6pts. Impact socket was to fat to fit into the space. I ended up using a 6pt 3/8's drive socket with a 3/8's breaker bar and a 1ft pipe. With my father pulling and me pushing we were able to get all the nuts off (with alot of effort).
With the head out of the way i saw that the fire ring had split in two on the #3 cylinder which had the leak.
Everything else looks good though. The cylinder head is going to the machine shop monday for new guides, stem seals and to be cleaned up in general.
What are some good techniques for cleaning up the block side of the sealing surface? I was going to use acetone and papertowels.. looks like i may need to get more involved than that. Is a brillo pad a good idea?
Also on reassembly, should i coat the 2 and 3 cylinders with oil of any type? How long should i let the head gasket 'break in'.
Wont be able to get everything back together until next week. Hopefully i can finish by next sunday night.
10-14-2006, 11:27 PM
#11
Race Car
No break in for head gaskets. Looks like you are burning some oil from the clean spot on the pistons.
A brillo pad, is that steel wool based? If it is I wouldn't use it.
I usually use a gasket scraper to take off any left-on material, then use a solvent to remove any residue. It won't come perfectly clean but I've never had any problems down the road. I don't know how well acetone will work, I usually use something like goo-gone or another similar cleaner.
Why coat cylinders 2 and 3?.....
I would give the cylinder walls a quick wipe of my fingers with oil on them to put a light coating on, just so the rings aren't dry when the engine starts up.
10-15-2006, 12:08 AM
#12
Nordschleife Master
Thread Starter
Thanks Zero. I was wondering what you answered actually, putting a light coat of oil on the cylinder walls before putting everything back together. The car is buring some oil, about 1qt every 3k miles. It was alot worse, about 1qt every 1k miles until i changed the AOS o-rings.
I am hoping the rebuilt head helps reduce this even further.
I bought a brass wire brush attachment for my dremel tonight. I am going to carefully hit everything i can reach with it tomorrow to start cleaning it up. Thanks for the advice.
I am hoping the rebuilt head helps reduce this even further.
I bought a brass wire brush attachment for my dremel tonight. I am going to carefully hit everything i can reach with it tomorrow to start cleaning it up. Thanks for the advice.
10-15-2006, 12:25 AM
#13
Race Car
I don't know for certain if the piston crowns are coated with anything, so you might want to be nice to them with the wire brush. The cylinder walls are aluminum which is definately softer than brass, so I would stay away from them (then again, they aren't dirty either). Unfortunately almost everything you can reach is aluminum which is softer than brass. 
I used seafoam on a rag to soften then remove soot from piston crowns in the past. Other petroleum based solvents may work just as well.
I give the walls a quick wipe with new engine oil before I put the head on, usually it will smoke blue for a few seconds on startup letting you know that the oil stayed put. I figure it's better than leaving them dry.
10-15-2006, 12:32 AM
#14
Instructor

Join Date: Dec 2003
Location: Wall, NJ
Posts: 154
Likes: 0
Received 0 Likes
on
0 Posts
I've only done one head job. I would follow Zero10's method for cleaning the mating surface. Put down the dremel and step away from the vehicle!!
Maybe a dremel and brass brush is fine, I really don't know. don't even own one. Just kinda scares me using dental equipment on an aluminum head.
Mike
Maybe a dremel and brass brush is fine, I really don't know. don't even own one. Just kinda scares me using dental equipment on an aluminum head.
Mike
10-15-2006, 12:33 AM
#15
Addict
Lifetime Rennlist
Member
Lifetime Rennlist
Member
jon i am good at spending other peoples money. how are your motor mounts and oil pan gasket? now is the perfect time to change them. you will have your pistons in your hand, and rings are just a stones throw away.
also, i bought a set of nice aftermarket sport seats but dont want to cut a hole in them for the sub strap. if anyone in your school wants a set of tuner fx seats for a nice savings send them my way.
also, i bought a set of nice aftermarket sport seats but dont want to cut a hole in them for the sub strap. if anyone in your school wants a set of tuner fx seats for a nice savings send them my way.

