When you click on links to various merchants on this site and make a purchase, this can result in this site earning a commission. Affiliate programs and affiliations include, but are not limited to, the eBay Partner Network.
Rebuilding the front ledas on the S2 race car. Well, the oil came out looking like quicksilver, there was so many allow fragments in it. No gas bags??
Does anyone know the size of the little tiny oring and the main large top cap oring?
I got my Ledas from 'Racers Edge' way back when... they might be known as TRE or TRE Performance now.
They might be a good source for rebuild parts?
Good luck!
I don't think Karl at Racer's Edge services Ledas anymore , i would suggest you reach out to Dimi on these forums, he's very knowledgeable
about suspensions and transmissions and he might be able to help you !
OK, for interested parties (from Leda in the UK):
1) Ledas do not have gas bags or N2 charges. They rely on atmospheric pressure in the top of the strut. you fill the oil level to a certain amount and do up the top cap.
2) The top cap must be as TIGHT AS HUMANLY POSSIBLE. Yes, that means really, really tight - with a special tool.
3) Citroen LHM oil is what is used to fill em.
Could you document the rebuild process and the parts needed? There are a lot of us still using these old shocks and it would be great to be able to rebuild them ourselves.
I rebuild these if anybody needs help with them in US.
The most outer seal is just a wiper and has no effect in sealing.
The actual oil seal is under the cap and seals tube oil and rod contact by crush pressure.
Can't tell from these pics but these look like single adjustment with no remote cannister..?
The technology may be dated (Justin) but these (especially the remote cannister double adj) are still great dampers.
Our cars are at the front of SP2 wherever we go on these.
We are about to install and test another shock in this price range, double adjustable with nitrogen pressure adjustable cannisters on an SP3 968 owned by a friend and driven by my son.
On it's first ever outing with much more suspension tuning left unexplored, my son passed the national SP3 points leader and lead 90% of one of the sprints several weeks ago at NOLA.
If the testing pans out like I am confident it will, we will be retailing and servicing these dampers for USA.
T
THanks T
Yes they are twin tube single adjustables. Quite old I think but perfectly serviceable. A lot of the guys are using new Gaz shocks here and having a lot of reliability issues, leaking seals and suchlike.
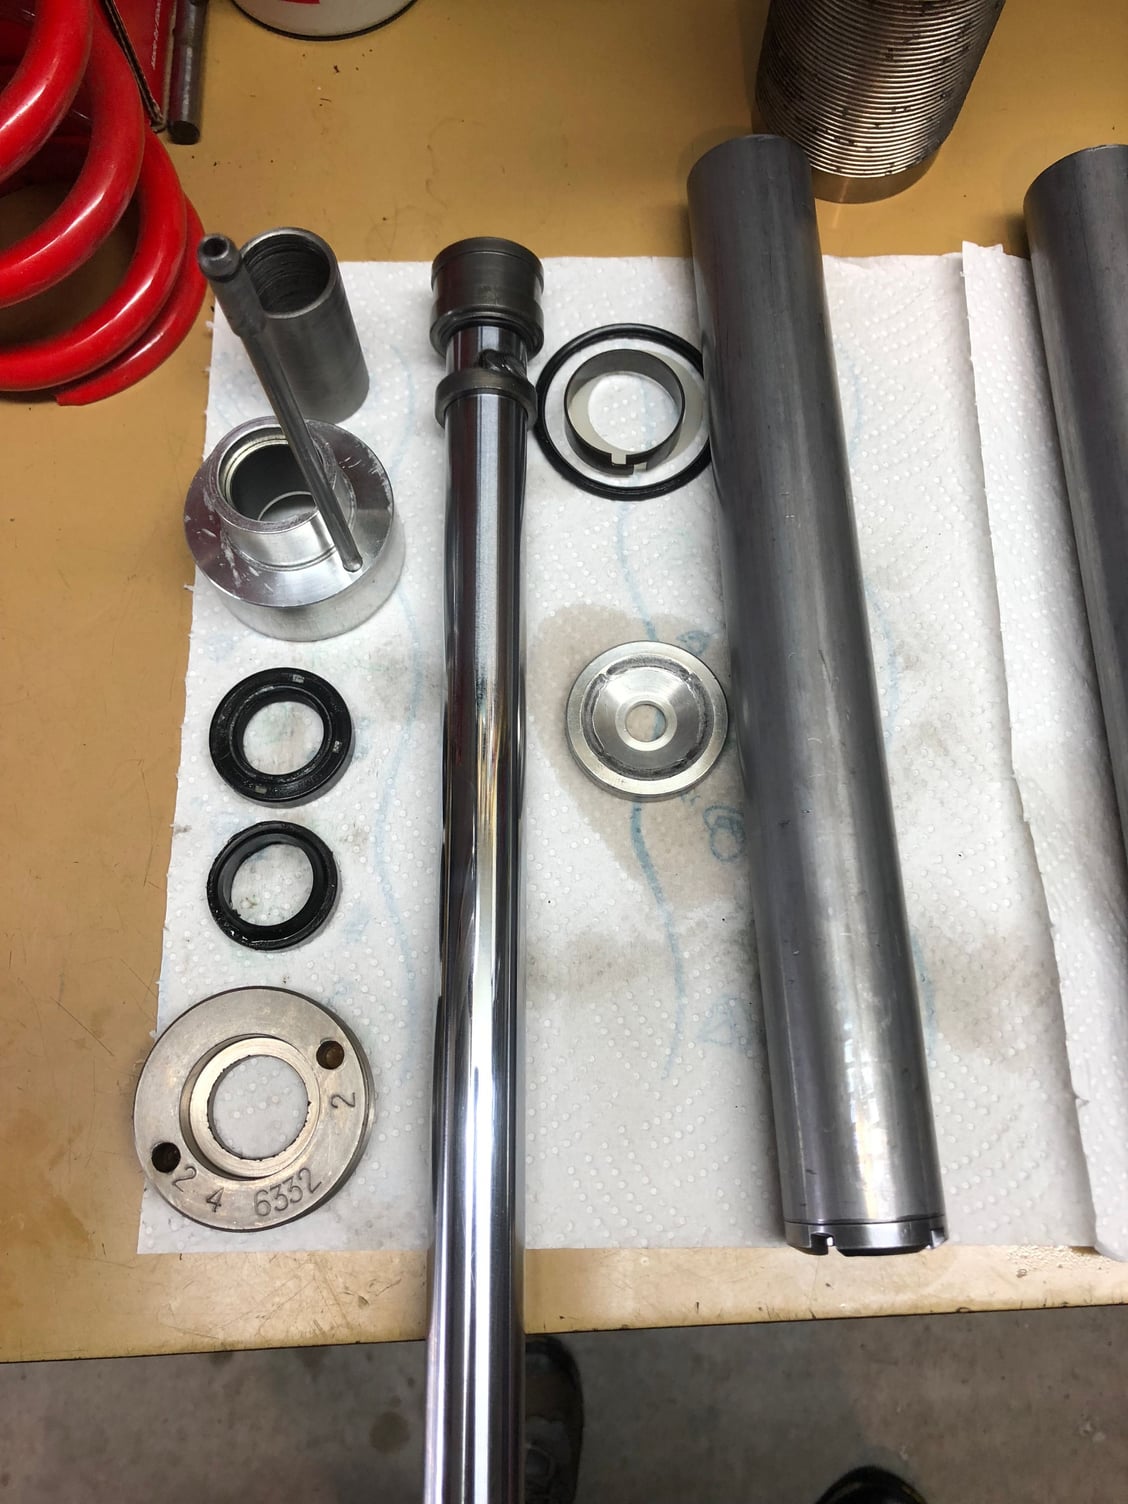
Right, rebuild time. Hopefully I took enough photos!!
So - Firstly - DO NOT disassemble the adjuster mechanism on the side. This is set up with a shock dyno and then drilled and pinned.
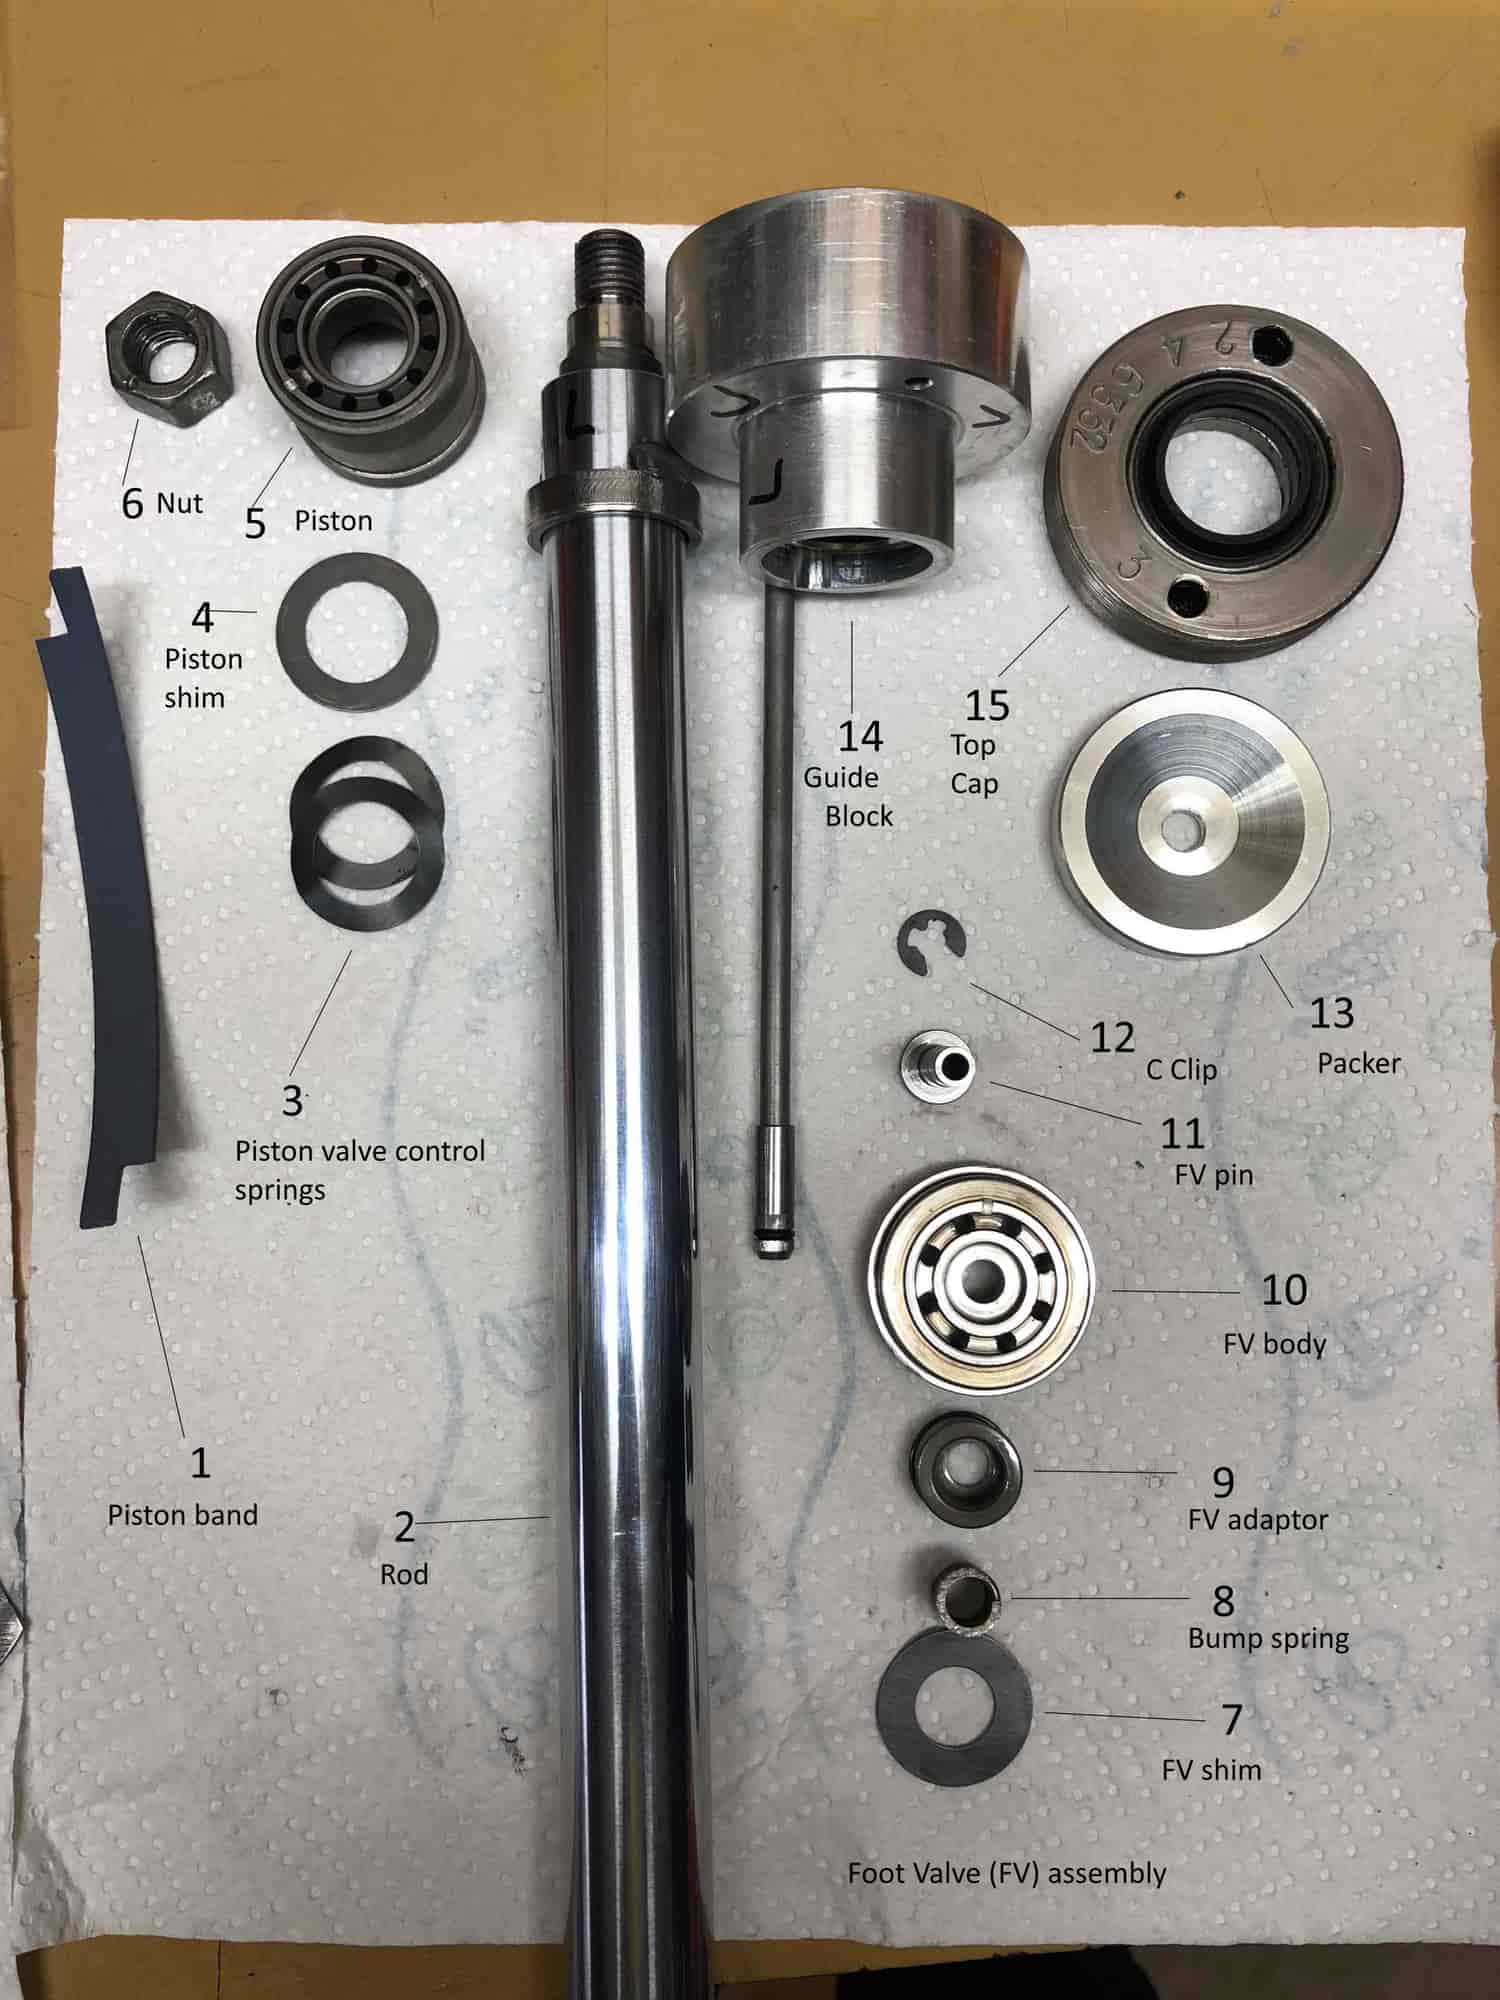
Refer to the picture - Note: the piston tube (with foot valve) and all the seals and orings not shown.
DISASSEMBLY
1) Undo the top cap - it should be really really tight and need a special tool made up to remove it. If not, well, you'll find out what happens inside.... Like mine were....
2) pull the piston assembly directly upwards and wriggle until the whole guts come out of the shock. Pour out the old oil that has so much alloy fragments that it looks like quicksilver....
3) Be very careful with the guide block and bleed tube. The bleed tube has a No 10 UNF thread.
4) hold the piston tube with FV (foot valve body) in an appropriate soft jaws. Use a sharp chisel or similar to tap out the FV body by cutting into the FV body itself. Don't try to insert the chisel into the gap between tube and body. Yes it'll make a little bit of a mess but you can file afterwards. Do this at about 4 points around the circumference and slowly tap the whole FV body out.
5) Disassemble the FV body assembly. Hopefully you have c cliped FV pins. If they are riveted, drill them out and order new pins from Leda. The pins may have some holes drilled in the base of them. Tell leda what size holes and how many when ordering.
6) Pop out all seals and bushes (if replacing them) and orings. Clean everything with solvent/petrol/brake cleaner etc. Make sure you get the old alloy packers out of the bottom of the strut body. The rears may not have them. If they are damaged order or machine up.
7) if you're changing the bushes press them out with a special sharp edged tool for that purpose. There isn't much to grab so size a tool accordingly.
8) Disassemble the piston body and shims and springs from the rod. The rears may look different to the photo above with an extra collar and spring.
9) If damaged, lap the shims and the piston body and the FV body with 800 grit wet and dry.
Parts required (for my ones at least)
Front struts
Top bush 22x25x25mm bush (CSB-50 25mm long)
Oil seal DC4 TTO 22x36x10mm seal or appropriate rod seal, nitrile. Not rotary seal!!!!
Wiper 22x32x7mm wiper, nitrile.
Piston band - unknown, but 1mm thick. (I ordered from Leda)
Top cap oring 3.5cs x 47mm oring, N70
Bleed tube 1.25cs x 3.5mm oring , N70
Rear struts
Top bush 14x16x10mm long bush.
Oil seal TC TTO 14x24x7mm rod seal, Nitrile.
Wiper 14x20x3.5/5 mm, nitrile. Could be taller than this, i.e longer than 3.5/5
Piston band unknown, also 1mm thick.
Top cap oring 3.5cs x 40mm oring, N70
Bleed tube oring as above.
1) Assemble the Piston body to the rod, locktite.
2) Assemble the FV body and assembly to the piston tube. Press this on/in.
3) put the packer if needed and the piston tube into the body. Lube the piston and rod and insert into the tube to the bottom.
4) fill with enough citroen LHM spec oil (green) to get to a level about 30mm below the outside of the inner tube in the front and about 25mm in the rear, with the inner tube full to the brim with the piston and rod at the bottom. Cycle the piston to remove trapped air and check level.
5) slide the complete guide block assembly over the rod and lube bleed tube oring with rubber grease. Slide CAREFULLY down the rod and engage into the hole in the adjuster assembly. Go real easy like....This step can take a bit of finesse. Make sure you dont go to one side of the adjuster assembly.
6) Top cap oring in, lube with rubber grease, top cap on the rod, slide down and do up with copper antisieze on the thread.. DO IT AS TIGHT AS YOU CAN MANAGE WITH AN APPROPRIATE TOOL. AS TIGHT AS A HUMAN CAN GET IT I WAS TOLD. Do this in stages and continue to cycle the rod to make sure it hasn't locked up off center.
 04-24-2018, 03:43 AM