1980 924 Turbo/931 Resurrection
 03-04-2018, 12:43 PM
#16
Rennlist Member
Thread Starter
First, i'd like to say that the bent valves seen here may not necessarily be like that because of some engine problem...you may have bent them when setting down the head like you showed in the picture above.
Its a clear rule when removing heads...you DONT set them on the valves...because...they...bend.
Good luck finding sodium filled valves as the 931 has them, perhaps you can find used ones? Ask Dan(ideola) he may be able to help.
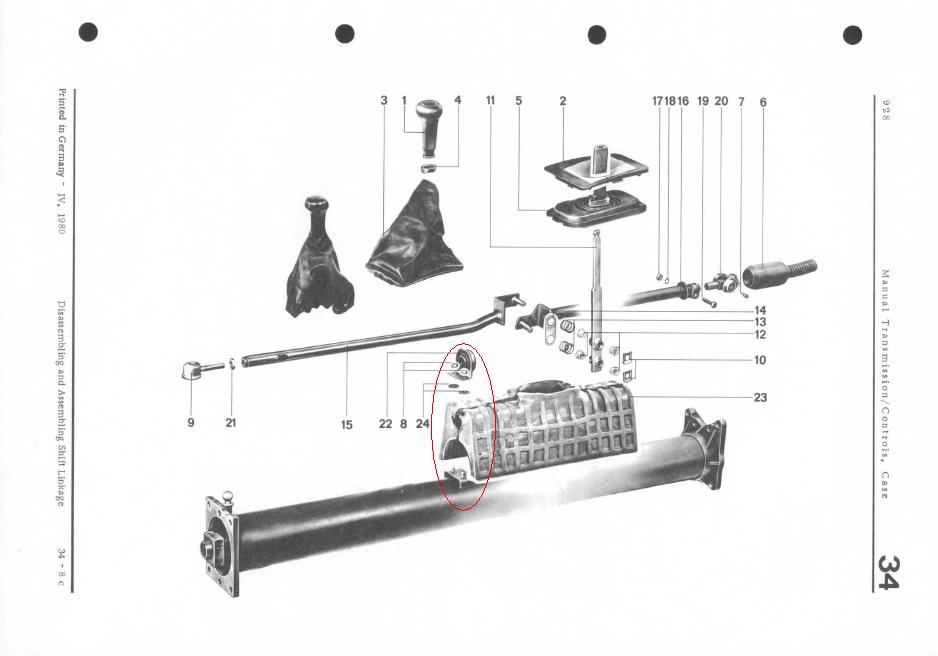
The shifter linkage is nearly identica to the 928 linkage. If i'm not mistaken the bushings are exactly the same between the 924 turbo, 928 and the 915 which also uses a similar gearbox as the 931.
have a look here for some pics and part numbers but do your homework right and search the part numbers in PET.
http://jenniskens.livedsl.nl/Technic...8/MyTip808.htm
the items you want to look for are: 9, 12, 13 and 20.
Its a clear rule when removing heads...you DONT set them on the valves...because...they...bend.
Good luck finding sodium filled valves as the 931 has them, perhaps you can find used ones? Ask Dan(ideola) he may be able to help.
The shifter linkage is nearly identica to the 928 linkage. If i'm not mistaken the bushings are exactly the same between the 924 turbo, 928 and the 915 which also uses a similar gearbox as the 931.
have a look here for some pics and part numbers but do your homework right and search the part numbers in PET.
http://jenniskens.livedsl.nl/Technic...8/MyTip808.htm
the items you want to look for are: 9, 12, 13 and 20.
Also, thank you for providing a diagram and which items will be required!!
 03-05-2018, 04:15 AM
#17
Three Wheelin'
You're very welcome. Learn something every day 
For replacing the bushings on the gearbox side of the linkage and the mushroom bushing on the torque tube you need to take the gearbox out(means exhaust off as well), lower the torque tube a bit(rest it on the torsion bar beam) and use a ratchet strap to pop the new bushing into place...unless you want to take the tube out completely which would make things a bit easier but more work involved.
Ask Ideola and 924RACR for further on site advice and help, they are really nice chaps and have tons of experience with the 931.
03-05-2018, 01:22 PM
#18
Rennlist Member
Thread Starter
You're very welcome. Learn something every day
For replacing the bushings on the gearbox side of the linkage and the mushroom bushing on the torque tube you need to take the gearbox out(means exhaust off as well), lower the torque tube a bit(rest it on the torsion bar beam) and use a ratchet strap to pop the new bushing into place...unless you want to take the tube out completely which would make things a bit easier but more work involved.
Ask Ideola and 924RACR for further on site advice and help, they are really nice chaps and have tons of experience with the 931.
I've ordered the bushings for the lever (12 and 13) and they should be here by the end of the week. I can't get a good look at the bushings on the gearbox until I jack the rear up; all of the jack stands are being used currently. I've also got a new water pump, T-stat, control arm bushings and ball joints on the way to pass the time.
03-05-2018, 04:25 PM
#19
Three Wheelin'
Pay attention to the correct way to install the t-stat and check the documentation if the one you've got is the right one for your car.
Be careful with jack stands...double safety.
After you've done the balljoints and front end bushings you need to get a wheel alignment.
It makes a world of difference in how well the car drives if you go to a shop that knows how to check and adjust the rears as well.
Be careful with jack stands...double safety.
After you've done the balljoints and front end bushings you need to get a wheel alignment.
It makes a world of difference in how well the car drives if you go to a shop that knows how to check and adjust the rears as well.
03-06-2018, 12:39 AM
#20
Rennlist Member
Thread Starter
Pay attention to the correct way to install the t-stat and check the documentation if the one you've got is the right one for your car.
Be careful with jack stands...double safety.
After you've done the balljoints and front end bushings you need to get a wheel alignment.
It makes a world of difference in how well the car drives if you go to a shop that knows how to check and adjust the rears as well.
Be careful with jack stands...double safety.
After you've done the balljoints and front end bushings you need to get a wheel alignment.
It makes a world of difference in how well the car drives if you go to a shop that knows how to check and adjust the rears as well.


Today, I just took some time to clean up the cylinder head and intake manifold with parts cleaner. They're much nicer to hold without gloves now that 30+ years of grime is mostly removed.
03-11-2018, 01:26 AM
#21
Rennlist Member
Thread Starter
Dan is the man! He got me two replacement valves this week! Water pump, t-stat, and balljoints arrived too. All I'm waiting on is the head gasket kit, and t-stat O-ring, then I'll have everything for reassembly!!
03-11-2018, 09:15 AM
#22
Rennlist Member
Can't wait to hear how the assembly goes! You'll have no problem driving this by summer!
03-14-2018, 02:48 PM
#24

This might go without saying, but make sure all the valves and valve seats are lapped properly before the head goes on. It'll wake up the engine completely (not that you've ever felt this engine). I'd also recommend a leakdown test once the head is on just to verify that the valves are sealing and the rings aren't too shot. It's an easy test that can tell you a lot.
03-20-2018, 11:40 PM
#25
Rennlist Member
Thread Starter

This is it, everyone! Looking at reassembling the head with 924RACR on Thursday and hopefully having the whole engine back together for it's first proper start this weekend! Did a proper cleaning of the head, and grinded the valves yesterday.

I've also been working on repairing the rust and repainting the hood. Just need to wetsand tomorrow before I apply the first basecoat!

I'm soo excited everything is coming together after a year!
 03-23-2018, 02:48 AM
#27
Rennlist Member
Thread Starter

Much progress was made! 924RACR and I began the rebuild process! With his experience and skill, we reinstalled the valves and cam into the head, and I learned how to adjust valve clearances (a VERY intense and precise task), and so much more! Most importantly, the importance of having a clean work environment and clean parts, preparation is the most important.
Now the head sits comfortably on it's side to keep the valves safe in my basement until the next time we work on finishing up the rebuild and installing the head on the car!

Until then I've been tasked with getting the exhaust studs in, and cleaning the rest of the parts before installation.
 03-25-2018, 03:31 PM
#29
Rennlist Member
Hi Karl - looks like a great project so far.
I have some interior parts (all black) for a 924/924S that are leftover from my 924S project. They’ve been sitting in storage for the past few years (I never got to install them before I sold the car), so if there’s anything you’re looking for to put the interior back together for this car, please shoot me a PM.
I have some interior parts (all black) for a 924/924S that are leftover from my 924S project. They’ve been sitting in storage for the past few years (I never got to install them before I sold the car), so if there’s anything you’re looking for to put the interior back together for this car, please shoot me a PM.
03-27-2018, 12:42 AM
#30
Rennlist Member
Thread Starter

Here's the interior pic I promised a while back....Or rather, what's left of it. Planning on cleaning up and painting the floorpan and other exposed metal pieces and putting in floormats to keep the car lightweight and nimble. I might delete the center console as well....Not sure yet, I've got a spare that I might spruce up to keep some form of "luxury" and convenience in the car.

