My 1967 912 Build Thread
 02-15-2015, 02:49 AM
#391
Professor of Pending Projects
Rennlist Member
Rennlist Member
Thread Starter
Installing the third case piece...
Loctite 574 on the engine block... install correct gasket from the three that comes in the gasket set.

Install the o-ring, and rubber gaskets


following the recommendations in the video of installing the distributor gear. First make sure that the distributor is inserted with the spacer/s. Align the slot with the narrow side facing the rear of the engine...

Then turn a few degress

Engine needs to be on TDC for pistion 1 on compression... video shows how to make sure that is the case.
Install the third piece of the case... tap gently as it goes in... the distributor gear should end up with the slot parallel to the face of the engine block... (PLEASE CORRECT ME IF I UNDERSTOOD CORRECTLY THE VIDEO)

Install washers and nuts... torque to specs (15-18 ft/lbs)... I torqued them to 17 ft/lbs

Now to install the front seal... first insert the washer/spacer. I ordered a new one since the old one was pretty beat up, even if it looked great when it came back from the yellow zinc plating...

Get your seal install tool... Look at it closely, you will see that it inserts the seal about 1/16" into the third case.

I put just a little bit of oil in the inside of the seal, the part that came in contact with the install tool...some Loctite 574 on the outside of the seal, and then inserted the seal into the tool.


And proceed to install the seal...


Clean any 574 that might have squeezed out... clean the tool... done!

Loctite 574 on the engine block... install correct gasket from the three that comes in the gasket set.
Install the o-ring, and rubber gaskets
following the recommendations in the video of installing the distributor gear. First make sure that the distributor is inserted with the spacer/s. Align the slot with the narrow side facing the rear of the engine...
Then turn a few degress
Engine needs to be on TDC for pistion 1 on compression... video shows how to make sure that is the case.
Install the third piece of the case... tap gently as it goes in... the distributor gear should end up with the slot parallel to the face of the engine block... (PLEASE CORRECT ME IF I UNDERSTOOD CORRECTLY THE VIDEO)
Install washers and nuts... torque to specs (15-18 ft/lbs)... I torqued them to 17 ft/lbs
Now to install the front seal... first insert the washer/spacer. I ordered a new one since the old one was pretty beat up, even if it looked great when it came back from the yellow zinc plating...
Get your seal install tool... Look at it closely, you will see that it inserts the seal about 1/16" into the third case.
I put just a little bit of oil in the inside of the seal, the part that came in contact with the install tool...some Loctite 574 on the outside of the seal, and then inserted the seal into the tool.
And proceed to install the seal...
Clean any 574 that might have squeezed out... clean the tool... done!
 02-15-2015, 12:58 PM
#392
Professor of Pending Projects
Rennlist Member
Rennlist Member
Thread Starter
Installing full flow oil filter system... all this was previously tested for fitment and clearance...

Now inserted into the modified third piece case...

Gasket...

To minimize the guessing... I turned the engine until the slot was vertical.

I first tried installing the gears on the cover and then into the case... but it was easier to install the gears in the case and then the cover... anyway, here is a photo of the gears nicely oiled.

Cover installed and torque to specs (10 lbs/ft) Engine still turns easily, so nothing has seized due to the install of the oil pump... so far, all good.


Filter filled with oil and installed

More later...
Now inserted into the modified third piece case...
Gasket...
To minimize the guessing... I turned the engine until the slot was vertical.
I first tried installing the gears on the cover and then into the case... but it was easier to install the gears in the case and then the cover... anyway, here is a photo of the gears nicely oiled.
Cover installed and torque to specs (10 lbs/ft) Engine still turns easily, so nothing has seized due to the install of the oil pump... so far, all good.
Filter filled with oil and installed
More later...
02-15-2015, 04:15 PM
#393
Professor of Pending Projects
Rennlist Member
Rennlist Member
Thread Starter
Heat shield installed:


Since a lot of oil is starting to go into areas... installed the bottom cover. So glad I got this before the owner retired.
Installed all bolt studs to the same height. Allows for the two gaskets and strainer to go in, cover, washers and nuts...


Gasket

Strainer

Gasket

Cover, washers, nuts...


Hold studs in place while tightening the nuts...

Finito!

Since a lot of oil is starting to go into areas... installed the bottom cover. So glad I got this before the owner retired.
Installed all bolt studs to the same height. Allows for the two gaskets and strainer to go in, cover, washers and nuts...
Gasket
Strainer
Gasket
Cover, washers, nuts...
Hold studs in place while tightening the nuts...
Finito!
02-15-2015, 04:16 PM
#394
Professor of Pending Projects
Rennlist Member
Rennlist Member
Thread Starter
Installed these as well...


And I had installed the front pulley before I read the comment from Mike... only thing I did was to slightly oil the pulley surface that came in contact with the seal...


And now to install the oil cooler...

And I had installed the front pulley before I read the comment from Mike... only thing I did was to slightly oil the pulley surface that came in contact with the seal...
And now to install the oil cooler...
02-15-2015, 10:04 PM
#395
Nordschleife Master
Great work! Keep the photos and videos coming... 
02-15-2015, 10:30 PM
#396
Professor of Pending Projects
Rennlist Member
Rennlist Member
Thread Starter
Thank you!
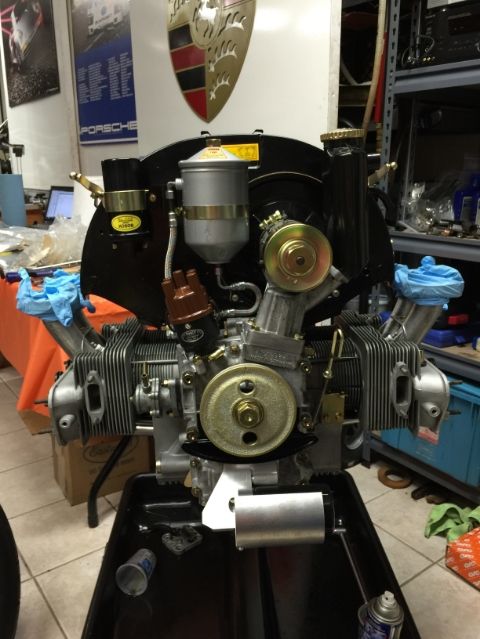
In my case, since using the aluminum cooler, I do not require the extra o-rings...
Cooler mounted

Cylinders mounted as well


Getting ready to install the heads... return tubes in place, orange mark is to make it easier to find the seam on the return tube. Recommendations is for that seam to be pointing up. Sping clip in place with air baffle plate...


Made sure it was the correct air baffle plate and that the cut out did not interfered with the through bolt

On with the heads!


Followed the recommendation of starting on one side and torquing then the other side... hand tight 3-4 then 1-2, 10 on one side then the other side, 15, 20, 25 lbs/ft... triple checked the torque on both sides to make sure it was set and I had not missed a head nut...


As I left it to update the thread...


There is space in the table again to place the notebook and the books! Parts are coming off the table!!

In my case, since using the aluminum cooler, I do not require the extra o-rings...
Cooler mounted
Cylinders mounted as well
Getting ready to install the heads... return tubes in place, orange mark is to make it easier to find the seam on the return tube. Recommendations is for that seam to be pointing up. Sping clip in place with air baffle plate...
Made sure it was the correct air baffle plate and that the cut out did not interfered with the through bolt
On with the heads!
Followed the recommendation of starting on one side and torquing then the other side... hand tight 3-4 then 1-2, 10 on one side then the other side, 15, 20, 25 lbs/ft... triple checked the torque on both sides to make sure it was set and I had not missed a head nut...
As I left it to update the thread...
There is space in the table again to place the notebook and the books! Parts are coming off the table!!
Last edited by Wachuko; 02-15-2015 at 11:08 PM.
02-16-2015, 01:40 AM
#397
Professor of Pending Projects
Rennlist Member
Rennlist Member
Thread Starter
Pulley removed. Surface that comes in contact with seal is in perfect condition. Nothing needed there. I have two wavy washers... the old one that I had yellow zinc plated and a new one (not plated)... I will decide tomorrow which one to use and apply some of the yamabond that I have. But it will squeeze out most of what I put on it, so I will make sure to put a very thin coat.
This was quick, so in went the rubber grommets for the heads...


Plug in place

Now the other side


This was quick, so in went the rubber grommets for the heads...
Plug in place
Now the other side
02-16-2015, 01:13 PM
#398
Professor of Pending Projects
Rennlist Member
Rennlist Member
Thread Starter
Cleaned, new seal...


New copper washer

Second washer in place, now with sensor housing

All set... small connector, I just used some of the Yamabond that I used in the front pulley washer. Since I had it and it was going bad (had to cut it to get to the little bit left that was still good).

Fuel pump...here you can see the new o-ring installed. Installed back with just a skin of yamabond, some blue loctite on the studs... bolted down and on to the next task.

New copper washer
Second washer in place, now with sensor housing
All set... small connector, I just used some of the Yamabond that I used in the front pulley washer. Since I had it and it was going bad (had to cut it to get to the little bit left that was still good).
Fuel pump...here you can see the new o-ring installed. Installed back with just a skin of yamabond, some blue loctite on the studs... bolted down and on to the next task.
02-16-2015, 06:15 PM
#399
Professor of Pending Projects
Rennlist Member
Rennlist Member
Thread Starter
Apologies for the additional photos with no real additional value add. Just that I am very exited... it is finally starting to look like an engine!! Must go slow to make sure nothing is missed... doing the rocker and arms tonight...


02-17-2015, 01:39 AM
#400
Professor of Pending Projects
Rennlist Member
Rennlist Member
Thread Starter
Cast iron distributors, clocked properly, do not have any interference problems. I'm sure someone, some time, found a way to mount the condenser that ended up in trouble, but I'm equally sure that if you got it from Glenn, there is no problem.
Remember that 1* at the distributor is 2* at the crank.
Remember that 1* at the distributor is 2* at the crank.
So... not having those washers and just watching the videos and staring at the engine... what the heck, even if I have to remove it again...


 02-19-2015, 09:04 AM
#402
Professor of Pending Projects
Rennlist Member
Rennlist Member
Thread Starter

On other news, eventually I would like to have a set of air cleaners in addition to the rock filters currently in my car. Seems that the air cleaner tins are easy to find (Jim @ Easy has several available) but the base plates are the ones that are not as easy get.
A fellow forum member pointed me to a set on ebay and I jumped on them. I will store them in a safe place (container with all 912 spare parts) for now.


But first, a nice coat of paint to make them look pretty again...
 02-19-2015, 09:08 AM
#403
Professor of Pending Projects
Rennlist Member
Rennlist Member
Thread Starter
Killing time... Cleaned these again... poured some oil inside the push-rods. I have new adjusting screws but forgot to order new nuts #$%#@$%@#


Recommendation is to take them completely apart, clean them well, and check for wear.
Pushrods are in good condition... each one rolls flat without problems.
More photos:


Cool! 
Went to the garage to give it a try... I remember also reading to be careful because you can pinch your fingers removing them... well, I did not read that anywhere, lol, but managed to do that taking the first one apart... lesson learned, hehehe...


Full rotation (video would have been better...)


Disassembled. Not sure how to remove the longer ones from that center block... does not slide out like everything else did.


Covered these just in case... do not want something going in...

What color should the valve covers be?? I have seen them black, gray, cad plated... Since I am redoing them, might as well ask if there is a correct color or it is just whatever color I want them to be... Started to clean the old black paint mine were covered with... using a blade and the paint is coming off without a fight...

Recommendation is to take them completely apart, clean them well, and check for wear.
Pushrods are in good condition... each one rolls flat without problems.
More photos:
Went to the garage to give it a try... I remember also reading to be careful because you can pinch your fingers removing them... well, I did not read that anywhere, lol, but managed to do that taking the first one apart... lesson learned, hehehe...
Full rotation (video would have been better...)
Disassembled. Not sure how to remove the longer ones from that center block... does not slide out like everything else did.
Covered these just in case... do not want something going in...
What color should the valve covers be?? I have seen them black, gray, cad plated... Since I am redoing them, might as well ask if there is a correct color or it is just whatever color I want them to be... Started to clean the old black paint mine were covered with... using a blade and the paint is coming off without a fight...
02-19-2015, 11:53 PM
#404
Professor of Pending Projects
Rennlist Member
Rennlist Member
Thread Starter
Workshop manual has clearances information. Pages E46-55 only covers disassembly and assembly... page E102 has the tolerances information...

02-19-2015, 11:54 PM
#405
Professor of Pending Projects
Rennlist Member
Rennlist Member
Thread Starter
I did use my toys today... 
Measuring the rocker shafts (that was just for the photo... I measured where the rocker arm rides....where the wear occurs. I did measure 90 degrees from that and that gave me perfect values since very little to no wear occurs in that arc):

Short Shaft 1,2,3 - .6289
Long Shaft 1,2 on both sides - .6287
Short Shaft 4 - .6283 This one I can clearly see that it was turned 180 at some point... since both sides are shiny...


So once again, glad I followed your recommendations and checked...
So the question is... I have to change one, no argument there... reproductions are solid. 29.22 for shorts and 41.62 for long. The other option is sending mine for reconditioning (44.00 Long / 41.00 Short each)... but not sure if the process of hard chrome brings them back to spec or the have to be within spec to send them in ??? And I should change a complete side, not just that short shaft, correct? And mount those on the 3-4 head.


And careful with any funny comments on the Diva box... left over from Valentine's Day
While I ponder what route to take... let me measure the rocker arms.
Measuring the rocker shafts (that was just for the photo... I measured where the rocker arm rides....where the wear occurs. I did measure 90 degrees from that and that gave me perfect values since very little to no wear occurs in that arc):
Short Shaft 1,2,3 - .6289
Long Shaft 1,2 on both sides - .6287
Short Shaft 4 - .6283 This one I can clearly see that it was turned 180 at some point... since both sides are shiny...
So once again, glad I followed your recommendations and checked...
So the question is... I have to change one, no argument there... reproductions are solid. 29.22 for shorts and 41.62 for long. The other option is sending mine for reconditioning (44.00 Long / 41.00 Short each)... but not sure if the process of hard chrome brings them back to spec or the have to be within spec to send them in ??? And I should change a complete side, not just that short shaft, correct? And mount those on the 3-4 head.
And careful with any funny comments on the Diva box... left over from Valentine's Day
While I ponder what route to take... let me measure the rocker arms.

