
My AC is broke, what would you do?
 11-05-2007, 06:46 AM
#46
Instructor
Thread Starter

Join Date: Aug 2006
Location: Fairfax Virginia
Posts: 165
Likes: 0
Received 0 Likes
on
0 Posts
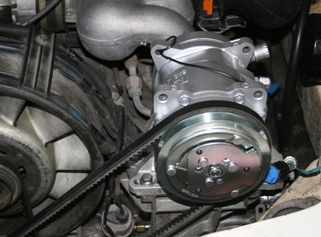
I installed the replacement compressor. This compressor is made by Sanden and it requires a special adapter bracket to be installed in place of the origional bracket that held the Nippondenso compressor in place. The new bracket is made out of aluminum, and appears to be cast, which should be fine for this application. The new adapter plate fit perfectly in place of the old one, but I did have to slightly rearrange the routing for the plug wires on the passenger side. The new adapter is installed using 4 x 8mm bolts, with both flat and lock washers that are supplied in the kit. The compressor is then installed on the bracket with 4 x 10mm bolts and nuts. Installing the compressor was pretty straight forward, and did not require a great deal of thought.
Here is a pic of the mounted compressor.
The pics are getting smaller due to my limited allocation of space on this site. I hope to resolve that issue.
Here is a pic of the mounted compressor.
The pics are getting smaller due to my limited allocation of space on this site. I hope to resolve that issue.
 11-05-2007, 07:43 AM
#47
Instructor
Thread Starter
Join Date: Aug 2006
Location: Fairfax Virginia
Posts: 165
Likes: 0
Received 0 Likes
on
0 Posts
I spent a few hours working on replacing the lines. I was not looking forward to this part as it involves crawling around on the floor in my 1 car garage. I can also confirm that the job is as dirty as everyone said it would be. I decided to start with the line at the high side of the compressor, and work my way around the car, one hose at a time.
The high side of the compressor has a short hose that leads to the rear condensor on the rear deck lid. Replacing this hose was pretty simple, and I did not have to crawl under the car...(yet). Next in the sequence is a really long hose that goes from the outlet side of the rear condensor all the way to the front condensor. The new replacement hose is a smaller diameter, which made it a little easier to feed from the bottom of the car, into the engine compartment. I decided to cut the old hose anytime it made it easier to remove. This hose is routed along the underside of the car, and held in place with some good strong clamps every two feet or so. So the procedure is to work your way along the underside of the car, towards the front, unscrewing the little brackets, removing the hose, sweeping up the mess as you go. I installed the new hose loosely in the brackets so that I can adjust everything once the condensors and evaporator are all re-installed. I installed the rest of the hoses using the same procedure. I dont have a good picture to represent the hose replacement.
Sorry no pic.
I have replaced all the hoses except for the one that goes to the suction side of the compressor. I am debating about changing the routing of this line from the passenger side to the drivers side of the car. This would mean that both lines would run down the drivers side of the car. The guy at Rennaire suggested doing this, and at the time I did not understand why, and pretty much rejected his suggestion. Now that I am starting to deal with the installation of the Pro-Cooler, I am begining to understand why the Guy at RennAire made the suggestion. More on this subject when I talk about the Pro-Cooler install.
11-14-2007, 05:59 AM
#48
Instructor
Thread Starter
Join Date: Aug 2006
Location: Fairfax Virginia
Posts: 165
Likes: 0
Received 0 Likes
on
0 Posts
ProCooler installation:
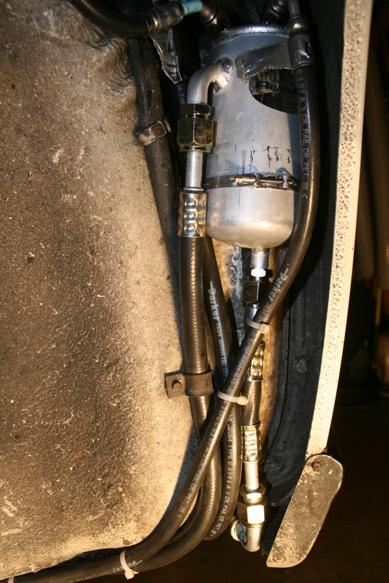
The ProCooler is installed in place of the receiver drier. The receiver drier is a round canister that receives the condensed or liquified freon, after it has been compressed and passed through both condensors. Moisture is removed in the receiver drier and then the freon is passed along to the evaporator, which is where the cold air is made. In the evaporator, the liquid freon transforms into a gas. This gas is then directed back to the compressor where the cycle starts all over again. I think the line that goes from the evaporator to the compressor is called the low side of the system.
The ProCooler serves the same function as the receiver drier, but in addition to collecting the condensed freon, and removing any moisture, the ProCooler also tries to add some additional coldness to the condensed freon. It adds this extra boost by rerouting some of the plumbing. The procooler has two extra lines attached to to it. The line that goes from the evaporator to the compressor (the low side) is rerouted to go from the evaporator to the ProCooler and then to the compressor. The idea here is that if the evaporator does not extract 100% of the coldness that is available in the freon, that this extra, or wasted coldness will be re-injected back into the incoming charge. I dont know how well it works, but the folks on the board had lots of good things to say about it.
Here is a pic of the ProCooler installed.
11-19-2007, 12:03 PM
#49
Instructor
Thread Starter
Join Date: Aug 2006
Location: Fairfax Virginia
Posts: 165
Likes: 0
Received 0 Likes
on
0 Posts
I finished installing the Rennaire system today.
I ended up following the recommendation of Rennaire, and I re-routed the low side return line (evaporator to compressor) from the passenger side to the drivers side of the car. So now both of the AC lines are running down the drivers side of the car. I think this was a good solution, and I am happy with the results.
I had both of the condensors cleaned and refurnbished locally (in Maryland). Having this done cost me way more than I expected, and I am no expert, but I dont think this shop performed their best work for me. They made no attempt to straighten any of the crooked fins, so I had to go in with a small screwdriver and straighten them out myself. Other than not being totally happy with the service provided, the condensors were re-installed, and seem to be working, and not leaking. So this is probably the imortant thing (working and not leaking).
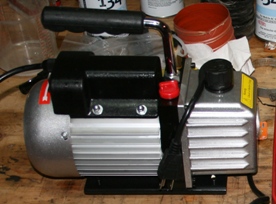
I bought an inexpensive vacuum pump, to evacuate the system. A cheap harry homeowner version is not that expensive, and I offset half the cost by buying it 50/50 with a friend. It works great.
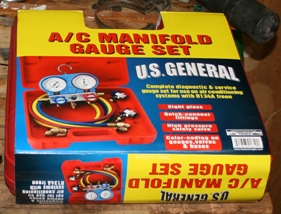
I also bought a set of AC manifold guages during a weak moment, while at our local Harbor Freight store. They were on sale for, well cheap, to cheap for me to resist.
I also bought 3 - 12 oz cans of R134 from my local parts house.
So I had everything I need to evacuate and charge this system. I hooked up the guages to the compressor, per the instructions, connected the evacuation pump. I let the system evacuate for about three hours to assure all the moisture was removed. After that I closed the valves, and let it sit for an hour to make sure there were no leaks. An hour later it was still holding a vacuum, so I decided to charge it up. This Renaire system requires 25 - 28 ounces of R134. This is slightly more than 2 x 12 oz cans. I loaded 2 full cans into the system, and then topped it off with 3 or 4 oz from the third can.
The results:
This was not a good day to determine how well the system works (60 degrees f outside), but I will post this anyway.
Ambient temp: 60 degrees F
Vent Temp: 36 degrees F
High side pressure: 165 lbs
Low side pressure: 15 lbs
A 24 degree differential between ambient and vent temp does not seen like a lot but it is certanly better than having no AC at all.
I ended up following the recommendation of Rennaire, and I re-routed the low side return line (evaporator to compressor) from the passenger side to the drivers side of the car. So now both of the AC lines are running down the drivers side of the car. I think this was a good solution, and I am happy with the results.
I had both of the condensors cleaned and refurnbished locally (in Maryland). Having this done cost me way more than I expected, and I am no expert, but I dont think this shop performed their best work for me. They made no attempt to straighten any of the crooked fins, so I had to go in with a small screwdriver and straighten them out myself. Other than not being totally happy with the service provided, the condensors were re-installed, and seem to be working, and not leaking. So this is probably the imortant thing (working and not leaking).
I bought an inexpensive vacuum pump, to evacuate the system. A cheap harry homeowner version is not that expensive, and I offset half the cost by buying it 50/50 with a friend. It works great.
I also bought a set of AC manifold guages during a weak moment, while at our local Harbor Freight store. They were on sale for, well cheap, to cheap for me to resist.
I also bought 3 - 12 oz cans of R134 from my local parts house.
So I had everything I need to evacuate and charge this system. I hooked up the guages to the compressor, per the instructions, connected the evacuation pump. I let the system evacuate for about three hours to assure all the moisture was removed. After that I closed the valves, and let it sit for an hour to make sure there were no leaks. An hour later it was still holding a vacuum, so I decided to charge it up. This Renaire system requires 25 - 28 ounces of R134. This is slightly more than 2 x 12 oz cans. I loaded 2 full cans into the system, and then topped it off with 3 or 4 oz from the third can.
The results:
This was not a good day to determine how well the system works (60 degrees f outside), but I will post this anyway.
Ambient temp: 60 degrees F
Vent Temp: 36 degrees F
High side pressure: 165 lbs
Low side pressure: 15 lbs
A 24 degree differential between ambient and vent temp does not seen like a lot but it is certanly better than having no AC at all.
11-19-2007, 07:03 PM
#51
Instructor
Thread Starter
Join Date: Aug 2006
Location: Fairfax Virginia
Posts: 165
Likes: 0
Received 0 Likes
on
0 Posts
Thanks spence88mph. Winter is approaching here in Virginia so the AC wont really be needed for several months. The real test will be next summer when it is 90+ degrees f. I have been told by many people that these systems are starved for condensor space. So if cooling is not meeting my needs, I will look into upgrading the condensors, or adding additional condensors, as many others have done. For now, I am just happy to have a working system.
11-19-2007, 10:05 PM
#52
Intermediate
Join Date: Sep 2007
Location: Weston, FL
Posts: 35
Likes: 0
Received 0 Likes
on
0 Posts
Very nice work. I have a non-working A/C as well and have debated on whether to purchase the Rennaire kit. I think I might just pull the evaporator first, clean it, flush the condensors and see if that makes an improvement. Please let us know how this system works in the summer.
Scott
Scott
12-04-2007, 09:33 PM
#53
Rennlist Member
I am out $1,200 tonight but a Rennaire kit is on the way for my 1987 911 with a 993 engine and 993 compressor. I did go for the larger front condensor so let the fun begin 
12-05-2007, 06:18 AM
#54
Instructor
Thread Starter
Join Date: Aug 2006
Location: Fairfax Virginia
Posts: 165
Likes: 0
Received 0 Likes
on
0 Posts
Excellent, now is a good time for a project like this. They are predicting 2 inches of snow here, probably more in Pa.
I think adding a new and bigger condensor is a wise move. I had my old one cleaned and tested, and it cost much more to clean and test it than I thought it would. If I were to do it again, I would just buy the bigger condensor and throw the old one away.
I would love to see some pics of 993 engine mounted in your 87. I have been dreaming about that setup recently.
Last edited by D.C.; 12-05-2007 at 11:03 AM.
07-16-2008, 01:50 PM
#55
Instructor
Thread Starter
Join Date: Aug 2006
Location: Fairfax Virginia
Posts: 165
Likes: 0
Received 0 Likes
on
0 Posts
An update on my AC replacement project....
I am very happy with the performance of the Renaire system that I installed this past winter.
One day last week I recorded the following.
Ambient air temp 83 degrees (very humid day)
Test #1
With the car parked in the driveway in the sun, AC temp control on max cold, AC fan controll on high, engine RPM about 2k, I recorded vent temps at 41 degrees.
Test #2
With the car rolling down the highway, I played with different settings on the controls to obtain the lowest vent temp possible. With the AC temp control on max cold, AC fan controll on 3/4, engine RPM varied, I recorded vent temps at 38 degrees. I think the better result here was due to better airflow over the condensors.
Test #2 is a 45 degree drop between ambient and vent temps. I am no expert but I think that is sufficient for driving in the Virginia area.
Thanks to all who contributed to this thread. It turned out to be a big success.
07-16-2008, 03:11 PM
#56
Drifting
I know someone who used to have a black/black SC and had the Rennaire system installed last summer and was very pleased with it during the 100 degree heat wave.
Unfortunatley the Porsche was totaled out a few weeks later the day after he installed the Rota 17 Fuchs with new tires
John
Unfortunatley the Porsche was totaled out a few weeks later the day after he installed the Rota 17 Fuchs with new tires
John