
The Ray Scrugg's Home Alignment Method
 05-09-2005, 09:35 PM
#1
Addict
Rennlist Member
Rennlist Member
Thread Starter
Note: Also posted on Pelican, but since Rennlister jet911 found Ray for me & many Rennlisters don't follow Pelican, I thought I would post here too.
To me, doing a Home Alignment was an important hurtle to reach. You intimately learn how your suspension works and how very small changes can have a major impact on driving. The booklet written by Ray Scruggs called Home Alignment of Porsche 911 For Street or Competition is essential.

To get a copy of the booklet, you can contact Ray Scruggs - PM me for his email address. I just got a copy from him today. I had downloaded the pictures of the booklet earlier, but I decided that he deserves my $10. For the help it gives, it is a great deal - rare in the Porsche world
Other resources:
Pelican Article
Another Pelican Article
Smart Racing
You will need:
A camber tool. Be inventive.
White string or thread (thread allows finer measurements & you can see white better).
19mm sockets & wrenches - breaker bar, torque etc . . .
12mm Allen wrench (tough to find but online guys have them as a last resort & you might as well get the 17mm one you need for transmission fluid change while you're at it).
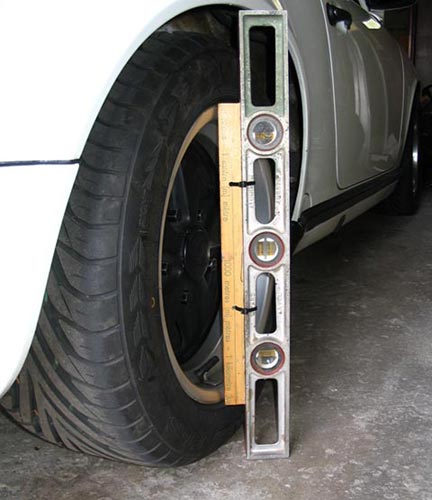
My alignment tools:
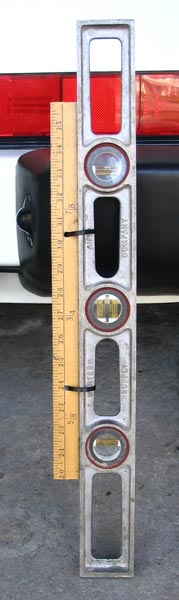
An old metal bubble level is an excellent camber tool. I cut an old yardstick to match the wheel diameter & tie wrapped it to the oblong openings in the level. That way, it can shift up & down to make measuring easier. With some practice, sitting on the ground, you hold the bottom against the wheel with your knee & use a tape measure to measure the top as you center the top bubble. Subtract the 'known' width of the yardstick & you have your camber figure. A camber excel sheet exists somewhere (I downloaded it from someone) to convert measurement into degrees.
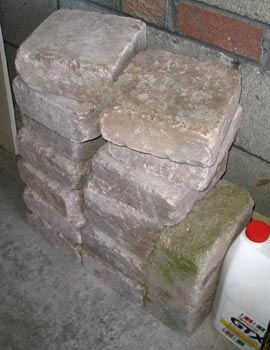
Decorative paving stones piled on blankets & planks (for protection & weight distribution) on the front seat & floor are a great way to simulate driver weight. These weighed 10 lbs each. Fuel was 1/2 to 3/4 full.
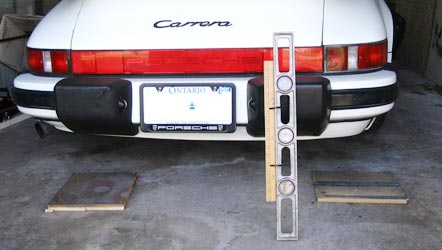
I fashioned wooden platforms (of layers of wood & old paneling) that I could drive up onto to level the garage floor or the car on the garage floor or . . . whatever . . .
Toe Measurement
This is the real fiddly part. I put jack stands on the four corners. White thread was strung around the stands. The stands were equidistant from each other with the tread equidistant from the center of rear wheel hubs & equidistant from the center of front wheel hubs and trust me, it is not hard, but it is really, really fiddly. Once you get these measurements, write them down so you can repeat setup & repeat setup & repeat setup . . .
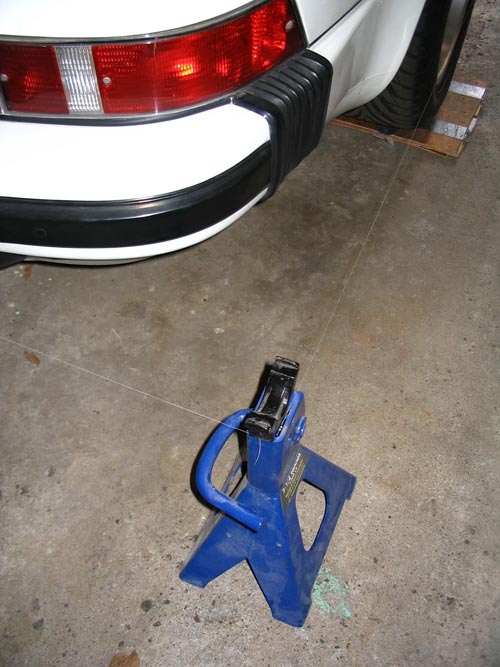
It will take time. Lots & lots of it the first time. Every change you make requires a drive 'around the block' before you can re-measure. You will jack the car up & let it down hundreds of times. That's why you need the platforms. That's why you measure the string placement & write it down. You will have to reset it again & again. Everything must be easily & accurately repeatable.
But, you will learn how the suspension in a 911 works. And you can be one of the smug few who can do it at home.
Ian
To me, doing a Home Alignment was an important hurtle to reach. You intimately learn how your suspension works and how very small changes can have a major impact on driving. The booklet written by Ray Scruggs called Home Alignment of Porsche 911 For Street or Competition is essential.
To get a copy of the booklet, you can contact Ray Scruggs - PM me for his email address. I just got a copy from him today. I had downloaded the pictures of the booklet earlier, but I decided that he deserves my $10. For the help it gives, it is a great deal - rare in the Porsche world
Other resources:
Pelican Article
Another Pelican Article
Smart Racing
You will need:
A camber tool. Be inventive.
White string or thread (thread allows finer measurements & you can see white better).
19mm sockets & wrenches - breaker bar, torque etc . . .
12mm Allen wrench (tough to find but online guys have them as a last resort & you might as well get the 17mm one you need for transmission fluid change while you're at it).
My alignment tools:
An old metal bubble level is an excellent camber tool. I cut an old yardstick to match the wheel diameter & tie wrapped it to the oblong openings in the level. That way, it can shift up & down to make measuring easier. With some practice, sitting on the ground, you hold the bottom against the wheel with your knee & use a tape measure to measure the top as you center the top bubble. Subtract the 'known' width of the yardstick & you have your camber figure. A camber excel sheet exists somewhere (I downloaded it from someone) to convert measurement into degrees.
Decorative paving stones piled on blankets & planks (for protection & weight distribution) on the front seat & floor are a great way to simulate driver weight. These weighed 10 lbs each. Fuel was 1/2 to 3/4 full.
I fashioned wooden platforms (of layers of wood & old paneling) that I could drive up onto to level the garage floor or the car on the garage floor or . . . whatever . . .
Toe Measurement
This is the real fiddly part. I put jack stands on the four corners. White thread was strung around the stands. The stands were equidistant from each other with the tread equidistant from the center of rear wheel hubs & equidistant from the center of front wheel hubs and trust me, it is not hard, but it is really, really fiddly. Once you get these measurements, write them down so you can repeat setup & repeat setup & repeat setup . . .
It will take time. Lots & lots of it the first time. Every change you make requires a drive 'around the block' before you can re-measure. You will jack the car up & let it down hundreds of times. That's why you need the platforms. That's why you measure the string placement & write it down. You will have to reset it again & again. Everything must be easily & accurately repeatable.
But, you will learn how the suspension in a 911 works. And you can be one of the smug few who can do it at home.
Ian
 05-13-2005, 02:43 PM
#2
Pro

Join Date: Jun 2001
Location: Peoples Republic of Long Beach, N.Y.
Posts: 556
Likes: 0
Received 1 Like
on
1 Post
Ray's book is great.
also the stock track is different in the rear than the front as per Ray's specs. If that's not adjusted for the "box" made of string won't be equal. If the "box" isn't equal the front and rear toe will be incorrect to what your seeking.
also the stock track is different in the rear than the front as per Ray's specs. If that's not adjusted for the "box" made of string won't be equal. If the "box" isn't equal the front and rear toe will be incorrect to what your seeking.
05-13-2005, 03:29 PM
#3
Addict
Rennlist Member
Rennlist Member
Thread Starter
Agreed. And that's why you have to write it all down. In my case, the thread was 3 5/16" away from bottom center of the front hub & 2 13/16 from the rear. You also have to be careful of 'eye' error. Depending upon how you are looking at your measure, how far it is from the string etc can all effect your accuracy.
Once you do get the distance from hubs set, you no longer need to set up the box, you can just run strings down the sides to quickly check toe.
Ian
Once you do get the distance from hubs set, you no longer need to set up the box, you can just run strings down the sides to quickly check toe.
Ian
05-25-2005, 03:44 AM
#4
Burning Brakes
Join Date: May 2005
Location: homestead Florida
Posts: 914
Likes: 0
Received 0 Likes
on
0 Posts
I would love to be able to get a copy of his book. I do every thing else on the car myself this is one of those few things they you seem to have to pay someone else to do.
04-20-2017, 01:39 PM
#5
2nd Gear

Join Date: Apr 2017
Location: Murfreesboro, TN
Posts: 2
Likes: 0
Received 0 Likes
on
0 Posts
I would love his email address please! I have sent an email to raystrax@yahoo.com but never heard anything?
Thanks!
Thanks!
04-20-2017, 02:58 PM
#6
Addict
I have a homemade string jig that has sort of become obsolete to me in preference of a couple of Longacre camber plates, two tape measures, and a couple of digital 24" levels from Home Depot......and 10 years of trial and error to find the sweet spot. 
04-20-2017, 03:57 PM
#7
I haddah Google dat
Rennlist Member
Rennlist Member
We did a home/ garage alignment thread here years ago, using the bubble level tool invented by Draco. I call it the Dracometer camber adjustment checker. Don't forget to calibrate your garage floor. Make a tool to thread onto and grab the strut and move it with leverage.
Trending Topics
04-20-2017, 04:31 PM
#8
Shade-tree wheel alignment has a long history of good observation and measurement to put things right. Back in the days of real horsepower, the driver of a horse drawn wagon/stagecoach would note if his horse was sweating too much for the load being pulled. If so, the wagon wheels needed an alignment. A common problem was excessive toe out, as the wheels turned they would also scuff against the ground adding a lot of extra rolling resistance. Best practice was to measure the distance between the front edges of the two front wheels as well as the distance between the rear edges. By adjusting the distance between the front edges of the wheels to be less than the rear edges, it gave a toe in effect to the front axle. Under load, all the flex in the axle and slop in the hubs etc would tend to eliminate some of the toe-in effect allowing the wheels to roll straight ahead in a parallel fashion. Similar adjustments could be applied to the over/under axle truss threaded rods to adjust axle sag, eliminating excessive wheel camber.
The point is the expert wagon builder could not know all the various operating conditions when building and adjusting the wheel/axle settings. An experienced and savvy owner could always find the sweet spot for his use.
The point is the expert wagon builder could not know all the various operating conditions when building and adjusting the wheel/axle settings. An experienced and savvy owner could always find the sweet spot for his use.
04-20-2017, 07:08 PM
#9
Addict
I have a six foot bubble level that I use to check the floor and the wheel arches. Actually even with it I put a digital level on it to be accurate.
https://www.summitracing.com/parts/l...FVVtfgodm4ABeg
04-20-2017, 07:19 PM
#11
I haddah Google dat
Rennlist Member
Rennlist Member
Shade-tree wheel alignment has a long history of good observation and measurement to put things right. Back in the days of real horsepower, the driver of a horse drawn wagon/stagecoach would note if his horse was sweating too much for the load being pulled. If so, the wagon wheels needed an alignment. A common problem was excessive toe out, as the wheels turned they would also scuff against the ground adding a lot of extra rolling resistance. Best practice was to measure the distance between the front edges of the two front wheels as well as the distance between the rear edges. By adjusting the distance between the front edges of the wheels to be less than the rear edges, it gave a toe in effect to the front axle. Under load, all the flex in the axle and slop in the hubs etc would tend to eliminate some of the toe-in effect allowing the wheels to roll straight ahead in a parallel fashion. Similar adjustments could be applied to the over/under axle truss threaded rods to adjust axle sag, eliminating excessive wheel camber.
The point is the expert wagon builder could not know all the various operating conditions when building and adjusting the wheel/axle settings. An experienced and savvy owner could always find the sweet spot for his use.
The point is the expert wagon builder could not know all the various operating conditions when building and adjusting the wheel/axle settings. An experienced and savvy owner could always find the sweet spot for his use.
04-20-2017, 11:52 PM
#12
Addict
