Porsche 993: How to Replace Brake Fluid
Proper brake maintenance begins with a fluid flush. Porsche recommends replacing your brake fluid every two years; however, drivers who participate in autocross or high-performance driving events will want to be proactive in replacing their brake fluid to maintain proper braking performance.
This article applies to the Porsche 993 (1993-1998).
Brake fluid is one of the most neglected maintenance items on vehicles today. However, it is a vital part of the brake system that is used each and every time the vehicle is driven. Brake fluid is hygroscopic, which means it naturally absorbs moisture from the atmosphere under normal conditions. As brake fluid ages, the absorbed moisture lowers the boiling point of the fluid, thus causing spongy brakes, especially under spirited driving conditions. Additionally, the corrosion inhibitors in the brake fluid begin to break down and cannot adequately protect components of the brake system as intended. On a sports car such as the Porsche 993, brake fluid maintenance is of extreme importance to keep the high-performance braking system operating reliably at its optimum level.

Materials Needed
- Floor Jack & jack stands
- Tire iron & torque wrench
- Baster or syringe
- 9 & 11mm box-end or flare nut wrenches
- 1/4 flexible hose
- Catch bottle
- Pressure bleeder or a willing friend
- Shop rags and contact cleaner
- DOT 4 brake fluid
- Vice grips
- Small funnel
Warning
Brake fluid is highly corrosive to the finish of your vehicle. Take precaution to not allow brake fluid on painted surfaces as they can become damaged. Clean up any spilled brake fluid immediately!
Step 1 – Lift vehicle and remove wheels
To gain access to the brake calipers for bleeding, the wheels must be removed. Lift the car and support with suitable jack stands. Remove the wheels.
(Related Article: Porsche 993: How to Jack Up Your 993 - Rennlist.com)

Step 2 – Remove old brake fluid from reservoir
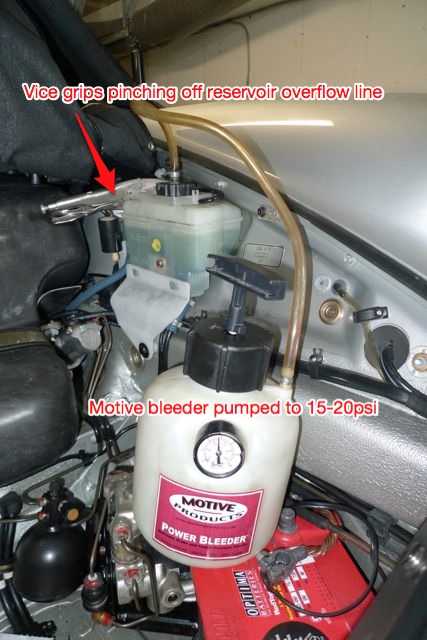
In the front trunk, remove the brake fluid reservoir cap and siphon the old brake fluid from the reservoir. This is best accomplished with a syringe or baster. Be sure to place old fluid in a suitable container and dispose of properly. Also, some early production 993s have a reservoir drain tube that needs to be clamped off or else excessive brake fluid will drain while trying to bleed the brakes. Clamp the line with a pair of vice grips or a similar tool to prevent flow through the drain tube.
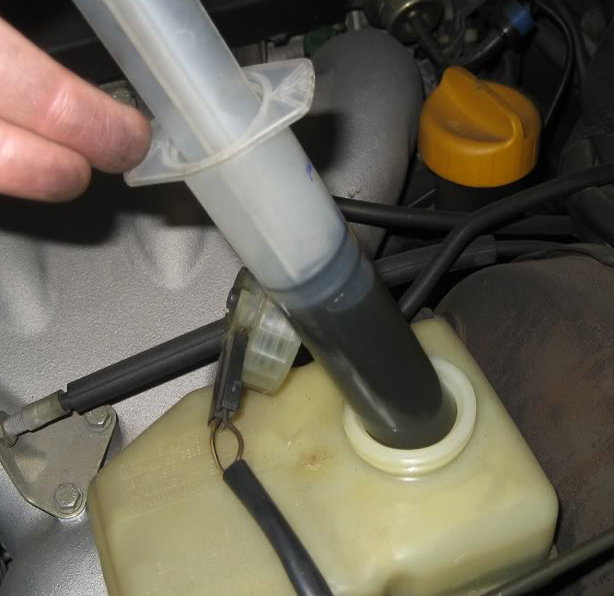
Figure 2. Siphoning old brake fluid. 
Figure 3. Reservoir drain tube needing clamping to prevent flow.
Step 3 – Fill reservoir with new brake fluid
After removing as much old brake fluid as possible, add fresh brake fluid from a sealed container to the reservoir. A small funnel may come in handy to prevent spillage of fluid.
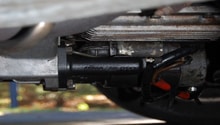
Step 4 – Depressurize system (Carrera 4 & Turbo cars only)
To begin brake bleeding on C4 and Turbo models, the brake system must first be depressurized.
- Turn on ignition and listen for hydraulic pump to pressurize the accumulator.
- When the pump stops pressurization, remove the electrical plug off of the pump (see Figure 5).
- With a suitable hose and catch container attached to accumulator bleed nipple, crack bleeder valve and catch all brake fluid that is released.
- With all fluid bled off, close nipple and continue with Step 5.
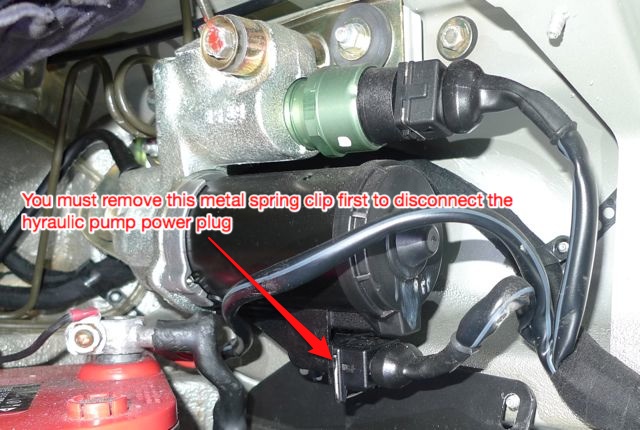
Figure 5. Disconnect hydraulic pump. 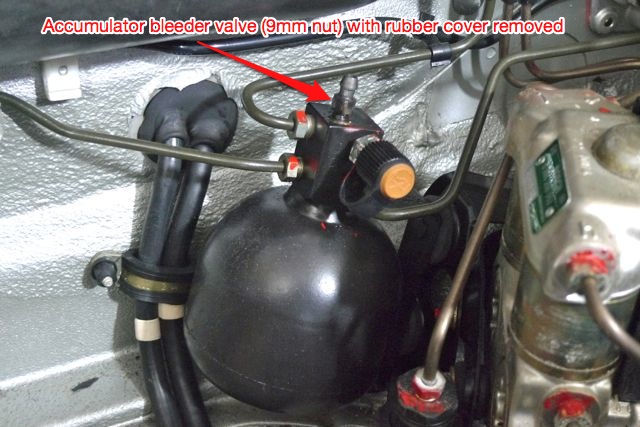
Figure 6. Bleed nipple at accumulator.
Step 5 – Connect pressure bleeder
To flush brake fluid through the brake system, it is highly recommended to use a pressurized bleeder attached to the reservoir. By pressurizing the reservoir, brake fluid will be forced out of the system when a bleed nipple is cracked at each brake caliper. It is recommended to not pressurize the system over 20 PSI when using a pressure bleeder. Conversely, if a pressure bleeder is unavailable to you, a friend can pump the brake pedal to build pressure in the system.
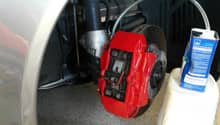
Step 6 – Begin bleeding at right rear brake caliper
Connect a length of 1/4" diameter hose to each bleeder nipple on the right rear caliper and place the other ends in a catch can. With the reservoir pressurized or a friend holding the brake pedal firmly, crack the inside bleeder open to release fluid.
- If using a pressurized bleeder, drain fluid until fluid looks clean with no air bubbles. Once clean, tighten bleeder nipple and repeat procedure on outside bleeder nipple.
- If using a friend to hold the brake pedal, the pedal will sink to the floor each time the bleeder is cracked open. When the pedal sinks and no more fluid emerges, tighten the bleeder nipple. Then, have your friend pump the pedal until they have regained pressure and the pedal is firm. With a friend again holding the pedal, crack bleeder again and drain fluid. Repeat until clean fluid with no air bubbles emerge. Tighten bleeder and repeat procedure on outside bleeder nipple.

Figure 8. Bleeder nipple locations. 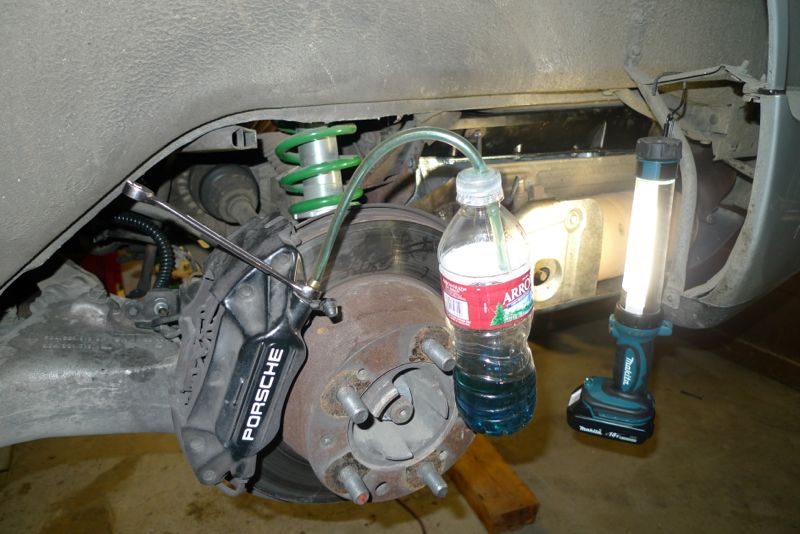
Figure 9. Use a suitable catch can to hold used brake fluid.
Step 7 – Repeat bleeding procedure at each corner
It is recommended that bleeding always begin at the caliper farthest from the master cylinder, hence this procedure bleeding the right rear first. Proceed with bleeding the left rear caliper, followed by the right front caliper, and finally the left front caliper. Additionally, it is recommended to bleed the inside nipple first because this is where fluid enters the caliper. If any air is in the system, it will exit this side of the caliper instead of making its way across and getting stuck on the other side of the caliper. As you are bleeding the brakes, continually check that the reservoir has plenty of brake fluid in it as you do no want to run it dry and introduce air into the system.
Step 8 – Complete bleeding and re-install wheels
With bleeding completed at each caliper, top up the brake fluid reservoir with fluid before re-installing the cap. Re-install wheels and torque to spec. Lower the vehicle. For Carrera 4 & Turbo owners, do not forget to reconnect the electrical plug to the hydraulic pump.
Related Discussions
- C4 & Turbo Brake System Depressurization - Rennlist.com
- Brake Fluid Flush - Rennlist.com
- Brake Bleed DIY Problem - Rennlist.com