
DIY: Hardwire Valentine 1 Radar Detector in Cayenne
 09-14-2013, 08:20 PM
#1
Rennlist Member
Thread Starter
I know that this isnt too difficult, I'd rank it slightly above changing out a light bulb, but in my search for fuse information, I did not see a well documented DIY for hardwiring a radar detector. This is specifically for the Valentine 1; however it should work for others like the Passport series as well. Use common sense, and follow this tutorial at your own risk; while I dont see any way to do real damage to your vehicle, there is always someone dumber than myself who will find a way.
Start to finish is about 15 minutes.
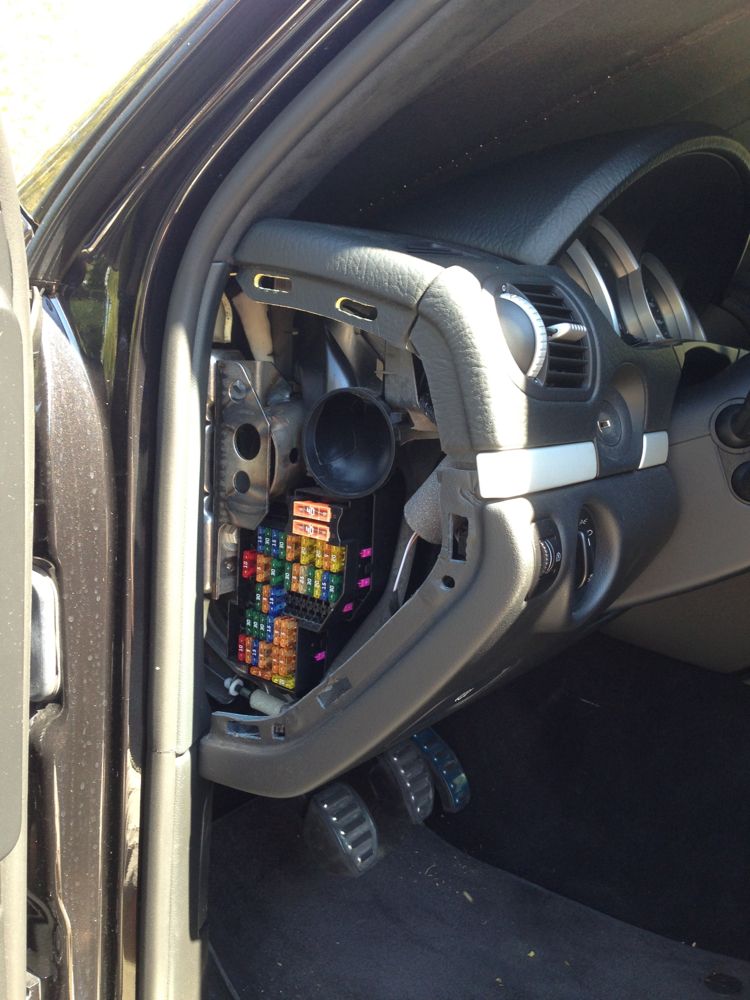
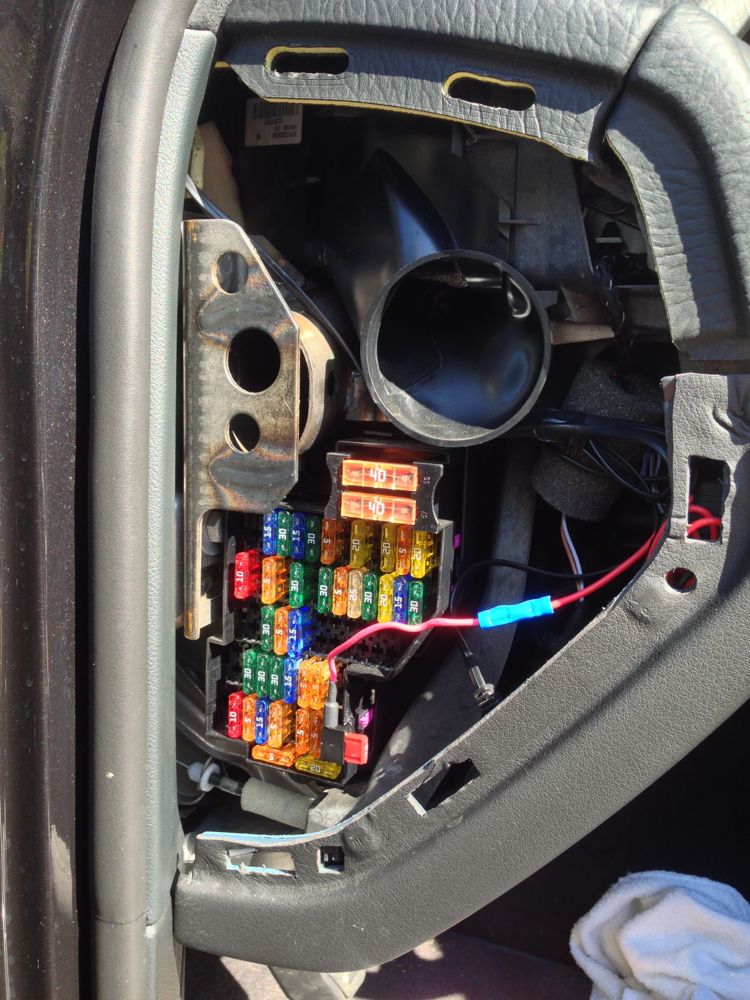
Step 1: Find and access your fuse panel. I will be installing an 'add a fuse' kit in one of the spare slots. I'll discuss later, but it will be #47 in the lower right of the fuse box. The panel that goes over the fuse box pulls right off. You may want to use a plastic pry bar or a screwdriver to get it started.
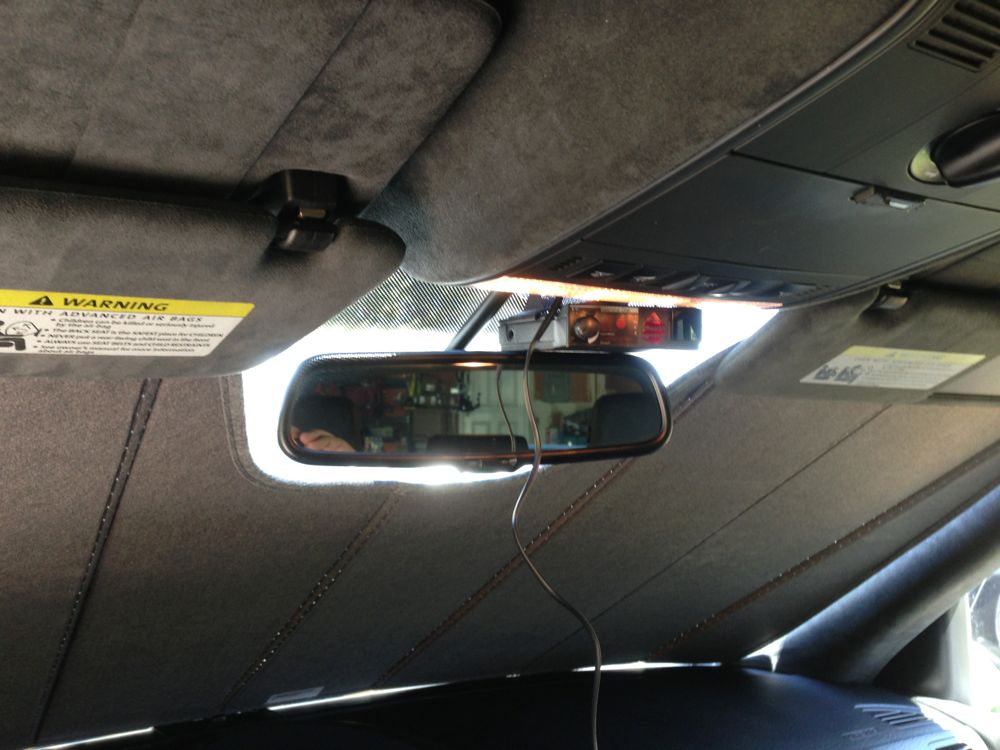
Step 2: Mount your Radar Detector. I chose a spot right above the rear view mirror. The suction cups dont work too well on the black dots; but that will be addressed later. For now, I am going to include enough extra wiring on this end to move the unit around as I need.
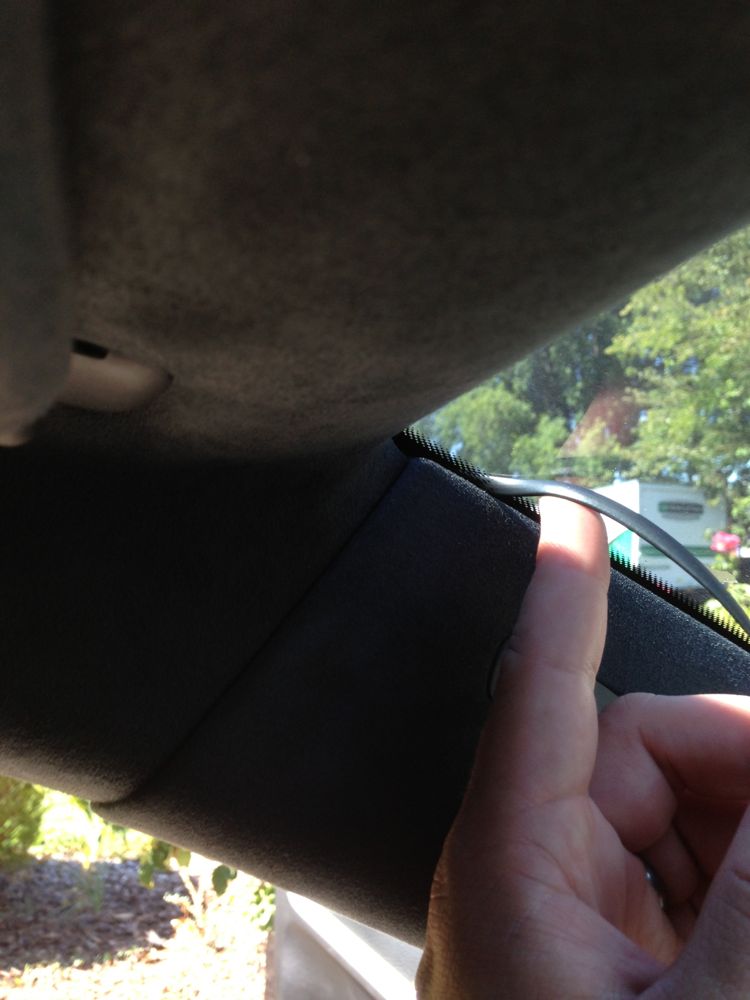
Step 3: Begin to tuck the wiring into your headliner. There is a small gap between the windshield and the headliner, just push the cable in here. Your plastic bar, or even a popsicle stick (unused of course) would be an ideal tool to help push the wiring. I have read about other users tying small knots in the wiring to help hold it in place; while I feel this is a good idea, I did not find it necessary at this time.

Continue to the A-pillar and tuck into the corner.
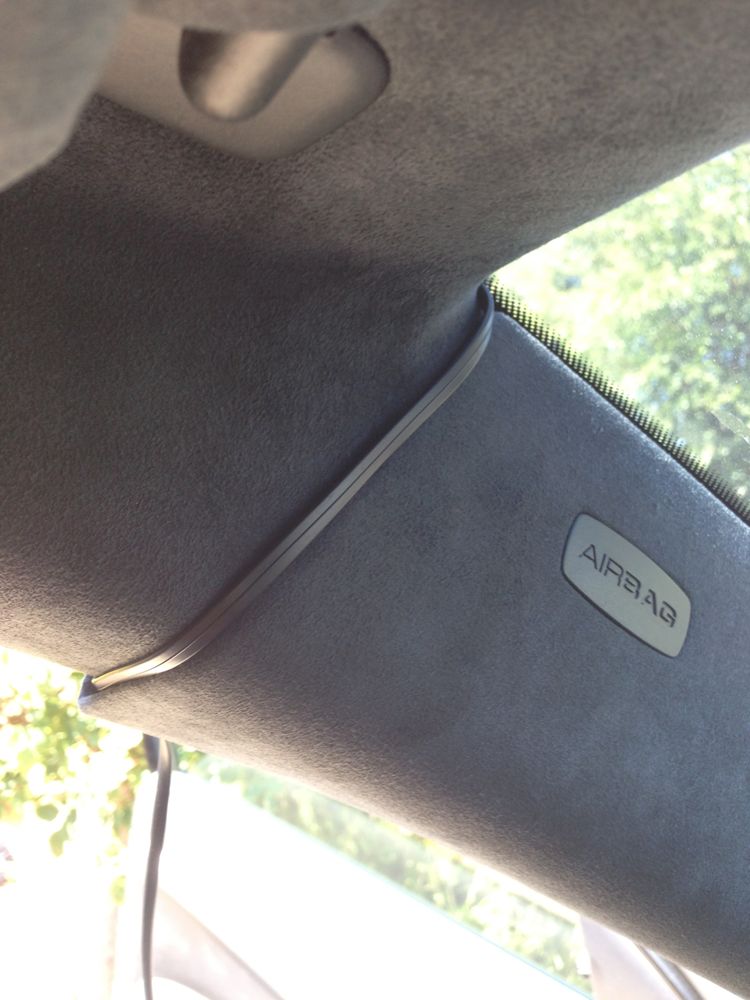
Step 4: BE CAREFUL HERE. YOUR CAR WILL HAVE AIRBAGS LOCATED IN THE A-PILLAR. The head curtain airbags are located along the A-pillar and along the roof, just above the door. While performing this step, you can actually see the airbags themselves. There isn't much to worry about here, since you wont be touching any of the electrical wiring associated with them, but you should exercise caution regardless.
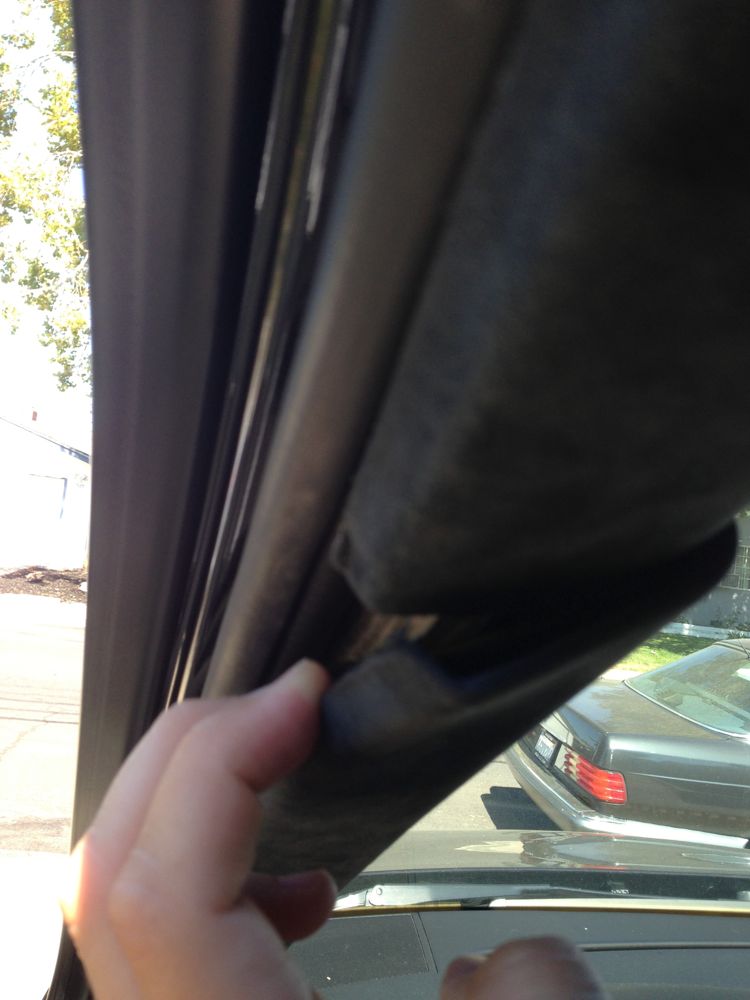
Wrap the cable around the outside of the A-pillar trim, right where it meets the headliner. It will be tucked in here shortly. You can see that I have pinched the cable in place with the A-pillar trim. To route the wiring along the A-pillar trim, gently push the rubber door seal out of the way, and gently pull down on the corner of the trim as shown below. Tuck the wiring neatly inside the trim panel.
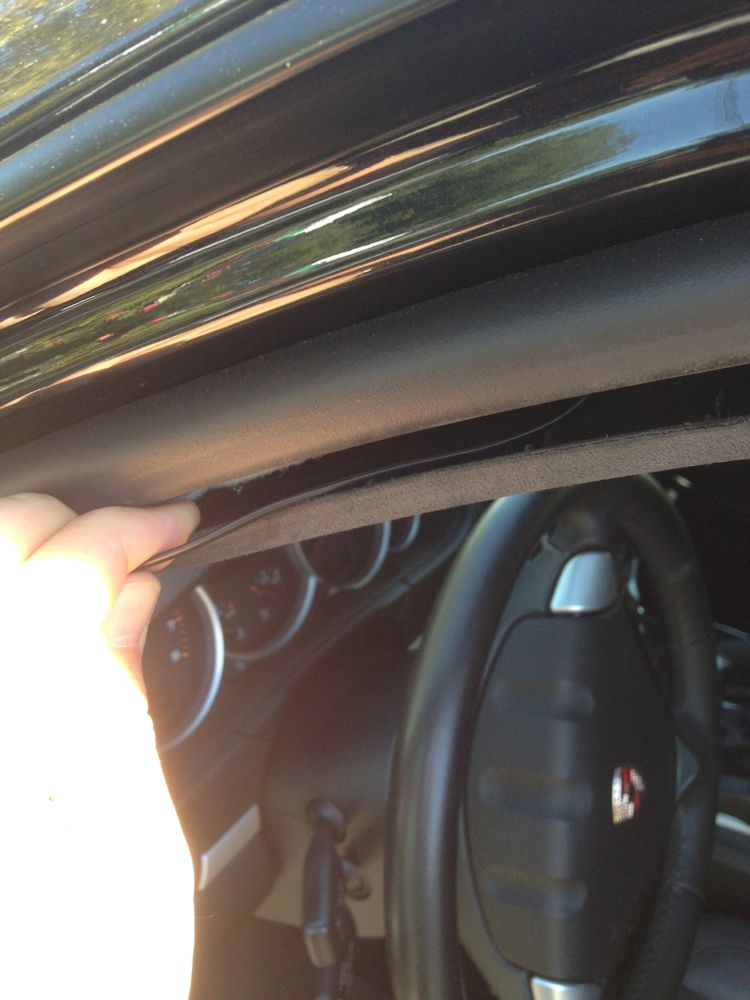
Step 5: Continue routing the wiring down the A-pillar by gently pulling down on the trim piece and pushing the wiring inside.
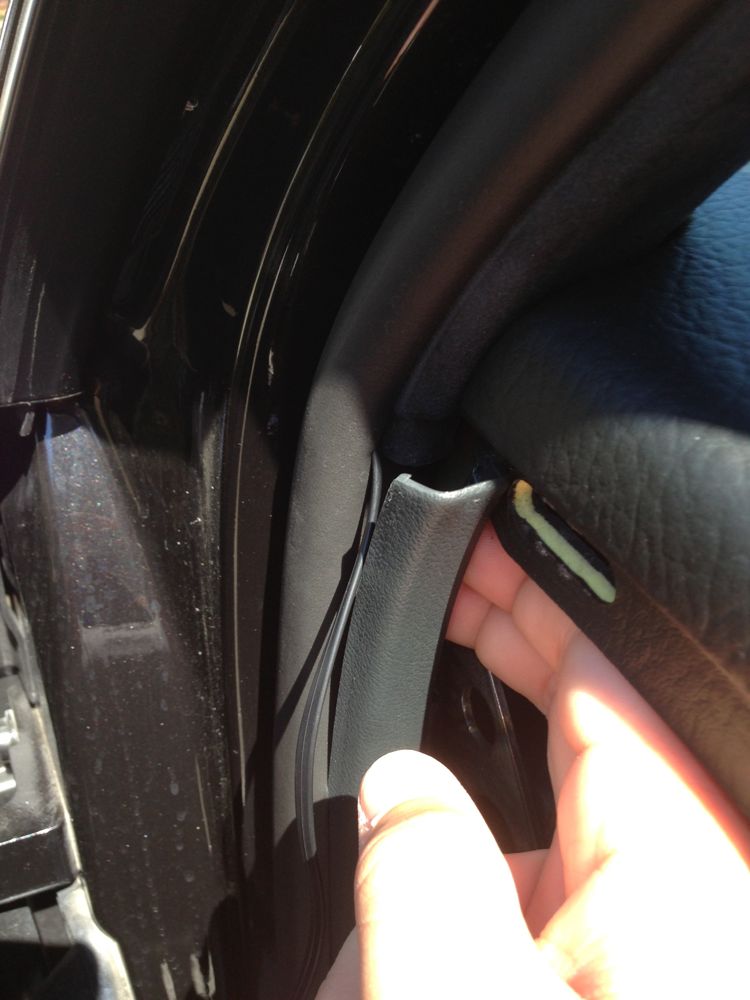
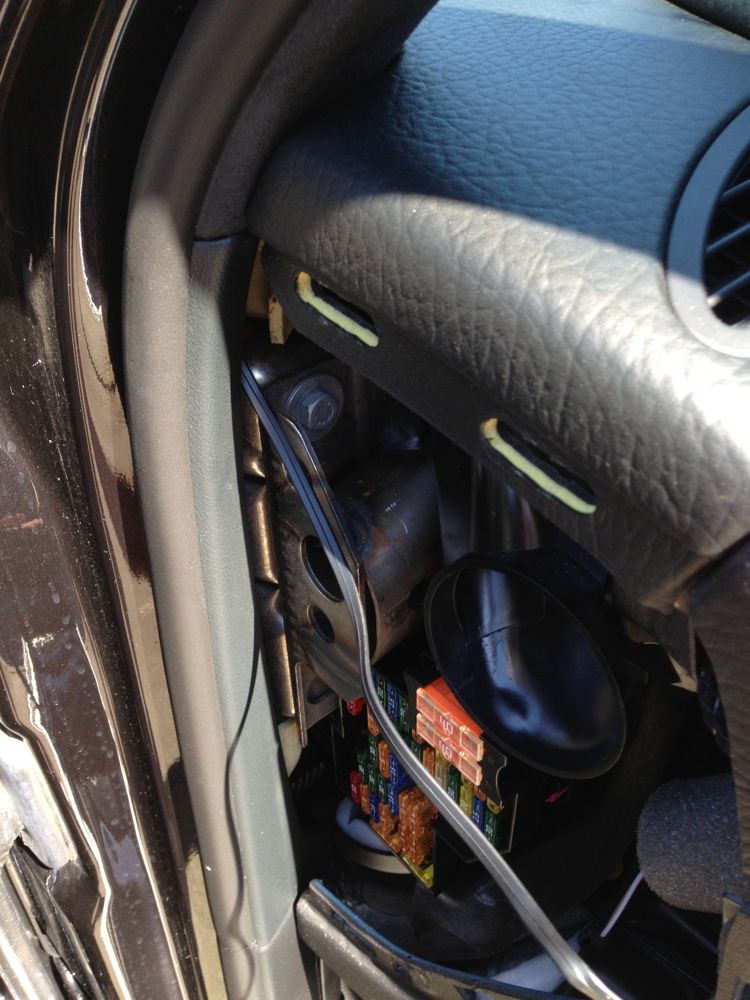
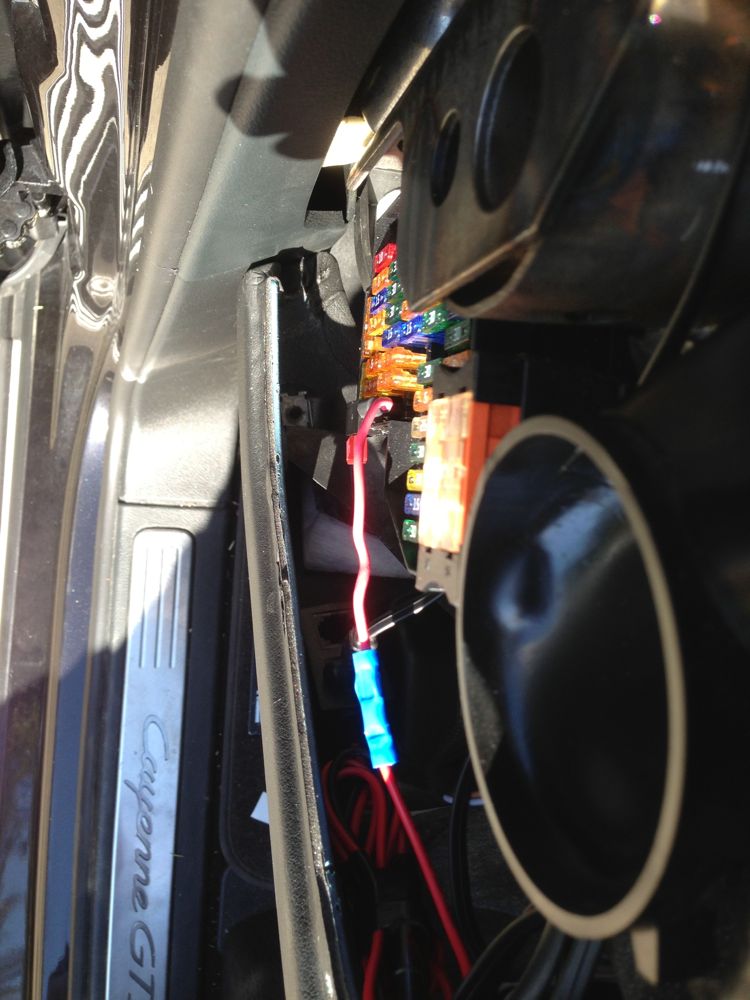
Step 6: You have routed the wiring down the A-pillar, and now need to get into the fuse box. There is a piece of hard plastic trim next to the bottom of the A-pillar trim, just pull it partially out as shown in the first photo below. Route your wiring behind the hard plastic piece and into the fuse box area. Replace the plastic trim piece. In the second photo, you can see that the power wiring is now inside the fuse area with trim replaced. If you are installing a V1, just tuck this wiring out of the way for a little bit, as we now need to install the jack that it plugs into (aka hardwire kit). For the Escort owners, I believe that the direct wire kit is simpler, a phone jack on one end, with power/ground wires on the other.
Step 7: Time for the multimeter. On my Cayenne, I tested 2 slots. #47, the empty one on the bottom right and #38 directly above it. For me, 38 was constant on, while 47 was switched with the ignition. We want to utilize a switched power source for the hardwire of the radar detector.
The V1 comes with a hardwire kit. It looks like two phone jacks, with a red and black wire coming out of the back. I didnt get a photo of it on its own, but in the next few steps we will be wiring it up.
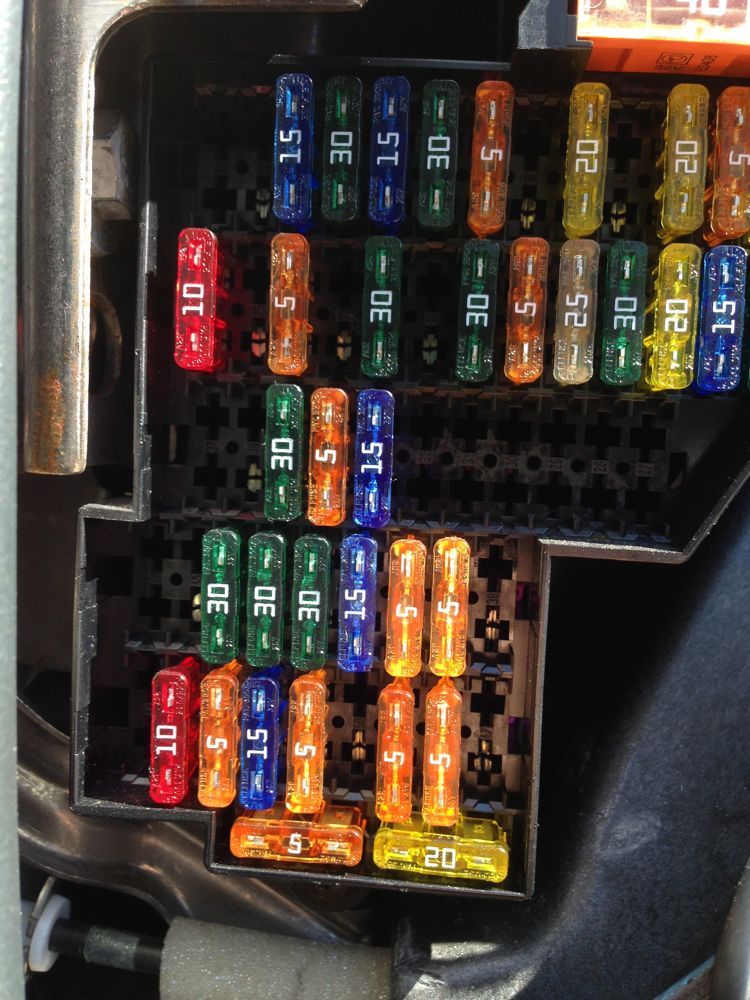
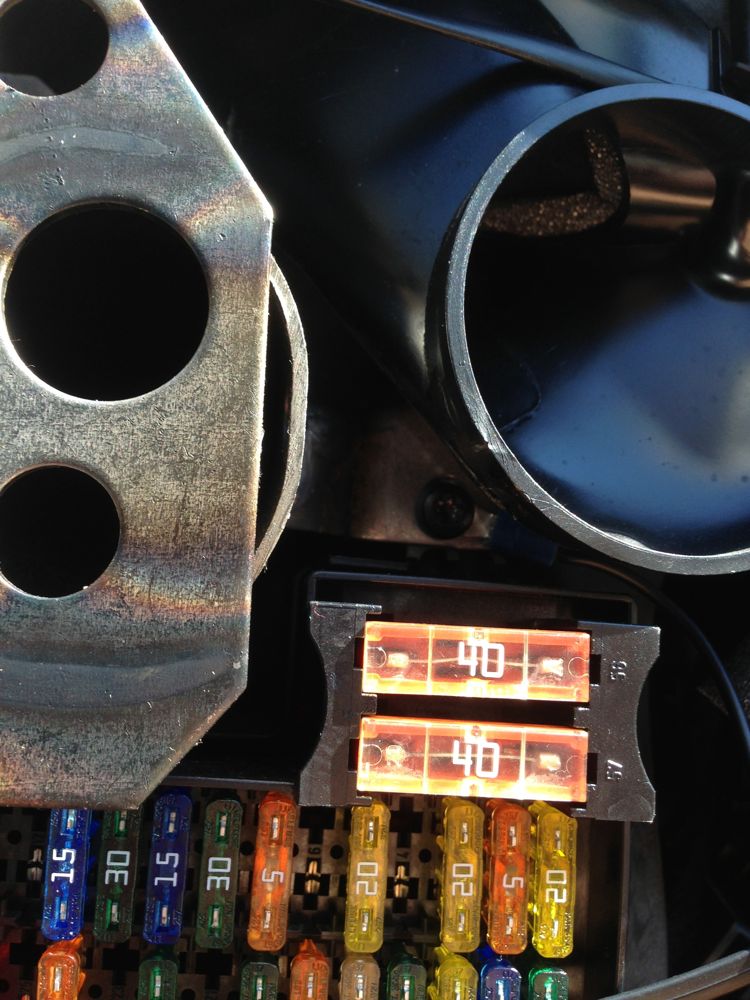
While testing for power, you should also verify a good ground location. I found a screw at the very top of the fuse box. It is a torx bit, but I dont recall the size. Install your ground wire here.
Step 8: Install the add a fuse kit.
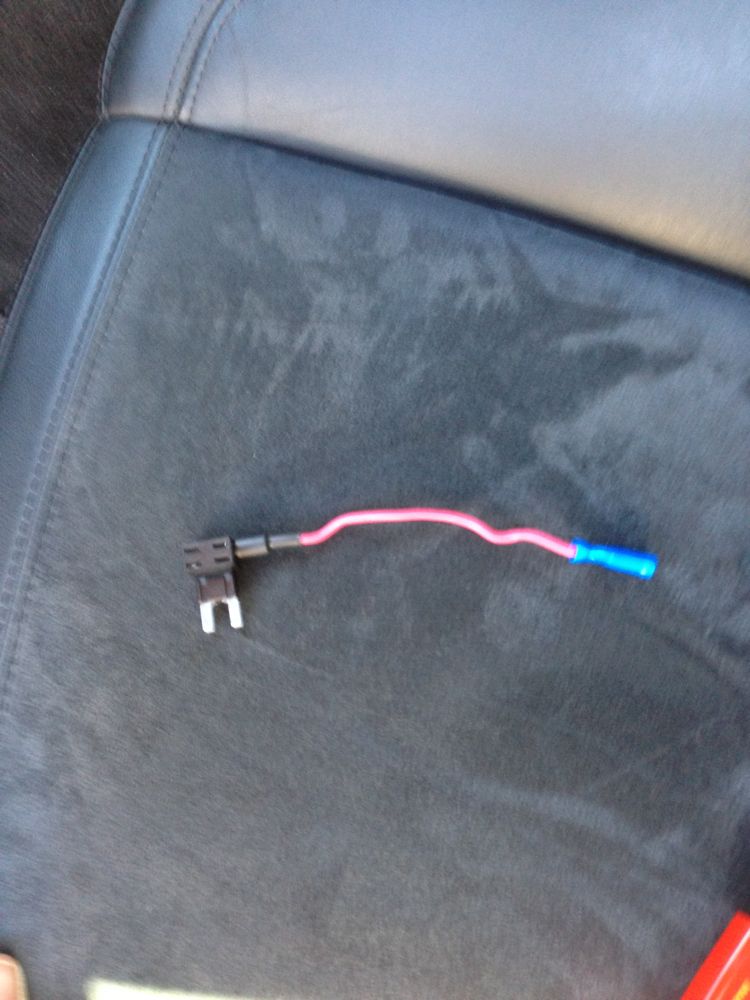
Crimp to the + side of your hardwire kit.
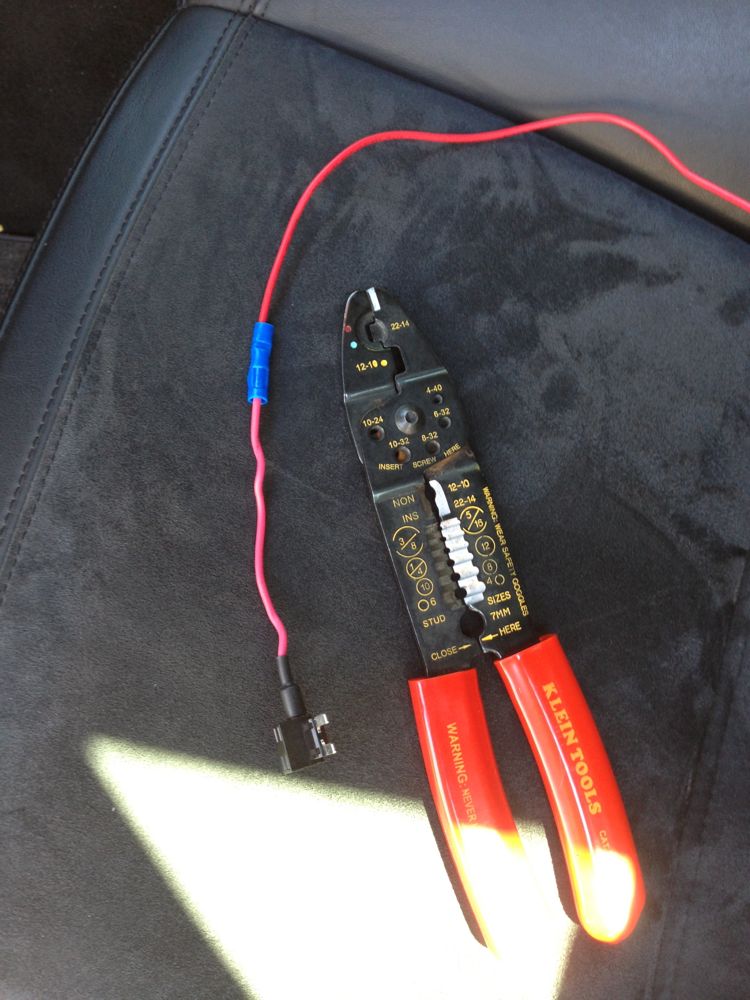
Put the add-a-fuse into the switched power spot identified above.
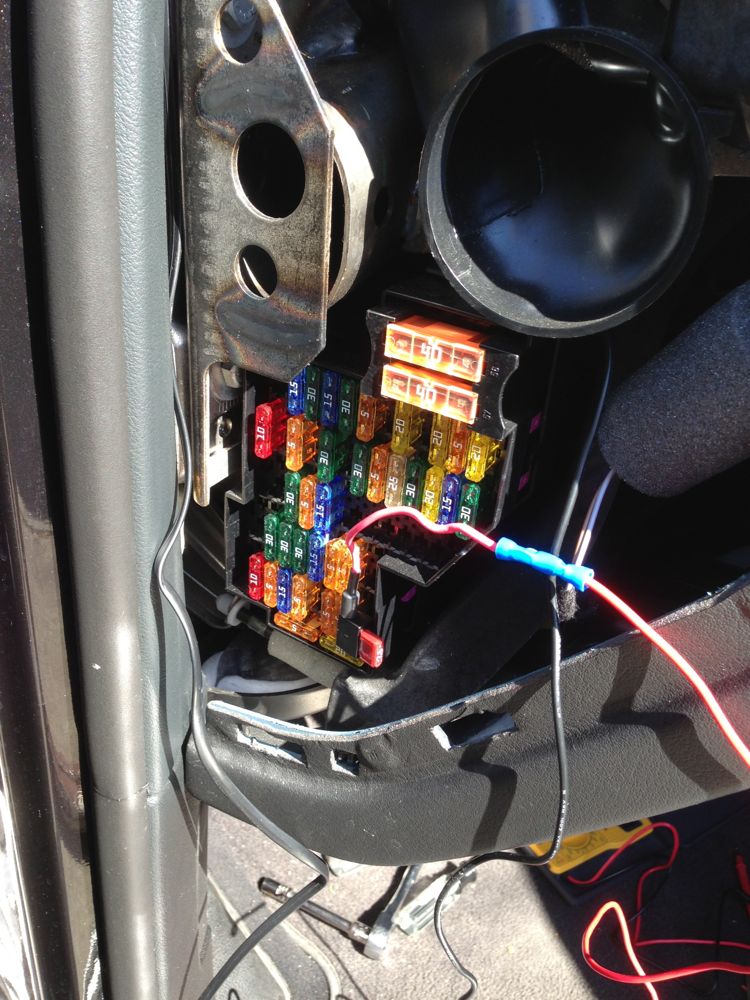
TEST YOUR RADAR DETECTOR HERE. ALL CONNECTIONS HAVE BEEN MADE, AND WE WILL JUST BE BUTTONING EVERYTHING UP FROM HERE. For the V1 owners, take the power cord that we squirreled away a few steps back, and plug it into the hardwire kit that was just connected. Take the other end, up by the mirror, plug it into the V1 and make sure that the unit powers on with the car.
Step 9: Everything worked? If so, lets close it up.
Wrap up excess wiring, and route away from any other components. Finally put the fuse box cover back on, it just snaps right into place.
The second photo is looking down, showing where I mounted the V1 hardwire kit onto the lower dash panel.
 .
.
Video of the finished product.
Start to finish is about 15 minutes.
Step 1: Find and access your fuse panel. I will be installing an 'add a fuse' kit in one of the spare slots. I'll discuss later, but it will be #47 in the lower right of the fuse box. The panel that goes over the fuse box pulls right off. You may want to use a plastic pry bar or a screwdriver to get it started.

Step 2: Mount your Radar Detector. I chose a spot right above the rear view mirror. The suction cups dont work too well on the black dots; but that will be addressed later. For now, I am going to include enough extra wiring on this end to move the unit around as I need.

Step 3: Begin to tuck the wiring into your headliner. There is a small gap between the windshield and the headliner, just push the cable in here. Your plastic bar, or even a popsicle stick (unused of course) would be an ideal tool to help push the wiring. I have read about other users tying small knots in the wiring to help hold it in place; while I feel this is a good idea, I did not find it necessary at this time.

Continue to the A-pillar and tuck into the corner.

Step 4: BE CAREFUL HERE. YOUR CAR WILL HAVE AIRBAGS LOCATED IN THE A-PILLAR. The head curtain airbags are located along the A-pillar and along the roof, just above the door. While performing this step, you can actually see the airbags themselves. There isn't much to worry about here, since you wont be touching any of the electrical wiring associated with them, but you should exercise caution regardless.
Wrap the cable around the outside of the A-pillar trim, right where it meets the headliner. It will be tucked in here shortly. You can see that I have pinched the cable in place with the A-pillar trim. To route the wiring along the A-pillar trim, gently push the rubber door seal out of the way, and gently pull down on the corner of the trim as shown below. Tuck the wiring neatly inside the trim panel.


Step 5: Continue routing the wiring down the A-pillar by gently pulling down on the trim piece and pushing the wiring inside.

Step 6: You have routed the wiring down the A-pillar, and now need to get into the fuse box. There is a piece of hard plastic trim next to the bottom of the A-pillar trim, just pull it partially out as shown in the first photo below. Route your wiring behind the hard plastic piece and into the fuse box area. Replace the plastic trim piece. In the second photo, you can see that the power wiring is now inside the fuse area with trim replaced. If you are installing a V1, just tuck this wiring out of the way for a little bit, as we now need to install the jack that it plugs into (aka hardwire kit). For the Escort owners, I believe that the direct wire kit is simpler, a phone jack on one end, with power/ground wires on the other.


Step 7: Time for the multimeter. On my Cayenne, I tested 2 slots. #47, the empty one on the bottom right and #38 directly above it. For me, 38 was constant on, while 47 was switched with the ignition. We want to utilize a switched power source for the hardwire of the radar detector.
The V1 comes with a hardwire kit. It looks like two phone jacks, with a red and black wire coming out of the back. I didnt get a photo of it on its own, but in the next few steps we will be wiring it up.

While testing for power, you should also verify a good ground location. I found a screw at the very top of the fuse box. It is a torx bit, but I dont recall the size. Install your ground wire here.

Step 8: Install the add a fuse kit.

Crimp to the + side of your hardwire kit.

Put the add-a-fuse into the switched power spot identified above.

TEST YOUR RADAR DETECTOR HERE. ALL CONNECTIONS HAVE BEEN MADE, AND WE WILL JUST BE BUTTONING EVERYTHING UP FROM HERE. For the V1 owners, take the power cord that we squirreled away a few steps back, and plug it into the hardwire kit that was just connected. Take the other end, up by the mirror, plug it into the V1 and make sure that the unit powers on with the car.
Step 9: Everything worked? If so, lets close it up.
Wrap up excess wiring, and route away from any other components. Finally put the fuse box cover back on, it just snaps right into place.
The second photo is looking down, showing where I mounted the V1 hardwire kit onto the lower dash panel.

 .
.Video of the finished product.
 09-15-2013, 08:52 AM
#2

Nice post and very well illustrated! I was wondering if the V1 mount position has any issues with metallic materials in the windshield? Does the signal sensitivity seem to be good?
09-15-2013, 09:17 AM
#3
RL Community Team
Rennlist Member
Rennlist Member
I have mine mounted on the top of the windshield and couldn't get a stronger signal if the cop was inside the car jamming the gun in my ear.
09-15-2013, 12:04 PM
#4
Step 4: BE CAREFUL HERE. YOUR CAR WILL HAVE AIRBAGS LOCATED IN THE A-PILLAR. The head curtain airbags are located along the A-pillar and along the roof, just above the door. While performing this step, you can actually see the airbags themselves. There isn't much to worry about here, since you wont be touching any of the electrical wiring associated with them, but you should exercise caution regardless.
Wrap the cable around the outside of the A-pillar trim, right where it meets the headliner. It will be tucked in here shortly. You can see that I have pinched the cable in place with the A-pillar trim. To route the wiring along the A-pillar trim, gently push the rubber door seal out of the way, and gently pull down on the corner of the trim as shown below. Tuck the wiring neatly inside the trim panel.

Wrap the cable around the outside of the A-pillar trim, right where it meets the headliner. It will be tucked in here shortly. You can see that I have pinched the cable in place with the A-pillar trim. To route the wiring along the A-pillar trim, gently push the rubber door seal out of the way, and gently pull down on the corner of the trim as shown below. Tuck the wiring neatly inside the trim panel.
The airbag extends about halfway down the A-Pillar. So just run the cable down the window side of the pillar and then come back along the dash. The cable will tuck in out of sight just fine. It's even easier to manage if you just pull the A-Pillar trim off a you can then clearly see and avoid the airbag.
Otherwise it's a nice clean job you did.
The following users liked this post:
Bassman37 (02-13-2020)
09-15-2013, 01:18 PM
#5
Rennlist Member
Thread Starter
I mention the airbag because it is important to know that it is there. I don't want somebody seeing the rolled white fabric behind the pillar, and thinking they shoul push it out of the way. Perhaps somebody would think that a screwdriver was a good tool to push the power cord behind the trim, they could puncture the airbag.
It's my opinion that running the phone cord over top of it will have no affect on the operation of the airbag, and it doesn't bother me in the least.
Removing the trim is a great idea, but I'm not sure if everyone is comfortable with it. But good point on avoiding the airbag completely.
It's my opinion that running the phone cord over top of it will have no affect on the operation of the airbag, and it doesn't bother me in the least.
Removing the trim is a great idea, but I'm not sure if everyone is comfortable with it. But good point on avoiding the airbag completely.
09-15-2013, 02:47 PM
#6
The airbag is something that is meant to inflate and deflate again in fractions of a second. Its possible that the cable running over it could either delay it or change its deployment characteristics. Additionally even if it doesn't hamper the airbag in any significant manner, it is going to yank pretty hard on the cable which means it might be dragging the detector at you at a high rate of speed (I personally wouldn't want to get smacked with a V1).
While those risks are theoretical, since its so simple to avoid them I don't see a good reason to take the chance.
09-15-2013, 05:19 PM
#7

You're better off running the cable down next to the windscreen. The airbag deploys from the underside of that trim piece. Fully deployed it is about 16 inches lower than the grab handle.
Then, near the speaker cross the a-pillar and down to the fuse box. Rerouting can probably be done without disconnecting the cable.
Then, near the speaker cross the a-pillar and down to the fuse box. Rerouting can probably be done without disconnecting the cable.
Trending Topics
09-15-2013, 06:55 PM
#8
I thought I've seen a post where someone used a power source by the rear view mirror. Can anyone confirm this for a cleaner installation?
Great instructions non the less. Very detailed
Great instructions non the less. Very detailed
09-15-2013, 09:05 PM
#9
Cleaner is in the eye of the beholder I suppose. Some like it because it is all up there and you don't have to route wires.
For myself, I dislike it because you are tapping into the factory wiring in a manner that is not undoable (in a way that leaves to sign or potential impact). For that reason I don't view it as "cleaner".
You also (because you are tapping into the wiring harness) run the risk of introducing electrical gremlins and I've chased enough on other cars to know it's not something that I'd like to self-inflict (though I often do...).
For cars that still have warranties I have also run into cases where dealers wanted to blame the V1 hardwire for some strange (and obviously unrelated) electrical issue. By doing the fuse mount as described here by Chris it is much simpler to remove it and prove them idiots/lazy/slimy than when you've tapped the wiring harness.
The following users liked this post:
Bassman37 (02-13-2020)
09-15-2013, 11:16 PM
#10
Yes that is a popular installation option.
Cleaner is in the eye of the beholder I suppose. Some like it because it is all up there and you don't have to route wires.
For myself, I dislike it because you are tapping into the factory wiring in a manner that is not undoable (in a way that leaves to sign or potential impact). For that reason I don't view it as "cleaner".
The following users liked this post:
Bassman37 (02-13-2020)