996 Starter Replacement
 10-27-2016, 05:25 PM
#1
AutoX
Thread Starter
Hey All, I noted that there was no starter replacement how-to on here so I document my experience the other day. (Sorry about the watermarked photo's, if that is not allowed, let me know and I will remove them)
Signs that your starter is bad: If your car sounds like this (
) your starter is most likely dying.
Time: 2-3 Hours working slowly (My second time only took 1 hour)
Tools:
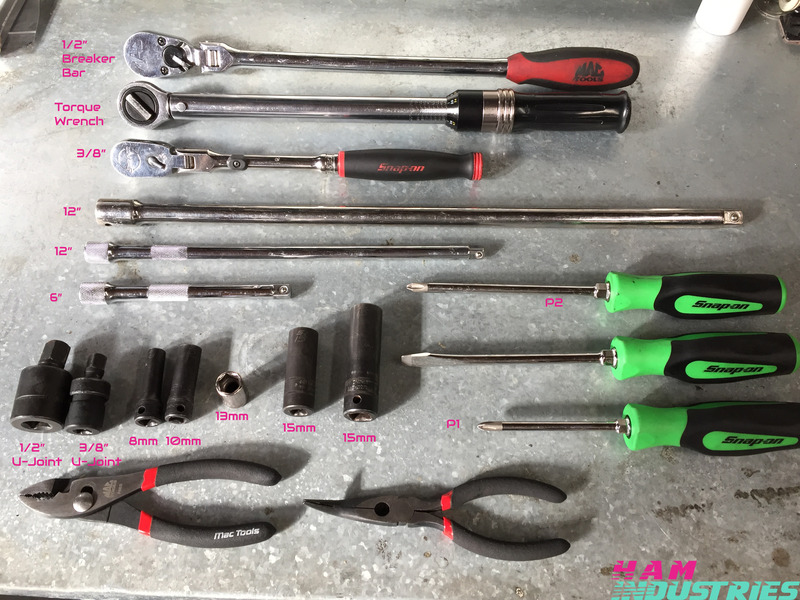
You really don�t need any fancy tools to do this job. I have listed the tools that I used (some not needed but highly recommended) below.
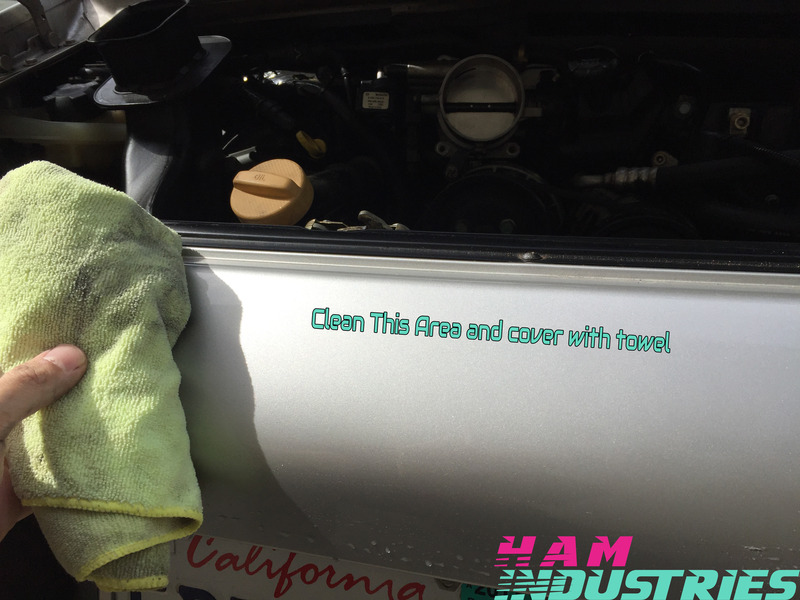
Step 1. To start off, I recommend cleaning your bumper and laying a soft rag over it to protect your paint. You will be working back here and leaning into the engine compartment quite a lot, this will help to protect your paint.
Step 2. STOP! Before you go any further disconnect your battery! The starter will give you an unholy shock if you do not disconnect it.....have you done it? Good, now you can proceed.
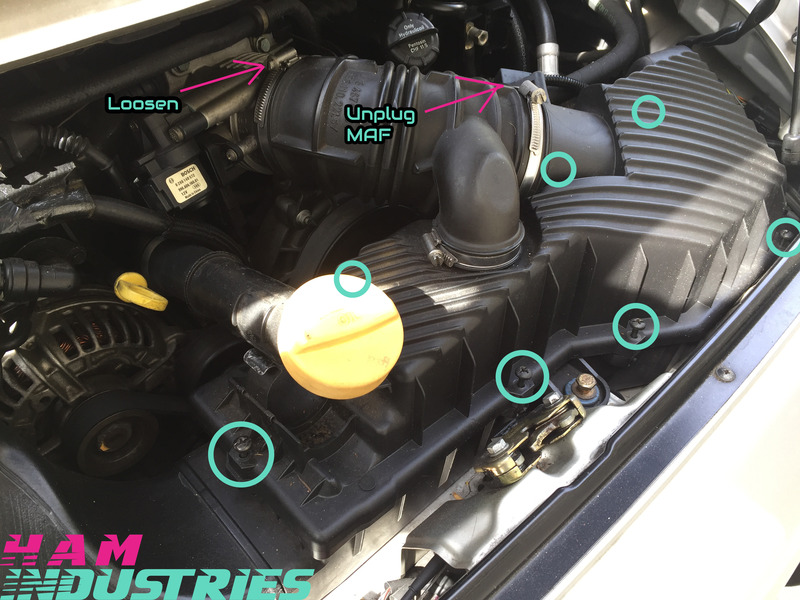
You will need to remove the lid of your airbox. Some recommend removing the whole airbox, I found this unnecessary. The airbox lid is held in place with 7 philips head screws. Use a large (p3) screwdriver here so that you don�t strip the heads. Next unplug the MAF and loosen the intake tube to the throttle body. Push the oil fill tube to the left side, remove the airbox lid and remove your air filter.
Step 3. Next you will need to remove your throttle body. To do this, remove the throttle cable (if you have fly by wire, just disconnect the plug) from the wheel. To remove the throttle cable, use your right hand to turn the throttle wheel up and use your left hand to simply unhook the cable.
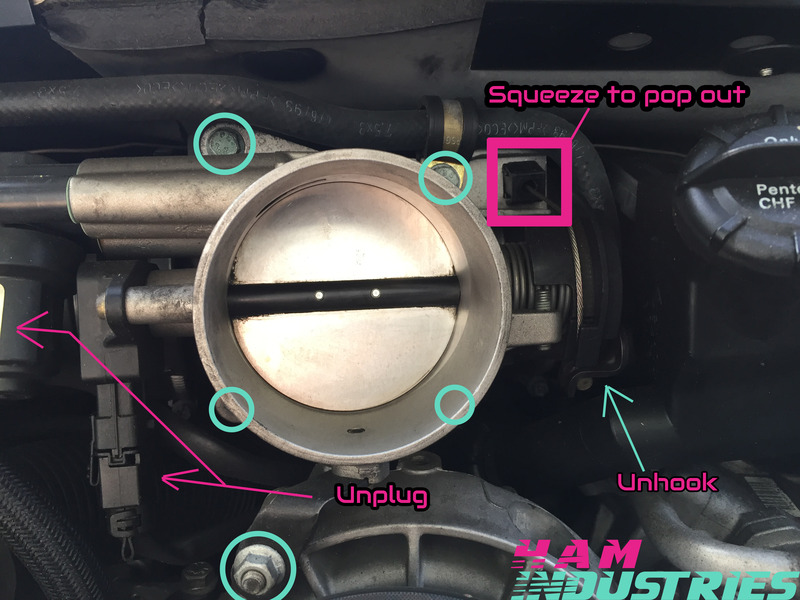
Now on the left side of the throttle body there are two sensors, you will need to unplug these by simply compressing the clips.
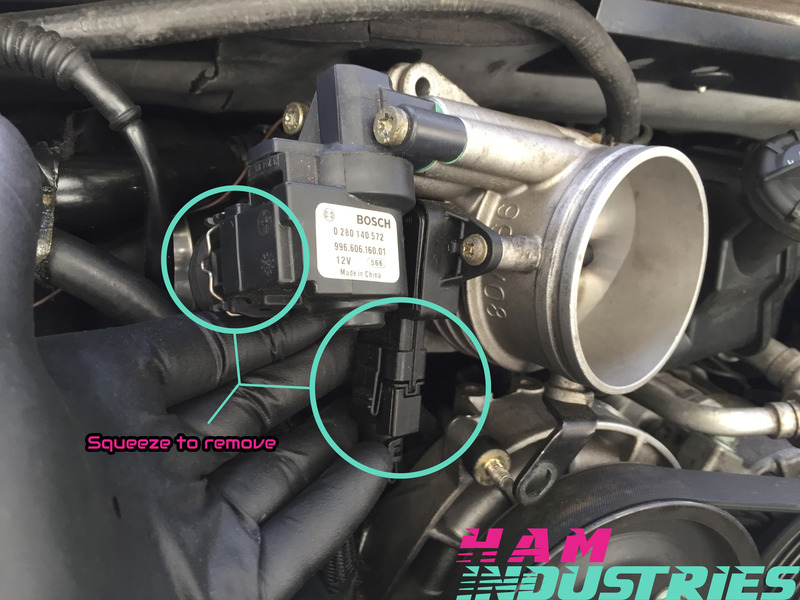
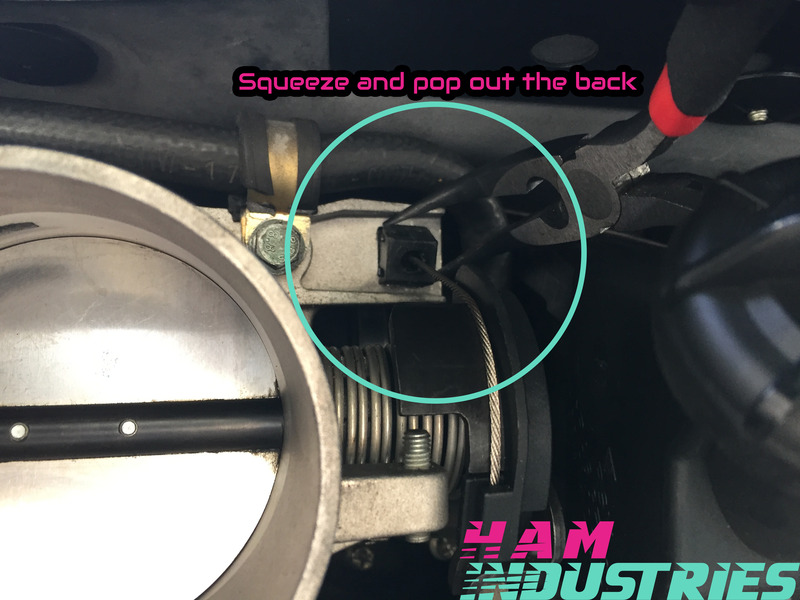
Once you do this you are ready to remove the (5) 10mm bolts holding it in place. Gently pull the throttle body away from the plenum. Now you will see that the throttle cable tube is clipped into the throttle body. Using angled pliers, I could squeeze it and pop it out the back.
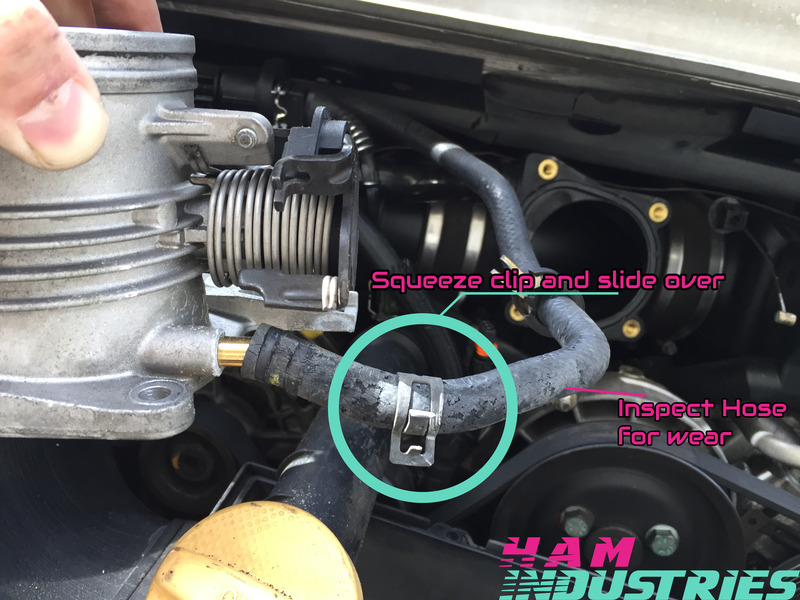
Lastly there is a vent tube running over the top to the right side of the throttle body. Use your pliers to remove this hose and inspect it. Mine was terribly worn so it was replaced with a new hose. Set the throttle body aside (great time to give it a good clean)
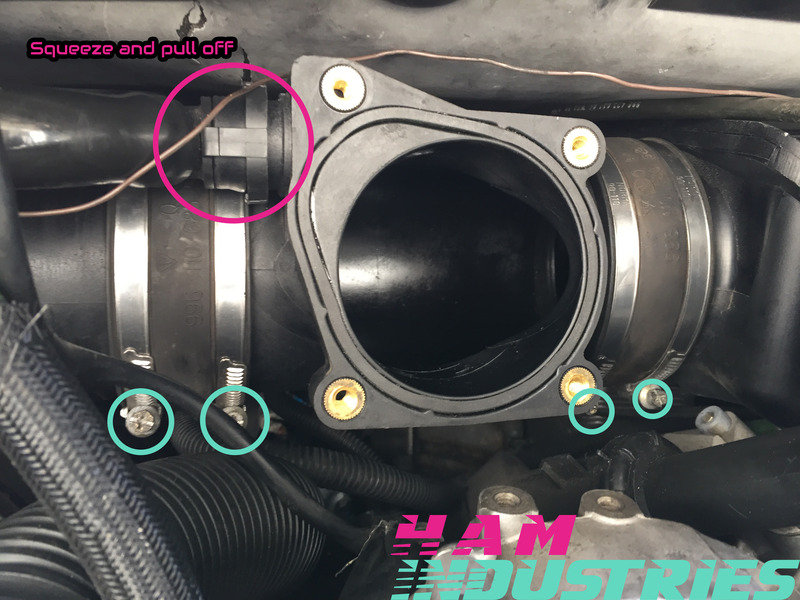
Step 4. Now you have full view of the plastic plenum. This is held in place with 4 clamps. A great tip that Pelican Parts had was to first loosen the two outer clamps and rotate the plenum up and down. This will break any seal that may cause removal to be difficult. Now tighten them and do the same to the two inner clamps. Now you can fully loosen them all. Unplug the vent on the top left and gently wiggle the whole plenum out. It is a tight fit but gently work it and it will come out. If you would like more room you can remove the couplers, though I found I did not need to. If you decide to remove them, note that the couplers both have hoses that slide in underneath, gently remove these before pulling the couplers out. Now give the plenum and couplers a good clean!
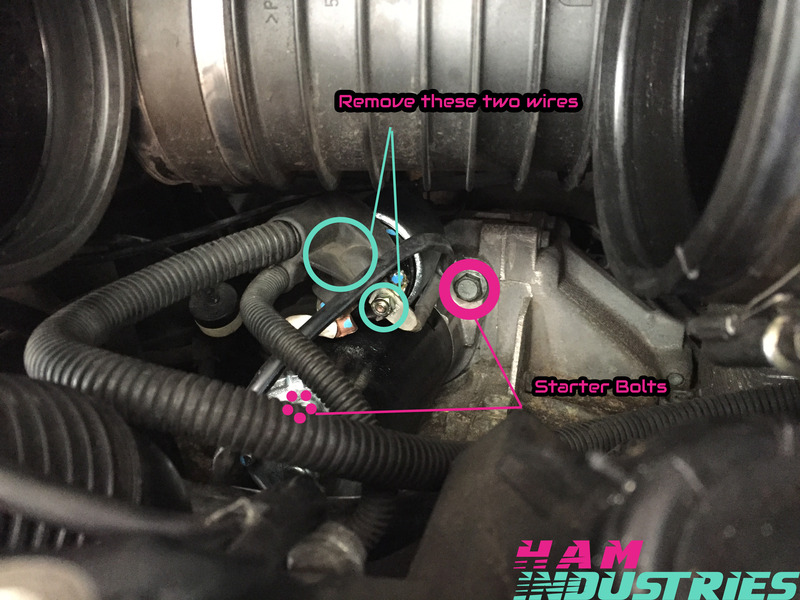
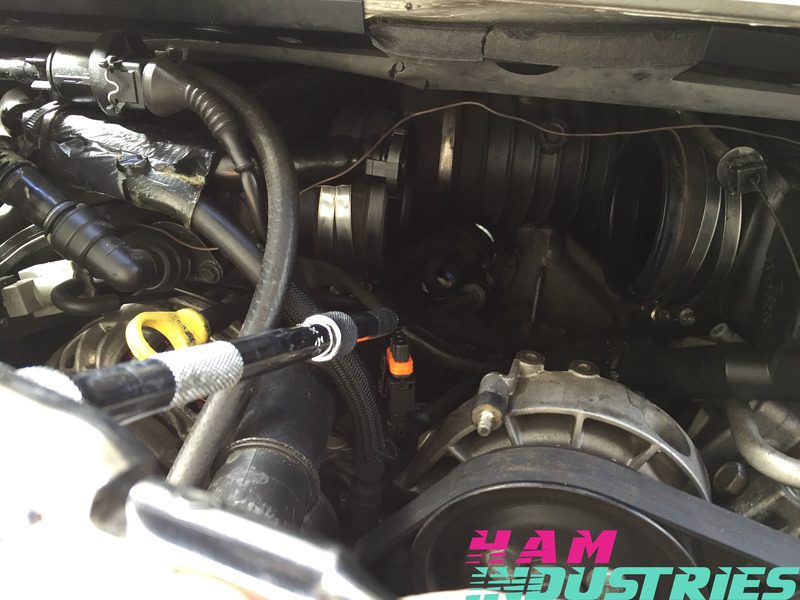
Step 5. Now if you look deep down inside you will see the starter. ***did you unplug your battery yet?? Go do it if you haven�t** Your starter solenoid should have 3 or 4 terminals on it (depending on what year your car is). Our starter had 3 terminals but many 996�s had 4. These bolts are deep in there and I found using around ~18-24 inches of extensions with a u-joint and deep socket worked great to access these. I recommend only loosening them with the ratchet. Once they are finger loose, remove them by hand so they don�t drop down. Pull the wires to the side to make some extra space.

Step 6. Now time to remove your old starter. This is held in with only two bolts, of which, you can only see one. Don�t worry, these are much easier to get than you think. These are 15mm bolts. I used a 24� extension with a u-joint and deep socket to access these and it was a breeze. Grab the socket with your right hand and reach down to the left side of the starter (think 7 o�clock position) and place the socket on the bolt. Using a ratchet loosen these until they are finger loose and remove by hand (so it doesn�t drop down). Now remove the top bolt in the same manor. The starter is now loose and you can remove it!
Putting it all back together
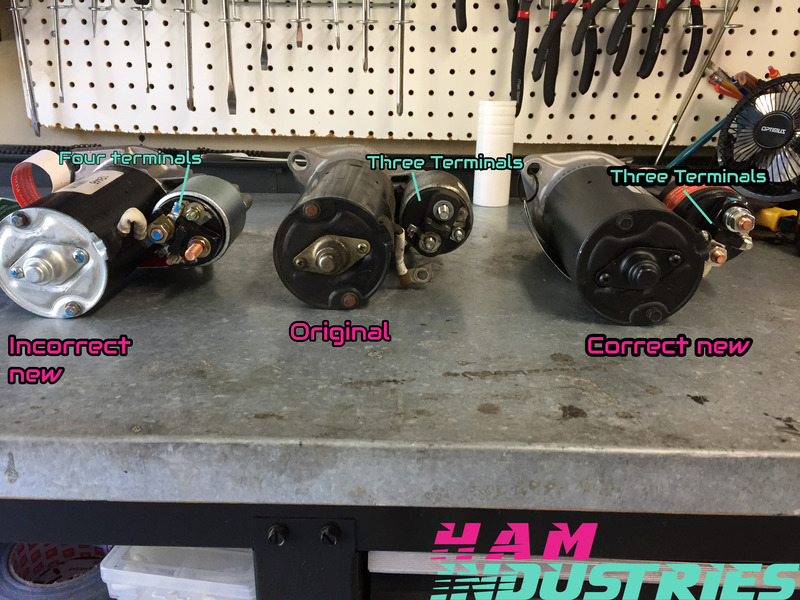
Step 7. Before you install your new starter, inspect it to make sure that you have the correct part. The first replacement starter that I received had four terminals on the solenoid but our original only had three. DO NOT INSTALL it if this is the case. Physically it will fit but it will be wrong. Return it and get the correct one (our car actually had a part number designated for a Boxster).
Reinstallation is much the same as removal. Put the starter in, tighten the two 15mm bolts (I was advised 33ft/lbs but check your manual). Reconnect the solenoid wires. According to one source, Terminal 30 is 11ft/lbs and terminal 50 is 5ft/lbs but check your manual.
Step 8. Now reinstall your plenum couplers (if you removed them). Don�t forget about the small vents that slide into the bottoms of these. Place all four hose clamps on but do not tighten them yet (make sure that the bolt heads all face you from the bottom). Now gently wiggle the plenum back in between (remember the correct way up. The vent plug will be on the top left) the couplers. This next step is quite important. Before you fully tighten down the plenum, take note that you have the ability to angle the plenum up and down about 15 degrees. This will drastically affect how your intake hose connects to the throttle body. The first time with did it, it was far too high and the second time it was far to low and pulled on the throttle cable. You want to aim for the middle of the adjustment range.
Step 9. Grab your throttle body and connect the hose on the right side, the two plugs on the left side and then pull the throttle cable and housing tube through until it clicks. Connect the throttle cable to the wheel (unless you are FBW, then reconnect your plug) and tighten the five 10mm bolts.
Step 10. Replace your airbox lid and tighten all seven screws. Tighten the intake tube to the throttle body, plug your MAF in, and replace you oil filler tube. Now you can reconnect your battery, I recommend making sure your car is in neutral before connecting the battery just incase you have a faulty starter and it engages when you connect the power. Now go start your car! Listen carefully, make sure there are no weird noises and that it cranks smoothly. Go to the rear of the vehicle and visually and audibly check for any leaks or signs of irregularity. If all is well, go for a nice drive!
Congratulations on finishing this job!
Signs that your starter is bad: If your car sounds like this (
Time: 2-3 Hours working slowly (My second time only took 1 hour)
Tools:
You really don�t need any fancy tools to do this job. I have listed the tools that I used (some not needed but highly recommended) below.
- Breaker bar (our starter bolts were quite stubborn)
- Torque Wrench (we used a 3/8�)
- 3/8� ratchet
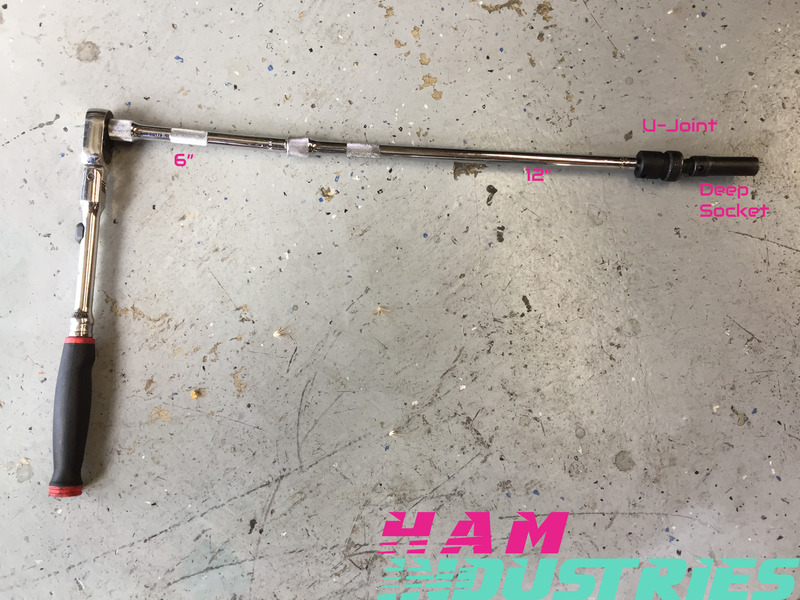
- Extensions (we liked using 24� and 12�)
- Wobble extension / Universal joint
- 8mm, 10mm, 13mm, 15mm sockets
- Pliers (angled and slip joint were our preferred)
- P3 Screwdriver (not pictured)
- P2 Screwdriver
- P1 Screwdriver
- Medium sized flat head screwdriver

Step 1. To start off, I recommend cleaning your bumper and laying a soft rag over it to protect your paint. You will be working back here and leaning into the engine compartment quite a lot, this will help to protect your paint.

Step 2. STOP! Before you go any further disconnect your battery! The starter will give you an unholy shock if you do not disconnect it.....have you done it? Good, now you can proceed.
You will need to remove the lid of your airbox. Some recommend removing the whole airbox, I found this unnecessary. The airbox lid is held in place with 7 philips head screws. Use a large (p3) screwdriver here so that you don�t strip the heads. Next unplug the MAF and loosen the intake tube to the throttle body. Push the oil fill tube to the left side, remove the airbox lid and remove your air filter.

Step 3. Next you will need to remove your throttle body. To do this, remove the throttle cable (if you have fly by wire, just disconnect the plug) from the wheel. To remove the throttle cable, use your right hand to turn the throttle wheel up and use your left hand to simply unhook the cable.

Now on the left side of the throttle body there are two sensors, you will need to unplug these by simply compressing the clips.

Once you do this you are ready to remove the (5) 10mm bolts holding it in place. Gently pull the throttle body away from the plenum. Now you will see that the throttle cable tube is clipped into the throttle body. Using angled pliers, I could squeeze it and pop it out the back.

Lastly there is a vent tube running over the top to the right side of the throttle body. Use your pliers to remove this hose and inspect it. Mine was terribly worn so it was replaced with a new hose. Set the throttle body aside (great time to give it a good clean)

Step 4. Now you have full view of the plastic plenum. This is held in place with 4 clamps. A great tip that Pelican Parts had was to first loosen the two outer clamps and rotate the plenum up and down. This will break any seal that may cause removal to be difficult. Now tighten them and do the same to the two inner clamps. Now you can fully loosen them all. Unplug the vent on the top left and gently wiggle the whole plenum out. It is a tight fit but gently work it and it will come out. If you would like more room you can remove the couplers, though I found I did not need to. If you decide to remove them, note that the couplers both have hoses that slide in underneath, gently remove these before pulling the couplers out. Now give the plenum and couplers a good clean!

Step 5. Now if you look deep down inside you will see the starter. ***did you unplug your battery yet?? Go do it if you haven�t** Your starter solenoid should have 3 or 4 terminals on it (depending on what year your car is). Our starter had 3 terminals but many 996�s had 4. These bolts are deep in there and I found using around ~18-24 inches of extensions with a u-joint and deep socket worked great to access these. I recommend only loosening them with the ratchet. Once they are finger loose, remove them by hand so they don�t drop down. Pull the wires to the side to make some extra space.


Step 6. Now time to remove your old starter. This is held in with only two bolts, of which, you can only see one. Don�t worry, these are much easier to get than you think. These are 15mm bolts. I used a 24� extension with a u-joint and deep socket to access these and it was a breeze. Grab the socket with your right hand and reach down to the left side of the starter (think 7 o�clock position) and place the socket on the bolt. Using a ratchet loosen these until they are finger loose and remove by hand (so it doesn�t drop down). Now remove the top bolt in the same manor. The starter is now loose and you can remove it!


Putting it all back together
Step 7. Before you install your new starter, inspect it to make sure that you have the correct part. The first replacement starter that I received had four terminals on the solenoid but our original only had three. DO NOT INSTALL it if this is the case. Physically it will fit but it will be wrong. Return it and get the correct one (our car actually had a part number designated for a Boxster).

Reinstallation is much the same as removal. Put the starter in, tighten the two 15mm bolts (I was advised 33ft/lbs but check your manual). Reconnect the solenoid wires. According to one source, Terminal 30 is 11ft/lbs and terminal 50 is 5ft/lbs but check your manual.
Step 8. Now reinstall your plenum couplers (if you removed them). Don�t forget about the small vents that slide into the bottoms of these. Place all four hose clamps on but do not tighten them yet (make sure that the bolt heads all face you from the bottom). Now gently wiggle the plenum back in between (remember the correct way up. The vent plug will be on the top left) the couplers. This next step is quite important. Before you fully tighten down the plenum, take note that you have the ability to angle the plenum up and down about 15 degrees. This will drastically affect how your intake hose connects to the throttle body. The first time with did it, it was far too high and the second time it was far to low and pulled on the throttle cable. You want to aim for the middle of the adjustment range.
Step 9. Grab your throttle body and connect the hose on the right side, the two plugs on the left side and then pull the throttle cable and housing tube through until it clicks. Connect the throttle cable to the wheel (unless you are FBW, then reconnect your plug) and tighten the five 10mm bolts.
Step 10. Replace your airbox lid and tighten all seven screws. Tighten the intake tube to the throttle body, plug your MAF in, and replace you oil filler tube. Now you can reconnect your battery, I recommend making sure your car is in neutral before connecting the battery just incase you have a faulty starter and it engages when you connect the power. Now go start your car! Listen carefully, make sure there are no weird noises and that it cranks smoothly. Go to the rear of the vehicle and visually and audibly check for any leaks or signs of irregularity. If all is well, go for a nice drive!
Congratulations on finishing this job!

The following users liked this post:
donwwheeler (04-25-2020)
04-25-2020, 08:32 AM
#2
Rennlist Member

Really amazing--great job. The best write-up and pic work I've seen so far and by far, and I've seen a few having a '02 996 that I've been slowly (but surely) replacing bit by bit for the last 8 years. If you'd take on an MGB restoration you'd be able to REALLY help me out! 
Thanks!
Thanks!
04-26-2020, 12:51 AM
#3
AutoX
Thread Starter
Thanks for the kind words, donwwheeler! I'm glad that some use was found in this. I forgot all about this post - how time flies. Funny you mention an MGB, I nearly bought one several years ago and still wish I had, I love any reason to pull a flat cap out = )