When you click on links to various merchants on this site and make a purchase, this can result in this site earning a commission. Affiliate programs and affiliations include, but are not limited to, the eBay Partner Network.
The hose running from my windshield washer fluid tank/reservoir to the jets that clean the windshield broke the other day, snapping right near where the trunk lid lifts up and causing water to shoot out the left side of the car rather than through the sparyers mounted on the underside of the trunk lid.. It looked simple to fix, so I decided to give it a go and make a DIY guide as I couldn’t find one elsewhere online. Only took me about 30 minutes to do, including taking photos. Follow this advice at your own risk – I admit I have no expertise in this area.
Tools needed: none. You may want a taped up screw driver to assist with the routing of the new hose, but it’s not necessary.
Parts needed: new hose (part number 99162866705, ~$20)
1. Start by removing the plastic cover in the trunk area. This is really easy as you just pull gently on the handles. Note that on my car, the alarm horn was held on by a plastic peg attached to the cover, so when I removed the cover the alarm horn detached and I had to put it back at the end of this process.
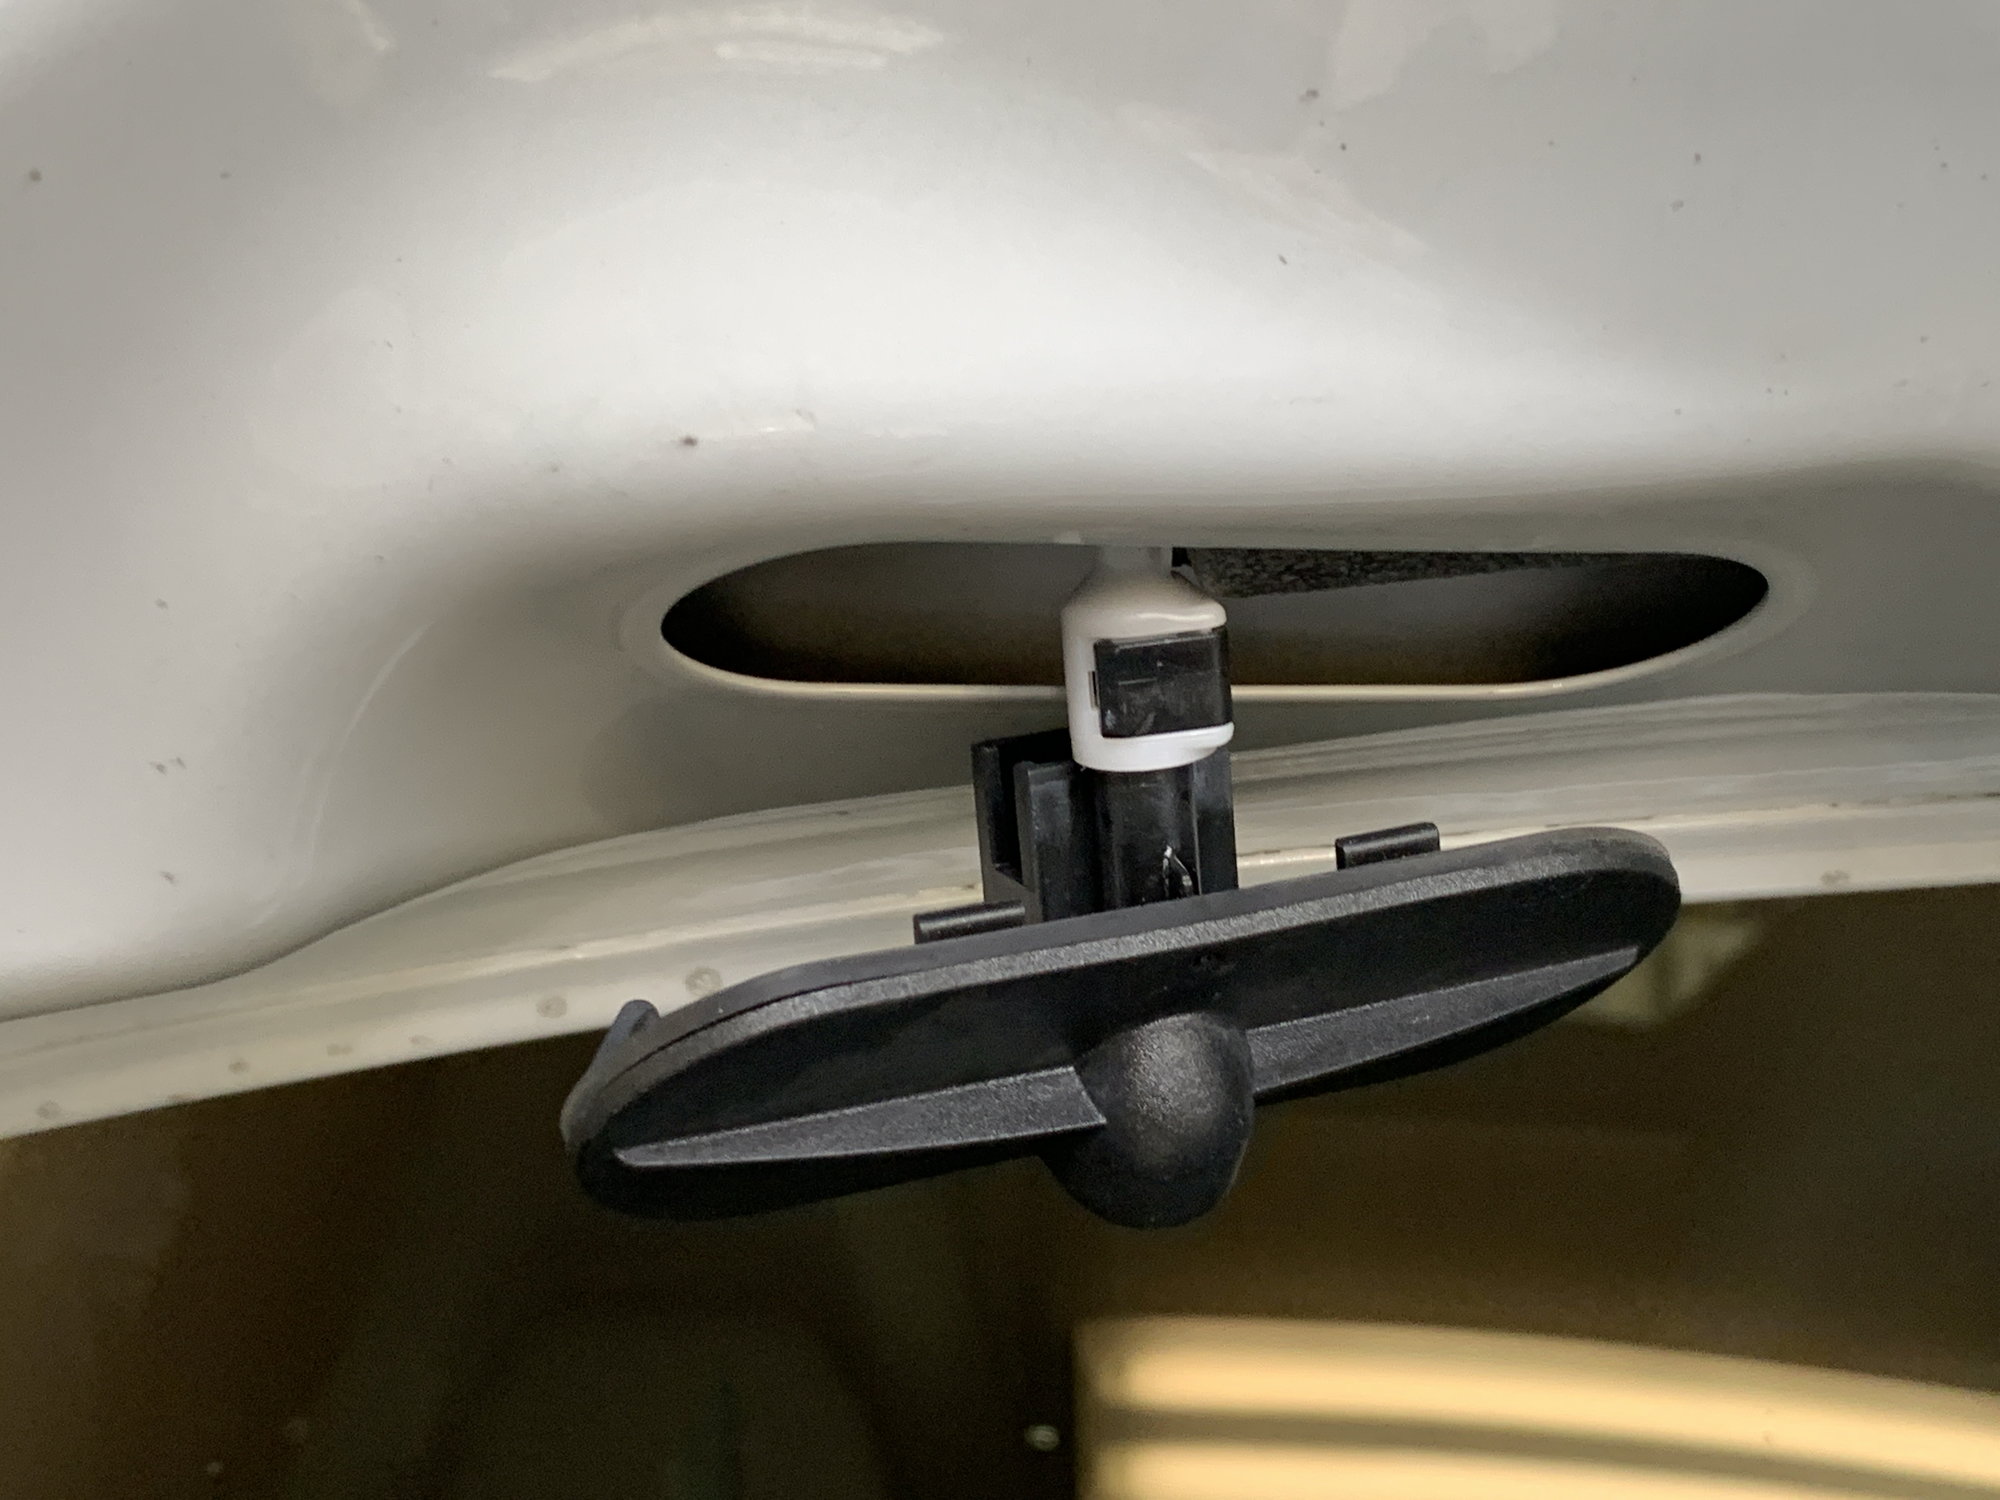
2. Next, dislodge the plastic jets that actually squirt the washer fluid. These are located on the underside of the trunk lid and can be pulled out easily. Be gentle. Once you have them dislodged, unhook the existing broken fluid lines by unclipping the black plastic u-shaped clip on the connector. This process is the same for both the left and right jet.
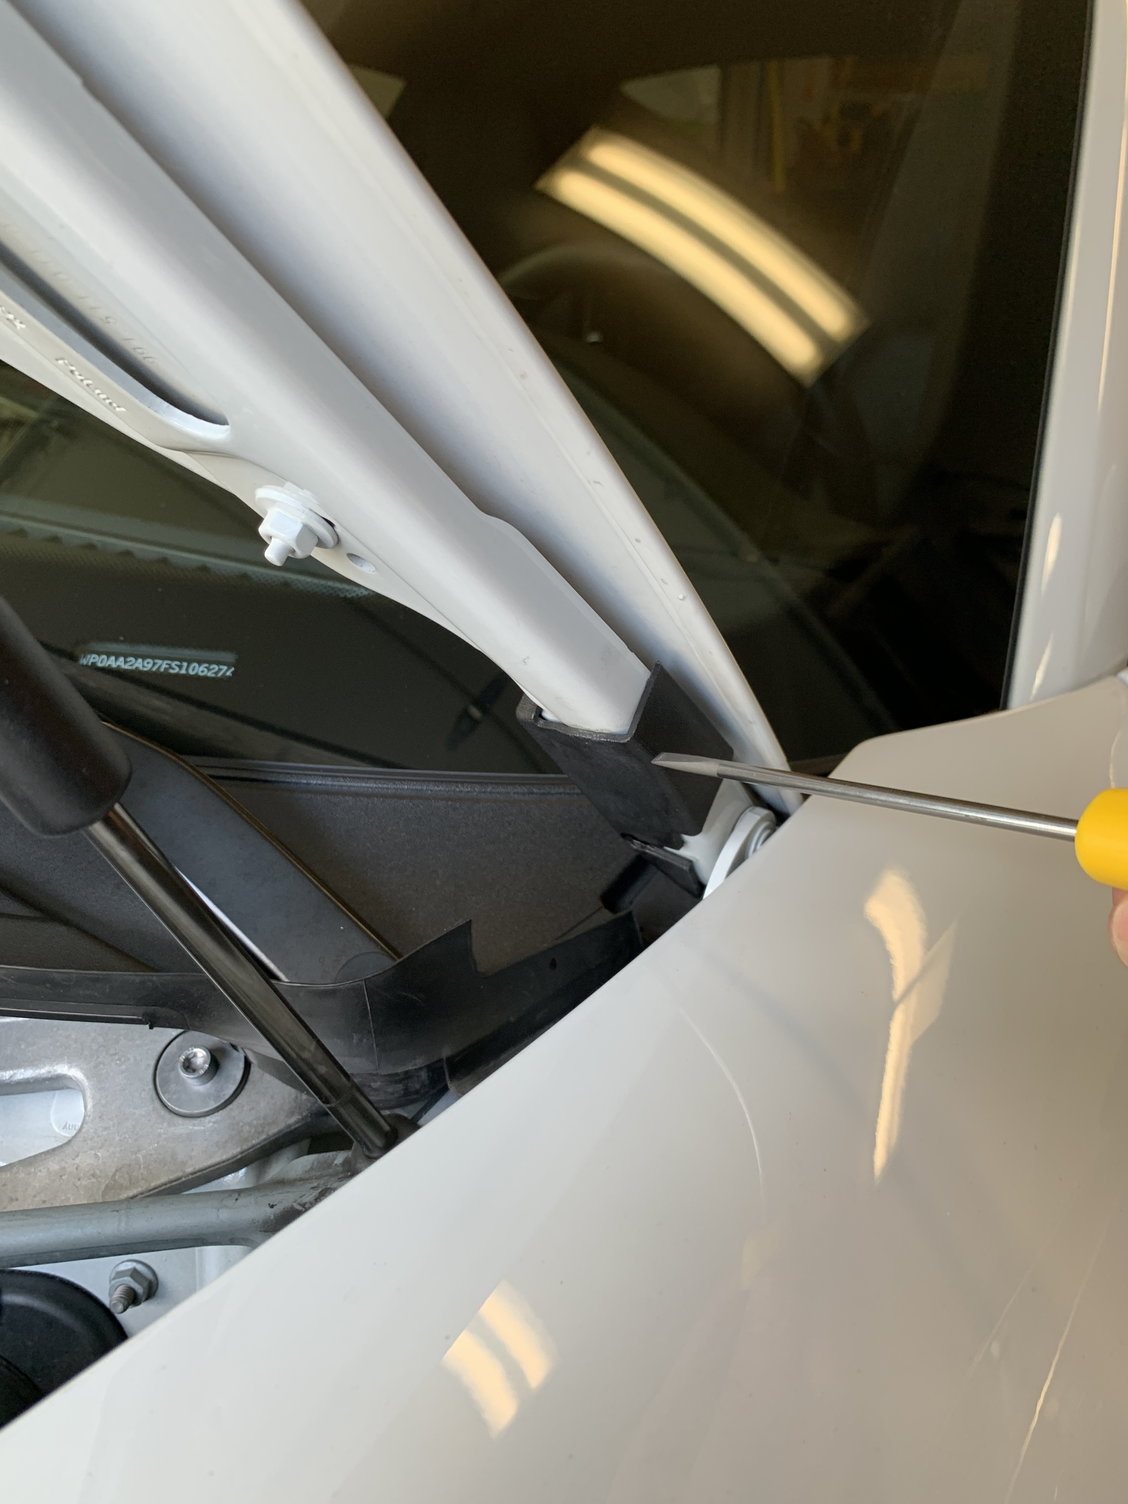
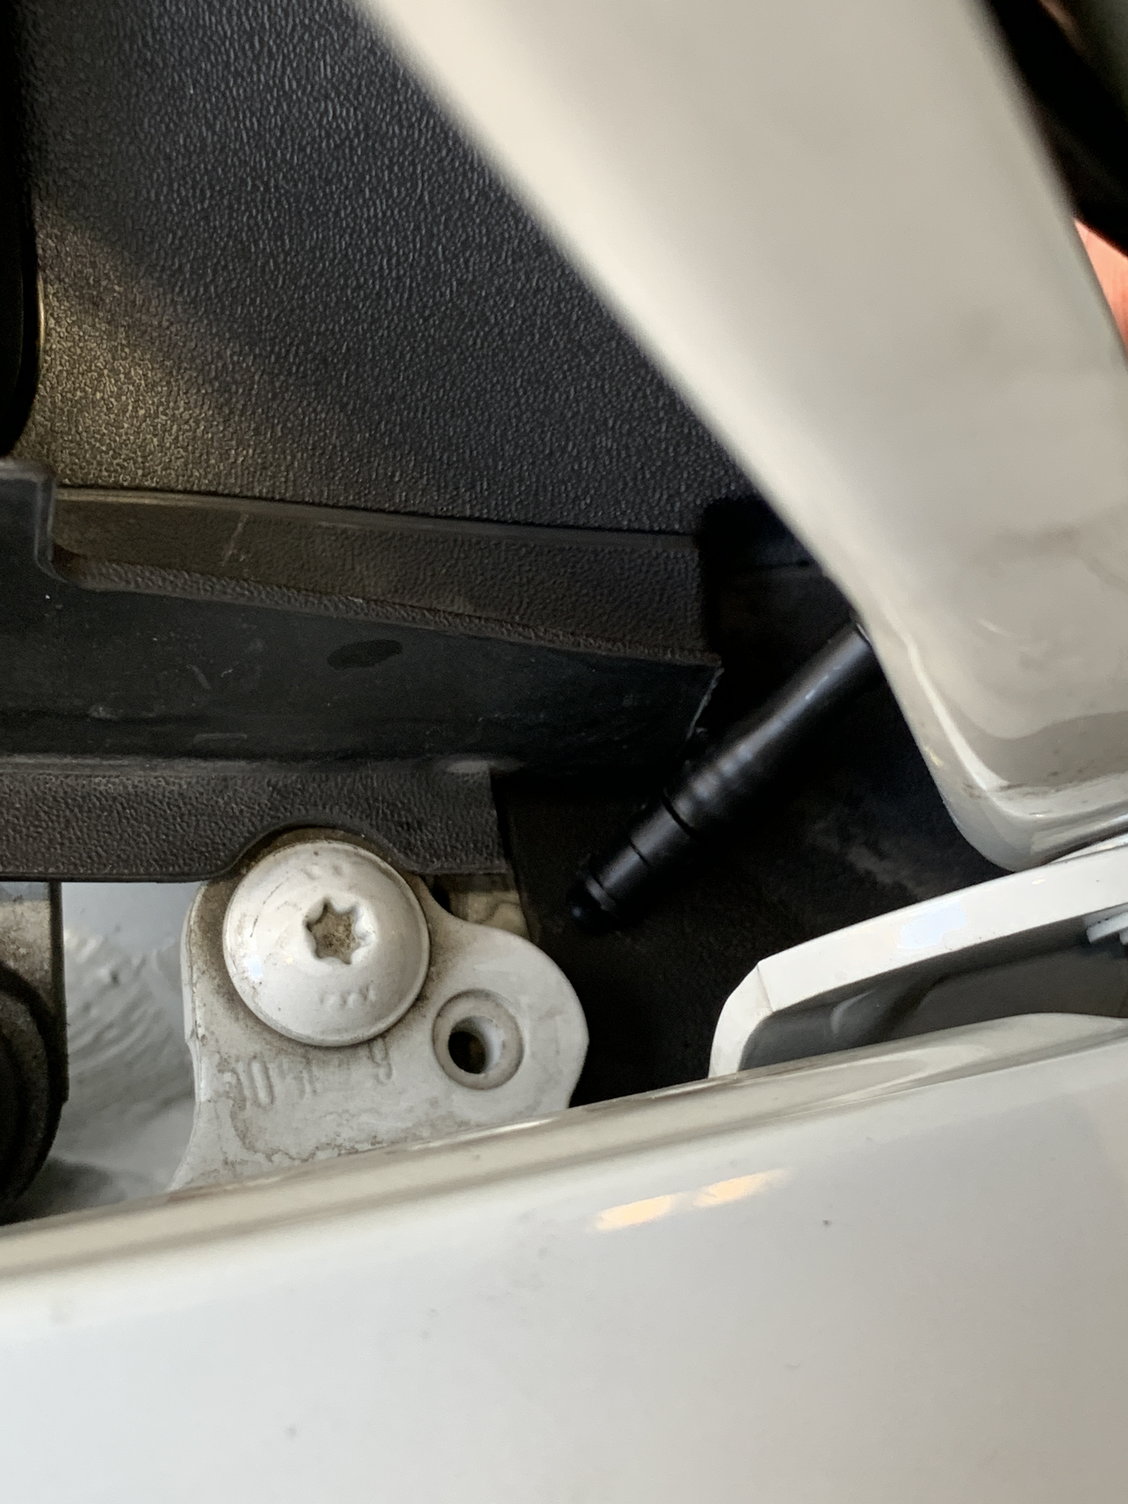
3. Now you’ll need to remove the broken hoses from the car. With the jets disconnected, dislodge the rubber grommet near the left side of the trunk lid. This piece pulls out pretty easily – once the grommet is out, you can pull the hoses you just disconnected from the jets out relatively easily.
4. Pull the remainder of the broken hose out of the routing channel on the left side of the hood.
5. Now you are ready to run the replacement hose to the water jets. Feed the new part through the hole on the underside of the hood – because the hoses are so rigid, it was easy to push them through so that the white connectors ended up next to the jets. Snap the new hose on to the jets (note that you do not have to have the U-clip open to do this, you can just pop them into place) and then gently push the jets back into their original position – you should hear them click into place. A side note – the new hose may have a small white piece in each connector that falls out when you open the clip; this is fine, that piece is just there to protect the new hose during shipping and is not necessary.
6. Insert the rubber grommet portion of the tube into the hole near the top corner of the trunk, making sure the seal is snug all around. Run the hose from the grommet to the channel on the left side of the trunk lid and begin feeding it through so that it exits just before the windshield.
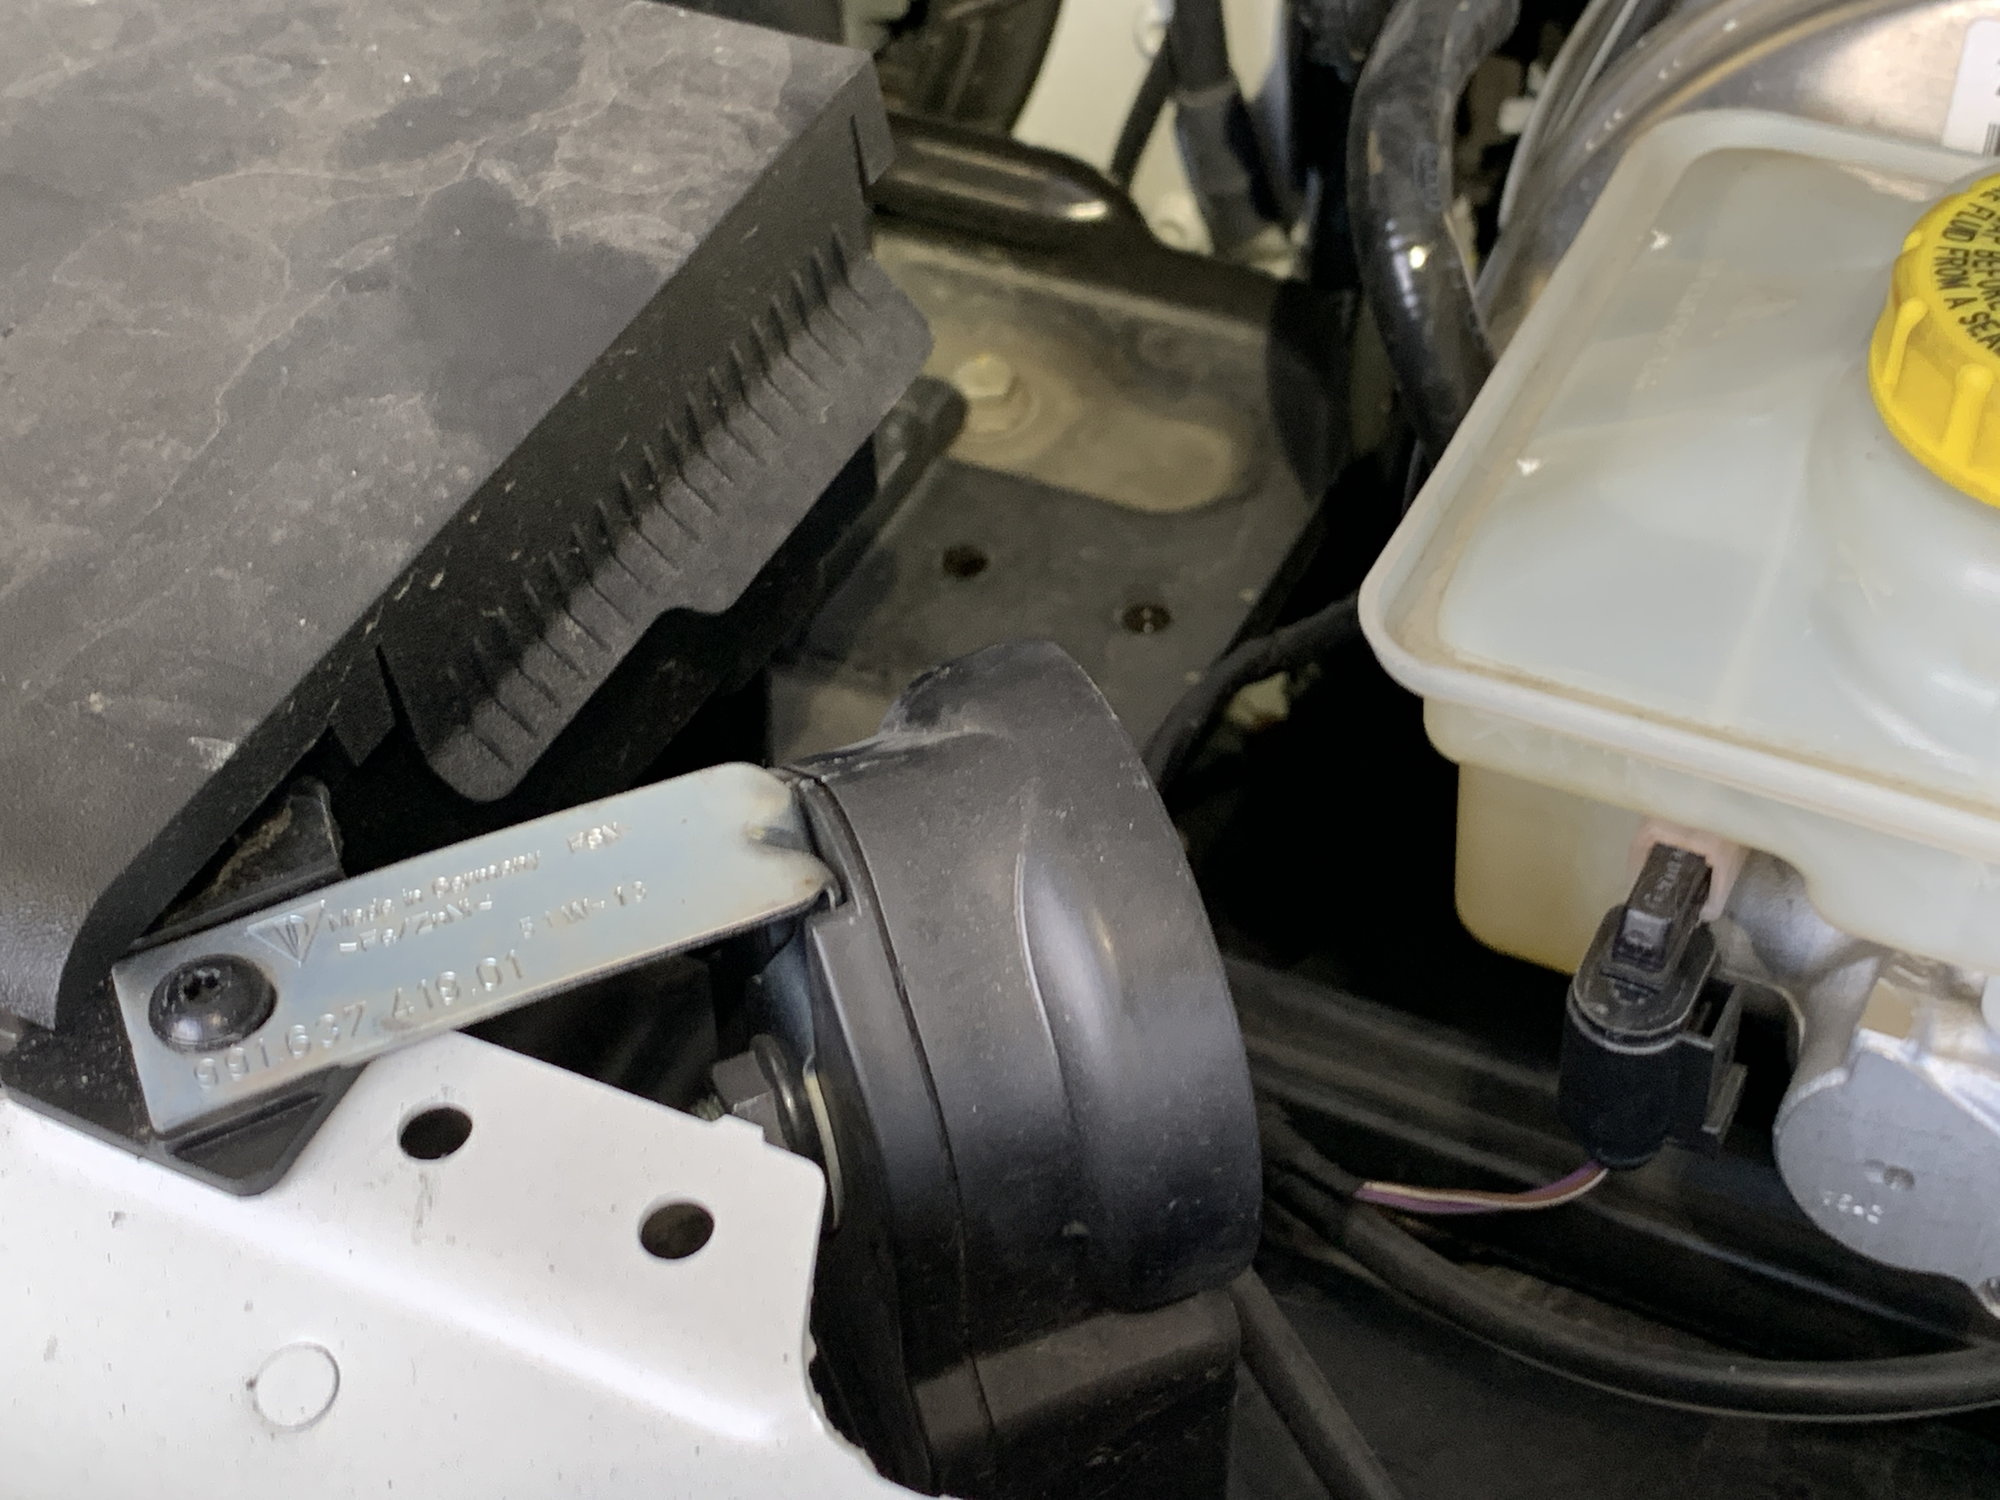
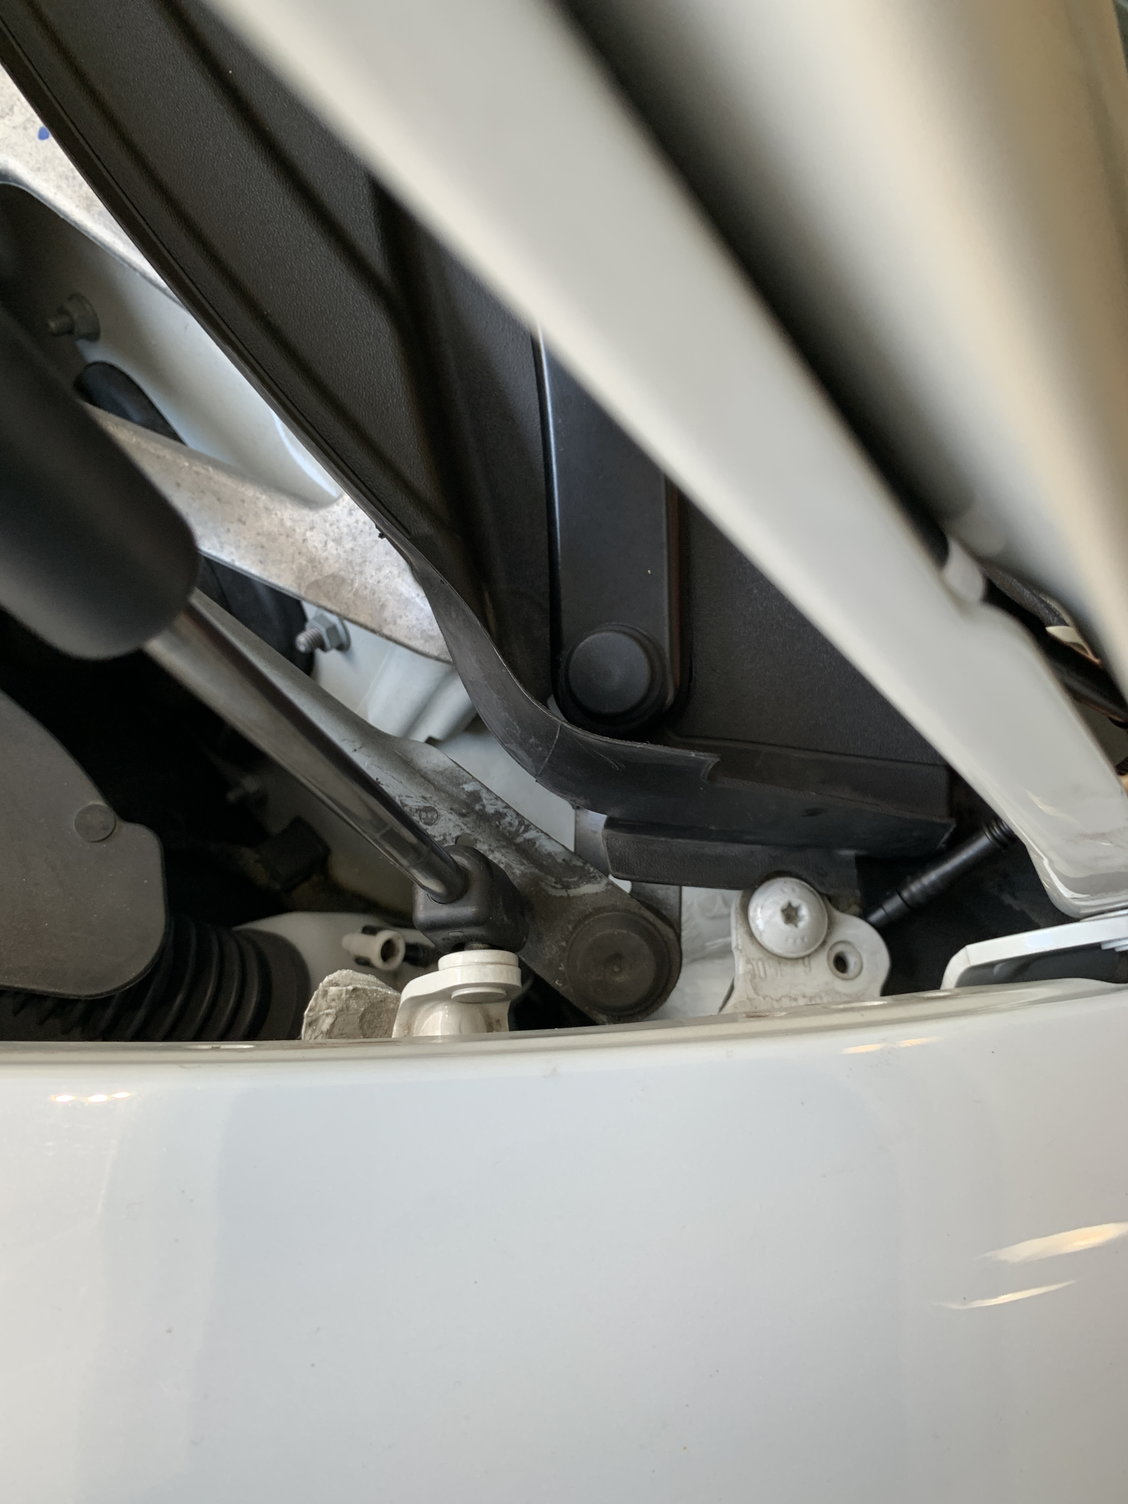
7. Now you’ll need to disconnect the old house from the fluid tank, which is near the left side of the car and uses the same type of connector as the windshield jets. You’ll then route the hose from the rubber grommet to the fluid tank. This was the most frustrating part of the install, as there’s not a lot of room to work with. I was patient though and eventually got it.
8. You may want to remove the weather stripping on the left side of the trunk compartment to give yourself a bit more room – this piece has plastic clips on the back and is easily removed.
9. Route the hose from the underside of the trunk lid down towards the fluid tank. Be gentle while doing this so that you don’t break the new hose.
10. Once you have the end of the new hose next to the tank, simply snap it into the connector (again, the u-shaped clip does not have to be up).
11. Check that the hose is not interfering with opening/closing the trunk and not getting crushed by any parts. If you removed the weather stripping on the left side of the car in step 8, replace that and ensure the seal is good.
12. Get in the car and test the wiper cleaning lever. I had to hit it twice before fluid got all the way to the right side jet. After you confirm that it works, open the trunk lid and ensure there’s no leaking from the jets. If it’s not working, you’ll want to check all 3 connection points and make sure the hoses are snapped in properly.
13. Replace the plastic cover – I had to line up the alarm horn to ensure it went back in place with the black peg on the underside of the cover. It really seems like there should be a bolt for this, but whatever.
14. Congratulate yourself for not paying the dealer an obscene amount of money for doing this simple task.
Awesome, thanks so much! My hose snapped yesterday right where the trunk lid opens. Replaced it according to your instructions, piece of cake! Only difference being that my '12 991 C2 has a plastic cover that guides the hose from the trunk lid channel out into the front compartment. This plastic clip snaps straight off and clips back on.
Awesome, thanks so much! My hose snapped yesterday right where the trunk lid opens. Replaced it according to your instructions, piece of cake! Only difference being that my '12 991 C2 has a plastic cover that guides the hose from the trunk lid channel out into the front compartment. This plastic clip snaps straight off and clips back on.
Glad to help. At some point could you post a picture of the plastic cover you're talking about? My car is also a 2012.
Would this work with a 981 Boxster? After only 2 years buying the car new, the trunk somehow broke this hose on mine. Really bad placement it seems (should have been more inward, not to the side.
My dealer just fixed mine. (I'm still covered by CPO warranty.) The tubing broke at the bend into the driver's side hood channel. All they did was connect the broken ends with a short section of clear tubing. They did not put the tubing back into the hood channel. I thought about putting it into the channel, but this routing reduces the tightness of the bend between the body and the hood, and it seems to work fine. I will keep an eye on it.
The mechanic also left a section of tubing in my trunk--so I will use that when the passenger side breaks.
Does the headlight washer jet squirter whenever the windshield washer one does. I thought I read somewhere that it only squirter if the headlights are on, but I might be confusing that with the Cayenne.
Thank you so much I am going to order the part and do it myself as well. Mine broke same spot. Must be common. My jet shot out the side as well that is how I discovered this unexpected problem.
Thanks for the guide - a few observations/additions
The instructions were great and very helpful, thanks.
Two things I observed/discovered
Careful with the insulated lines. If you let them push too firmly against the metal edges on holes they will get cut/nicked. Take it slowly. Remove and try again if you encounter resistance. It�s possible the hose connector will get stuck inside (or go off in wrong direction inside the hood) and forcing the line may result in too much pressure near opening and risk damaging the insulation.
Near hinge on car�s left side there is a piece of plastic that the line goes through. It�s a sort of cap that clips around the bottom of the corner of the hood (see photo). You can remove this to make it significantly easier to feed the line through the hinge area. Use a long, thin, screwdriver to push the internal side clip edge. Then pry off the side near you. When rebuilding at the end it pops on with ease.
View of right nozzle after detach View of left model after detach 2015 look alike they started bolting alarm down View of left hinge area - black cap top right of photo (you can see the old/severed line Screwdriver used to reach in and pop opposite side of clip off Hinge clip removed - you don�t have to try fish through this! Remove then clip on after Wide view for context Feeding line theough Make sure line goes to rear/right of bolt on right
Great instructions. Used them last year to replace mine. Unfortunately, just broke again! Within a year. Ridiculous. For those that had a rubber hose placed to transition that bend, what was the measurement? I can experiment, but it would be nice to not have to! Did it get inserted inside, or larger diameter placed outside?
Thanks for the post and part #! I have a 2016 991... this is the second time I had to replace the washer hose (1st time was still under warranty). Cost $20 and took 15 min.
 07-19-2016, 06:49 PM