Making scratched door sills look brand new
 11-04-2013, 12:04 AM
#1
Burning Brakes
Thread Starter
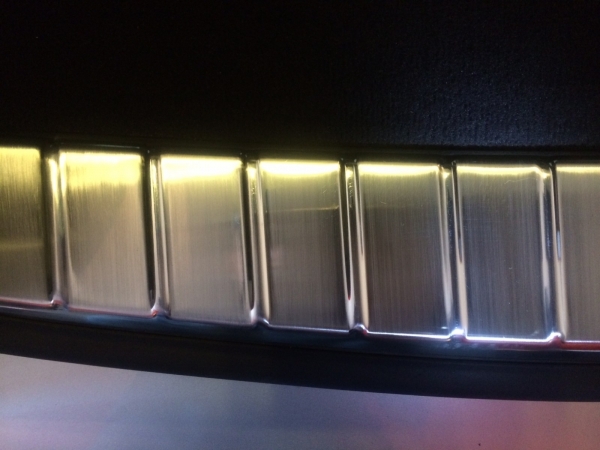
The stainless steel door sills on the Cayenne were in pretty bad shape, so I started looking for options to bring them back into respectable condition.
This is what they all looked like before I started:

So after some research and a little trial and error as well this is what I did:
Step 1: Wet sand with 150 grit sandpaper:
This is enough to take out even pretty deep scratches, although some may require a little more pressure in the affected area to get rid of)

Step 2: Wet sand with 220 grit sandpaper

For both of the above steps I used Diablo Palm sander sheets that I had lying around.
I wrapped the sandpaper around a sponge sanding block to ensure even distribution of pressure.
If you are very careful and linear with your motion you can achieve a nice �brushed� finish as can be seen in the picture.
I actually did this with the trunk trim (pictures later in the post), but for the door sills I wanted a high gloss finish.
For Steps 3 and 4 I used the Eastwood Automotive Polishing Kit Eastwood Buffing Kit - Paint Buffing Kits - Buffing and Polishing Kit
I also used a Craftsman Pro variable speed drill (running at 2500 RPM)
Step 3: Polish with Tripoli (brown) compound and the large round (cylindrical) buff
I do 4 very slow passes with a good amount of downward pressure, followed by 6 more passes reducing the pressure each time, thus allowing the buff to spin increasingly faster with each pass.
This step polishes out most of the 220 Grit sanding marks, but still leaves a slightly hazy appearance.

Step 4: Polish with White Rouge and the spiral sewn wheel.
I do 2 passes with medium pressure, followed by another 4 passes with reduced pressure allowing the wheel to spin faster each time. This results in a high gloss, mirror finish.:dblthumb2:


For the trunk I wet sanded with 150 to get the deep scratches out, then I polished with brown compound, to smooth it out a little and then went back with 220grit to get the brushed effect.
I didn�t have time to finish it off completely today, but here are some pics in the interim. I should have taken some before pics, but basically this area was even worse than the door sills before I started.

This is what they all looked like before I started:
So after some research and a little trial and error as well this is what I did:
Step 1: Wet sand with 150 grit sandpaper:
This is enough to take out even pretty deep scratches, although some may require a little more pressure in the affected area to get rid of)
Step 2: Wet sand with 220 grit sandpaper
For both of the above steps I used Diablo Palm sander sheets that I had lying around.
I wrapped the sandpaper around a sponge sanding block to ensure even distribution of pressure.
If you are very careful and linear with your motion you can achieve a nice �brushed� finish as can be seen in the picture.
I actually did this with the trunk trim (pictures later in the post), but for the door sills I wanted a high gloss finish.
For Steps 3 and 4 I used the Eastwood Automotive Polishing Kit Eastwood Buffing Kit - Paint Buffing Kits - Buffing and Polishing Kit
I also used a Craftsman Pro variable speed drill (running at 2500 RPM)
Step 3: Polish with Tripoli (brown) compound and the large round (cylindrical) buff
I do 4 very slow passes with a good amount of downward pressure, followed by 6 more passes reducing the pressure each time, thus allowing the buff to spin increasingly faster with each pass.
This step polishes out most of the 220 Grit sanding marks, but still leaves a slightly hazy appearance.
Step 4: Polish with White Rouge and the spiral sewn wheel.
I do 2 passes with medium pressure, followed by another 4 passes with reduced pressure allowing the wheel to spin faster each time. This results in a high gloss, mirror finish.:dblthumb2:
For the trunk I wet sanded with 150 to get the deep scratches out, then I polished with brown compound, to smooth it out a little and then went back with 220grit to get the brushed effect.
I didn�t have time to finish it off completely today, but here are some pics in the interim. I should have taken some before pics, but basically this area was even worse than the door sills before I started.

The following users liked this post:
Gonzalo Zamarro (04-06-2022)
 11-04-2013, 09:24 AM
#5
Burning Brakes
Thread Starter
Thanks.
Thanks. I'm sure it could be removed, but i just used Scotch Blue painters tape around the piece to protect the plastic.
Thank you.
Thank you.

Trending Topics
11-04-2013, 03:22 PM
#9
Burning Brakes
Thread Starter
11-04-2013, 03:23 PM
#10
Burning Brakes
Thread Starter
11-05-2013, 12:38 PM
#11
Burning Brakes
Thread Starter
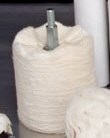
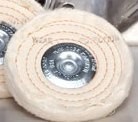
For clarification, these are the buffs that were used in steps 3 and 4 in the initial post.
I couldn't find links to the individual parts on the website so I will just post snapshots from the package pic:
I found that reapplying the compound to the buff approx every 40sec - 1min of buffing worked well.
I also reversed the direction of the buff rotation when applying the compound (i.e. anti-clockwise) as this helped loosen up the material on the buff.
This is the buff used in step 3 with Brown/Tripoli compound:
It is dense and allows for a good amount of pressure to be applied.
This is the buff used in step 4 with white compound:
Lower density but good for getting a higher level of gloss.
The following users liked this post:
Gonzalo Zamarro (04-06-2022)
 11-09-2013, 11:13 AM
#13
Burning Brakes
Thread Starter
I'm afraid that the Titanium Edition door sills could be a lot more difficult to do if you want to retain the factory lettering.
I think on yours the "Cayenne" lettering is recessed and painted, and the "titanium" lettering is painted directly on a flat section of the sill. Is that correct?
If the above assumption is correct, then:
The problem is that both the sanding and the polishing steps can remove paint. You could tape up the lettering and work around it, but unfortunately it will add a LOT of time to the process.
Wet sanding around the lettering would be very difficult, and you would have to use some of the small felt bobs in the kit for polishing.
Also, I think yours have a satin/flat finish. Using the steps I posted, you can go with a brushed or high gloss finish. Ideally you need to be able to repair the entire piece.
If you're at the point where you want to replace the pieces anyway, this is what I would do, as it would still be reasonably simple and quick.
Select one test piece.
Sand the entire piece knowing that you would lose the "Cayenne" and "titanium" lettering. Try some finer grade papers than I used first, and move to coarser grit if needed.
Polish the whole piece back to high gloss.
Get some "titanium" decals online. If you can't find them off the shelf, there are lots of companies that will custom print a set for $20 or less.
The above would be an easy fix, but the tricky part is that I'm not sure how easily you could remove all of the paint in the "Cayenne" lettering. I say this because I am sure some will come off during sanding or polishing, and it will have to be addressed.
If it all comes off easily, you could leave the "Cayenne" letters unpainted, as the recess should still make the letters stand out enough.
Alternatively, you could consider repainting the "Cayenne" letters.
Another completely different option might be to look at some of the 3M or other wrap materials on the market. I've seen the 3M 1080 range and they have some impressive finishes including brushed metals. I know these can work very well on trim, but am not sure which ones are better suited to applications where scuffing is likely.